Microsoft .NET Framework Repair Tool is designed to fix Microsoft installation or update problems. NET Framework. This tool attempts to resolve problems by applying known fixes, or by restoring already installed versions. The program supports .NET Framework 4.6.1, 4.6, 4.5.2, 4.5.1, 4.5, 4, 3.5 SP1 (including 3.0 SP2 and 2.0 SP2).
(1.11 MB)
Supported operating systems: Windows XP, Windows Server 2003, Windows Vista, Windows Server 2008, Windows 7. The program can work as a step-by-step wizard, as well as in automatic mode.
What is Microsoft .Net Framework
One of the main components of the Windows operating system is the Microsoft .Net Framework. With its help, you can run programs and utilities that are written using the Common Intermediate Language (CIL) environment. The .Net platform translates program code using a compiler into a language that the operating system can process and execute.
Microsoft .Net Framework
The latest versions of the platform are currently installed through Center Update Windows. When you uninstall a component with a new service pack, the software will be re-downloaded to your personal computer.
Important! This utility must be installed on the device. If the platform is missing, applications will not be able to work correctly.
.NET Recovery
Method 1: Windows Updates
Microsoft .net framework for windows 7
All files associated with the library in question are included in Windows along with the latest updates. Of course, it may seem that removing related updates will get rid of elements of the .NET Framework, but this is not the case, because Microsoft uses unusual algorithms for installing packages. Instead, you can try to disable existing library elements and try to update them the next time you install updates, which happens like this:
- First, you must make sure that the next Windows 10 update is ready to install. After that, open Start and go to Settings.
In the menu that appears, select the “Applications” category.
Scroll down to the very bottom of the list, where you click on “Programs and Features.”
Through the left pane, navigate to “Turn Windows features on or off.”
The very first lines in the “Windows Components” window are responsible for the functionality of the .NET Framework. Uncheck them to disable them.
Wait for confirmation of this operation. This will take literally a minute, and then you can close the window with the components.
Now, through the same “Settings” menu, go to “Update and Security”.
Install the updates found and restart your computer.
This is interesting: How to properly install Apple iTunes on Windows 10
Now we can only hope that all the missing files were downloaded and installed along with the latest update, which allowed us to fix problems with the functioning of the .NET Framework. Don’t forget to enable these libraries through the “Windows Components” menu immediately after logging into the OS. However, in some cases there are additional problems associated with installing updates. Then the user will have to solve them additionally. We suggest reading related guides on this topic in our other articles linked below.
Method 2: Install Visual Studio
Visual Studio is a proprietary software from Microsoft that is used to develop applications in various programming languages. First of all, the manufacturer aims to ensure correct interaction of this development environment with Windows, because many utilities and software are written specifically for this platform. This will allow the average user to use Visual Studio for their own purposes by checking the missing .NET Framework files.
- From the official Visual Studio website, select the Products pop-up list.
In the menu that appears, you are interested in the inscription “Applications for Windows”.
Scroll down the tab and find the “Visual Studio Community” version there. It is distributed free of charge and is completely suitable for our task today. Click on the “Free download” button to start downloading.
After that, run the resulting installer.
Wait for all components to download for installation. During this process, do not interrupt your Internet connection.
When the installation window appears, move to the Individual Components tab and check all versions of the .NET Framework.
We have just described one basic action that must be performed as part of today's instructions. As for the operation of downloading Visual Studio and its installation into the operating system, a separate article on our website is devoted to this topic, so we recommend that you read it to complete the installation process and check the functionality of the .NET Framework files.
This was all the information about reinstalling the .NET Framework in Windows 10. As you can see, this operation in the usual sense cannot be carried out, and you can only try to fix missing or damaged files. If this does not help, try using the troubleshooter, which you can read about below.
If this manipulation does not bring the desired result, you should pay attention to the assembly of the operating system itself. Most likely, you downloaded a broken repack from pirated sources, and the only way to get rid of the problem with the .NET Framework is by reinstalling Windows using a different assembly
Why is removal necessary?
It is necessary to remove a system component in a situation where errors occur when launching applications. If a user has the latest version of a program installed, but the application does not see it and requires a re-installation, this means that critical files and support services have been damaged.
Is it possible to remove .Net Framework
How to remove Skype in Windows 10 - description of possible methods
The .Net Framework is removed via:
- operating system parameters;
- using uninstaller utilities;
- third party software;
- through the system registry.
Note! When you need to temporarily remove the framework, it is recommended that you simply disable the Framework components. If necessary, you can restore the software. File recovery is done by downloading online libraries, and installation takes place while connected to the Internet.
You can uninstall through the classic control panel
Features of the utility
- Correction of errors and conflicts in the operation of Net software. Framework;
- The utility supports both 32 and 64-bit Windows operating systems of all current versions;
- The program is very easy to use, presented in the form of a standard step-by-step Windows wizard;
- No translation into Russian, only English version;
- There are four operating modes, from fully automatic to completely user-controlled;
- The utility was developed by Microsoft and is official software, so there can be no fear for the user in terms of the program intentionally harming your PC or stealing your data.
How to remove .Net Framework on Windows 10
How to disable Windows Defender 8 - description of methods
The .Net Framework is uninstalled through the Control Panel and the “Programs and Features” item. After restarting the personal computer, all utility files will be completely restored. Therefore, it is recommended to disable the platform.
Features of removing versions 4-4.5
This version supports backward compatibility, which allows you to remove the package through system options. This is done as follows:
- You need to go to the start window.
- In the search bar, type the keyword “classic control panel”.
- Open the “Software” item.
- Select the “Uninstall programs and features” option.
- In the list of installed software you need to find “Microsoft .Net Framework 4.5”.
- Right-click on the selected object.
- In the context menu, click on “Delete”.
- The installation wizard will be displayed on the screen, where you need to check the box next to the “Remove software package and all user settings” option.
- You need to restart your PC.
Disabling Microsoft .Net Framework versions 3.5
Many users ask how to remove the .Net Framework in Windows 10. It is impossible to completely uninstall this version of the software. In this situation, the user can disable platform components.
Instructions:
- You need to go to the start menu and enter the query “control panel” in the search bar.
- Launch system settings and select “Uninstall software”.
- In the left column you need to select the item “Activation and deactivation of operating system components.”
- In the list of components you need to open the “Microsoft” tab.
- Open the “.Net Framework” subcategory.
- Uncheck the corresponding checkbox.
- You will need to restart the operating system.
On Windows 10, you cannot completely remove the Framework, since it is integrated into the system; you can only disable components
Automatic operation
All functions of the .NET Framework Repair Tool can be automated when running the program in silent or passive modes. In this case, no interaction between the program and the user is required.
Command Line Options
| /? or /help | Displays help information |
| /q or /quiet | Quiet operation, no user interaction. No windows are displayed, the program silently performs all necessary corrections. The /q and /p options are mutually exclusive. |
| /p or /passive | Passive mode, only the progress bar is displayed. The /q and /p options are mutually exclusive. |
| /a or /addsource | Enables offline recovery mode. Here you need to specify the folder on your computer or network share where the necessary .NET Framework installers are located. This feature will be required on computers without Internet access. The list of required installation packages is given below. |
| /r or /repair | The versions of the .NET Framework that you need to try to restore are listed separated by a colon. If the parameter is not specified, the program will try to restore all supported versions. Available values: .net35, .net4, .net45, .net451, none. If you specify the none parameter, the Repair Tool will only attempt to apply known fixes, but will not repair the .NET Framework installation. |
| /l or /logs | Specifies the folder in which the FixDotNet*.cab log archive created by the program will be placed. If the parameter is not specified, the program will create a file on the desktop or in a temporary folder if Repair Tool is running in automatic mode. |
| /c or /collectonly | Only collection of various .NET Framework installation logs. If this option is specified, no patches or installation repairs are applied. |
| /n or /noceipconsent | Disables sending logs to Microsoft. |
All parameters except /logs work only in automatic mode.
Distributions for offline mode
By default, all the necessary packages are downloaded from the Internet, but the program supports recovery in offline mode. To do this, use the /addsource parameter to specify the folder with .NET Framework distributions. If the required file is not in the folder, Repair Tool will try to download it from the Internet. The files that may be needed are listed in the following table.
| Version | Platform | File name | Size |
| .NET Framework 4.6.1 | x86, x64 | NDP461-KB3102436-x86-x64-AllOS-ENU.exe | 64.5 MB |
| .NET Framework 4.6 | x86, x64 | NDP46-KB3045557-x86-x64-AllOS-ENU.exe | 62.4 MB |
| .NET Framework 4.5.2 | x86, x64 | NDP452-KB2901907-x86-x64-AllOS-ENU.exe | 66.8 MB |
| .NET Framework 4.5.1 | x86, x64 | NDP451-KB2858728-x86-x64-AllOS-ENU.exe | 66.8 MB |
| .NET Framework 4.5 | x86, x64 | dotNetFx45_Full_x86_x64.exe | 48 MB |
| .NET Framework 3.5 SP1, .NET Framework 3.0 SP2, .NET Framework 2.0 SP2 | x86, x64 | dotnetfx35.exe | 231 MB |
| .NET Framework 4 Client Profile | x86 | dotNetFx40_Client_x86.exe | 28.8 MB |
| .NET Framework 4 Client Profile | x86, x64 | dotNetFx40_Client_x86_x64.exe | 41 MB |
| .NET Framework 4 Full | x86 | dotNetFx40_Full_x86.exe | 35.3 MB |
| .NET Framework 4 Full | x86, x64 | dotNetFx40_Full_x86_x64.exe | 48.1 MB |
| .NET Framework 2.0 SP2 (if 3.0 and 3.5 are not installed) | x64 | NetFx20SP2_x64.exe | 46.3 MB |
| .NET Framework 2.0 SP2 (if 3.0 and 3.5 are not installed) | x86 | NetFx20SP2_x86.exe | 23.8 MB |
How to remove manually
Users can manually remove Framework components. You need to use the functionality of the system registry editor.
How to change the recycle bin icon in Windows 10 - description of methods
Instructions:
- You need to call the “Run” utility by pressing the “Win + R” key combination.
- Next, you need to enter “Regedit” in the search bar.
- After loading the editor snap-in console, you need to select “File” on the toolbar.
- In the dialog menu, select the “Search” option. Check the following checkboxes: “Category name”, “Settings name” and “Binary file value”.
- In the “Find” item, enter the name of the software “Microsoft .Net Framework”. There is no need to specify the platform version. A notification “Searching for fragments in the system registry” will appear on the screen.
- All software files found must be deleted. To do this, you need to select all parameters and folders.
- Right-click on the selected objects and click on “Delete”.
- After this, you will need to restart the operating system.
Important! Before you delete objects from the system registry, you must create a restore point for Windows files and settings.
To completely clear your PC of the Framework, you need to delete all system registry keys
Cleanup Tool - will help fix a problem in Microsoft software
This utility can efficiently remove all old and non-working editions of the .Net Framework from your system. It cleans everything - folders, files, product information from various databases, entries and registry keys. The utility is specifically designed for cases where some program files were installed incorrectly or with an error.
The Cleanup Tool is intended to act as a last resort, which should help if the utility and its components in the OS are not removed in the usual way. The program cleans all common files and registry keys that were intended for older versions of the product. After using the Cleanup Tool, you need to reinstall or roll back to the remaining versions of the .Net Framework that are present in the operating system, otherwise they will not be able to work stably.
When Clean Tool is running, logs are written to a temporary folder, however, it can be deleted later.
| Log | Purpose |
| Cleanup_actions.log | deletion action log (registry keys, auxiliary files) |
| Cleanup_main.log | deletion action log - the main one, contains all actions according to the utility logs and other information about the operation |
| Cleanup_errors.log | warning message log |
This may be useful: How to fix bad_module_info in Windows 10.
Removal using third party software
To do this, you need to use the third-party utility Ashampoo Win Optimizer:
- You must run the program with extended access rights.
- In the toolbar, select “Show all available modules”.
- Select the “Performance” section, and then “Remove programs and components”.
- In the list, find the “Net Framework” item and right-click on the selected element.
- In the dialog menu, click on “Delete”.
- Wait for the process to complete.
- After that, open the “Registry Defragmentation” item and click on “Start”.
- This will search for invalid registry keys. To remove them, you need to select the “Clear” option.
Uninstalling .NET
Newer versions of .NET (version 4.5+) can be uninstalled like any other program. Older releases (such as the commonly used version 3.5) can only be disabled, not uninstalled. Deactivation and cleaning are available both through system settings and using a third-party free program.
Through system settings
The steps below will allow you to remove or disable .NET. Please note that to permanently erase or turn them off, you will need to restart the computer, so close all programs in advance and save important documents.
- Open Control Panel.
You can find it using the system search bar. Opening the control panel - Go to the "Programs and Features" block.
Open the “Programs and Features” section - If you want to erase a more modern version of .NET, you can find it in the list of all programs.
Having found it, select the line corresponding to it and click on the “Delete” button or right-click on it and select the “Delete” function. Select the library and click the “Delete” button - If you want to disable .NET, then go to the section on enabling and disabling components.
Click on the line “Turn Windows components on or off” - Find the .NET component of the required version in the drop-down list and uncheck the box next to it.
The system will prompt you to restart your computer, agree. Disable the required version of .NET
Once your computer is turned on again, you can proceed to download and install the appropriate version of .NET.
Through a third party program
There is a third-party application that allows you to remove different versions of .NET with one click - NET Framework Cleanup Tool. You can download it for free from the official Russian-language website - https://net-framework.ru/soft/net-framework-cleanup-tool.
The only thing you have to do is run the downloaded file, select the version to be removed, and click the Cleanup Now button. To complete the cleaning, you will have to restart your computer. Done, .NET has been deleted, now you should move on to restoring it as quickly as possible.
Select the version and click Cleanup Now
Fixing Framework problems using the Net Framework Repair Tool
Users can check the platform and fix errors without uninstalling the software. To do this, you need to use a proprietary utility from Microsoft.
The NET Framework Repair Tool helps fix errors in the .Net platform
Instructions:
- You need to download the utility from the official website of the software developers.
- After downloading, the archive must be unzipped to the root of the system disk.
- Run executable files with extended permissions.
- In the installation wizard window, accept the license agreement.
- Click on “Next” and check the “Full file scan and restore settings” checkbox.
- After this, you need to click on “Continue”.
Note! Upon completion of the scan, the personal computer will restart.
Diagnostic capabilities
Microsoft NFRT is programmed to calculate and correct all kinds of errors associated with problems with the framework. The program is quite easy to use, and resembles other wizards for working with errors in the Windows OS in its interface and, in fact, step-by-step steps. The program uses English, so those who speak basic English will find it very easy to work with it, but those who are not fluent in English don’t need to be upset - NFRT is quite understandable at the level of intuition, and can be corrected almost automatically. Well, as a last resort, you can translate what is not clear using Google Translate. Diagnostics by the NFRT program is carried out in standard four stages. To begin with, of course, you should launch the program and start scanning. During the scan, the utility will display a list of problems, errors and software conflicts, and after the user confirms, it will start the repair process, that is, the second stage. After which the program will automatically correct errors or restore missing framework libraries. After operation, the program will provide the user with correction logs (list of changes), and, again, with the user’s consent, the logs can be sent as a report to Microsoft, which will further help developers proactively prevent certain errors in the future.
Reinstallation No Framework on Windows 10
Users can reinstall the software. But it is important to remember that it is not possible to completely remove the .Net Framework from Windows 10. However, PC owners can reinstall the platform using Microsoft online libraries.
Using software from Microsoft
Instructions:
- You need to go to the main page of the Visual Studio software.
- Next, open the “Additional components” section and select “Framework” (web installer).
- Download the executable file and run it with extended permissions.
Note! After launch, automatic downloading of platform library files from the Internet will begin. Upon completion, the personal computer will restart.
Reinstallation is done using online libraries
It is not possible to completely remove the .Net Framework from a computer running Windows 10. Users can only disable the platform and supporting services. You can only remove version 3 of the Framework from your computer. When changing system registry settings, you need to create a restore point for files and settings.
Find errors in the .NET Framework
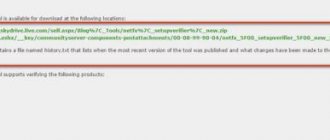
.NET Framework Setup Verification Tool – this utility is useful for checking whether the .NET Framework versions are correctly installed on the system. The program checks directories and registry keys for contents and their presence. If you find missing files or errors, reinstall the required version of the .NET Framework; if the program cannot cope with the problem, use the .NET Framework Cleanup Tool described above.
When launched, the program displays a list of .Net Frameworks that are installed on the computer. To make the program display a list of all versions, run the utility with the following key:
netfx_setupverifier.exe /q:a /c:"setupverifier2.exe /a"
Size: 247 KB Interface: English Platform: Windows XP/Vista/7/8
System requirements for optimal performance of the .Net Framework
The hardware requirements for normal operation of
the .Net Framework are quite low, so the component will work even on the weakest computer. The rest of the information in this chapter is primarily intended for first-time users. For the more advanced, skip ahead to the chapter where you will learn about the latest version of the .Net Framework available for installation on your OS. Your computer is required to:
- Processor with a frequency of 1 GHz or higher;
- The amount of RAM is at least 512 MB ;
- The minimum amount of hard disk space is 4.5 GB .
The .Net Framework has quite a few versions that have been released since the days of Windows XP, but there have been no major changes in the architecture of the component. Remember that the version of the .Net Framework on which this or that program was developed will require the corresponding ( 2, 3, 4 ) version on your computer.
Therefore, for best compatibility with the maximum number of applications, all possible variations of this component should be installed. But this does not mean that the latest libraries will be fully supported by older operating systems. Sometimes, in order to install the appropriate version of the .Net Framework, you need to upgrade to a new version of Windows. We strongly recommend that users install Windows 10. ↑ Return
2.1.
Determining the bit depth of the operating system: x32 (x86) or x64
the bitness of your operating system (if necessary) in the “Properties” of your computer.
Figure 1. Find out the system capacity. This information will be required when installing older versions of the .Net Framework .
The new libraries are suitable for operating systems of both bit sizes (x32-x64). ↑ Return
3.
Install the .NET Framework 3.5 on Demand
You may see the following configuration dialog if you try to run an app that requires the .NET Framework 3.5. Choose Install this feature to enable the .NET Framework 3.5. This option requires an Internet connection.
Why am I getting this pop-up?
The .NET Framework is created by Microsoft and provides an environment for running applications. There are different versions available. Many companies develop their apps to run using the .NET Framework, and these apps target a specific version. If you see this pop-up, you're trying to run an application that requires the .NET Framework 3.5, but this version is not installed on your system. version 3.5, but that version is not installed on your system.
Errors when installing or running the .Net Framework
Sometimes incorrect installation or update
of the .Net Framework can cause the component to malfunction. This chapter provides information on various errors that you may encounter at different stages of using ".Net" . First, you need to download the official utility from Microsoft called ".Net Framework Repair Tool ", which will automatically help solve the problem with the component .
You will find instructions for this program below. 4.1.
.NET Framework Repair Tool will find and fix most crashes
According to the Microsoft website, this utility solves problems when working and installing or updating any version of
the .Net Framework .
Microsoft .Net Framework Repair Tool (online version). | 1.22 MB The utility is designed to identify the most common problems when working or installing the .NET Framework, as well as automatically fix them.
Unfortunately, "Repair Tool" does not support Russian language. However, all the processes occurring in it are simple and intuitive. The user is required to:
- Periodically press the “Next” ;
- Agree with the application of the proposed changes.
The program will test the system in several stages
.
If an error is detected, actions to eliminate it will be proposed. After confirmation, you must wait until the utility completes and restart your computer.
Figure 3. Testing process with the Microsoft .Net Framework Repair Tool.
The next time you start the system,
the .Net Framework will be corrected, and you will be able to reinstall the required version of the component (if this process was previously accompanied by failures).
If the problem persists during installation or operation of a component after using the program, please review the detailed information on specific errors described in the following chapters.
↑ Return
4.2.
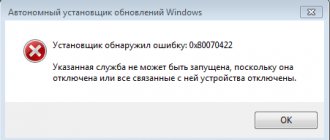
Error installing .Net Framework update 0x80070643 on Windows 7
Error
643 is related to the work of the Update Center . Occurs mainly among Windows 7 users. Attention! It is recommended that you begin the actions described below only after familiarizing yourself with the program from the chapter: “.NET Framework Repair Tool will find and fix most failures.”
Executable file for restarting Windows Update. | 558 B Attention! Unpack (zip) and run as administrator.
If
the “Repair Tool” does not detect a problem, you should restart Update using a ready-made program written specifically for esate.ru or using a command algorithm that you can create yourself using the instructions described below.
The executable code is the same in both cases .
The program was created solely for convenience: when using it, you do not have to carry out any manual manipulations. The following will describe the manual method of restarting the system update.
Carefully follow the following instructions:
- Create an empty text document and copy the following code into it:
@echo attrib -h -r -s %windir%\system32\catroot2 attrib -h -r -s %windir%\system32\catroot2\*.* net stop wuauserv net stop CryptSvc net stop BITS ren %windir%\system32\ catroot2 catroot2.old ren %windir%\SoftwareDistribution SoftwareDistribution.old ren "%ALLUSERSPROFILE%\application data\Microsoft\Network\downloader" downloader.old net Start BITS net start CryptSvc net start wuauserv pause
- Save the file with the extension “.bat” ;
- Run the created program as administrator .
In Figure 4 you can take a closer look at the second step.
Figure 4. Save the file in the “.bat” extension. Now all that remains is to restart the computer and reinstall the .Net Framework .
↑ Return
4.3.
Error when installing .Net Framework 3.5: 0x800F0906, 0x800F081F, 0x800F0907 on Windows 8 or 8.1
This issue occurs when you try to install
.Net Framework 3.5 . Before performing the steps below, it is recommended that you read the chapter: “Error installing .Net Framework update 0x80070643 on Windows 7.” Errors 0x800F0906, 0x800F081F, 0x800F0907
in most cases appear when installing the .NET Framework 3.5, when the operating system has security updates
KB2966826 and KB2966828 .
This is most likely due to the fact that some Windows updates may not be tested to work or interact with the .NET Framework 3.5 installer.
MS developers assumed that users would use new, more current versions of the Framework, and the .NET Framework 3.5 installer itself was created long before these updates, and does not take into account the changes in policies and security mechanisms that they bring.
To use .Net Framework 3.5 (and below) on new OSes, you must:
- Temporarily disable Windows Update ;
- Remove KB2966826 and KB2966828 through the standard Add or Remove Programs tool;
- Restart your computer and repeat the installation of .Net Framework .
After installing the component, you can turn automatic updates back on.
↑ Return
4.4.
Selecting the hard drive and folder to unpack .NET before installing (the installer can choose the drive, for example drive A:)
The installer of the latest versions of the .NET Framework selects the destination drive and folder at its discretion. This may be a rather non-obvious choice, for example drive A:, or another drive not intended for these tasks. To get around this problem, just run the installation using the command line (see Figure 5):
- Launch the command line: open the “Start” → write in the search bar: cmd → launch the corresponding program by left-clicking the mouse;
- Go to the installer package folder using the command “cd C:\my-install-dir”
- Run the installation package with the key "/x":
NDP47-KB3186497-x86-x64-AllOS-ENU.exe /XPlease note that the name of your installer package may be different!
- In the window that opens, specify the path to unpack the .NET Framework
Figure 5. Installation of .NET Framework 4.7.1 with unpacking into a specific folder.