Imagine a moment: you just purchased a brand new SSD drive, but when you connect it to a computer, it is not detected, or you have been using it for quite a long time, but at one fine moment, it is no longer recognized. Of course, here you might think that it broke down, burned out, in general, went out of order. And the right decision would be to take it to a service center.
However, often the problem lies in ordinary system errors that can occur after various failures or if you connect a new SSD. In this case, fixing this is quite simple, we will talk about this below.
Causes of SSD connection problems
Despite the fact that solid-state drives have a completely different principle of storing information, they often use the same interfaces and form factors as conventional HDDs. To connect an SSD to a computer today, the SATA interface is used. Based on this, the conclusion suggests itself that these hard drives are susceptible to the same problems when connected as SATA hard drives. Moreover, solid-state drives designed to connect to mSATA, M.2 connectors or a PCI-Express slot have become widespread.
There are many reasons why an SSD drive is not detected by the computer and does not want to work properly. It is important to say that they apply not only to a new device connected to a PC for the first time. It also happens that a previously used hard drive suddenly stops working.
A user without the appropriate knowledge and skills will likely have serious difficulties diagnosing and subsequently solving the problem. Therefore, we will try to understand the manifestation and solution of each of them.
Partition recovery
In almost all cases when a logical partition of a hard drive disappears, it can be returned. For recovery we will use the same Acronis Disk Director. So here's how to do it:
- I will not repeat myself and describe how to create bootable media and run from it, you can read about this above in the previous paragraph.
- We go to the utility interface and select “Recovery Expert” in the menu on the left.
- Click “Next” and select manual mode, then “Next” again.
- Select the unallocated space (highlighted in green) and click “Next”.
- In the “Search Method” window, I recommend specifying “Full”, but in most cases, fast is enough.
- After the missing partition is found, by the way, do not be embarrassed if it has a different letter indicated, Acronis often confuses the names, select it and click “Next”.
- We wait until the status in the “Status” column changes to “Restored”, mark it and click further.
- In the “Recovered Volumes” window, mark our partition and move on.
- All you have to do is click on the “Continue” button to start the process.
- Upon completion of the procedure, exit the LiveCD and start the computer using the installed Windows OS.
The procedure for restoring information from a partition that the PC has stopped seeing can take a significant amount of time. The duration of the process depends on the amount and volume of data available on the disk. Therefore, you should be prepared for the fact that the computer may work for quite a long time.
We hope that the methods we have listed for solving the problem are easy to implement, and you can use them to fix the problems that have arisen.
Couldn't fix the problem? Contact a specialist for help!
Video: how to solve the problem of unallocated space in Windows 10
Professional help
If you were unable to resolve the problems yourself, then most likely the problem lies at a more technical level. This could be: a breakdown of the motherboard, power supply, hard drive, video card, RAM, etc.
It is important to diagnose and repair the breakdown in time to prevent failure of other components.
Our specialist will help you with this.
It's free and doesn't oblige you to anything. We will call you back within 30 minutes.
The hard drive is one of the most important hardware components of a PC. It houses the operating system and stores data. Over time, the amount of accumulated information grows, and users think about additional space. Everyone's approach is different. Some people prefer to use an external drive. Someone will replace the HDD with a fast SSD, and leave the old disk only for data storage. The most advanced ones use NAS for this purpose. It would seem that everything is simple - buy it, connect it and use it. Trouble can lurk just in the middle of this path. Cases when the hard drive is not visible in the system are not that uncommon. Today we will tell you how to cope with this unpleasant situation.
We carry out initialization
The first thing you need to consider is the situation when the computer does not see the new SSD drive the first time it is connected. That is, the drive cannot initialize on its own, and this must be done manually; I will use Windows 7 as an example, but in other versions, Windows 8 and 10, all steps will be similar:
- Press the key combination “Win+R” and enter “compmgmt.msc”, then click “OK”.
- We look for the “Disk Management” item in the left column and click on it.
- Select the one you need, right-click and click “Initialize disk”.
- In the new window, put a checkmark on it, select “MBR” or “GBT” and click “OK”. It is recommended to select "MBR"
- At the bottom of the main window, click on the disk and then select “Create a simple volume.”
- A new window will open, click “Next”.
- Now you need to specify the volume size. It is not recommended to change the default setting. Click “Next”.
- Next, select any letter and click “Next” again.
- Then select “Format this volume”, in the “File system” item select NTFS. Click “Next”.
- A new window will display the main parameters. If they match, click “Done”.
Following the algorithm exactly, you can initialize the disk without any problems, and it will be completely ready for use.
If there is an unallocated area, then simply create a new volume, you should start from point 5.
How to find out SSD or HDD in Windows 10
If you use the Windows 8 or Windows 10 operating system, then you can find out which drive is on your computer in just a couple of mouse clicks. To do this, open the Start menu or press the Windows-S key combination (if you have Windows) and enter the word “Defragmentation” into the search.
The program “Defragment and optimize your disks” should appear in the search results. Open it and you will see a list of all the drives that are installed on your computer. In this case, next to each of these disks the type of this disk, SSD or HDD, will be indicated.
If “Solid State Drive” is indicated, then it is SSD, and if “Hard Drive” is indicated, then HDD.
Changing a letter
When you connect the solid-state drive for the first time, the OS may simply not see it. That is, physically it can be fully functional, but it will not be displayed among other local disks.
Fixing this problem is quite simple as follows:
- We repeat step 1-2 from the previous instructions.
- In the middle of the window that opens, the drives connected to the PC will be shown, including the one that the system does not see. This is due to the wrong letter being assigned to it.
- Find the problem drive, right-click and click “Change letter”.
- In the new window, click “Edit”.
- Select any letter from the list, click "OK".
This way, you can quickly change the letter and solve the problem when a computer or laptop does not see the SSD device.
How to find out SSD or HDD in Windows 7
If you use the Windows 7 operating system or the method described above did not work for you for some reason, then you can determine which disk is on your computer using third-party programs. For example, you can use the HWiNFO program. Launch this program on your computer, go to the “Drives” section and select the drive whose type you need to define as SSD or HDD.
If this drive is a hard drive, that is, an HDD, then on the right side of the window, in the “Media Rotation Rate” line, its rotation speed will be indicated (for example, 7200 RPM).
If the drive is a solid-state drive, that is, an SSD, then in the “Media Rotation Rate” line it will be written “SSD Drive (Non-ratation)”.
You can also see which disk is installed on your computer using the Piriform Speccy program. Run this program on your computer and pay attention to the data in the “Storage” block. There will be information about all drives that are connected to the PC.
In this case, there will be a corresponding mark next to the solid-state drives (SSDs).
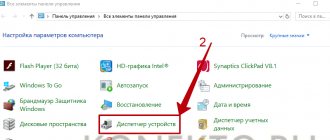
If it is not possible to install these programs, then you can simply find out the name of the disk model and search for information about it on the Internet. In order to use this option, you need to open “Device Manager”. This can be done in different ways, the simplest and most universal is to press the Windows-R key combination and execute the command “mmc devmgmt.msc”.
In the "Device Manager" window, open the "Disk Devices" section. Here you will see a list of all the drives on your computer.
Enter the name of the desired disk into any search engine and study information about it. This way you can easily determine the type of drive SSD or HDD.
Good afternoon friends. In the tenth years of this century, ssd drives appeared, which are becoming increasingly popular over time, as they have many advantages over conventional HDD drives. For example:
- Speed of work;
- Reliability;
- Increased productivity;
- Low energy consumption;
- Silence;
- Low thermal conductivity and others.
But quite often, when you connect this drive, the computer does not see the Windows 7 - 10 ssd drive. Moreover, in most cases, these problems can be easily solved using Windows system software. For example, this happened with my new ssd drive. It simply did not appear in Explorer. Typically, a solid-state drive is not displayed by the system when it simply has not initialized it. In worst cases, the drive is not detected due to BIOS or motherboard incompatibility.
Of course, if the system has not initialized it, then it is not assigned another drive letter, such as C or D. Of course, in this case it will not be recognized in Explorer. Also, it may have a different file system that Explorer does not see. There may be incorrect settings in the BIOS, or you simply connected the disk itself to the motherboard incorrectly (perhaps your motherboard is too old, and such disks are simply not suitable for it). What to do?
File system type
This option is possible when the “Change drive letter” option is missing. This indicates a mismatch in the file system, which is why the computer does not see the SSD. For the drive to work properly in Windows, it must be in NTFS format.
That is, in order for it to become available for full-fledged work, it needs to be formatted. This method is only suitable for those hard drives that do not contain important data, because during the formatting process all existing information will be deleted.
You need to do the following:
- Repeat steps 1-2 from the first instructions.
- Click on the disk and select “Format”.
- Select the NTFS system and click OK.
Once the drive is formatted, the problem will be fixed.
Making the second disk visible using the command line
Please note: The following method to fix a missing second disk using the command line is for informational purposes only. If the methods described above did not help you, and you do not understand the essence of the commands below, it is better not to use them.
I also note that these steps apply without changes to basic (not dynamic or RAID disks) without extended partitions.
Run Command Prompt as an administrator, then enter the following commands in order:
Remember the number of the disk that is not visible, or the number of the disk (hereinafter referred to as N), the partition on which is not displayed in Explorer. Type select disk N and press Enter.
In the first case, when the second physical disk is not visible, use the following commands (attention: the data will be deleted. If the disk is no longer visible, but there was data on it, do not do this, it may be enough to simply assign a drive letter or use programs to recover lost partitions ):
- clean (cleanses the disk. Data will be lost.)
- create partition primary (here you can also set the size=S parameter, specifying the partition size in megabytes if you need to make several partitions).
- format fs=ntfs quick
- assign letter=D (assign the letter D).
- exit
In the second case (there is an unallocated area on one hard drive that is not visible in Explorer), we use all the same commands, with the exception of clean (disk cleanup), as a result, the operation to create a partition will be performed on the unallocated space of the selected physical disk.
Note: in the methods using the command line, I described only two basic, most likely options, but others are possible, so do this only if you understand and are confident in your actions, and have also taken care of the safety of the data. You can read more about working with partitions using Diskpart on the official Microsoft page Creating a partition or logical drive.
And maybe this will be interesting:
Why not subscribe?
Distribution of new, sometimes interesting and useful, materials from the site remontka.pro. No advertising and free computer help for subscribers from the author. Other subscription methods (VK, Odnoklassniki, Telegram, Facebook, Twitter, Youtube, Yandex.Zen)
08/31/2019 at 20:25
Good afternoon. While working, the laptop ran out of charge and switched off. In the evening, when I recharged it and turned it on, I noticed that the D disk was missing. When I turn on disk management, I see one long column at the end of which “recovery (1.00 GB NTFS) fixed.” When I right-click, only help appears, which takes me to a page on the Internet. What to do?? How to save all data from a disk. From what you listed, I simply cannot click on changing the media name or formatting.
09/01/2019 at 10:44
Hello. Can you post a screenshot from disk management somewhere? I'll take a look and maybe give you some advice.
10/09/2019 at 11:02
Thank you very much. I bought myself two new ssds, one for the system and the other for everything else, and for some reason I didn’t see the second one. The article helped.
Doesn't show up in BIOS
In some cases, it happens that the SSD is not displayed even in the BIOS. There are two reasons why this happens, and just as many solutions. The first of them is a disabled SATA controller, to enable it you need to:
- Go to the BIOS, find the “SATA Controller” parameter and check that the value “Enabled” is indicated there. If it is Disabled, then change this parameter to the required one.
- In the Bios settings, in the “Advanced”, “Integrated” or “Main” section (depending on the BIOS version used), find the “SATA Operation” or “SATA Type/Mode” parameter and select the “AHCI” controller operating mode.
It should be noted that the operating system may not be installed due to the selected “AHCI” mode; in this case, change it to “IDE” and after installation, change it back to “AHCI”.
If this does not help, then you should reset the BIOS settings. If you have the appropriate knowledge, it is recommended to update the BIOS itself to a new version.
Another reason that it is not detected could be faulty SSD firmware at the production stage. Of course, you can try to reflash it yourself, but there is a risk that due to incorrect actions it may completely fail. Therefore, it is better to return it under warranty or take it for repair.
The main causes of the problem
There are several common problems that an SSD owner may encounter.
The disk does not appear in the BIOS
This problem may occur if you are using a drive connected via a SATA interface. The problem lies in a disabled controller that is used in a different mode. This is a throwback from the days when peripheral devices were connected to the motherboard via IDE or SATA ports and you had to switch between them.
To activate the SATA controller, you need to do the following:
- Restart the laptop and press the F2, F12, Delete or Escape button before loading the operating system. Which one exactly depends on the BIOS version.
- In the SATA Controller section, set the value to Enabled. If it says Disabled, select it, press Enter and select the required option from the drop-down list.
- In the Advanced section, set the SATA Operation or SATA Mode attribute to ACHI.
If such manipulations did not help and the laptop still does not see the SSD drive, you need to reset the BIOS settings by selecting the Reset and Save Settings option.
The laptop cannot initialize the disk
The situation occurs when the solid-state drive is connected for the first time - the laptop does not recognize it automatically, so initialization must be done manually. The steps you need to perform are the same in different versions of Windows.
Algorithm of actions:
- Press the Win + R key combination and enter compmgmt.msc in the search bar, then click OK.
- On the left side of the window that opens, find the “Disk Management” section and click on it.
- Select a new unallocated drive, right-click on it and select the “Initialize disk” option in the context menu.
- In the new window, check the box next to MBR and click OK.
- In the next window, select the “Create a simple volume” option, then click “Next”.
- Specify the size of the new volume. It is recommended to use the default option.
- Assign the drive any free letter from the drop-down list and click “Next”.
- In the “Format” window, select NTFS as the file system and click “Next”.
- Click the “Finish” button.
You need to wait until the operating system creates a new volume on the connected SSD drive.
No drive letter assigned
In the event of an operating system error, the letter assigned to the volume may be invalidated, and then the drive will not be recognized. You need to assign a letter manually. Also, reassigning the letter sometimes helps if the SSD is lagging or running too slowly. Algorithm of actions:
- Repeat points 1 and 2 from the previous paragraph.
- Select a solid-state drive from the list of drives and right-click on it.
- From the available options, select “Change drive letter.”
- Select a new label from the drop-down list, then click OK.
In some cases, the laptop will again begin to see the connected SSD drive.
File system mismatch
It may be that changing the drive letter is not available. This indicates a mismatch or damage to the file system or routing table that stores the coordinates of files written to the drive.
To operate normally in a Windows environment, the solid-state drive must be formatted with the NTFS or FAT32 file system. NTFS is preferable, since FAT32 does not allow you to write files larger than 4 GB, which is very small in modern realities - even a good quality movie in Full HD resolution usually “weighs” more.
The drive will have to be formatted. All data recorded on it will be deleted.
How to do it:
- Repeat points 1 and 2 from the previous paragraphs.
- Select the solid-state drive in the list of connected drives.
- Right-click on it and select the “Format” option.
- Select the NTFS file system from the drop-down list and click OK.
Once the drive is formatted, the problem will be fixed and it will be detected by the operating system.
Damage to the USB cable or cable
The drive, which is connected via the SATA port, is connected to the motherboard using two cables - one supplies power, the other exchanges data with the motherboard. Some laptops have a special latch slot into which a hard drive or SSD of the appropriate size is inserted and fixed there. In this case, there cannot be a problem with the cables - they simply do not exist.
The problem may occur if the drive is mounted in a special pocket and connected to the motherboard by cables. If any of the cables are damaged, they will not be detected by the system. The only thing that can be done in this case is to replace the cable that came under suspicion with a working one. They can be purchased at any computer store.
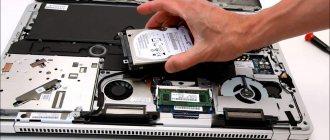
To carry out this operation, you need to partially disassemble the laptop - remove the components that prevent you from getting to the solid-state drive. The design of different laptop models is different. It is best to find instructions with illustrations for disassembling a specific model or a video in which a technician disassembles the device and comments on his actions. If you are not sure that you can handle the task yourself, it is better to contact a service center.
Important! Do not open a laptop that is still under warranty - in this case the manufacturer declines all responsibility. When disassembling the laptop, you will definitely damage one or more seals that hide the screws that secure the bottom cover.
Problems with the disk device itself
A typical “sore” of some brands is a lagging controller, due to which the laptop stops seeing the SSD drive. Physically, everything is fine with the device, but due to firmware glitches, it does not work as expected. If you have tried all the methods described above, but the defect is not resolved, then most likely the reason is in the SSD controller.
Such a defect can be “cured” by flashing it. Replacing the controller is carried out only in particularly advanced cases, when nothing else helps. In any case, you should contact the service center. Flashing or replacing is too complicated a procedure that a novice user cannot handle.
Also, do not forget that any solid-state drive is designed for a certain number of rewrite cycles. If you use it intensively for several years, there is a high probability that the device has already exhausted its resource and all this “dancing with a tambourine” will not help it.
Damaged cable or cable
Special attention should be paid to cables and cables; they may have been damaged and out of order. In addition, in many cases, the SSD drive does not work precisely because of inaccurate or incorrect connections inside the computer.
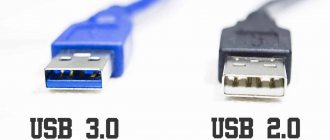
Typically, connecting a solid-state hard drive uses exactly the same cables as for SATA hard drives, so the potential problems are similar to problems when connecting hard drives. We discussed them in a separate article about the reasons when a PC does not see the HDD.
OS doesn't see external drive
USB-connected external hard drives are popular due to their versatility. The file archive is not tied to a specific computer, and the volume available for storing data is an order of magnitude greater than a flash drive. As a result, such devices are often used to transfer large amounts of information between different PCs, the configuration of which can vary significantly. The situation in which Windows does not see the external hard drive on the computer can be caused by several reasons.
So, we connect the device and see the following picture. It did not appear in Explorer and only system drives are available to us.
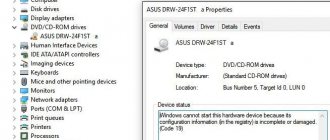
Armed with the knowledge gained, we check the availability in the device manager.
As you can see, the system has identified three drives. The next step is to move to the disk manager.
As you can see in the screenshot, the SSD is fully functional, but the letter is missing in the place indicated by the arrow. A device that does not have a letter designation is ignored by Windows and therefore does not appear in Explorer. Call up the context menu of the found “invisible device” and select the marked item in it.
In the empty window that opens, click “Add”.
At this stage, we agree with the proposal and confirm our choice.
Immediately after clicking “OK”, the “Explorer” window will open.
After assigning a letter, the disk is identified and ready for use.
Other file system
This may come as a revelation to some, but Windows is not the only operating system in the world. There is also Linux or MacOS for Apple computers. Each of these OS uses its own file system. Therefore, when, having connected a disk borrowed from a friend, you receive the following window, do not rush to follow Windows recommendations.
By clicking the cancel button, you will get the real reason for this behavior.
Microsoft, while dominating the market, does not include support for other file systems in Windows. Therefore, if you receive a disk formatted in ext2/3/4 or HFS+, you will not be able to read it without installing an additional driver.
In order not to resort to the help of third-party utilities, find out the type of file system used from the owner. If this is not possible, install drivers from Paragon.
They are available for free use for a month. This period is enough to gain access to information on removable media.
Drive failure
Finally, it is necessary to say about the likelihood of the drive failing, which is why it is no longer detected. Even though there are no moving parts in an SSD, this does not mean that it cannot break.
For example, the drive controller may be faulty. In this case, repairs can be extremely difficult or completely impossible, since the memory modules, which are responsible for storing information, are located on the same chip along with the controller.
Power supply failure
If your computer or laptop does not see the SSD drive, then you should check the power supply. Often, due to its defects, many devices fail, and it becomes extremely difficult to repair them.
For example, the following situation may arise. You purchased a new SSD, connected it, but it shows no signs of life, it simply does not work. The right decision would be to return it under warranty and exchange it for another one. But if the same problem arises with the next one, then most likely either the batch is defective, which happens very rarely, or the problem is in the power supply.
Without understanding electronics, it is not possible to repair the power supply yourself, so it is best to take it to a trusted service center for diagnostics.
Update laptop drivers
It is important to make sure that the necessary drivers are available in the system. If you find that the external drive is detected by another computer, but does not work via any USB on an Asus, Lenovo or other brand laptop, check the control programs that are necessary for the proper functioning of the storage device. To do this, you will need to launch Device Manager again.
Press Win+R and enter devmgmt.msc in the “Run” line
What is your opinion: is WiFi harmful?
Yes
22.91%
No
77.09%
Voted: 36474
After going to the program, carefully review the entire list and try to find devices that have a yellow exclamation mark next to them.
There may not be any, but if you manage to find an external drive with an exclamation mark, open its properties and look at the error details.
You can find a solution to the problem on the Internet, remove or reinstall the driver. If you are good with computers, find and download the driver for the HDD or SSD from the official website of the device manufacturer and install it manually.
We separately check the USB controller driver, since the interaction between the external drive and the laptop occurs through a connector, the operation of which also requires a control program.
It’s even better if you update the control utility – the driver – for each position. It won’t take too much time if you right-click on the name of the USB controller, select “Properties” and click the driver update button.
Built-in storage
It should also be said about one more feature that is unique to SSD drives. Sometimes it happens that a solid-state hard drive does not act as a connector connected to SATA, but is present as an integrated disk on the motherboard. In this case, the SSD is detected by the OS tools, but is not visible in the BIOS.
Based on the fact that these drives are needed for use as service hard drives for the needs of the operating system, the situation when the SSD is not detected in the BIOS is quite normal, since this drive is integral to the motherboard.
Now you know what to do if various malfunctions occur and you can fix them yourself. But if none of the options helped solve your problem, then you should contact a specialized service center. Experienced employees will certainly find the cause of the breakdown and help you solve it.
SSD is no longer detected
The SSD with the system is no longer detected. Good afternoon!
Guys, please tell me what the problem might be. System I5 3470, gigabyte. I stopped seeing the SSD. I understand that the topic is hackneyed, I read a lot of things right there and tried again, but it didn’t help. No computer.
SSD stopped being read SSD: silicon power slim s55 60gb I disconnected the ssd from the power supply, but did not remove the sata wire from the ssd. IN.
Windows has stopped loading from the SSD. Good afternoon. I have a relatively ancient computer; I assembled it in 2011-2012. 1. Processor.
The SSD drive is no longer detected After 2 weeks of using the SSD drive - SSD 2.5″ SATA-II 120Gb OCZ Vertex PLUS, computer.
carry it under warranty
Added after 5 minutes
By the way, I bought this second 120 GB SSD drive SiliconPower Slim S55 [SP120GBSS3S55S25] the flight is normal and there is support from the officials when updating the firmware. I don’t understand how it’s so bad on the market with SSDs. in general, the ssd works via sata and this is a guarantee of the protocol and data exchange of the sata guarantee, so if the ssd malfunctions right away, it’s better to bring it back.
Added after 1 minute
and yes, this 120 GB SSD drive SiliconPower Slim S55 [SP120GBSS3S55S25] has a 36-month warranty. In principle, I don’t care how long it takes for him to die. It’s easier for me to roll out a new system. and the price is ridiculous 1699 rubles. I am ready to go and change it under warranty for the speed of the PC.