Unfortunately, the hard drive is a rather capricious element of the PC, so a problem with reading it can arise either when you first connect it, or quite suddenly, after many months of normal operation. However, hardware problems are easy to fix yourself, let's look at how to do it.
Reasons why the computer does not see the hard drive
There may be several reasons for inoperability:
- Synchronization between the computer and the new HDD is not configured;
- internal BIOS failure or incorrect settings;
- malfunction of contact wires, connectors;
- insufficient current to supply;
- poor cooling;
- material failure in the disk itself.
Sometimes it happens that when entering “My Computer”, the user does not find the disk, but it is displayed in the input/output system.
Removing ATA Channels
In some cases, the problem was resolved by removing all ATA the IDE ATA/ATAPI controllers menu . This is supposed to be a way to force Windows to search for and reconfigure ATA devices again when the operating system boots.
Open Device Manager, expand “IDE ATA/ATAPI Controllers” , remove all existing ATA channels (devices) through the context menu, and then restart the computer.
Connecting the drive for the first time
The most common problem: the computer does not see a new hard drive that has never been connected to it. This is easy enough to handle:
- Enter “run” into the system search.
- Find the application of the same name in the list.
- Right-click on the name and select Run As Administrator (it’s better to do this so that the system does not ignore your commands).
- In the utility line, enter: compmgmt.msc and press “Enter”.
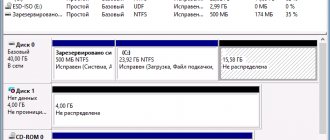
- In the new window, find the Disk management section, and in the list on the right - your problematic HDD. The hard drive is not displayed because it is not assigned a letter, and you will have to navigate by memory capacity to find the one you need.
- Click on it with an additional button and select Change the drive letter or path to the disk, and then specify a letter of the Latin alphabet.
After this, the system should start working with it. If it is not on the list at all, you can try to find it not through the standard manager, but using a similar third-party program.
Causes of the problem and solutions
There are the following types of problems due to which the system does not see the hard drive:
- Mechanical: HDD failure and malfunction of external contacts of the case or other computer components.
- Software: lack of drivers, BIOS problems, presence of third-party applications and initialization errors.
- Physical: insufficient power supply.
Also, the hard drive is not recognized by the computer due to incorrect connection of the device to the motherboard, which depends on the human factor. The user can fix these problems independently. But in some cases, the help of a specialist who understands the architecture of a personal computer and software settings is required.
First connection
We study the design of the device and the features of its interface.
© screenshot of Windows 10 Before connecting the drive to your computer for the first time, you need to study the design of the device and the features of its interface.
The hard drive consists of the following components:
- housing: protects important parts of the storage device from mechanical damage;
- magnetic plates: they contain all the files read by special heads with a sharp surface;
- power connector: designed to connect the device to the electrical network;
- actuator: regulates the operation of magnetic heads, consists of a pair of coils;
- IDE or SATA connectors: connect the HHD to the motherboard;
- solenoid drive: used to move magnetic heads that read information;
- mounting holes: bolts are screwed into them to secure the disk to the computer case.
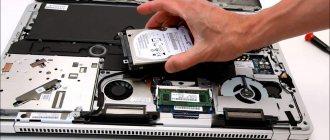
Before installing the storage device, you need to open the side of the PC case to gain access to the motherboard. The hard drive is located in the right segment and is tightly fixed with fastening mechanisms. It is important to check that the drive connectors and connectors are located on the motherboard side. Otherwise, the device will not be able to function. It is recommended to place the HHD in the central part of the right housing bay. This will allow the cooling system to cool the device more efficiently.
HHD is connected to the motherboard using a SATA interface. It connects the central processor and hard drive. The SATA hard drive is connected using wires to the blue connectors of the same name. It is important that the cables fit tightly into the connectors and fully comply with the design of the ports. It is not recommended to press hard on the connectors when connecting the SATA interface. This may damage the connectors and network card.
After connecting the SATA interface, you need to install electricity supply to the hard drive. To do this, you need to connect the white cable built into the power supply to the corresponding connector on the storage device.
The user can build a second disk into the computer. To do this, you need to similarly position the additional HDD in the right segment of the case and connect it to the SATA connector using the cable of the same name. To supply electricity, you must connect the drive to the power supply using a special splitter. After installation, you need to determine the operating mode of 2 disks: Master or Slave. This parameter determines where the PC operating system will be located. If you do not distribute the operating mode, the system will not see the disks.
Contact elements are damaged
If the hard drive does not work, then you should check the serviceability of the internal contacts and cables of the motherboard. To check the functionality of the connectors, you need to disconnect the cable and connect it to a similar connector.
If, when changing connectors, the PC does not recognize the HDD, then you need to check the status of the SATA interface. If the cable is completely broken, the device will not be able to work on any computers. In this case, you need to completely replace the interface. The average cost of a wire is 90-200 rubles. It is recommended to purchase cables from official stores. This will reduce the chance of purchasing faulty products.
Lack of nutrition
The computer does not see the hard drive if the storage device does not receive enough electricity.
This is due to the following reasons:
- Insufficient power supply. Modern computers are equipped with high-performance components connected to the network. Weak power supplies cannot handle the transmission of electricity. This causes individual devices to disable, including the HHD. For a stable power supply, power supplies with a power of at least 600 W are required.
- Malfunctioning cooling system. When overheated, the hard drive automatically fails and is not recognized by the computer. This is due to insufficient cooler power. To solve this problem, it is necessary to purchase updated mechanisms with fast fans and high-performance radiators. The most efficient is a liquid cooling system. It consists of transparent tubes through which coolant moves, lowering the temperature of the HDD and other components.
If expansion cards or peripheral equipment are connected to the motherboard, then the main components will not be able to receive sufficient energy. In this case, you need to disconnect the devices to more efficiently power the drive.
Wrong format
You need to check your computer's file system.
© screenshot of Windows 10 If there are no mechanical or physical problems, you need to go to the computer’s file system and open the “Change drive letter or drive path” tab. In the menu that opens, you need to select the NFTS format and format the hard drive. It is recommended to use this method if the HDD is missing important information.
After formatting, all files stored on the storage device are deleted. To restore data, you must first create a backup copy and save it on another storage medium. After formatting, the hard drive should appear in the PC file system.
Initialization error
When connecting a new storage device, you need to initialize it by performing the following algorithm:
- Press the Win + R key combination. A search panel will open in a new window, where you need to enter compmgmt.msc.
- In the menu that opens, go to the “Disk Management” tab.
- Select the desired hard drive and click on the “Initialize disk” button.
- Configure the HDD style according to the computer device.
- Using RMB, click on the initialized device and select “Create simple volume”.
- In the Volume Creation Wizard that opens, click the “Next” button.
- Set the volume size (the default value for this parameter is the largest).
- In the “File system” parameter, check the box in front of the NFTS item. It is recommended to leave the remaining volume characteristics unchanged.
- Confirm the settings by clicking on the “Done” button.
After initialization, the new HHD will be ready for use. It will appear in your computer's Explorer automatically.
Incorrect BIOS settings
If the computer no longer sees the hard drive, then you need to go into the BIOS:
- Restart your PC.
- After reboot, press F2 or Del.
- Select the Device Priority property from the menu.
- Click on the Boot tab.
BIOS does not see the hard drive due to incorrect installer settings. To fix this problem, you need to go to the First Boot Device tab and select HDD in the window that opens. If after the settings the hard drive is displayed but cannot be read, then you need to update the BIOS using an additional UEFI extension that supports larger disks.
After reinstalling the BIOS, additional settings will open and the installer will become more stable and secure. After updating, you need to restart the BIOS by removing the CMOS battery on the motherboard. The removed adapter should be left for 30 minutes and inserted back.
Outdated drivers
Download the drivers and install them on your computer.
© screenshot of Windows 10 Some computers with the Windows operating system do not have drivers designed for reading and processing disks. In this case, you need to go to the “Device Manager” and open the “Disk Devices” tab. If there is an exclamation point, red cross or yellow question mark next to the hard drive symbol, then the required drivers are missing for this HDD.
To download the software you need to do the following:
- Right-click on the HHD symbol.
- Open the "Properties" tab.
- Go to the “Information” section.
- Copy the hard drive ID and paste it into the search bar.
It is recommended to look for drivers only on the manufacturer's websites. Otherwise, the user may download a large number of virus files to the computer. Driver installation can be done manually. You must first specify the basic parameters. If the system does not show the HDD again, it is recommended to install the driver automatically.
No letter specified
Change the destination letter of the hard drive.
© screenshot of Windows 10 If the hard drive is not detected by the system, then you need to display it among all local drives by changing the destination letter:
- Press the Win + R key combination and open the search bar, where you need to enter compmgmt.msc.
- Go to the “Disk Management” tab.
- The menu that opens will show all hard drives connected to the personal computer.
- Find the “Change drive letter or drive path” tab and right-click on it.
- Select the “Change” option and enter the desired letter.
If the utility does not start, you need to download third-party programs from the Internet.
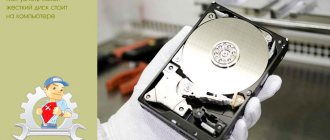
Failure of the disk itself
Hard drive failure and diagnostics.
© dlpn / depositphotos.com Due to collisions with hard objects, shocks, falls and other physical impacts, the hard drive may fail. To check the performance of the disk, you should connect it to several PCs. If the HHD was not recognized by all devices, then it was completely broken.
In this case, a user without professional skills will not be able to troubleshoot problems. To repair the disk, you must take the device to a service center. The average cost of the service is 500 rubles. If it was not possible to revive the old storage device, then you need to buy a new disk.
Uninitialized HDD
Also, Windows 10 or Windows 7 may not see the hard drive if it is not properly formatted. This applies to almost all newly purchased hard drives. Let's fix everything:
- Open the disk manager again, as described above, find the HDD and click the additional button on the manipulator.
- Select Initialize The Disk.
- In the settings window, mark the MBR style with a dark circle. You can choose another one, but it’s better to stick with the “Master Boot Record” to absolutely avoid errors.
- After that, right-click on the disk again and select Create a simple volume to structure the space into volumes.
- Just click “Next” twice.
- Specify the letter under which the hard drive appears in the system and click “Next” again.
- In the Format as item, set NTFS.
- Now click "Done".
You have to do all this yourself, because, unfortunately, the hard drive, even a very advanced and expensive one, does not initialize on its own. The system cannot decide for you what type of formatting to choose, what title to display in Windows, and how to structure information to best integrate the HDD into your PC.
Reason 7: Motherboard Drivers
There is a possibility that there is a problem with the drivers that are responsible for connecting SATA drives. Either they are not installed or do not support this operating system. I encountered something similar once when I installed Windows 7 on a laptop, although there were no drivers for it. In addition to the lack of a hard drive, the system may crash and shut down when running some programs, displaying a blue screen of death.
Our task is to find and update all drivers for the motherboard. First, let's find out the name of the model. To do this, launch the command line as administrator.
After this we use two commands:
wmic baseboard get product (motherboard model) wmic baseboard get Manufacturer (manufacturer)
Next, just google our motherboard model. If the search engine does not find our motherboard, then we go to the manufacturer’s official website and look for the model there. If you have a laptop, then you need to look for exactly the laptop model - the exact name is usually written on the label under the device’s case. Then everything is simple, download all the drivers and install. You can also try updating the BIOS.
Wrong format
Also, a laptop or computer will not see the hard drive if the initial formatting is incorrect. As you remember from the previous paragraph, you need to install the NTFS file system. Check and correct if this is not the case:
- Open Disk Manager.
- Right-click on the hard drive.
- Click Format As and set NTFS in the required line.
IMPORTANT. Changing the format will lead to a complete loss of all information recorded on the disk. If it works fine on some device, transfer all the data, and then start formatting.
Third party programs to help
The user can find out detailed information about the status of the hard drive using the following programs:
- Victoria HDD: utility that checks storage devices through connectors. This program diagnoses controllers and determines the performance of the disk. The application independently eliminates device defects. During operation, the program creates text reports that indicate the main faults of the HHD.
- AOMEI Partition Assistant: utilities for formatting and activating hard drives. It can copy file systems. The program provides complete information about the state of the storage device in the form of technical documentation.
These utilities can be downloaded from the official websites of the developers for free. They do not contain virus programs. These applications must be installed in accordance with the license agreement.
Damaged cables and connectors
If the external hard drive is not detected, try changing the cable and connecting again or changing the port - sometimes the problem is due to bad contacts. The internal HDD suffers from the same problem: take the SATA cable and connect it to another input of the board. You may even have to go to a workshop if something breaks.
Part 4: Reset BIOS
If your hard drive is fine and the operating system is not found because the BIOS does not recognize your hard drive, you can try resetting all BIOS menus to default by following these steps.
Step 1. Restart your computer and boot into the BIOS menu.
Step 2: Press "F9" to execute the "Set Defaults" command. Tip: You can see the correct key associated with the default settings in the BIOS menu.
Step 3: When prompted and reboot your device, click on the “Load optimal default settings” option to confirm the operation.
In most cases, your computer should boot into the operating system correctly.
Incorrect BIOS settings
If, when connecting, a window appears notifying you that the boot failed and asking you to insert a HDD, it means that for some reason the BIOS does not see the hard drive. Most likely, it lacks the necessary priority, and this should be changed:
- Turn off the PC, then turn it on and press several times the key responsible for calling up the BIOS (which one depends on the manufacturer, look for information in the operating instructions or on the company’s website).
- Find some inscription with the word “Boot”, get to it using the keyboard arrows and click “Enter” (the appearance of the BIOS and the labels of the options also depend on the laptop model).
- Next you need a sentence with the words “Boot Priority” or “First Boot”. Expand the option and select “hard drive” from the drop-down list. He needs to be in first place.
- Look down and find which key to press to save your changes (look for the word “Save” for a hint).
Also, the BIOS does not see the hard drive if integration with the parallel drive interface technology is not configured. Do the following:
- Enter BIOS.
- Look for the inscriptions: “Main” - “Advanced”, or “Intefrated Peripherals”.
- Now you need to find a function with the abbreviation SATA, for example, “SATA Operation” or “Configure SATA As”, or “SATA Type”.
- You will be prompted to enable IDE support (look for this word), agree and do not forget to save the changes.
If all this did not help, and when entering the BIOS the wrong date, month and year appeared, a failure has probably occurred. In this case:
- Turn off your computer.
- Look at the motherboard: there should be a small switch with large CMOS letters.
- It needs to be switched to the “2-3” position, count down half a minute and return everything as it was (to the numbers “1-2”).
The BIOS may be too old to support reading new hard drives. If you bought a computer 8-10 years ago, the devices may not be able to work together.
Reason 4: Checking connection
If all the previous steps did not help, and the disk still refuses to appear, then you need to check the physical connection of the hard drive itself. Turn off the computer completely, remove the side cover of the system unit and check whether the hard drive is connected correctly. Just in case, reconnect it to the motherboard again - pull out and connect all the main wires (power and SATA cable).
Usually motherboards have several SATA ports at once, so just try reconnecting the drive to a different connector. Try to connect the cable as tightly as possible. If you have another wire in stock, you can try that too. The same applies to SSD drives.
Also be sure to check the cable that goes to the power supply. If possible, try replacing it. Turn on your computer and check that the hard drive itself is working. To check this, bring your ear to the device - when you turn on the computer and apply power, the hard drive should hum slightly. If it does not make any sounds, then there are two options:
- There is a problem with food. We change the cable or the entire unit.
- Hard drive failure.
Some hard drives with a high number of revolutions may begin to overheat. In this case, the hard drive may suddenly stop being detected during operation. This is often observed in laptops, where all the hardware is in a confined space.
Insufficient power or cooling
The computer may not see the hard drive if it does not have enough power to handle multiple devices. For example, an adapter is connected into which several flash drives, mouse, keyboard, graphics tablet cables, plus an external HDD are inserted. From such an overload, one or another device turns off from time to time. Remove all unnecessary ones.
If you hear characteristic wave-like whistling sounds, it means that the cooling system cannot cope with the overheating of the hard drive. When replacing a hard drive with a more advanced one, do not forget about the cooler - they work in pairs.
What to do if the laptop does not detect the external HDD
Modern external hard drives are devices that connect using the Plug'n'Play protocol. They do not require additional settings or driver installation from the user. If, when you connect such a device to a USB port, the computer does not detect it, then the problem is either in the port itself or in the cable.
Try connecting an external hard drive to a different port. Also check whether the cable is tightly seated in the socket on the hard drive case and whether it is damaged.
If everything is fine in this regard, then the problem is most likely in damaged drive firmware, which does not respond to the autorun procedure. In this case, it is better to contact a service center.
Physical breakdown
Remember if you dropped the disc, if something heavy stood on it while it was in the box, or if liquid spilled. Connect it to another PC and check if it works. In case of material damage, the only thing that can be done is to return the hard drive for repair.
Have you encountered problems connecting the HDD to your computer? How did you manage to deal with it? Tell us about it in the comments.
Why does the problem occur?
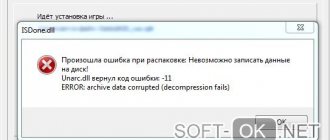
The virtual absence of a hard drive for the OS is a problem with many versions of the Windows Installer, not just dozens. It seems that all the steps were performed correctly, but launching the installation process did not lead to the storage selection window, or there is not a single hard drive or its partitions in this window. If previously such mistakes happened more often with XP and seven, then ten looks like a winner against their background. However, she sometimes plays tricks with a non-existent propeller.
What are the reasons for whims:
- Most modern PCs and laptops use Intel® Rapid Storage Technology (Intel RST), where the driver is not pre-installed and you need to find it yourself.
- If the processor in the device is not from Intel, but from AMD, then the chipset on it is someone else’s. And this distribution is also distributed without integrated “native” drivers for the SATA controller.
- You have come across a “broken” or unlicensed version of Windows 10. Only replacing the original media of the installation files will help here with a 100% guarantee.
- The hard drive is not connected: the cable or connector connecting it to the other parts is damaged. Sometimes a user accidentally disconnects one HDD. Before you panic about system errors, it is better to check the reliability of the power supply, and, if necessary, completely replace the plug and cable.
Where to begin?
If you are sure that the drive is working properly and there is no hardware failure, try the following:
- Connect the hard drive to another USB port.
- Sometimes Explorer “does not see” the hard drive due to malicious software. Check if there are viruses on the media. But how to do this, since the device is not displayed? Connect it to another computer (for example, at a friend's or at work).
- Format your hard drive. If you store important data on it, first copy it to another location.
Diagnostics
The device is not visible for various reasons. It is important to check the motherboard, power cables, the device itself and the software. To reduce the list of potential pests, you need to connect the device to a free cable and try to work with them.
If you have another disk at hand, and you know that it is probably working, then plug it in instead of the faulty one. This will help ensure that the motherboard is functioning correctly. It is also better to connect your “invisible” drive to another PC - perhaps the reason is a software component? If this is the case, then there are a number of methods that help return everything to its place without using the services of expensive specialists.
Note! If you do not have experience in repairing computer components, and through the manipulations described above it has become clear that the problem is in the software itself, then take the computer to a service center. They will tell you whether it is realistic (and how expensive) to repair the device. The last resort is to forget about the lost files and purchase a new hard drive.
Recommendations for recovery
BIOS
First check the settings of this system. Getting into the BIOS is easy; hold down the Del or F2 key while loading the OS. A possible failure of the computer settings is indicated by an incorrect system date in the BIOS. A simple reset will help solve the problem; to do this, remove the battery from the motherboard for a few minutes. Wait half an hour before returning the component. It's funny, but sometimes this is enough to improve the performance of the drive.
The device may also be lower on the priority list. This parameter is checked in the “Boot” section. Make sure the HDD is at the top of the priority list.
Power problem
The disc does not click or crack, but appears and disappears from time to time? In this case, the main problem is probably a lack of power, and a buzzing sound may indicate this (the operating cycles are changing). Buying a powerful power supply will help improve functionality. You can also try to disconnect a less important component.
OS problems
BIOS “sees” the device, but Windows doesn’t? Adjust compatibility manually. To do this, follow these steps:
- open Administrative Tools in Control Panel
- click on "Computer Management"
- Select "Disk Management" and evaluate the information presented. The system will present a list of devices, one of which must be without a letter indicating the volume (E, D, etc.)
- Right-click on the partition, then click on “Change drive letter”
- select any character from the English alphabet
- restart your PC.
This method often helps inexperienced users bring their hard drive back to life.
Often a component does not work due to file system incompatibility. NTFS is suitable for adequate operation. In Disk Management, you can examine which option is installed on your PC. If the system is different, then it is better to reformat the disk.
Equipment conflict
If two drives of the same brand are plugged into a PC, then this is what sometimes causes conflicts. Check and configure each drive separately to avoid this situation.
Problem with contacts
A very banal factor is the lack of contacts. Reconnecting the wires will help correct the defect. Remove the cover, disconnect from the power, turn off and plug the cables back into the hard drive. If nothing has changed, then use another pair of wires. Do not forget that the device can be connected to the board through two main connectors (black and blue). The blue connector is responsible for external reading; connect to it.
Tire
SATA II (SATA), which is required for many modern drives, may not be supported by older operating systems. The solution is simple - reinstall Windows. If you do not want to work with a more recent OS, then reinstall the old one by installing special drivers for the required interfaces. You can find out what drivers your system needs on the motherboard developers website. Its type is registered in the properties (right-click on “My Computer”).
And a final recommendation: before installation, the drive must be wrapped in antistatic material, this will make your work with it more reliable.
Other utilities
- support.microsoft.com utility “Automatic diagnosis of USB problems”. To do this, enter its name in the search bar.
- Run this program.
- In the window that opens, click “Next”.
- The service will prompt you to remove the device you are checking. Mark it and click on “Next” again.
- The utility will display a list of errors associated with USB devices. She will fix some of them. If you see what the problem is, it is easier to solve it.
USBOblivion
After updating Windows, entries may remain in the registry that relate to previous connections of the drive. Because of this “extra” data, the system cannot obtain up-to-date information about the hard drive. The USBOblivion program is suitable here. It's free.
- Find it online, download and run.
- O and “Save undo file.”
- Remove all USB devices.
- In the utility, click on the “Cleanup” button.
- Restart your PC.
- Connect all gadgets.
If the hard drive does not appear in Explorer, this does not mean that it is broken. Update the drivers and assign a volume label to the hard drive. Or download a USB troubleshooter.