Situations often arise when you need to send someone a screenshot that captures, for example, part of a conversation, a work screen, or just a beautiful picture. It is not always possible to download the desired image and upload it in this format, and it is not always convenient. But knowing a quick way to take a screenshot on a Lenovo tablet is always useful. Today's article will be devoted to this.
A screenshot is an exact image of what the user sees on the screen.
The word itself is translated from English as “screenshot”. Why might it be needed? For example, you are talking with a friend and it becomes necessary to refer to correspondence with someone else. If you are chatting in a messenger that does not provide a message forwarding function, the task may not be easy. But having learned how to take a screenshot on Lenovo, you can easily take a photo of an open application and send the screenshot to your correspondence.
Options
There are several methods for creating a screenshot on Android. I suggest considering the simplest ones:
- using tablet/phone keys. This is a fairly simple method that does not require additional settings or downloading applications;
- via the drop-down menu. The method involves adding a button to the top menu - will be described in detail below;
- downloading additional software. Not the fastest method, but downloaded third-party software can make the job easier if you often need to take screenshots.
Choosing a convenient way to take screenshots
So, we have told you how to take a screenshot on Lenovo laptop with many options. Which one is most convenient? Standard system tools do not require installation, but the file cannot be edited in them. These methods are only suitable if the screenshot is taken once and they do not need to be changed.
If you need to add explanatory notes to a photo, hide part of the photo, add arrows, or emphasize important information, choose the PhotoSCREEN program. An additional advantage is that it is compatible with all versions of Windows, and the created screen can be exported in three ways.
Save this article so you don’t lose it:
Let's start with the simplest method
The simplest method is often called a print screen - following the example of screenshots on a computer and laptop, which are taken with the PrintScreen key. On Android devices, of course, there is no such key, but a photo of the desktop can also be taken by pressing the keys, which is why, out of habit, they call it a print screen. But how to produce it?
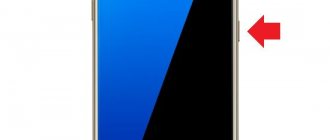
It's very simple - different models of phones/tablets can have different versions of Android installed. They differ in what buttons the screen is photographed with. On Lenovo, this is most often done by a combination of the on/off key (Power) and the volume button (Volume, in the lower part, where volume down is Vol-). The buttons must be pressed simultaneously - you will hear a clicking sound as when taking a photograph. Ready! You will find the picture in the gallery or in the Pictures/Screenshots folder (may also be called Screens or something similar).
How to take a screenshot of the monitor on a Lenovo laptop
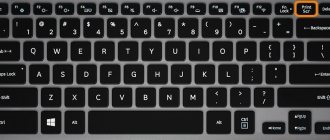
There are only two such ways. The most common and, one might say, traditional method is to use the Print Screen button found on any keyboard:
- Having opened the desired image, you need to press the Print Screen button at the top of the keyboard. Externally, nothing happens.
- The image is inserted into Paint, a standard graphics editor, using the right mouse button (“Paste”) or simultaneously pressing the Ctrl+V keys.
- Save a screen photo.
Another method: install a special application that allows you to instantly take a snapshot of an image on your laptop screen. Corresponding programs can also be found. The main advantage of this method is the ability to instantly, in one action, save the image to a folder.
The second way is through the top drop-down menu
The second method is also simple, but still requires some actions in the settings area. But if you haven’t changed the settings in the quick access menu section since purchasing the device, then you can find a button that will allow you to make a screenshot on Lenovo in this very menu.
It opens with a swipe from the top (swipe from top to bottom) and contains many different useful functions: Wifi connection, Bluetooth, adjusting the screen backlight level and much more. Among them you can find a button with the image of scissors or something similar (in some models the signature is Screenshot). Click on it and get the desired picture in the Pictures/Screenshots folder.
It may be that the button will be missing. Go to the settings - the item “Quick Access Menu” or “Manage Switches” (may be located as a sub-item in the “Notification Panel”). There is no need to sound the alarm if you don’t find a button for taking photos - some models may simply not have such a function. There is nothing you can do about this (except perhaps ask the seller about it in advance), you need to make a screen in other ways.
Where to view the saved screenshot
Different screenshot tools export the created files in different ways, so users do not always know where to view the created picture.
- By default, PhotoSCREEN saves the image in the subfolder of the same name in the “Images” directory. But in the export window you can manually specify the save path.
- PrintScreen and the Snip and Sketch utility copy the image to the clipboard. It can be embedded into any graphics or text editor using Ctrl + V.
- In "Scissors" you need to independently select a folder to save.
- Once saved, the PNG file can be found at “Video” - “Clips”.
Using additional software
Downloading and installing the program to take a screenshot on your tablet is easy. Of course, if you can use a button in a drop-down menu, it’s easier to click on it. But if you have a tablet without this feature, or the menu is full of functions you need, for which you cannot install another, third-party software can help.
Such programs that take a photo of the screen on a Lenovo tablet are called screenshots. For a similar request, you can find a bunch of applications and choose the most convenient one for yourself. Some tips on how to choose your software:
- the screenshot should be taken with one click;
- you need the ability to choose a “custom” location to save the image;
- The ability to edit the resulting image is desirable.
Dropdown and Quick Launch Menu
In some models of phones and tablets, the “Screenshot” button is already in a special menu. As a rule, information about the availability of this function can be clarified immediately upon purchase and at the same time ask a consultant to show you how to take a screenshot on Lenovo.
On phones equipped with this feature, the “Screenshot” button is located in the drop-down menu. You can open it by holding the “Power off” button on the phone for a few seconds.
On tablets, a similar button can be found in the quick launch menu - it opens if you swipe your finger across the device screen from top to bottom.
Then everything is simple: having opened the desired image on the screen, activate the “Screenshot” icon with a simple click. The image is saved in the same “Gallery” folder.
For iOS
Taking a photo on your iPad is done by pressing the Power and Home buttons at the same time. You can also try holding down “Power” and then clicking on “Home”.
For devices with Face ID, the combination of “Power” and “Volume Up” is suitable.
Saving a picture is accompanied by a characteristic click, and the resulting screen is displayed in a small window.
All images can be found in the Photos app under the Camera Roll section.
Long screenshots can be taken using the Safari web browser. Immediately after saving, you need to go to preview and select “Full page”, crop as needed, and click “Finish”.
If making a screenshot using the usual keyboard shortcut does not work, you can use any corresponding application from the App Store.
Where is the screenshot saved?
When using different software, a logical question arises: where are screenshots saved on a Lenovo laptop? When using standard features, they are saved in a buffer, after which the information must be copied into any application, for example, Paint or Word. In the future, you can choose the location where to save the data. For convenience, you need to create a special folder, for example, Screenshots, and send all the photos you take there. With this approach, there will be no difficulties in the future where to find the necessary information.
As for special applications or extensions, you can immediately set the file storage location or select a path for each specific case. It all depends on the functionality of the selected software.
In the comments, tell us which method you liked best, and what difficulties you previously encountered when taking a screenshot on a Lenovo laptop.
Screenshot on phone
There are several ways to take a screenshot on phones (it all depends on the device firmware). We will consider all known methods so that the user can choose the most convenient one.
Method number 1. Drop-down menu.
Some devices have a special button in the menu called “Take a screenshot.” If you press it, a screenshot will be taken and the photo will be saved to the appropriate folder. Below is a visual example of this button. This is the most convenient way that allows you to make a screenshot as quickly as possible.
Method number 2. Power button on the phone.
Another convenient way to take a screenshot is to hold down the phone's power off button, after which a special menu will appear. It may contain a “Screenshot” button, which performs the function we need.
It is worth noting that not all devices have such functionality, so if the button is missing, you will have to use the third option.
Method number 3. Simultaneously pressing two buttons.
To take a screenshot of your desktop, you need to hold down two buttons – “power off” and “volume down”. As soon as you complete this operation, a screenshot will be created. You can find it in the following path: ..SD cardPicturesScreenshots.
If you encounter any difficulties during this operation, watch the video below.
Additional methods
The most modern tablets provide control of the device using special gestures. However, in order to do this, you need to activate the function in the settings - sub-item “Motion”.
If the tablet owner has at hand a keyboard designed for his gadget, then there are no problems at all - just press the “Print Screen” key .
In addition to the methods listed above, there are also a lot of third-party applications that will help you take a screenshot with ease. The owner of the device is free to assign combinations of buttons and gestures himself.
Lenovo Tab 2
In order to create a screen on the device in question, you can use several options. Here are some of them.
Method 1:
- Press the power button and the volume down key at the same time;
- While holding the keys in the indicated position, listen. There should be a click as if the camera took a photo;
- If the screen “blinked”, it means that its image was saved in the “Gallery”.
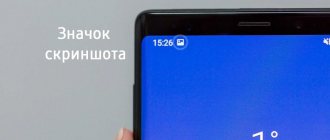
Additionally, on Android, a shortcut to an image can be accessed through the top notification bar.
Method 2:
- Press and hold the power button until a window with options appears;
- Among the list there is an item “Screenshot”;
- By clicking on the indicated section, you need to wait for the camera to click and the screen to “blink”;
- In this case, the screenshot will also be saved in the “Gallery”, or it can be accessed through the top panel.
Method 3:
- First, you will have to install the themed application from Google Play;
- Using the instructions, launch the application and take a photo;
- The application can create a folder specifically for screenshots, or you will have to use the “Gallery”.
Method 4:
- A photo taken as a reaction to a special movement of the hands;
- Activate in the “Motion” menu;
- Perform the selected gesture;
- You should look for a screenshot on your tablet in the “Gallery”.
As you can see, all options are extremely accessible.
- Screenshot on MacBook Air or Pro - How to Take a Screenshot of MacBook Air and Pro?
Using third party programs
Additional applications are used by those users who either want or do not know how to work with standard tools. You can find them in the Google Play app store.
The advantages of this method include:
- the ability to edit pictures on your phone;
- the photo is taken with one touch;
- you can choose the path to save the photo;
- availability of detailed instructions for creating a screen.
The user can also find an application that suits his phone model.
How to take a screenshot on a tablet
On tablets, similar actions are performed, although the Chinese manufacturer does not seem to have paid enough attention to these devices when it comes to taking screenshots. The function does not work from the power button, although other methods are quite acceptable.
With two keys
Two buttons (volume and power) can be used on any Lenovo tablet, except very old models. Everything is done the same as on the phone (read above).
In the Quick Launch menu
This method is also similar, only the launcher here has its own curtain located on the right side of the screen. If you pull it, a selection of possible actions will open, including the desired button. By clicking on it, you can easily take a screenshot.
Through a special program
If you don’t want to bother with buttons, you can use some universal and free solution. There are a lot of them on Google Play. This method is chosen for functionality. Using a special program, you can not only take a screenshot, but also edit the image, select its type, save path or share, and much more. Sometimes you can get by with just one button; on new models, just touching the screen or shaking the device is enough.
It is worth noting that some applications require root access, which in itself is not easy. For example, one of the best utilities is Screenshot It. Some utilities are expensive, others do not work with certain versions of the operating system. Therefore, when choosing a program, it is important to pay attention to the developer’s requirements.
For Windows
The standard hardware key combination is “Power” and “Volume Up”. They need to be pressed at the same time. While saving, the screen goes blank for a couple of seconds.
Windows Surface tablets have a Start key on the case. A combination of this button with “Volume Down” is suitable for them. The same goes for Dell devices.
Windows tablets also allow you to create a screenshot using your palm. To activate the function, you need to go to the settings in the “My Device” section, go to “Movements and Gestures”, “Palm Control”. In the menu that opens, find “Screenshot” and switch the toggle switch located opposite it to working status. Taking a screenshot is the same as for Android.
There are several options through which you can take a photo of the screen:
- “Scissors” (“Snipping Tool”). This is a built-in tool for Windows that allows you to capture your screen. You can select the format in which you want to save the image.
The utility is capable of capturing the full screen, a selected part of it, or the active window.
The application can be found by opening the Start menu in the Accessories - Windows folder. Or you can type the name in the search.
- "Surface Pen". You need to double-click the top button of the stylus. Before saving, you can crop the photo to a suitable size. To do this, you need to select the required area and release it.
The screenshot is saved to the Pictures folder or OneDrive.
If a keyboard is attached to the tablet, this makes the task much easier. You can take a screenshot using the “PrtSc” (Print Screen) key or using the “Fn” and “PrtSc” key combination. The image will be saved to the clipboard. It can be pasted into a document or into Paint.
Alternately holding down the “Fn”, “Start” and “PrtSc” keys saves the file in the “Screenshots” folder. It is located in the “This PC” section in the “Pictures” folder. If the keyboard does not have a “PrtSc” button, you need to hold down “Fn”, “Start” and spacebar.
Important! The key combination “Alt” and “PrtSc” allows you to take a photo of the active window.
The process of taking a screenshot is quite simple. There are many options for different OSes. And if you can’t do it with a keyboard shortcut, you can always use special programs.
Subscribe to TechnoCouncil on social networks so you don’t miss anything:
New users of mobile devices sooner or later face the question of how to take a screenshot on Android . This is one of the most popular mobile operating systems in the world, and information like this will be useful to many. It seems that on a Windows desktop computer, a separate key on the “PrintScreen” keyboard is responsible for this operation, but there is nothing like this on the desktop or in the virtual keyboard of the Android operating system.
If you don’t know how to take a screenshot on an Android phone , then we will tell you about all the possible methods, including individual options depending on the mobile device manufacturer.
First we will introduce you to universal methods.