The problem when the hard drive does not appear on the computer is extremely common. This can happen with both built-in and external hard drives.
But before you try to correct the situation and solve this problem, you need to find its cause. Even an inexperienced user can find and correct existing difficulties by strictly following our instructions and acting as carefully as possible.
Possible reasons
There are a number of reasons why the hard drive may not be visible in my computer. Often this problem occurs with new devices that are just connected to a PC. These reasons are often:
- No letter specified.
- Wrong format.
- Initialization failed.
- Cables and wires are damaged.
- BIOS settings failed.
- Weak power supply or cooling system.
- Motherboard failure.
- Bad sectors (BAD blocks).
- Malfunction of internal mechanics.
To avoid complications, let's take a closer look at each problem when the hard drive does not open, its cause and an effective solution.
Disk with caching SSD
Laptop owners may encounter another type of the described problem when reinstalling the operating system. Windows does not see a drive that uses a caching SSD running on Intel Rapid Storage Technology and requires a driver. In this case, you will have to postpone the installation and prepare first by visiting the Intel website from another computer.
In the “Support - Drivers and Software” section you will find the RST driver for your OS.
No letter specified
When connecting for the first time, a new HDD, whether external or internal, may not be recognized by the system. It will not appear like other local drives, but will be fully functional and intact.
The fix is quite simple:
- Press the combination “WIN+R”, enter “compmgmt.msc” in the free field of the window that opens and click “OK”.
- Find “Disk Management” in the left column and click it.
- In the middle of the window all connected hard drives will be listed, including the new one, which is not visible on my computer.
- Find it, right-click and select “Change drive letter”.
- In the new window that opens, click “Change”.
- Next, select any desired letter from the drop-down list.
- Click “OK” and restart the computer.
After the system boots, it will begin to detect the new hard drive in the “My Computer” folder, and you can work with it.
Reasons why the computer does not see the hard drive
There may be several reasons for inoperability:
- Synchronization between the computer and the new HDD is not configured;
- internal BIOS failure or incorrect settings;
- malfunction of contact wires, connectors;
- insufficient current to supply;
- poor cooling;
- material failure in the disk itself.
Sometimes it happens that when entering “My Computer”, the user does not find the disk, but it is displayed in the input/output system.
Wrong format
However, what to do if when you call up the menu there is no “Change drive letter” option. This is usually caused by a file system mismatch. For normal operation in the Windows operating system, it must be in NTFS format. That is, in order to start the hard drive, it must be reformatted.
For this:
- Repeat steps 1 and 2 from the above instructions.
- Right-click on the disk and select “Format”.
- A window will appear in front of you where you need to select NTFS and click “OK”.
- After formatting is completed, reboot the laptop.
After the system boots, the drive will be displayed and available for full operation.
Reason 6: Setting in Device Manager
Open Device Manager. Next, expand “IDE ATA/ATAPI controllers”. And we are looking for all secondary and primary IDE channels.
Right click – “Properties”. On the “Advanced parameters” tab, in all lines “Device type” there should be an “Auto selection” parameter.
Initialization
As we said above, new HDDs sometimes do not work the first time they are connected. However, there is nothing to worry about, since if the drive does not initialize on its own, then this process must be carried out manually.
We do the following:
- We repeat steps 1 and 2 from the first instructions again.
- Find the desired hard drive, click on it and select “Initialize disk”.
- In the window that opens, mark the disk that is no longer displayed, select MBR and click “OK”.
- Right-click again, only on the initialized hard drive, and click “Create a simple volume.”
- The Volume Creation Wizard will launch, click “Next”.
- Next you need to specify the volume size. By default, the maximum size is set; it is not recommended to change the number set by the system. Click “Next”.
- Select a letter and click “Next”.
- We find the item “Format this volume ..”, and in the “File system” field we set NTFS. Leave the remaining fields as is and click “Next”.
- The last window will open in front of you, in which all the specified parameters will be displayed. If you agree with them, click “Done”.
After this, the disk that was installed earlier will be initialized, and all you have to do is restart the computer and begin full-fledged work.
Restoring a logical partition using special programs
Now let's look at the situation related to the logical partitions on which important user files were saved.
In this case, the partition can be recovered with the Recovery Expert tool, which is available in the Disk Director program from Acronis. Having launched the appropriate “Wizard”, you need to select the manual recovery method, set the full search type and wait until the restoration of the missing partition is completed, after which, by opening “Explorer”, make sure that all the information present in the partition is safe and sound.
Note: in some ways, this is also similar to working with an unallocated area.
Unallocated area
It happens that due to periodic failures in Windows or system errors, part of the HDD disappears and becomes inaccessible. This is why the explorer simply does not see the hard drive.
The fix is quite easy:
- You need to go to the “Disk Management” interface, as described in the previous paragraphs.
- Find the unallocated part, right-click on it and select “Create simple volume”.
- Immediately after opening the wizard, click “Next”.
- We indicate the size. It is recommended not to change the Windows OS setting.
- In the next step, select a letter.
- Next, set the option “Format this volume...” and select “NTFS” as the file system, indicate the desired volume label, leave everything else as default and click “Next”.
- To start the process, click “Finish”.
After you restart the computer, Explorer will begin to see it.
However, if this partition contained the data you need, you can restore it without any loss.
What are the causes of dysfunction on Windows?
When considering the causes of the problem, it is important, first of all, to decide what we are dealing with - the loss of logical partition D on the hard drive of your PC (when logical partitions C and D are located on the same hard drive), or the loss of hard drive D (when C and D in the system are separate hard drives).
Depending on the answer to the mentioned question, the reasons for the D drive display problem may be as follows:
- The cable of hard drive D has come loose (or is not tightly connected to the connector);
- An accidental failure occurred in the PC, damaging the logical structure of the hard drive partitions;
- The logical structure of the hard drive was damaged by virus programs;
- Logical partition D is programmatically hidden by enthusiastic pranksters;
- The system has a D drive (often purchased) connected to it, which is not initialized or formatted.
Contacts and cable
When connecting the drive, you need to be as careful as possible. Your computer may not recognize your new hard drive due to a faulty or damaged cable. If there is no apparent reason why it does not work, then you need to take a similar wire with identical connectors and use it to connect the hard drive to the PC.
This problem, when cables fail and need to be replaced for normal operation, can affect both external and internal storage. Also, do not exclude the possibility that, due to inexperience or carelessness, you simply connected the HDD to the computer incorrectly, and therefore it does not find it. Be sure to check the connection and make sure that the contacts are not coming loose.
Search for cause and effect
First, you need to determine exactly what problem you are facing -
— a disk partition has “disappeared”;
— the disk itself “disappeared.”
This is important to determine, because if the disk and all its partitions are missing, then the problem in question is most likely associated with a hardware failure, that is, a physical malfunction of the hard drive or solid-state drive.
When using a desktop computer, you should check:
— correct connection between the hard drive and the motherboard;
— correct operation of the power supply;
— no damage to the disk casing.
In general, you will need to check all visual aspects that may indicate the reason for the “disappearance” of the disk from Explorer and the corresponding partitions of the operating system.
If only one of the disk partitions has disappeared, and the rest have not lost their visibility, then the whole problem may lie in a software failure, therefore the range of possible solutions in this case will be more diverse.
BIOS Settings
If you connected a hard drive, but the computer does not see it, then the problem may be related to the BIOS settings. There are several possible causes of problems. Let's take a closer look at each of them and find an effective solution.
Download priority
If you connected a hard drive, but the computer does not see it, then it is possible that the device boot priority is incorrectly set in the BIOS settings. That is, we need to put the new hard drive in first place, so that when the computer starts, it boots first from it.
Let's take a closer look at how to do this:
- When loading the OS, press the DEL or F2 key to open the BIOS. Sometimes other combinations are used.
- Next, go to the Advanced BIOS Features section.
- We find the option with the word “Boot”, in this example it is called “First Boot Device” and put the HDD we need in first place.
- Press F10 to save the changes and exit the settings.
Thus, after the system boots, the drive will be available for normal operation, and the problem when a new hard drive is connected, but the computer does not see it, will be solved.
Menu items may differ in different BIOS versions. Therefore, if the specified parameters are missing, you should look for the most suitable ones by name.
SATA operating mode
It is possible that my computer does not see the HDD due to the fact that the IDE-compatible operating mode is not specified in the BIOS. To fix this you need to:
- Go to BIOS.
- Find the Main, Integrated Peripherals or Advanced menu, depending on the BIOS interface.
- Next, find the settings Configure SATA As, SATA Operation or Onboard Sata Mode.
- Among the available options, select IDE or Native IDE, save the changes with the F10 button and confirm your actions with the letter Y.
Afterwards, the system will boot in normal mode and will be able to recognize and open the hard drive.
Resetting BIOS settings
If you installed a hard drive, but even the BIOS does not see the connected hard drive, then most likely the reason for this is a settings failure. This reason can arise either as a result of incorrect user actions, or due to viruses in the system and power outages. This type of problem is indicated by the system date - if it is not accurate, then it is a failure. To correct the situation, you will have to perform a reset and return to factory settings.
There are two ways to do this. Let's look at the first one first:
- Turn off the computer and unplug it.
- Open the case and find the motherboard.
- Find the Clear CMOS jumper on it, located near the battery.
- Move the jumper from one pin to the other.
- After 30 seconds, return it to its original position.
This way, the BIOS settings will be reset and the system will be able to detect the hard drive and start working with it.
The second option takes a little longer:
- Turn off the computer and turn off the power.
- We find the motherboard and remove the round silver battery
- After 30 minutes we insert it back.
After this, the problem where Explorer does not see the hard drive should be resolved. I would also like to add that both options may require changing the download priority, as described in the instructions above.
Why is drive D not showing up in Windows 10?
This situation can happen for various reasons. If the user did not delete the storage on his own, then the problem lies in a failure that occurred during the installation of the system or updating its components.
The main causes of the problem include:
- System failure – a system error may occur in the “ten”. After reinstalling and updating components, the user can fix the problem with the hard drive.
- Virus attacks - malware negatively affects the operation of Windows. Viruses can deactivate some system functions, delete files and components, and damage the structure of the hard drive.
- Bad sectors on the disk – over time, drives installed on a PC fail. The stability of the components is disrupted, which leads to the formation of bad sectors. Such elements must be removed, as they negatively affect the operation of the hard drive.
- Violation of the integrity of system files - a problem that occurs when the operating system is used incorrectly. The problem can be resolved using built-in system tools.
- The cable is not tightly connected - Windows cannot recognize the hard drive and its contents.
- A new hard drive has been installed - the user has not installed or formatted the element.
If the device has an outdated BIOS version installed, this may also cause the system not to see the HDD. It will not be possible to fix the problem on your own, as the user may encounter serious problems related to the operating system. In other cases, you can easily restore the visibility of the hard drive if you follow the instructions below.
Lack of power or cooling
If the hard drive is connected and working, but is not visible in Windows, then you should listen to the sounds it makes. For example, a buzzing indicates a change in cycles, and most likely the problem is a lack of power from the power supply.
You need to act according to the circumstances:
- Buy a more powerful power supply.
- Disable an unused device.
Of course, it is recommended to replace it to prevent future problems.
If you have a laptop and its cooling system is faulty or works extremely poorly, then it is likely that the hard drive in the My Computer folder is not displayed due to overheating. There is only one solution - clean the cooler or replace it with new ones.
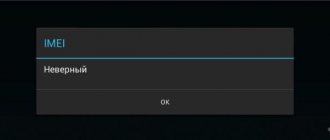
Actions with RAW format
Finally, it happens that the “D” drive is not literally missing. It's just that its format has been changed to RAW, which is unreadable, which is why access to it may be blocked or limited. In this case, all the described methods are suitable. If possible, try formatting the partition or reinitializing it. If some information was stored in the partition, try restoring it using the specified utility or similar programs. Sometimes you can first make the files visible, again using third-party software, copy them to another location, and then perform a full formatting.
Motherboard failure
If the hard drive is detected by the system, but does not open, perhaps the reason lies in a malfunction of the motherboard, namely in the “south bridge”. It is he who is responsible for the correct operation of IDE/SATA devices.
To check this, connect the hard drive to a laptop or any other device, if it starts working, then we have found the “culprit”.
Unfortunately, you won't be able to fix the problem yourself. It is necessary to replace the motherboard or take it in for repair.
Damaged sectors
Inaccessible sectors (or so-called “BAD” blocks) are a common reason why a connected hard drive is not visible to the computer.
Before you start checking and eliminating errors, you should know that bad problems are divided into 2 types:
- Logical – system errors. Most often they occur due to incomplete read/write to the sector. They can be fixed programmatically.
- Physical – appear when the magnetic layer ages, overheats or physical damage to the magnetic plate. This screw can only be replaced.
You can fix logical problems using the free program Victoria or MHDD.
They are quite light and easy to use.
Mechanism malfunction
If the hard drive does not open, but the computer sees it, then most likely it has simply failed. This mainly happens due to a fall, impact, shock, overheating or wear of the mechanism.
In this case, third-party sounds, knocks, clicks, noise, buzzing, and system freezes may appear when connected to a PC or laptop.
If the above methods did not bring any results, then the only correct solution would be to take the HDD to a service center before it completely fails.
The external hard drive is disconnected. What to do? [Human language]
A completely new hard drive started shutting down on its own every 40 minutes. In my practice this happened several times, but each time for a new reason. There were only a couple of old and not very useful threads on the forums. In this article, I tried to describe in detail in human language the scenarios why something like this could happen, and what can be done about it.\
Physical
Everything is obvious here - the operation of the equipment is disrupted. Most often this is:
- Cable. For one reason or another, the cable does not pass the signal. An easy way to check is to ask a friend for the cable. Treated by buying a new one.
- USB controller. It is also a “flash drive slot”. The cable came loose/broken, the contacts melted (yes, this happens), someone suddenly pulled the flash drive towards themselves not horizontally. Most often, trouble does not come alone, and other devices on the controller do not work along with the disk. It is treated by going to a service center.
- Short circuit in the disk itself. Rare but possible situation. Possible loss of data. Each case is unique, and can also be treated by visiting a service center.
- It is better not to connect external hard drives to USB hubs (splitters), especially without external power (from an outlet). They require relatively high current strength, so it is best to connect them to the computer itself (the controller closest to the motherboard).
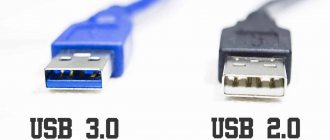
This type of cable is called “USB-A to Micro B”
device Manager
Windows Device Manager is an essential tool for solving hardware problems. It opens as follows: simultaneously hold down Win + R, . In the window that appears, enter devmgmt.msc and press Enter.
The following window will appear:
We are interested in two sections: “Disk devices” and “USB controllers”. To expand the list of devices, click on the gray arrow to the left of the section.
To open the device properties, left-click on it and select “Properties”. I described below how to work with this dispatcher.
Check functionality
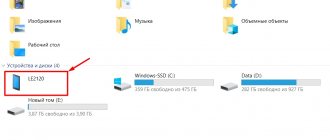
First, you should check whether the disk is working normally. To do this, in the “Properties” section of the disk in the Device Manager (described above), select “Volumes”, then “Fill”. If everything went well, pay attention to “Disk”, write down the number (in my case Disk 3).
Next, using the already familiar Win+R, type diskmgmt.msc and press Enter.
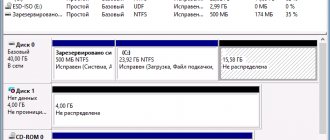
Then, if necessary, use the scroll slider (right) to navigate to the desired drive and note the following:
- "NTFS" or "FAT32" is specified, but not "RAW"
- Marked "Active"
If anything is different, the drive is probably malfunctioning, and again you should contact a specialist.
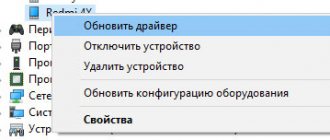
Drivers
A driver is a small program for the correct operation of equipment. Sometimes it is installed automatically the first time you connect, and sometimes it requires you to configure it yourself. You can do the following:
- Find the device box. Feel like a “non-Russian” after reading the instructions. It may contain useful information, and the most meticulous manufacturers generally have a Q&A [question and answer] brochure. Sometimes there is a driver disc.
- Go to the device company's website. Usually, right on the main page there is a button for “Drivers”, “Download”, “Software” and so on. If you have difficulty with English, enter the name of the site in Google Translator and click on the link in the “Translation” field. Then find your device (the full name of the device model can be found on the disc itself, in the device manager, on the box, or in the “My Orders” section if you ordered it online), and download.
- Look for the driver on third-party sites. This item is very undesirable, but if all else fails, you can look for something like “Company Model external hdd driver”, where Company Model is the name of the company and disk model. Be sure to check the downloaded file with an antivirus. How to update the driver is described below.
- Sometimes a new driver can “break” the operation of the device. How to restore an old driver version (roll back) is described below.
When downloading, the driver must be saved in a separate folder, on the Desktop or on disk, so that it can be easily found.
[1]How to remove a driver: Open the Properties window in Device Manager, go to the Driver tab and click Uninstall a device, then Uninstall. No, nothing will explode. Once the device is removed, unplug it from the USB port and reinsert it.
[2]How to install the driver: First, uninstall the current driver if installed. How to do this is described above. With a new connection, this device may appear in the “Other devices” section (question icon). Next, in the “Driver” properties tab of this device, select “Update driver”, then “Search on this computer”, then “Select a driver from the list of already installed drivers”, then “Install from disk”, then “Browse” and select a separate folder with your driver. Then click "OK" and wait for installation.
[3]How to roll back a driver: In the “Driver” properties tab of this device, select “Roll Back” and click “Yes”. Sometimes you may be asked for your opinion right at the window. Select “For another reason” and write something.
the Intel Driver and Support Assistant program helps , which automates the search process and searches for the driver itself, installs it and restarts the computer.
If you have a laptop
For owners of laptop computers, there are separate points related to energy consumption:
- Disable the USB port from being disabled. To do this, using Win+R, type powercfg.cpl and press Enter. The Power Options window appears. Then, next to the selected option, click “Configure power plan”, then “Change additional power settings”. Expand “USB Settings” – “Settings for temporarily disabling the USB port” and set “Never” for all items from the list. Then click "Apply".
- Disable disabling in Device Manager. To do this, in Device Manager, expand the previously specified “USB Controllers” section and for each device in the “Power Management” tab, uncheck “Allow the computer to turn off this device to save power.”
That's all for today. If this article helped you, please leave a comment or share with someone with a similar problem.