Published on 06/22/2017 80 Comments
A local network between two computers is an excellent way to conveniently and quickly transfer files. It can be used both for home use, connecting several computers at home, and for work purposes. And despite the fact that Windows 10, like previous versions of Windows, has all the necessary tools for creating and configuring a local network, the procedure for creating it is somewhat complicated for ordinary users.
- 2 Creating a LAN using a cable
2.1 Video: creating a LAN between computers in Windows
- 4.1 Adding a new device
- 5.1 Video: deleting a local network in Windows 10
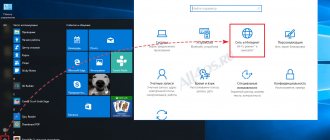
Setting up LAN in Windows 10
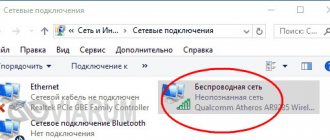
You connect to the router with a cable or over the air - make sure that the network card (adapter) has received TCP/IP and DNS server addresses from the router:
- Open “Network Connections” and find there the network card through which the computer is connected to the router.
- Expand the properties of the adapter, and in them - the TPC / IP protocol.
- Make sure that all values are obtained automatically.
All adapter parameters must correspond to those shown in the picture
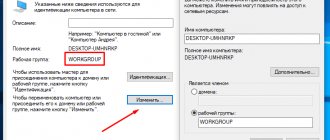
Next, you need to make sure that all Windows devices connected to the network have the same workgroup selected:
- Open the “System” window using the Win+Pause key combination on all clients on the network and check whether the name of the working network matches.
All computers on the network must have the same workgroup name
- If the workgroup names of the machines are different, we change the parameters so that the group name is the same for all clients.
If the names of the working network between devices do not match, they need to be changed and brought to a single option
- Also make sure that the names of the computers in the DS are unique (different). If this is not done, a conflict of network resources is inevitable and the operation of the LAN will be impossible.
Possible problems
For many users, setting up a network is a complex process that causes a lot of difficulties even if all the instructions are followed. Below we consider the most common problems and offer solutions:
- When trying to open a file (folder) on the local network, a password is required. To resolve this issue, you need to check your sharing settings and disable password protection for your data.
- One PC does not see the other. This error is also resolved by correcting the access settings, where each item must be allowed.
- Both devices cannot see each other. If everything is in order with the access and display settings, then try activating the IPv4 protocol in the network connection settings.
Be that as it may, any problem associated with LAN is an error at one of the setup stages. Be sure to check each item and set the correct parameters.
How to disable network discovery
Network discovery is a mechanism that allows computers on a network to see other machines, their network drives and printers. If you don't want your machine to be visible on your home network, it's best to turn off network discovery.
- Check your account. The sections of the control panel we need are available only to the administrator.
- In the Control Panel, open the Network and Sharing Center, and from it open the dialog box we need.
Network Sharing Center in Windows 10 gives you access to disable network discovery
- For each network profile (private, guest, or all networks), enable or disable network discovery.
Disable network discovery for the selected profile
- Save the changes using the button of the same name at the bottom of the screen. There is no need to reboot the OS; network discovery will be disabled immediately.
conclusions
After these manipulations, your Windows 10 should see the computers in its group and gain access to all open folders. This is how to briefly set up a local network using Microsoft operating systems. In reality, everything may look different: the article provides only general principles.
For example, without a router (with a DHCP server enabled and automatic distribution of addresses), two computers can be connected by a patchcord. In this case, after the first stage of setup, you will need to register IP addresses manually. This is done in the properties of the network adapter and the properties of Internet Protocol version 4. It's the same for Windows 10, 8, 7 and even XP.
See also: How to activate Windows 10
An IP of the form 192.168.0.* is registered (for each computer the last digit is unique, except for 0 and 1. You can use, for example, 5 and 7, Subnet mask 255.255.255.0 and default gateway 192.168.0.1. 192.168 is indicated as DNS servers. 0.1 and 192.168.0.0 (optional) If the router has DHCP disabled, a similar setting must also be done.
Home network does not work: causes and diagnostics
The network is both a technically and programmatically complex organism, equipment that ensures round-the-clock uninterrupted operation and costs a lot of money. In the home segment, the class of equipment is lower and it is prone to failures and malfunctions. All this leads to loss of network functionality. Let's take a quick look at the main mesh problems and how to fix them.
Router malfunction
Most home routers are made in compact plastic cases. Electronic components operate in a very severe thermal regime, almost “to the limit”. The hot season adds 10–15 degrees to the temperature of the device and the router freezes. Along with it, the entire home network loses its functionality. Symptoms include the inability to log into the router’s web interface and lack of access to the Internet and network resources. To restore the network, you need to turn off the router and let it cool down, but this is a palliative measure. A radical solution to the problem would be to improve the heat transfer of the router by creating additional ventilation holes and installing a fan for airflow.
Installing additional fans will help your router overheat significantly less and work longer
Operating a router in severe thermal conditions not only makes the network unstable and glitchy, but also reduces the lifespan of the router itself by 3–4 times.
Damage to the network cable
Pets, curious children, or just a wife with a mop can instantly render a network segment inoperable by damaging the wire that connects the computer to the router. If only one client has lost access to the network, the problem is most likely in the cable. Disconnect the connectors, carefully inspect them and the wire itself. If the RJ-45 plugs are damaged, you can cut them off and crimp new ones. If the wire itself is mechanically damaged, you need to replace it entirely. Twisted or soldered connections will lead to network errors and a drop in speed to a snail's pace.
Inexpensive twisted pair UTP is designed for installation in protected cable boxes. If the cable is laid along the baseboard and is poorly secured, it can be easily damaged
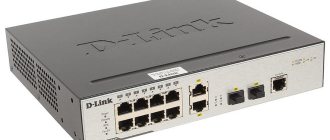
What is required to combine two or more computers
To connect two computers, 2 laptops, or a computer and a laptop together, we need:
- Network cable, crimped on both sides (patch cord). If you suddenly decide to crimp it yourself, then look at how to do it correctly in our article: the procedure for crimping twisted pair cables, all the diagrams.
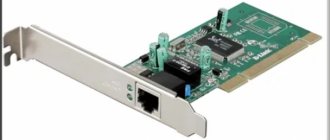
- If you need to connect two desktop computers, then make sure there are two network cards, one on each PC. But it won’t be difficult to connect any two laptops to each other, because there are definitely network cards there.
Checking the connection between your computers over the configured network
After setting up the network cards, you can check the connection between the devices. Right now we will show you how to check it between computers.
- On any custom PC, go to “ Search ”, enter “ cmd ”, “ Enter ”.
- A command line will appear, write in it the IP address of the second computer. For example: ping –t 192.168.10.11 .
- If your computer and laptop are connected correctly, then you should see “ Answers ”.
- But if it says “ The specified node is unavailable or the timeout interval for the request has been exceeded ,” this means that either you entered the command line incorrectly, or there is no connection with the second device. In this situation, you will not be able to quickly connect a computer to a laptop; first you need to find the problem.
Tracert
Windows 10 also includes tracert (Trace Route).
It is a diagnostic tool to determine the network path to a destination using a series of ICMP echo requests. However, unlike the ping command, each request includes a TTL (time to live) value that is incremented by one each time, allowing you to display a list of the route taken and the duration. To trace a route to a destination using the command line, follow these steps:
- Click on the "Start" button.
- Search for cmd and right-click on “Run as administrator.”
- Type the command to understand the path to the destination and press enter: tracert IP-OR-DOMAIN
In the command, replace IP-OR-DOMAIN with the actual IP address or domain name of the destination you want to troubleshoot.
For example, this command allows you to view the path that packets take to reach Google.com: tracert google.com - Not necessary. Type the commands to configure the number of hops to the destination and press enter: tracert -h HOP-COUNT IP-OR-DOMAIN
In the command, replace IP-OR-DOMAIN with the actual IP address or domain name of the destination you want to troubleshoot, and HOP-COUNT with the number of hops you want to track.
For example, the following command sets a limit of five hops (nodes) to the destination: tracert -h 5 google.com
After completing these steps, you will know if your destination is accessible or if there is a network problem along the way. Like the ping tool, tracert includes several options that can be viewed using the tracert /? command. team.
ARP
Windows 10 maintains an arp (address resolution protocol) table, which stores IP entries in the Media Access Control (MAC) that the system resolves.
The arp tool allows you to view the entire table, modify entries, and use it to determine the MAC address of a remote computer. Typically you don't need to worry about MAC addresses, but there are scenarios where this information can come in handy. For example, when troubleshooting network problems at the data link (switching) level or when restricting access or filtering content through the network for certain devices.
To get started with arp on Windows 10, follow these steps:
- Click on the "Start" button.
- Search for cmd and right-click on “Run as administrator.”
- Type the following command to view the current arp table cache in Windows 10 and press enter: `arp -a'
4. Type commands to determine the MAC address of the remote device and press enter: arp -a IP
In the command, replace IP with the destination address.
For example, this command shows the physical address of the destination 10.1.4.113: arp -a 10.1.4.108 - Confirm the MAC address (physical) of the remote device.
After completing these steps, you will be able to view the entire arp table and MAC address of a specific IP address. If you want to know all the available options, use the arp /? to display a list of all parameters with descriptions.
Route
The Routing Tool displays a routing table that allows Windows 10 to understand the network and communicate with other devices and services.
The tool also offers some options to modify and clean up the table if necessary. As with the arp tool, there is usually no need to worry about the routing table. Still, this command line tool comes in handy when troubleshooting problems.
To view or clear the routing table in Windows 10, follow these steps:
- Click on the "Start" button.
- Search for cmd and right-click on “Run as administrator.”
- Type the command to view the routing table in Windows 10 and press enter: route print
- Confirm the routing table information.
- Not necessary. Type the command to clear the routing table and press enter: route -f
Note:
When running this command, the device will lose connectivity to the network because the system no longer understands the network topology.
After running the command, reboot your computer to allow the network stack to rebuild the routing table.
There is usually no need to clear the table unless you have changed some records and you need to reset the table. After completing these steps, you will understand what a routing table is and how to clear the information.
You can also use route /? to view a list of available options, including options to change network metrics, specify a gateway, add a new route, and more. However, it is generally not recommended to change these settings unless you understand how the network works.
NSLookup
The nslookup (name server lookup) tool can provide valuable information for troubleshooting DNS-related problems.
The tool includes interactive and non-interactive modes. Most often, you will use non-interactive mode, which means you will enter a complete command to get the information you need. You can use this command to display the default DNS name and address of the local device, determine the domain name of the IP address, or name servers for a specific host.
To get started with nslookup on Windows 10, follow these steps:
- Click on the "Start" button.
- Search for cmd and right-click on “Run as administrator.”
- Type the command to lookup the local DNS name and address, press enter: nslookup
Note:
This command is also used to open nslookup interactive mode. - Confirm your current DNS information.
- Type the following command to exit interactive mode and press enter: exit
- Type a command to determine the name and address of a specific server, press enter: nslookup IP-ADDRESS
In the command, replace IP-ADDRESS with the address of the remote device.
For example, this command looks for the IP address 172.217.165.142: nslookup 172.217.165.142 - Type the command to determine the address of a specific server and press enter: nslookup DOMAIN-NAME
In the command, replace DOMAIN-NAME with the address of the remote device.
For example, this command looks up the IP address of Google.com: nslookup google.com
After completing these steps, depending on the command, you will know whether the device has a DNS resolver and an IP address or domain, and vice versa, a remote host.