Author of the article
Sergey Sakadynsky
He worked in the field of IT consulting, was engaged in the creation and administration of Internet resources. 10 years of experience in designing and maintaining computer networks.
Connecting to Wi-Fi is usually not difficult even for novice users. But it happens that problems arise: the computer does not see the network or there is no connection icon. In this article we will figure out how to connect Wi-Fi on a laptop with Windows 7.
Checking the adapter and drivers
In order to connect a laptop to a wireless network, it is necessary to have a Wi-Fi adapter installed and configured correctly. On new laptop models it is present by default. But if you have an old laptop or netbook that is already ten years old or more, it may well be that the manufacturer saved on this part. It also happens that the adapter is installed, but fails. In this case, the problem is solved by purchasing an external module that is connected to a USB port.
First of all, make sure you have a Wi-Fi adapter on your laptop. If you have documentation for your PC, its hardware will probably be described there. Also on the case there may be inscriptions and stickers depicting the antenna.
But you can check the adapter through the laptop settings. Right-click on the “Computer” icon on the desktop and select “Properties” or press the Win+Pause keys on your keyboard. In the window that opens, on the left, click the “Device Manager” section. Find "Network Adapters" and open it. There should be something like “wireless network adapter” or “Wireless Network Adapter”. If the device is displayed correctly and there is no yellow triangle with an exclamation point or cross next to it, then it is working normally.
It happens that you can’t turn on Wi-Fi, and you see an unknown device in the list of equipment.
Most likely, you do not have the drivers installed. There are several options here. If your laptop comes with a software CD, you can install the necessary drivers from it. Nowadays, manufacturers rarely write documentation and software onto discs. And CD/DVD drives were almost completely abandoned. All necessary files can be found on the Internet. Go to your laptop manufacturer's website and find the software you need by model.
If you couldn’t find the driver or you don’t know exactly what you need to download, use the DriverPack Solution program. She will determine what equipment you have and install software for it.
When the adapter is configured and working, a ladder icon should appear in the tray.
If it is not there, the adapter may be disabled.
How to install software for a Wi-Fi adapter
A driver is a program through which the OS receives data about the type of connected equipment and its purpose. It ensures the proper functioning of a laptop, computer and other devices with an operating system.
Quite often, failures in the wireless network appear after the system is cleaned of viruses, after reinstalling the equipment or the operating system itself. At this time, settings may be deleted. If a problem is detected, the presence of a driver on the laptop is determined.
To do this proceed as follows:
- Enter “Start” and then “Computer”;
- Go to the appropriate section of “System Properties”;
- Open the “Device Manager” tab. This section contains the inscription in English “Wireless Network Adapter”. Click on it and go to “Driver”. When there is no content, install the driver on the laptop.
Key combination for different models
Laptops have a function to disable the Wi-Fi adapter. The absence of a tray icon or a crossed out icon may mean that it is disabled.
To enable the Wi-Fi adapter, you need to use a keyboard shortcut. Each manufacturer has its own. Most often you need to press the Fn button and at the same time the button with the antenna icon. Usually this is one of the F1-F12 keys. If there is no antenna icon, use this tip.
| Laptop manufacturer | Keyboard shortcut to activate Wi-Fi |
| Asus | Fn+F2 |
| Lenovo | Fn+F5 |
| HP | Fn+F12 |
| Acer | Fn+F3 |
| Samsung | Fn+F9 |
| Toshiba | Fn+F12 |
In most cases, these keyboard shortcuts work. But on some models, especially if you have an older laptop, there may be other options. Please note that some laptops do not have an Fn key at all and Wi-Fi cannot be turned off from the keyboard. And others may have a separate button on the body.
Automatic connection
When the Wi-Fi adapter is turned on, you can connect to a wireless network. In Windows 7, you need to click on the Wi-Fi icon in the tray to do this. A list of available networks will open. There are two options here. The first is a passwordless WPS connection. To do this, click on the icon in the corner in the form of two arrows and the same button on your router.
If WPS does not work on your network, click on the network name and click the Connect button. A window will appear asking you to enter a password.
That's all. Wait until the connection is established. The computer will remember the network and in the future will connect to the Internet itself if the “Connect automatically” checkbox is checked.
How to connect a Wi-Fi adapter to a laptop
Let's say you're tired of getting tangled wires. This problem can be easily solved by purchasing an external wireless network adapter. This is the simplest and most affordable option.
For the best signal, you should give preference to devices with an antenna. There are adapters with two ranges. They are only relevant if home computers support the 802.11ac standard. Of course, you also need to purchase a router operating at 2.4 and 5 GHz frequencies.
You must plug the wireless network adapter into the USB port on your PC. It is better to use the 3.0 connector for the highest speed. 2.0 will do as well.
As for drivers, they are usually already in the laptop. Manual installation will be required on Windows XP. However, there are not many users of this operating system left at the moment. If you need to install drivers, a disk will be included with the adapter.
The device is configured as follows: go to the device settings (Wi-Fi adapter properties). A software update is available here. Then connect to Wi-Fi. At the bottom of the screen on the right, click the network connections icon, select the one you need from the list and click “Connect”. If necessary, enter a password. Check the presence of an Internet connection.
Manual connection
If there is no “ladder” icon in the tray, and instead you see a crossed-out monitor or there is no connection symbol at all, you need to enable Wi-Fi manually. In seven, this can be done in two ways.
Right-click on the connection icon in the tray and select “Network and Sharing Center.” In the window that opens, on the right, click the “Change adapter settings” link. Right-click on the wireless connection icon and select “Enable”.
Another option is to use Device Manager. Find your network adapter there, right-click on it and select “Enable”.
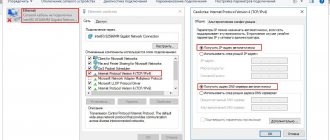
To connect, your PC must automatically obtain an IP address. This option is enabled by default, but check it just in case. To set up a Wi-Fi connection on a Windows 7 laptop, open Network Center, click "Change adapter settings", right-click on your wireless network card and select "Properties". In the window that opens, find the TCP/iP v4 protocol, click on it and then on the “Properties” button. The settings should be the same as in the screenshot.
Now you can connect to the wireless network using the method described above.
Procedure for Windows XP
The following sequential steps must be followed:
- Through “Start”, enter the “Control Panel”;
- Next, go to “Network Connections”;
- Then, in the window that appears, call up the context menu for the wireless connection and click on the “Properties” line;
- Open the “General” tab;
- Next, in the “Components” section, click on “TCP/IPv4 Protocol”;
- Click “Properties”;
- Activate receiving IP, DNS automatically or print them (depending on the router parameters);
- Exit the protocol properties and open the “Wireless Networks” tab;
- Set the network through which you plan to access the World Wide Web and click “Connect”;
- If Wi-Fi is protected by an access code, you will need to type it and press “Enter”;
- Ready"! Now you can go online.
How to connect to a hidden Wi-Fi network
If you connect to a network whose name (SSID) is hidden by the router’s security settings, you will not see it in the list. To connect to a hidden Wi-Fi network on Windows 7, click on the connection icon and find the “Other networks” item. Click the “Connect” button.
You will first need to enter the network name and then the password.
You only need to do this once. In the future, the laptop will automatically connect to the hidden network when it is within its coverage area.
How to position and turn on the router?
First, let's look at the places where it is strictly not recommended to install the router (otherwise it may not work correctly):
- The first and basic rule is not to place the router near other devices that operate at frequencies from 2 to 6 GHz (cordless phones, microwave ovens, wireless extenders, etc.). The explanation for this is very simple - two devices operating on the same wavelength interfere with each other.
- There is no need to place the router at a short distance near reflective surfaces, for example, a mirror. In this case, the signal will be much worse or disappear altogether.
- It is advisable to have as few electrical devices as possible between your access point and your laptop.
- It is best to avoid installation near a load-bearing wall.
The recommended location for installing the router is a wall, the higher the better. Very often, the routers themselves already have special grooves, so you don’t need to drill a hole.
Setting up the router
If your router is not configured to distribute Wi-Fi, you will not be able to connect to the Internet. You will need to go to its web interface to set the necessary parameters.
Connect to the router using a cable. Open any browser and enter the router's IP address in the address bar. Most often this is 192.168.0.1 or 192.168.1.1. This information is usually found on a sticker on the bottom of the device. There you will find the default login and password. Use this data if you have not changed it. Or enter the administrator password that was set when setting up the Internet.
Using the example of a D-Link router, I’m telling you how to set up a wireless network. The menu of routers from other manufacturers looks different, but the parameters are set in exactly the same way.
- Open the Wi-Fi “Basic Settings” tab.
- The “Enable wireless connection” and “Broadcast wireless network” checkboxes must be checked here. You also need to specify a network name. You don't have to change it, just leave it as it is by default.
- Then go to security settings. Enter your passkey here. Do not change any other parameters.
- Save all changes and restart the router. You can now connect to the wireless network.
Please note that some routers have a button to turn on Wi-Fi. It is located on the side or back of the case, and on some models on the top panel. If it is in the "Off" position, the wireless network will not be broadcast.
Forgot your password or it doesn't work
If the router is fresh out of the box and has not yet been configured, then the password is on a label under the device. Otherwise, you can make a connection via WPS. For this:
- We find the WPS button on the back of our Wi-Fi machine. It can be combined with the reset button or located on the side or on the top cover of the device. On Zyxel routers, a similar button is located at the top and has a Wi-Fi wave icon.
- Press it for 2-3 seconds, no more.
- Now we are looking for available connections and trying to connect. Next, a window will appear where you will need to enter the PIN from the WPS network. It is located on the label. But if it’s not there, then just click on the same button once and the password request will disappear.
If you don’t remember it, you will have to reboot the router to factory settings and configure it again. This is done very easily and instructions for each model are on our website. Just enter the name of your router into the search bar (it's located in the upper right corner).
Possible problems
If everything is done correctly, and Wi-Fi on a laptop with Windows 7 still does not work, the reasons may be the following.
- The laptop does not see the Wi-Fi network. There is a connection icon in the tray, the adapter is displayed in the device manager. The PC may be too far from the signal source. Place it closer to the router or increase the signal strength on the router.
- If this does not help, the wrong drivers may be installed. Download the latest version.
- When this does not help, most likely your adapter has failed. Only replacing or purchasing an external module will help here.
Possible problems with the wireless signal receiving device
Often, even after the correct procedure for turning on the WiFi adapter, there is still no wireless connection. This problem occurs due to the following circumstances:
- Incorrectly installed software (problem with drivers);
- Computer damage by malicious software (viruses);
- OS operating errors.
It is necessary to establish the cause and solve the problem, since without this the laptop will not be able to establish a wireless connection. Most often, reinstalling drivers leads to a successful solution to such difficulties, however, sometimes, without completely curing the computer of viruses, it is not possible to restore the connection.
Features of connecting different laptop models
Different laptops have different methods for turning on Wi-Fi. Let's look at the features of devices from the most popular manufacturers.
HP
Laptops from this manufacturer used to have a wireless mode button next to the keyboard. If it is not there, use the Fn+F12 key combination.
On the latest models, the Wi-Fi touch button is often found.
Asus
On older Asus laptops there was a Wi-Fi module switch with two positions. It was usually located above the keyboard. It must be switched to the ON position.
Modern models do not have such a switch. To turn on Wi-Fi, press the Fn+F2 keys simultaneously.
Lenovo
Lenovo has a Wi-Fi switch located on the side or front of the case.
The Fn and F5 key combination is also used. Some models provide the Fn+F3 combination.
ACER
Some Acer laptops have a Wi-Fi button. And sometimes there is also an additional WPS button.
On the keyboard you need to press Fn and F3.


