Recently, due to the emergence of information about massive hacking of wireless networks, paranoia has prevented some people from living in peace. One way to protect yourself is to hide your WiFi network from prying eyes. That is, it will not appear in the list of available ones when searching on connecting gadgets. I should note that Wi-Fi disguise is not a panacea, just like other methods of protection separately. All of them give maximum effect only in combination and subject to basic information security rules. Otherwise, individually, at best, it only works against illiterate hooligans, but it still won’t stop a more or less advanced person, and it can add certain problems to you. But let's talk about everything one by one.
What is hidden WiFi network and invisible SSID?
The essence of a hidden wifi network with an invisible SSID is that if someone wants to illegally pick up the key and use your Internet for their own purposes, they will not see it in the list of signals available for connection. In fact, purely physically, your network does not disappear anywhere, its name is simply not displayed. That is, the connection will exist and you will use the Internet as before. But the wifi name will not appear on any device that searches for it. Only someone who knows exactly its hidden SSID and password will be able to connect to it.
How to make a Wi-Fi network invisible
If there is some “home-grown” hacker living in your neighborhood or someone who likes to use someone else’s Internet at someone else’s expense, I recommend that you secure your Wi-Fi network settings and make it hidden. Those. It will be possible to connect to it, only to do this you will need to know not only the password, but also the name of the network (SSID, a kind of login).
We will demonstrate this setting using the example of three popular routers: D-Link, TP-Link, ASUS.
1) First, enter the router settings. In order not to repeat myself every time, here is an article on how to do it: .
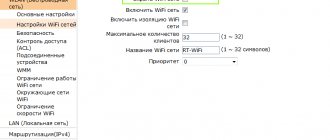
2) To make a Wi-Fi network invisible, you need to uncheck the box next to “Enable SSID Broadcast” (if you use English in your router settings, then it probably sounds like this; in the case of the Russian version, you need to look for something like “hide SSID").
For example, in TP-Link routers, to hide the Wi-Fi network, you need to go to the Wireless settings section, then open the Wireless Settings tab and at the very bottom of the window uncheck Enable SSID Broadcast.
After that, save the router settings and reboot it.
The same setting in another D-link router. Here, to enable the same feature, you need to go to the SETUP section, then go to Wireless Settings. There, at the bottom of the window, there is a checkbox that needs to be enabled - “Enable Hidden Wireless” (i.e. enable the hidden wireless network).
Well, in the Russian version, for example in an ASUS router, you need to set the slider to the “YES” position, opposite the item whether to hide the SSID (this setting is located in the wireless network section, the “general” tab).
By the way, no matter what router you have, remember your SSID (i.e., the name of your wireless network).
3) Well, the last thing you need to do is to reconnect in Windows to an invisible wireless network. By the way, many people have questions about this item, especially in Windows 8.
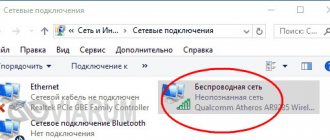
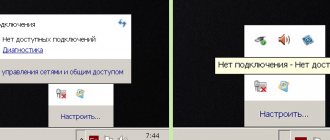
Most likely, you will see the following icon: “not connected: there are connections available.”
Right-click on it and go to the “Network and Sharing Center” section.
Next, select “Create and configure a new connection or network.” See screenshot below.
Then a window should appear with several connection options: select a wireless network with manual settings.
We actually enter the network name (SSID), security type (which was set in the router settings), encryption type and password.
The epilogue to these settings should be a bright network icon in the tray, signaling that the network is connected to the Internet.
That's all, now you know how to make your Wi-Fi network invisible.
Good luck!
The nuances of hiding
To exclude an access point from network discovery, it is assumed that you already have a router installed and configured for Internet distribution via Wi-Fi. You also have access to the router’s admin panel, which you can access through a browser. The function is available if you use a login (SSID) and password to connect to Wi-Fi.
Once the hiding feature becomes active, the wireless network connection will be interrupted on each connected device, and you will have to enter the SSID and password again.
Hiding SSID on TP-Link
On TP-Link WR740N, 741ND, TL-WR841N and ND routers and similar ones, you can hide the Wi-Fi network in the “Wireless Mode” - “Wireless Mode Settings” settings section.
To hide the SSID, you will need to uncheck and save the settings. When you save the settings, the Wi-Fi network will be hidden and you can disconnect from it - in the browser window this may appear as a frozen or unloaded TP-Link web interface page. Simply reconnect to the now hidden network.
How to set up access control on a MERCUSYS AC router?
1. Log in to the web management utility. If you don't know how to do this, click on the link below:
How to log into the web-based management utility of the MERCUSYS AC router?
2. In the Advanced Settings section, go to menu Network Management → Access Control , then you can configure access control in the window that appears.
To add a new rule, follow these steps:
1. Enable the Access Control function.
2. Select White list or Black list .
3. Click Add and enter a short description of the rule.
4. Click Configure in the Monitored Devices to add the device, then click Apply .
Node Description - In this field, create a unique description for the node.
Mode - two options: IP address and MAC address . You can select any of them from the dropdown list.
If IP Address , the following field appears:
IP Address Range —Enter the host's IP address or address range in decimal format (for example, 192.168.0.23).
If MAC Address is selected, the following field will appear:
MAC Address —Enter the host MAC address in the format XX-XX-XX-XX-XX-XX (for example, 00-11-22-33-44-AA).
5. Click Customize in the Goal , you can select Any Goal or Add to add a new goal. Then click Apply .
Description - In this field, create a description for the goal. Please note that this description must be unique.
Mode - two options: IP address and website domain. You can select any of them from the dropdown list.
If IP Address , you will see the following options:
IP Address Range —Enter the IP address (or address range) of the target(s) in decimal format.
Common Service - Some common service ports are listed here. Select one from the drop-down list and the corresponding port number will be filled into the Port field automatically. For example, if you select HTTP , the value 80 will be entered in the Port field automatically. Port - Specify the port or range of ports for the target. For some common service ports, see Common Service above. Protocol - three options: All, TCP and UDP. Select one from the drop-down list for the target.
If Website Domain , you will see the following options:
Domain Name - Here you can enter 4 domain names, full name or keywords (eg Mercusys). Any domain name with keywords in it (www.mercusys.com) will be blocked or allowed. 6. Click Customize in the Schedule , you can select Any Time or Add to add a new schedule. Then click Apply .
Description - In this field, create a description for the schedule. Please note that this description must be unique.
Time - Click and drag across the cells to specify the required time for the rule.
7. Click Save to complete the setup.
For more detailed information on each feature and setting, go to the Support page to download the user manual for your device model.
Why make the network invisible?
What is the reason? Why do people resort to installing such a regime? The most common answer is to increase the security level of your Internet network. Many people believe that setting a good password is enough to solve this problem. But if anyone is tormented by paranoia in Internet matters, resort to the tips in this article and make your network invisible. This is not a very difficult manipulation. For a more detailed description, it is worth resorting to a real example - the Tp-link TL-WR841N rotor.
Upon completion of all stages of hiding the name of your network, one obvious change will occur - the connection process will become different. Those gadgets that you have and that you want to connect to your router will have to be slightly tortured. And not only them, but also yourself. This means that access to the wireless Internet can only be achieved through manual configuration. Quite an inconvenient procedure.
Securing your wireless network
Since at the beginning of the article I said that WiFi masking is not a complete way to protect it, I will give three basic recommendations that will allow you to maximally protect your home wireless network:
- Use WPA2 standard with AES encryption.
- Set a complex network key consisting of numbers and letters of the Latin alphabet, at least 8-10 characters long.
- Disable WPS and UPnP functions. They contain many vulnerabilities that allow you to bypass the security methods used.
- Change the password for entering the settings of the router or access point.
Only compliance with all these four requirements guarantees that you will not be hacked by any computer hooligan who turns up.
How to hide other WiFi networks
Windows doesn't allow you to hide WiFi networks through its user-friendly GUI. As nice as it would be if you could just right-click on the network you want to hide and hit the Hide/Block button, that's not what we have.
Instead, you need to run several commands through the command line. It's a fairly simple process if you follow the steps carefully.
- Open Command Prompt as an administrator by searching for cmd in the Start menu, right-clicking it, and selecting Run as administrator. If you're using Windows XP, you can simply open Command Prompt from the Start menu without worrying about administrator rights.
- Enter the following command: netsh wlan show networks
As you can see, all the wireless networks that your computer can connect to right now are listed.
- Identify the WiFi network you want to hide and write down its SSID. The one we will hide is called HTC_9EF2. Note: Windows sometimes has trouble identifying all nearby networks. If you're looking for the SSID of a network you've seen before but don't see now (perhaps due to weak signal strength), use a WiFi scanner like WifiInfoView to generate a more comprehensive list.
- Open Notepad or another text field, paste the following command into it and replace our SSID with the one you want to hide (don't forget to enclose it in quotes): netsh wlan add filter permission=block ssid=»HTC_9EF2″ networktype=infrastructure
- Go back to the command prompt and enter this command. You can do this by right-clicking the black space and selecting Paste. The response should be: The filter has been successfully added to the system.
- This particular WiFi network will be hidden. As you can see, if we repeat the command that shows the networks, it is no longer there.
You can repeat these steps for each network you want to hide.
If there are several that you want to hide, you can run another command to add multiple networks to the block filter at the same time.
This is definitely a time saver, but please know that if you continue with these steps, you will have to undo the command if you ever want to see other networks again, for example if you move your laptop to another location or change the SSID to your network .
- Add the network you want to see/allow (replace NETWORKNAME with SSID): netsh wlan add filter permission=allow ssid=”NETWORKNAME” networktype=infrastructure
- Block any other network: netsh wlan add filter permission=denyall networktype=infrastructure
Connecting to a hidden point
To log in through a hidden Wi-Fi network that is not accessible for scanning, you need to know its SSID and then enter the password. Depending on the operating system used, connection variations will differ.
Windows 10
Authorization goes like this:
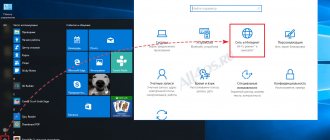
- In the taskbar (bottom right), click the notifications icon, select Network, and click Network and Internet options.
- In the new window, select Manage known networks.
- Select "Add a new network."
- Enter your login and then your password.
Windows 7
In the popular “seven” authorization is done like this:
- Right-click on Start and select “Control Center...”. In it, click the item corresponding to the screenshot.
- Select your wireless network connection manually.
- Then enter “Name…”, “Security Key” (password), check the “Connect…” checkbox on the last item and click “Next”.
If a connection error occurs, remove the mention of this Wi-Fi point and try again.
Android
Watch video instructions here:
Authorization of tablets, smartphones and TV boxes follows the following scenario:
- Go to the Wi-Fi section, activate the function and go down to the end of the list.
- Select "Add...".
- Set the protection that is used at the configured point. Typically this is WPA2-PSK.
- Enter “Name” and “Password” and wait for a successful connection.
To connect to iPhone:
- Open in Wi-Fi settings.
- At the bottom, click on “Other...”.
- Select the WPA2 security option, then enter the SSID and password.