This guide shows you the steps you can take to set up a second monitor in Windows 10.
The Windows 10 operating system supports multi-monitor systems of various configurations by default, so you don't need to install third-party software to set up multiple displays.
The need to use a second monitor is primarily to expand the workspace, which in some cases makes it easier to perform multiple tasks simultaneously.
It is important to note that some video cards do not support multiple monitors, and that older displays may not always connect automatically.
The rest of the article discusses the settings of various parameters when connecting a second monitor to a computer.
To connect a second monitor, you need a computer (laptop) or video card with an additional video signal output to an external display using various connectors, such as HDMI, VGA, DVI port or DisplayPort, as well as a corresponding cable that connects the monitor to the connector (port).
How to use a second monitor on Windows 10
Typically, the 10 will automatically detect the second monitor, so it will be ready to use right away. If this does not happen, you will have to configure the hardware first: after connecting the second monitor, press the and [P] keys at the same time. Here are some options for further action:
- If you want to use both monitors at the same time, you'll be interested in the Duplicate and Extend options.
- The duplication element displays the contents of the first screen on the second screen.
- With the extension option, creates an additional empty desktop on the second screen. To access the second display, move the mouse pointer to the right edge of the screen. Then you can simply move programs and windows from left to right.
Projecting Windows 10 how to connect a second screen
To connect a second screen, you need to open the notification center
to do this, click on the icon that looks like a leaf.
In the window that opens, click - Project
.
Attention! be careful. You only need to adjust the projection after you connect the second screen!
Notification Center, click Project.
Now the new window that opens will display 4 types of possible projection.
Option #1 Computer screen only
. In this case, only the screen of this computer is connected.
Option #2
Repetitive
. In this case, the image on the second screen (monitor) will be exactly the same as on your computer.
Option #3 Expand
. Using this projection feature in Windows 10, you can combine one image (picture) from multiple screens.
Option #3 Second screen only
. With this method, only the 2nd screen connected to the PC will be active. The main computer screen will not be active.
Selecting a display option
To change the display on your monitors, press Windows key + P. Here are the options you can choose from.
View items on only one monitor.
Computer screen only
View the same elements on all monitors.
View your desktop on multiple screens. When you expand your monitors, you can move elements between two screens.
View everything only on the second monitor.
Second screen only
Preparatory steps before setting up a second monitor in Windows 10
Before connecting a second screen to a PC with Windows 10, you need to make sure that the selected monitor contains VGA, HDMI, DVI standards, which are also available on the rear interface panel of the system unit itself (the video card must support the ability to connect two displays). Thus, when connecting 2 monitors, the user can use different plug connectors. It is recommended to install the main screen that has the best characteristics.
The first thing you need to do is connect both monitors to your Windows 10 PC using the appropriate cables.
After connecting a second display, you can adjust the clarity (and other parameters) and the position of the desktops on the monitor.
Setting up a second monitor on a Windows 10 computer
Setting up a second monitor on Windows 10 is as follows:
- Press “Win + P” to bring up the “Projection” menu and choose how to use the second monitor. A small window will appear.
- Next, select the option of using an additional display. In most cases, the options “Extend” (creating a second empty Windows 10 desktop) or “Repeat” (completely duplicating the contents of the screen on a second monitor) are used.
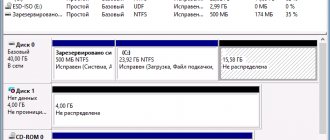
IMPORTANT! If for some reason the installed monitor is not detected by the Windows 10 operating system, you can try to manually force the system to recognize it. To do this, right-click on an empty space on the desktop and select “Display Settings” from the menu that opens.
A new window will open. Under the image of a small monitor, click on the “Detect” button.
Or, you can open “Settings”, “System”, “Display” and perform all the same actions.
If after this manipulation the image does not appear on the monitor, you should change the screen resolution and make sure that the cable is connected correctly.
If the cable is connected correctly, but there is no image, we recommend installing or updating the video card driver. After updating the software, you need to make the following settings in the additional screen parameters:
- Select "Graphics adapter properties".
- A new window will open. The adapter type should contain the name of the video card, not the basic adapter from Microsoft.
- If the video card is not set as the main device, you should click on the “Properties” button and change the settings.
It's important to note that installing a second monitor is not a complicated process. However, you need to be careful when connecting monitors and setting picture display parameters.
Projection
in the
Windows 10
and
how to connect a second screen
.
Hello. Dear readers of the COOL inet website. Today in this post I suggest you analyze one of the functions of the Windows 10 operating system (Windows 10), namely how you can set up projection and connect a second screen to your computer. This could be another screen, a TV, or another PC.
Disable Windows taskbar on second display
The process is very simple and within a minute you can get rid of the taskbar on your second screen. All you need to do is follow these steps:
- Open Settings and go to
- Click Taskbar in the left menu.
- Scroll down to find multiple displays .
- Now turn off the switch that says Show taskbar on all screens.
That's all it does is disable the taskbar on all secondary displays. Remember that these settings will only work if you are running the second screen in Advanced . If you're in Duplicate , this option won't work, but you can set your taskbar to Auto Cover so it doesn't show up.
If you're having trouble figuring out which screen is the primary screen and which is the secondary screen, you can follow these steps:
- Open Settings and go to System .
- Now open Show in the left menu.
- You can now select the display you want and make it your primary display as required by your settings.
It was all about disabling the Windows taskbar on the second monitor. The steps are simple and self-explanatory.
Disabling the taskbar on the second screen has its perks. This is an ideal setup if you use a second screen for presentations.
Solution
I order tests, term papers, dissertations and any other student work here or here.
You need to remove the “left” links from the MySql database table, leaving the links of the my-site.ru domain. Hello. The online store's database has been hacked, and scammers regularly post “perpetual” links to different ones.
How to remove the “Windows XP Professional” logo from the Start menu When you open the Tusk menu on the left, there is a picture on a blue background “Windows XP Professional”, like hers.
Chrome “lost” all bookmarks and passwords and installed “wrong” programs. I went into Chrome, it worked for a minute, then closed, opened in a new window without old bookmarks, etc.
Once you connect your Windows 10 computer to external monitors, you can configure settings for each of them.
Before starting work
Before changing external monitor settings, ensure proper connections. Here's what you can do:
Connect the cables correctly to your computer or docking station.
Check for Windows updates. To check for updates, select Start > Settings > Update & Security > Windows Update > Check for updates.
Tip: If you're using a wireless video adapter, connect to the HDMI port on your new TV, and then wirelessly connect your computer to it. After connecting the wireless display adapter to your TV, go to your Windows 10 PC and select Start > Settings > System > Display and click Connect to a wireless display.
How to connect devices:
- A modern TV is connected via an HDMI cable. Look on the back panel to see if there is such a connector. Some TV models can be connected using Bluetooth, if available.
- If you need to connect a projector, you can do this using VGA or HDMI cables.
- A PC or laptop can be connected using Bluetooth.
How to turn on Bluetooth?
To connect Bluetooth in Windows 10, you need to go to the Action Center
find and click - Bluetooth.
After which this connection will be activated and the corresponding icon will be displayed at the bottom of the screen. Bluetooth connection
Windows 10: Multiple desktops
- To open multiple desktops in 10, click on the "Task View" button on the taskbar. The screen will be darkened.
- Next, select the “New Desktop” option. This will open another desktop where you can work completely independently and use multiple windows at the same time.
This guide shows you the steps you can take to set up a second monitor in Windows 10
The operating system supports multi-monitor systems of various configurations by default, so you don't need to install third-party software to set up multiple displays.
The need to use a second monitor is primarily to expand the workspace, which in some cases makes it easier to perform multiple tasks simultaneously.
It is important to note that some video cards do not support multiple monitors, and that older displays may not always connect automatically.
To connect a second monitor, you need a computer (laptop) or with an additional video output to an external display using various connectors, such as HDMI, VGA, DVI port or DisplayPort, as well as a corresponding cable that connects the monitor to the connector (port).
CONTENT:
Switching between display modes
By connecting the monitors to your computer, you can select the appropriate display mode.
There are four display modes available in Windows 10.
PC screen only
The image will be displayed on the first computer monitor or on the main laptop screen. The second monitor will not be used and nothing will be projected onto it.
Duplicate
The contents of the main monitor are copied to the second monitor. This option is optimal for presentations.
Two monitors turn into one large virtual screen. This makes it possible to display one file, for example, a large photograph, on two monitors.
Second screen only
Only the secondary monitor is used. This mode allows you to check the resolution of the second monitor. Accordingly, if you have a laptop from which the presentation is projected onto a large monitor, then choose this option to get optimal results.
Depending on which device you are using, the appropriate display mode will be automatically selected. When you connect a second monitor to a laptop, the default display style is set to Repeated
When you connect a second monitor to a desktop computer, the default display style is set to
Extend
To quickly switch between modes, press the keyboard shortcut + P, this will bring up the PROJECT sidebar with four options.
You can also select the display mode using the screen options; to do this, open: Screen options
Then, on the right side of the window, click on the Multiple displays drop-down list and select one of the options.
After this, save the selected option.
Setting display options
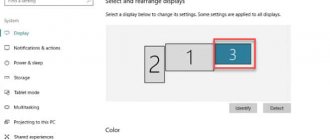
Setting up and managing displays using Windows is very simple, to do this, open: Windows Settings ➯ System ➯ Display, or right-click on an empty area of the desktop and select Display settings from the context menu that appears
Each of the monitors is represented by a small rectangular miniature.
Drag the thumbnails on the screen so that their relative position matches the configuration of the monitors on your desk.
Use zoom to enlarge text and other content. (This is suitable for higher resolutions or for people with vision problems.)
You can also change the desktop resolution.
Select landscape or portrait to change the selected screen orientation.
The multiple display option allows you to switch display modes (as described in the section above).
In additional display settings, you can view general information about connected displays, as well as the properties of the video adapter for the display by clicking on the corresponding link.
Taskbar Settings
When you connect a second monitor, the taskbar appears on all displays by default. You can completely remove the taskbar from one of the monitors or leave only icons of applications running on this monitor on each panel.
To customize taskbars, open: Windows Settings ➯ Personalization ➯ Taskbar, or right-click in an empty area of the taskbar and select Taskbar Settings from the context menu that appears.
To show the taskbar only on your primary monitor, under Multiple displays, set the Show taskbar on all displays switch to Off.
If you prefer the default configuration, where each monitor has its own taskbar, you can set the behavior of these taskbars using the Show taskbar buttons drop-down list:
All taskbars
The default mode where the same panel is present on both monitors.
The main taskbar and the taskbar in which a window is open
In this case, the taskbar on the main monitor contains icons of all running applications, while on the second monitor it contains only icons of applications that are running on it. For example, you launched Microsoft Edge and Word on the main monitor, and PowerPoint and Excel were displayed on the second monitor. The taskbar on your main monitor will now contain icons for Microsoft Edge, Word, PowerPoint, and Excel. On the second monitor there will be only PowerPoint and Excel icons.
Taskbar with a window open
In this mode, the taskbar on each monitor will contain only icons of applications running on this monitor. As a result, if we recall the above example again, only the Microsoft Edge and Word application icons will appear on the taskbar of the first monitor, and PowerPoint and Excel on the taskbar of the second monitor.
Background settings on monitors
With a second monitor connected, you can personalize your desktops.
To configure screen design settings, open: Windows Settings ➯ Personalization ➯ Background, or right-click on an empty area of the desktop and select Personalization from the context menu that appears
Then, in the right part of the window, select a suitable background and right-click on it, in the context menu that appears, select one of the menu items, for example Set for monitor 1
In the same way, select the background for the second monitor.
You can also select the position of the wallpaper from the Select position drop-down list
Today, PC users have two or more monitors in their arsenal. A smaller display is used for working with office applications, while gamers prefer a large monitor for running colorful games. However, having only one system unit, users often wonder how to connect and configure a second monitor in Windows 10.