Most laptops already come with built-in Wi-Fi adapters. You can also purchase a USB Wi-Fi adapter for your desktop PC and use it. The basic idea is that your computer has the ability to connect to a variety of wireless Wi-Fi networks if everything is configured correctly.
However, many users are faced with the inability to find any Wi-Fi networks after upgrading to Windows 10. Some users claim that no wireless networks appear in the list of available connections, despite the fact that everything is configured as it should.
Other Windows 10 users claim that they are unable to identify any wireless networks, and some are experiencing a situation where they are able to join a previously connected network, but other networks remain unreachable. In general, for many users, after upgrading to Windows 10, Wi-Fi breaks.
Reasons for Wi-Fi networks not appearing in the list of available connections
Typically, this problem relates to the drivers for the WLAN card if you have a laptop or Wi-Fi adapter if you use one to receive a wireless network on your desktop PC. Drivers from a previous version of the Windows operating system, i.e. from Windows 7, 8 or 8.1 in most cases cause compatibility problems, since drivers from previous Windows do not always fit the newer version of the OS. In cases of incompatibility or damaged drivers, the WLAN card may simply not work correctly with your computer.
Wi-Fi adapters also have their own regional settings, due to which you cannot join an available network. These regional settings exist to prevent you from joining a Wi-Fi channel whose frequency is outside the frequency range for your region. If your Wi-Fi network is on one of the prohibited channels, then it will not be accessible.
Let's look at the methods by which you can fix problems when searching for a Wi-Fi network on Windows 10, regardless of its cause. However, first you need to make sure that you are within range of the signal and that your network is not masked. Restart your router as a precaution.
Make sure the network card is enabled
Disabling a network card often results in the icon for the corresponding function also no longer being displayed correctly. Instead, a cable or local network symbol appears, with a completely different appearance. There will be no classic image with three divisions for WiFi networks.
The procedure for solving the problem is usually described as follows:
- Go to the Start menu. This is usually easy to do.
- Search for “Control Panel”, launch this part of the system.
- Next, the transition is carried out through the following sections - “Network and Internet”, “Network and Sharing Center”, “Changing network card settings”. The last item is most often displayed on the left side. Disabling it is also easy.
- After this, the user will see a list of all network cards currently running on the computer.
- You need to make sure the card is turned on. When no WiFi networks are found, Windows 10 is recommended to be rebooted.
Important. If the icon color remains gray, you just need to click on it to select the option with the enabled state.
In the case of laptops, an additional check is carried out regarding the position of the switch responsible for the WiFi function. Otherwise, problems with launching network cards will inevitably arise.
How to fix Wi-Fi connections not showing up on Windows 10
Method No. 1 Update Wi-Fi adapter drivers
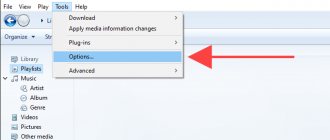
- Press the key combination Win+R .
- Type devmgmt.msc and press Enter.
- Expand the “Network Adapters” tab and find your Wi-Fi drivers. If you do not see your Wi-Fi adapter, then it is probably located in the “Other devices” tab, since there are no drivers installed on it.
- Right-click on your adapter and select Update Driver.
- Select automatic search for drivers.
After installing the drivers, check whether the Wi-Fi network you need appears in the available connections. Most often, this problem occurs precisely because of uninstalled or outdated drivers.
Method No. 2 Rolling back drivers for the Wi-Fi adapter
If updating the drivers did not fix the problem, then perhaps it will be solved by rolling back the drivers to an older version. To do this, do the following:
- Open Device Manager again as shown in the previous method.
- Find your Wi-Fi adapter and right-click on it again.
- This time select "Properties".
- Go to the "Driver" tab.
- Click on the "Roll Back" button.
Try looking at available wireless networks. It is possible that things will go much better with an older version of drivers.
Method No. 3 Removing the Wi-Fi adapter and restarting the PC
Using this method, you can remove all drivers for your Wi-Fi adapter and subsequently install them completely. To do this, do the following:
- Go to Device Manager again.
- Find your Wi-Fi adapter and right-click on it.
- Select "Delete".
- Close Device Manager and restart your computer.
As soon as your system is completely rebooted, it will automatically download the latest drivers for the new, and in our case, removed equipment. After that, try to check for the problem of no available Wi-Fi connection on Windows 10.
However, if the drivers were not reinstalled when the PC was restarted, which is possible, then you can manually update the hardware configuration in Device Manager. To do this, do the following:
- Press the key combination Win+R , enter devmgmt.msc in the empty line and press Enter.
- Find "Action" in the menu bar and select it.
- Then select "Update hardware configuration".
After selecting this option in Device Manager, drivers for your Wi-Fi adapter will be installed automatically. Try checking the availability of the wireless network from your Wi-Fi adapter.
Check if the WiFi icon has been hidden
Why the Wi-Fi icon is not displayed on the laptop and how to get it back
Note! It often happens that this element simply remains invisible to the users themselves. The Windows 10 notification area allows you to move any icon from place to place. This applies to audio signals and network related items. Users could drag the icon to another location themselves, causing it to become invisible.
To expand the list with all the icons in the notification area, just click on the arrow icon at the bottom. After this, the WiFi icon may appear in the tray among other similar images. It must be picked up and held using the left mouse button. Then they drag it to its usual place - in the same place where the clock is located. Then you can be sure that the Wi-Fi icons on your Win 10 laptop have not disappeared.
The computer or laptop does not see wifi - correct errors on the disk
This procedure may also help because errors may prevent the Wi-Fi Automatic Setup service from starting.
Similar to the third step, we also open the Command Prompt in Administrator mode and enter the command:
- sfc /scannow
After confirmation, the system will check the disk and correct errors. Finally, reboot the computer and check if the Wi-Fi network is working.
A computer or laptop with Windows 10 does not see the wifi network - start the WLAN service manually
Press the Windows + R key combination, and then in the launch window, enter:
- msc
Confirm the command with OK. In the new window with a list of services, look for services named “WLAN AutoConfig Service”. Double-click the found item to view details.
This service must be running and its startup mode set to Automatic.
If the launch mode is manual, set it to automatic. Then click the "Run" button to enable the service.
If the service is running, networks should be detected again. Unfortunately, this is rarely fixed in such a simple way, so you may need to do the following.
The problem is on the provider's side
If the reason has not been identified, and all of the above methods did not help, the user will have to contact the Internet provider. If you try to correct the situation on your own, it does not work, which means that the reason is most likely related to the service provider. You can find a phone number and contact the service through the official website.
The problem of connecting wired or wireless Internet on a computer may be associated with maintenance work on the server, network outages, emergency situations, and so on.
Recovering to a checkpoint
Windows operating systems have a useful option that allows you to create recovery checkpoints at different periods of system use. For example, they are created before the update is performed, and the user will be able to return the state of the OS before they were installed.
That is, if something goes wrong, it becomes possible to return to the previous state with working configurations. This also applies to the correct operation of the network adapter. Activate the “Recovery Wizard”:
- Press + R and enter the command in the field - rstrui.exe.
- Press Enter to launch the system utility.
- Select the restore point when the networks were recognized and click “Next”.
This tool allows you to keep the user’s personal data safe and secure. The recovery concerns the system only; other information will not be changed. When the process is completed, the problem when a laptop or PC running Windows 10 does not see the Wi-Fi network will disappear.
Change power management properties
Another reason for the lack of Internet connection may be a change in power settings. To check the functionality of the equipment, you need to do the following:
- Press the keys simultaneously: “Win + X”.
- Select "Device Manager".
- Find "Network adapters".
- Double-tap your adapter and open Properties.
- Open the “Power Management” tab.
- Uncheck the box next to permission.
- Confirm action.
If the problem is caused by changing the power management properties, the instructions above should help resolve network connection issues.
Network discovery
Why does the Internet connection via Wi-Fi disappear?
Many people have had problems with Wi-Fi in Win 10. In some situations, for Wi-Fi to work correctly, you may need to set some parameters. One of these is network discovery. It must be connected correctly. To do this you will need to do the following:
- In the Wi-Fi window, you should find a message called “Changing advanced sharing settings.”
- The item shown in the picture below should be activated.
Switch on with button
Almost all laptops have a special button to turn the Wi-Fi module on and off. Perhaps you just accidentally clicked on it. In this case, the module will turn off and no longer appear in the tray. To put everything back in place, first find the antenna icon with outgoing waves in the “F” key bar. And then press Fn and this key simultaneously. Also, on some models the “WiFi” on and off button may be separate.
How the BIOS should be configured
In this case we are talking about a laptop. To enter the BIOS on this device, while turning on the computer, press the F2 key several times, which is usually located at the top of the keyboard. Also, on some laptop models, you can enter the BIOS using the Delete button and F10. After completing this action, a window with various system parameters will open to the user’s attention. From the list provided, you must select the item called “Wireless Network Settings”. In some laptop models, this parameter may have a different name. However, the essence remains the same.
As a rule, any laptop must have a special slot for a wireless communication module.
Note! In some cases, the system may turn it off automatically. Therefore, when entering the BIOS, you need to enable this option.
The problem is in the router
If the laptop does not receive Wi-Fi, you need to check the router. Problems with the device may be caused by overheating or initially incorrect settings.
Reboot
The restart button is located on the back panel of the router. Press it, wait 3-4 seconds and release. During the reboot, the DNS cache on the router is cleared and new network settings are received from the provider.
Check the wires
Make sure that the WAN cable plug fits tightly into the socket. Check the wire as you go. If repair work has recently been carried out at the entrance, be sure to check the integrity of the wire. If the cable is damaged, you need to call your provider. The company must send an engineer.
Settings are wrong
This problem occurs due to malware or power surges. The device settings change and network access is lost. There is only one solution - reconfigure the router via the web interface in accordance with the provider's instructions.
If the problem is malware, then first you need to remove it using an antivirus utility (Dr.Web CureIt!, AVZ, etc.).
Broadcast channel
If the laptop does not see your home Wi-Fi network, but does see others, try changing the signal broadcast channel. To do this, open the router’s web interface and go to the “Wireless Mode” section. In settings, select one of 13 channels.
You must select a free channel to broadcast the network. This can be done by selecting a number manually or using third-party software. The simplest channel scanner program is WiFiInfoView. For the software to work, you need to activate the Wi-Fi module on your laptop. After launch, the program will scan all connection points and determine their channel numbers.
In the router settings, specify the number of any free channel. After activating the new settings, the network will become visible.
SSID and Visibility
Hiding the access point is one way to improve the security of your wireless connection. When this feature is activated, the SSID (Wi-Fi network identifier) becomes invisible to third-party users. The access point will not appear in the list of active wireless connections found. But a user who knows the ID and password will be able to connect to it.
SSID visibility is configured in the router's web interface. In Keenetic devices, this option is located in the additional settings of the “Wireless Wi-Fi network” section. To disable the stealth mode, you need to uncheck the box next to “Hide SSD” and save the changes. In the same section you can change the network name.
In the web interface of TP-Link routers, the visibility of the ID is configured in the “Wireless Mode” section. In order for the connection to be displayed in the list of available Wi-Fi networks, you need to check the box next to “Enable SSID broadcasting” and click on the “Save” button.
Device malfunction
If after all the manipulations the Wi-Fi adapter does not detect your home wireless network, make sure the router is working. Connect it to the network card of your netbook or desktop PC. If the wired connection works fine, then the problem is with the router's antennas.
If there is no Internet, connect the cable from your provider directly to the network card. Try setting up the connection. If the connection is established, it means that the Internet is working normally, but the router is faulty.