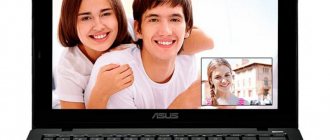
Today, one of the most popular methods of communicating online is video calls. This function is already available in almost any messenger and is gradually appearing on social networks. But of course, in order to make video calls, it is not enough to simply register on one of these resources. In addition, you will need a connected and configured webcam. How to enable the camera on a laptop on Windows 7, 8, 10 and XP will be discussed in this article.
How to quickly turn on a laptop's built-in camera
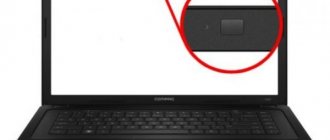
As already mentioned, many modern laptop models have a built-in video camera. Such cameras cannot be disconnected from the computer, but they can still be turned off. Typically, special buttons or key combinations are used for this. On laptops from different manufacturers, the activation methods are different. Let's figure out how the built-in camera is turned on on the most popular brands of laptops.
Asus
There are three ways to turn on the camera built into an Asus laptop. Most often, a combination of two keys is responsible for this function. The first key is “Fn”, but the second one can be different, but an icon in the form of a camera should be drawn on it below.
Some laptops from this company are equipped with a special button that allows you to turn the camera on and off. It is located next to the camera itself.
Well, the third possible option is a special utility for controlling the camera. You can download it from the disk that comes with some laptops. It's called “Life Frame”.
HP
You can also launch the camera on an HP laptop in different ways. To begin with, it should be noted that most cameras built into HP laptops turn on automatically when certain applications are launched.
If automatic activation does not happen, you can try looking for a combination on the keyboard (the principle is the same as with Asus).
Let's sum it up
A web camera is a built-in or plug-in element that is an integral component in the operation of computers, laptops and modern gadgets. Its functionality makes it possible to communicate through special video chats with friends, acquaintances and relatives. A few years ago, such an opportunity was simply mythical, but today you can “see” your loved ones, regardless of the distance from them, using modern devices modified with cameras, provided you have the Internet and an installed utility. Such superpowers of the camera determine its popularity, as well as the search for solutions to issues related to connecting and diagnosing the performance of a video device when problems arise with its functionality. This article describes simple methods for inspecting camera operation that even a “newbie” can handle on their own. Choose a testing method that is convenient for you, diagnose, configure and enjoy the communication.
Test area
- QQVGA (160×120)
- QCIF (176×144)
- QCIF (192×144)
- HQVGA (240×160)
- QVGA (320×240)
- Video CD NTSC (352×240)
- Video CD PAL (352×288)
- xCIF (384×288)
- 360p (480×360)
- nHD (640×360)
- VGA (640x480)
- SD (704x480)
- DVD NTSC (720x480)
- WGA (800x480)
- SVGA (800×600)
- DVCPRO HD (960×720)
- XGA (1024x768)
- HD (1280×720)
- WXGA (1280x800)
- SXGA− (1280×960)
- SXGA (1280x1024)
- UXGA (1600×1200)
- FHD (1920x1080)
- QXGA (2048×1536)
- QSXGA (2560×2048)
- QUXGA (3200×2400)
- DCI 4K (4096×2160)
- HXGA (4096×3072)
- UW5K (5120×2160)
- 5K (5120x2880)
- WHXGA (5120×3200)
- HSXGA (5120x4096)
- WHSXGA (6400×4096)
- HUXGA (6400×4800)
- 8K UHD (7680x4320)
- WHUXGA (7680×4800)
- UW10K (10240×4320)
Camera information
| Camera name: | Not chosen |
| Quality Rating: | — |
| Built-in microphone: | — |
| Built-in speaker: | — |
| Frame frequency: | — |
| Stream Type: | — |
| Picture Mode: | — |
| Number of megapixels: | — |
| Camera resolution: | — |
| Video standard: | — |
| Aspect Ratio: | — |
| PNG file size: | — |
| JPEG file size: | — |
| Bitrate: | — |
| Number of colors: | — |
| Average RGB Color: | — |
| Lightness: | — |
| Luminosity: | — |
| Brightness: | — |
| Color tone: | — |
| Saturation: | — |
Rate your camera
Check how high quality your camera is! Leave a review of your camera and find out where it ranks among the best cameras.
About WebcamTests.com
This site provides a free online tool to test your camera and make sure it's working properly. In other words, you can test the camera directly from your browser without the need to install third-party software. Despite this simple method, you can test your camera with one click on different devices, including laptops, smartphones, TVs, tablets and others. Regardless of the device and operating system, as a result of testing you will learn not only if your camera works, but a lot of useful information about it (for example, camera name, resolution, frame rate, number of colors, image quality and many other characteristics). Plus, if any problems are found with your camera, you'll get tips on how to fix them. Once testing is completed, among other things, you will be able to take photos with the camera and download them to your device. You can also watch the camera in full screen mode and rate it.
Why do you need a camera check?
- You have purchased or connected a new camera and want to check if it is working correctly (the camera viewer displays the image in real time).
- You have doubts about the parameters of a recently purchased camera and want to check your camera and its functions (since not all sellers are honest).
- You have several cameras and want to compare them to see which one is better (the better the camera, the higher the “Quality Rating”).
- Want to know if your camera has a built-in microphone or a built-in speaker (just note that this feature is a bit glitchy).
- Want to know how many frames per second (FPS) your camera displays (low FPS causes video lag).
- Want to know how many colors a photo taken with your camera contains (more colors means higher image quality).
- Want to know the resolution of your camera (high quality cameras have high resolution and can provide HD video calls).
- Check the quality of the camera compared to other cameras (for this you need to leave a review about your camera).
How to check your camera?
Testing your camera is easy with our online tool: just wait until all media devices are detected and then click the Test Camera button. If this button does not appear and you have not received any notifications, there is most likely an error with your browser. To help you, please email us at [email protected]
How is the camera checked?
- First of all, it is determined if the browser supports functions for accessing multimedia devices. If so, a list of detected cameras and the necessary controls are displayed.
- When you click the "Test Camera" button, the browser will ask permission to run the camera on this site.
- Once access is granted, the camera will launch and you will see the video in the camera viewer (viewing area).
- Now it's time to determine the maximum resolution of the camera (among other things, this will allow you to calculate the number of megapixels and discover the supported video standard).
- Then the image quality is determined (including the number of colors, brightness, saturation).
- After some measurements, the number of frames per second (FPS) is determined.
- Among the latest tests, the approximate bandwidth required for video conferencing is calculated.
- Finally, test results, tooltips, and additional controls (i.e., take photos, enable full screen, pause camera, refresh data) are displayed.
Why do you need to leave a review?
Once testing is complete, you can leave feedback about your camera. This is not necessary, but we recommend doing it to help other people get a good camera and beat the bad ones. Plus, once you post your review, you'll see how good your camera is (that is, you'll see how it ranks among the best cameras).
System requirements
To test the camera, you only need a modern browser (unfortunately, Internet Explorer is not one) that supports functions for accessing multimedia devices. As you will notice, our camera test tool does not require any additional software such as Adobe Flash, Microsoft Silverlight or browser add-ons.
The operating systems and minimum versions of supported browsers are listed below:
If your operating system or browser is not listed here, it does not mean it is not supported. They just haven't been tested yet. So feel free to check for yourself.
Confidentiality
- All operations required for testing are performed in the browser, and the data is stored in the memory of the user's device.
- We do not store technical information until the user posts a review.
- If the user does not post a review, all data from the device memory is destroyed when the page is closed.
- Reviews are public and contain only technical information about the cameras tested.
- We do not store photographs taken with the camera under any circumstances.
How to turn on the camera on a laptop running Windows 7 or XP
So, you have connected your webcam to your PC and are ready to start setting it up. This process will differ depending on the version of OS you are using. So let's look at different options.
Let's start with instructions for those who want to enable the camera on Windows 7 and XP. There will be no differences in the instructions for these versions, and therefore we will not consider them separately.
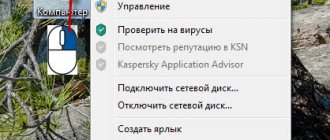
- To get started, launch “Control Panel”.
- In the upper right corner of the window, select the “Category” view mode.
- Go to the “Hardware and Sound” section.
- After this, you need to find the “Devices and Printers” subsection, but do not go into it.
- Instead, click on the “Device Manager” button located next to it.
- A list of devices will appear in front of you, where you need to find your camera in the appropriate section.
- Double click on its name.
- A window will open in front of you with information about the operation of the camera; here you can turn on the camera if it is turned off.
If everything is fine, the device is working properly and it is turned on, you can start working with the camera.
WebCam Monitor download
Using this utility, you can organize professional monitoring from web and IP cameras connected to your computer. The product generates video surveillance in real time, conducts automatic monitoring, records images and notifies of an alarm when the detector detects extraneous movements. WebCam Monitor has an integrated scheduler, a player for viewing materials, a setup wizard and many parameters for convenient work. The user can configure types of alerts and save screenshots, use the options for uploading records via FTP, broadcasting pictures over a wireless network, auto-detection of connected devices, etc. The menu is in English, but it won’t be difficult to understand the basics of how the software works. Among the minuses, we note the overlay of advertising on the video, connection of no more than 4 devices and autonomous operation for 2 hours.
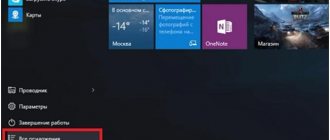
How to run a webcam on Windows 10 and 8
Versions of Windows 8 and 10 are also not much different in terms of webcam settings. Therefore, we will consider them in one instruction. You can also check the connected camera here via the control panel. However, getting to the control panel here is a little more difficult. Therefore, we will look at another option on how to run a webcam on Windows 10.
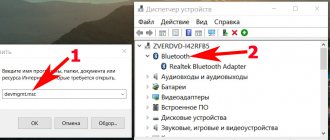
- Go to “My Computer”.
- Right-click on an empty space in the window.
- In the menu that appears, select “Properties”.
- In the left panel, select the “Device Manager” tab.
- Find your camera in the list of devices.
- Double click on it.
- Check the status of your camera and turn it on if it is turned off.
This option, by the way, may be suitable for older versions of the OS.
How to set up a camera on a laptop
After you turn on the camera on your Windows laptop, you may need to configure it. Setting up the camera is not done through the system, but directly inside the application with which you will use it. For example, you can customize the camera image in Skype. To do this, just do the following:
- Launch the application.
- Log in.
- Click on the three dots next to your profile name.
- In the menu that appears, select “Settings”.
- In the left panel, open the “Sound and Video” section.
- Then on the right you can configure the camera as you wish.
Setting up through other applications and instant messengers is done in a similar way. You just need to find the correct settings section.
Trouble-shooting
In some cases, standard startup methods do not work and the imaging hardware remains inactive. There may be several reasons for this:
- If keystrokes are used, they may be erroneous. Especially if liquid has been spilled on the keyboard or if the laptop has not been serviced (cleaned) for a long time. There are two solutions: repair or clean, or use other methods to turn on the camera.
- There are errors in the system.
- Drivers are not installed.
- Software error in drivers.
How to check the camera
Once you've connected and configured your camera, you may want to test it out. This can again be done using video calling applications. However, this is done in different ways - in some places they use bots for verification, and in others they use settings. It is quite inconvenient to understand the nuances of this process each time.
It is much easier to use special sites for checking. There are quite a lot of resources that allow you to test the camera. Just choose any of them and check. Their controls are extremely simple and straightforward, and therefore you should not have any problems.
How to enable the built-in webcam on a laptop: video
This is all the information you need to work comfortably with your webcam. In this article, you could learn how to turn on the camera on a laptop with Windows 7, 8, 10 and XP, as well as how to set it up and test it. A webcam is extremely useful in communicating via the Internet, and therefore all users should know how to use it.
Thank you for your interest in the article. If you found it useful, please do the following:
- Share with friends using the social media button
- Write a comment at the bottom of the page - share tips, express your opinion
- Check out similar articles below, you might find them helpful.
All the best!
webcamXP download
Convenient software with functionality for creating high-quality video surveillance using a large number of devices. Organizes surveillance using TV tuners, IP and web cameras, video capture cards, allowing you to control them remotely via a remote PC or mobile phone. In the settings of WebCamIXPI you can adjust the transmission speed, select IP addresses and server ports, manage recording, image sources, and the operation of the surveillance sensor. The user can also create screenshots, set individual parameters for the surveillance sensor and its notification options. The free version provides broadcasting of only one stream and connection of two cameras.