The Action Center in Windows 10 is where your app notifications and quick actions will appear. You can change settings at any time to customize when and how notifications appear, and add apps and settings to your Quick Actions bar.
Click the Start button, and then select Settings > System Notifications > Actions.
Select and arrange the quick actions that appear in the action center
In the Quick Actions section, drag quick actions to reorder them. In this order, quick actions will appear at the bottom of the notification center.
Both the operating system and programs installed on the computer can display informational messages to the user - notifications.
In Windows 10, just like in previous versions of the operating system, there is an area at the bottom right of the screen called the Notification Area. It is in this area that program and operating system notifications were previously displayed. Windows 10 has a special tool - Action Center and its icon is logically located in the Notification Area in the lower right corner of the screen.
To open the Notification Center, you need to click on its icon.
Notification Center has several features.
Firstly, it displays all notifications that appear in the system and you can view them at any time. Notifications are generated by programs and applications, as well as the operating system itself. This could be a notification about a new email, a calendar reminder, an update notification, and so on. Notifications typically appear in the lower right corner above the taskbar and stay there for a few seconds.
The notification is also placed in the Notification Center list, which you can always open.
In addition, the Notification Center gives us the opportunity to quickly access the most important operating system controls and, first of all, System Settings, which we have already accessed.
The settings here are grouped into categories, and each category consists of several subsections with parameters.
And the settings of the Notification Center itself are located here, in the “System” category, subsection “Notifications and actions”.
Here we see four icons that represent quick actions available from the Notification Center. We will see exactly the same icons if we open the Notification Center.
We can change quick actions to others. For example, the first action enables tablet mode, which, as the name suggests, is designed to be activated on tablets. If Windows 10 is used only on a computer, then this action may not be relevant and can be replaced with something more useful.
To do this, in the settings, click on the corresponding icon and select the desired action from the list.
Changes will also be instantly reflected in the Notification Center itself.
Well, you can access all possible options at any time by clicking on Expand.
But let's return to the settings of the notification area and Notification Center. Here we can enable or disable certain notifications, for example, we can completely prohibit programs from displaying their messages.
Or you can go down a little lower in the settings window and here we should see a list of programs that can create notifications and display them in the Notification Center. In my case, they are absent, but this is where you can disable or enable the ability to send notifications for each application separately.
Also, usually each such application in its settings allows you to specify the parameters for displaying notifications in more detail. For example, in the Mail program settings, you can set your own notification settings for each account.
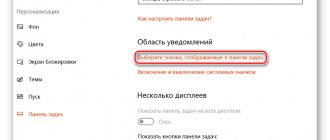
Well, in the system notification settings there are two links that allow us to configure the display of application icons and system programs in the notification area.
By changing the position of the switch, we change the visibility of the icon.
We will return to the system settings more than once, but I do not plan to dwell on them in detail.
There are two reasons for this.
Firstly, this course is aimed at beginners, and most of the settings require certain deeper knowledge.
Secondly, some settings are not used at all or are used extremely rarely on home computers.
Therefore, I will limit myself to considering the most popular system settings.
Good afternoon, dear blog readers and viewers of the pyatilistnik.org channel, we continue to study Windows redstone, last time we looked at how to limit the operating time of a user account, today we will look at how to configure the notification area of Windows 10 Anniversary Update, since in contrast from the seven everything changed a little.
Windows 10 notification area
Let me first remind you what the Windows notification area is and why it exists. Essentially, this is the area of the screen in the lower right part where the Windows operating system displays programs minimized or running in the background, as well as system utilities:
- date and time
- Keyboard layout
- Volume control
- Network connections
Rename the file
In UsrClass.dat, the OS stores profile data. Press “Win+R”, enter the command:
Further:
If the OS prohibits file poaching, log in using a different account. How to do this, see the article: “Changing the user in Windows 10.” Or create a new one. Press "Win+I", select:
Go to:
Log in to the OS under the new entry. Now the file path will change:
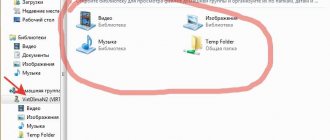
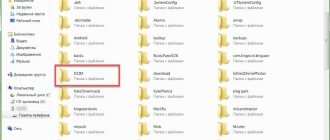
C:\Users\record where CU\AppData\Local\Microsoft\Windows does not open. Open it in Explorer. Rename the file. How to do this was discussed above.
Windows Action Center
In the Windows 10
the ability to personalize the operating system to meet specific user requirements and services for interaction and management of a personal computer have been raised to a new qualitative level.
The user can personalize a custom folder configuration, apply a variety of desktop background themes, change graphical and audio interface styles, use a variety of pre-installed operating system accessibility features, etc. Windows Action Center
application deserves special attention .
The capabilities of this application are most fully presented in the version of the Windows 10 operating system.
.
For a long time, notifications in Windows
were something of a joke, or an application whose actions were not considered by users as a serious feedback tool.
Even Windows 8
, which finally introduced pop-up notifications, had a number of shortcomings.
Notifications appeared on the desktop and then disappeared, and there was no way to view missing notifications that you might have missed. Windows 10
corrects this oversight with the
Windows Action Center
, located in the slide flyout sidebar.
Windows
Action Center organizes and displays all notifications, and provides direct access to quick action buttons such as
Tablet Mode
,
Virtual Network
,
Focus
,
All Settings
,
Night Light,
and etc.
"Windows Action Center"
It's pretty easy to use, and it's also pretty easy to customize to whatever the end user wants.
Silence and grace
Now no irritants will prevent you from working, studying or relaxing. Remember that you can always read missed notifications in the Notification Center to the right of your watch. Don't disable them for the really important things—security features and system updates—that keep your computer running properly.
We have instructions for turning off notifications for Android, iPhohe and iPad, and macOS. Read about how to achieve even greater digital comfort in our blog.
View available notifications in Windows Action Center
First of all, you need to note that “Windows 10”
Toast notifications still appear in the lower right corner of your desktop (just above the notification area on the
"Taskbar"
) when an application needs to tell you something about any activity or state of the operating system.
If you don't close the notification yourself by clicking the white cross (X) in the top right corner of the toast, it will automatically disappear after six seconds. Whenever you have new notifications, the Windows Action Center
in the notification area on
the “Taskbar”
turns white and displays the number of new notifications (in the picture below on the right). If there are no new notifications, then this icon appears empty and without a numerical designation (in the picture below on the left).
Click on the icon shown in the pictures above (regardless of what state it is in) to open "Windows Action Center"
. A panel will pop out from the right edge of your display, showing all your recent notifications, grouped by individual app.
When you click on any notification in Windows Action Center
, then a specific action occurs depending on the specific application that presented you with the specified notification.
Most of the time, clicking on a notification will bring up some important message regarding the actions of that application. For example, clicking on the Virus & Threat Protection
highlighted in the image above will open the
Threat History
the Windows Defender Security Center
window and display the results of a full system scan by the antivirus program.
Or, clicking on the "ESET Smart Security Premium"
will launch the application and present specific ways to improve your computer's security.
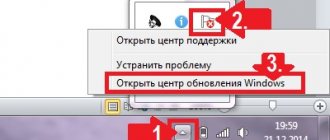
Sometimes the results of clicking on a specific notification are explained directly in the notification itself. For example, if there are available updates for the operating system or individual applications and programs, this will be directly stated in the notification, and when you click on it, the corresponding updates will be launched and installed.
We open access to the “TsU”
So that the user could easily open the necessary program, Microsoft developers worked on two possibilities at once.
- the first is with the mouse. This method involves simply clicking on the corresponding icon at the bottom of the work area;
Launch the Notification Center - the second is a combined press of the “Win” and “A” keys.
Press the “Win” and “A” keys
Clear notifications in
This procedure is quite simple. Hover your mouse over any specific notification in the Notifications & Actions panel and you will see a Clear
(white cross
"X"
) in the upper right corner. Click on it to completely remove this notification from the panel. Please note that once the selected notification is deleted, it cannot be restored.
You can also remove the entire notification block for a selected app (in our example for the Windows Defender Security Center
), by hovering your mouse over the application name and clicking the
Clear
that appears there.
Finally, you can clear all available notifications by clicking on the “Clear all notifications”
in the lower right corner
of the Windows Action Center
(just above the Quick Action buttons).
Setting up notifications
You can't set many of the settings that control how Windows
notifications will be displayed, but there are several ways to configure the notifications themselves.
To get started, you need to open the Settings
. This can be done in different ways, we will show you a few of the most common ones:
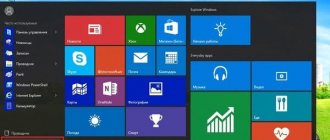
Method 1
: Open the Windows main user menu by clicking the Start button
located
on
the Taskbar
in the lower left corner of the desktop.
Click on the gear icon in the left menu bar. Or, using the scroll bar, move the slider down and in the list of installed available applications and programs, select the "Settings"
.
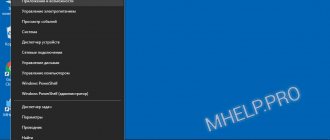
Method 2
: Press the keyboard shortcut together
“Windows + X”
or right-click on the
“Start”
on
“Taskbar”
, and in the pop-up menu that opens, select the
“Settings”
.
Method 3
: Click the notification area icon on
the “Taskbar”
in the lower right corner of the desktop, then in the pop-up panel that opens, click the
“All settings”
.
Method 4
: Press the
“Windows + I”
and call the
Settings
directly.
In the list of available pages in the Settings
select the
"System"
(marked in the image above).
System
settings page, in the left pane of the window, go to the
Notifications and Actions
.
In the right pane of the window, using the scroll bar, move the slider down and select the “Notifications”
.
The following are the main types of notification settings settings:
- Show notifications on lock screen
- Disable this option if you want to prevent any notifications from appearing when you use PC lock mode.
Simply move the switch next to the corresponding cell to the “Off” position.
. - “Show reminders and incoming VoIP calls on the lock screen”
– Turning off notifications on the lock screen allows you to display reminders and incoming calls. Turn the switch to the “Off” position. and turn off this setting to prevent these types of notifications from appearing on your lock screen. - “Show the Windows Welcome screen after updates and sometimes when you sign in to tell you about new features and offers”
and
“Receive tips, tricks, and tricks when using Windows”
– turn these two options off if you are not interested in tips, offers, new features, or announcements . - “Receive notifications from applications and other senders”
– this option allows you to completely disable notifications. To do this, in the corresponding cell, set the switch value to “Off.” and the changes made will be instantly applied to the notification settings. - Hide notifications when mirroring my screen
- This option can be turned off if you are mirroring your screen (for example, while presenting a presentation) and want to limit the appearance of notifications during the show. Disable this option by setting the switch value to Off. in this cell.