To set an alarm, regardless of whether it will be set using standard Windows tools or using third-party software, you need to set the “sleep mode” options. To enter the settings, open the control panel and switch to the “Large Icons” view mode.
How to set an alarm on a laptop
“Sleep mode” settings are made through the “Power Options” menu.
Go to the “Power Options” menu
In the middle part of the window, select the “Set up power plan” link and set the time period for switching to sleep mode.
Select the “Set up power plan” link and set the time period for switching to sleep mode
This is interesting! Computers have three similar power saving modes: sleep, hibernation, and hybrid. Their differences lie in the way information is stored. In sleep mode, the laptop stores data in RAM; therefore, constant power supply is required, and the time to return to operating mode is minimal. During hibernation, data about the parameters of running applications is written to a special system file hiberfil.sys, after which the device turns off. The transition to the working state is longer than from sleep, but energy consumption is significantly lower. Hybrid mode stores data in two places at once. During a power outage, the computer turns off completely, and during boot it receives information from hiberfil.sys. On laptops, the hybrid mode is set by default, although in the Russian version it is designated as sleep.
Through the “Change advanced power settings” menu, go to the settings for turning off hard drives and set the value in minutes.
Set the value in minutes
The hibernation configuration is complete.
Setting an alarm using standard Windows tools
Using standard operating system tools, you can set an alarm on a laptop using the task scheduler. To enter it, you need to open the control panel, switch to the “Large Icons” view mode, then click on the “Administration” shortcut.
Administration shortcut
In the window that opens, launch the “Task Scheduler” shortcut.
Launch the “Task Scheduler”
On a note! To speed up access, you can display the desired shortcut on the desktop. To do this, select the desired option, right-click on it and select the “Send to Desktop” command from the context menu.
Displaying a shortcut on the desktop
In the “Actions” tab, click on the “Create Folder” button. Creating a new folder makes sense if you do not want to look for your alarm clock in a large mass of tasks automatically generated by the operating system.
Create a new folder
In the same tab, click on the “Create a simple task” button, in the simple task creation wizard window that opens, enter a name and description, and click on the “Next” button.
Enter a name and description
The next page sets the startup mode, for example “Daily”.
Setting the launch mode
For the selected mode, the start date and time of the task, as well as the repetition period, are specified.
We specify the start date and time of the task, as well as the repetition period
By clicking “Next” you are prompted to select a task action. For the alarm clock, the launch of the program is relevant.
In the window that opens, you need to specify a music or video composition, which will act as an alarm clock. “Arguments” and “Working folder” can be omitted.
Specify the music or video composition
After completing these procedures, the Create Task Wizard will present a summary to validate all arguments. Clicking the "Done" button will complete the creation of the alarm.
Finishing the alarm creation
You can turn off the alarm by stopping the melody in your player or closing it.
Special program Free Alarm Clock
Alarm Clock program is very simple and free. By installing it on your computer or laptop, it will prevent you from getting up late.
It is enough to choose a melody that is pleasant to the ear and wake up with pleasure. It allows you to add a message that appears on the screen at the time of the call.
In addition, it can wake the computer from sleep mode and turn on the monitor power. You can set as many alarms as needed and edit them at any time.
It supports a large number of audio formats:
- exe;
- mp2;
- mp3;
- wav;
- ogg;
- aiff;
- aifc;
- flac;
- bat;
- com and others.
In addition to the main function, Alarm Clock has:
- adding a signal with a message;
- setting a repeat daily schedule.
The signals it is capable of reproducing can be saved as backup files in *.alm format.
The user can edit messages at any time.
If we talk about the repeat mode, it can be set or canceled. You can delay it from one to ten minutes.
Working with him is easy. To do this, use the Add button, which means Add, to set the signal. In the new window that opens, you need to select the signal time, repetition frequency, and insert a text message that accompanies it.
If the user wants to hear a melody that is stored on the computer, then just specify it.
For some options it is possible to turn them on or off:
- repetition of sound;
- bringing the PC out of standby mode;
- turning on the monitor;
- setting a call schedule.
If you need to change the settings, you can use the Edit button.
The conclusion comes naturally - the program will be useful to everyone who is afraid of oversleeping.
For the Windows 8 operating system, all settings are also performed step by step in the same way as the seventh version.
Setting an alarm using FreeAlarmClock
The program is completely free. After installation, you need to select “Run the program”. By default, there is one alarm clock in the window, which turns on on weekdays. In the status bar (bottom of the window) you can see the following three alarms.
Default alarm clock in FreeAlarmClock program
By clicking the “Add” button, the settings window for the new alarm clock appears. It is necessary to mark the trigger days, give the new task a name, and select the sound to play. The “Turn on sound” knob allows you to adjust the ringer volume. Don't forget about.
New alarm settings window
If necessary, you can place a “Snooze” button on the alarm clock. The “Options” menu allows you to set the interval for which the repeated call will be delayed; in this case, the window of the triggered alarm changes as shown in the figure.
Snooze button
Alarm window
A working alarm clock can be turned off by pressing the “OK” button.
If the task does not start
Sometimes it happens that putting your PC into sleep mode interferes with the process. In this case, it is necessary to carry out the following manipulation:
- Go to the “Setting up a power plan” section through the “Control Panel”.
- In the window that appears, click on the “Hard Disk” section and set the following parameters:
- Go to “Sleep”, where you set the alarm and all the settings as shown in the screenshot:
After all these manipulations, the PC will not shut down running processes after going to sleep. As you can see, setting an alarm is not that difficult, since all the features on a computer running Windows 7 are present from the very beginning.
Source: https://windowsprofi.ru/win7/kak-zavesti-budilnik-na-kompyuterax-s-windows-7.html
Setting an alarm using the MiRelojDigital widget
You can use the MiRelojDigital widget as an alarm clock. This program is completely free. During installation, a message may appear stating that it is impossible to verify the publisher, which indicates that the application was created by “traditional craftsmen”, but this product does not pose a danger to your computer.
Installation of MiRelojDigital
After installation, a widget appears on the desktop with the ability to customize the appearance and time of setting the alarm.
Widget MiRelojDigital
To turn on the alarm, you must select the appropriate menu item.
Setting the time format and style
The settings window will change to allow you to set the ringing time. Don't forget to set the parameter in the leftmost window. AM means before noon, RM means after.
Setting an alarm
To turn off a running alarm, press the R key.
comments 2
- Vitaly 03/25/2017
Is it possible to set an alarm clock so that it rings at 8:00 and then again at 10:00 and so on?
Answer
- LuperCalia 03/29/2017
Of course you can. If we look at Free Alarm Clock as an example, the process of setting multiple alarms is painfully simple. It is necessary, following the instructions already stated, to carry out all the manipulations again, simply by setting a different time. Considering the AIMP program, unfortunately, nothing will work out. It does not have such a function, which cannot be said about the latest representative - “Task Scheduler”. Roughly speaking, the actions performed are identical to those indicated for the Free Alarm Clock program - you need to perform the operations again, as indicated in the article, only changing the playing time of the selected song. This way you will create two tasks that will be completed at the time you set.
Answer
Setting an alarm using AIMP
The program is completely free. After installing and launching the program, in the main window you need to enter the menu and select “Scheduler”.
“Scheduler” item
In the scheduler, after going to the “Alarm Clock” tab, you need to set the desired settings. Please note that it is possible to set the alarm to go off either at a specific time or on a reverse timer. You can specify a specific file as a melody, or select your favorite playlist; in addition, it is possible to smoothly increase the volume over a certain time.
Set the alarm time
Enable Task Scheduler
Typically, the situation when the task scheduler is encountered by people who use pirated builds of Windows or who have disabled this service themselves. This is due to the fact that such services take away RAM little by little. Imagine what will happen if a large number of similar services are included?
So, before creating a job, we should make sure that the Scheduler is enabled.
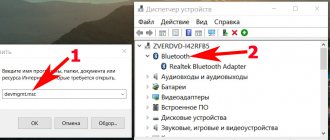
To do this, through Start or using the “Win + R” combination, we get to “Run”. Here we enter “services.msc” and look for “Task Scheduler”. Status (startup type for Windows service should be set to Auto (automatically). If the status is set to Manual or Disabled, then set the mode we need and reboot the device.