- 20shared
- 0Facebook
- 20Twitter
- 0VKontakte
- 0Odnoklassniki
Video communication technologies have become so popular and in demand that you probably won’t find a laptop or tablet that doesn’t have a built-in webcam. Even some models of desktop computers are equipped with this useful device, but if the PC does not have its own camera, you can always purchase and connect an external one to it. But the simple fact of having a webcam is not enough; without the appropriate drivers and software it will not work.
In general, before you start enjoying the benefits of video calling, you need to test the camera on your laptop. Making sure that the device is functioning properly is not difficult. You can test it in three different ways, namely: using the operating system itself, using special online services or through desktop programs.
How to check the webcam on Windows 10. How to enable it.
Now I’ll show you how to quickly check whether your camera is working on Windows 10, if it doesn’t work, see if it’s turned on, and we’ll show you how to install drivers for a webcam.
Microsoft has introduced a special “Camera” program in Windows 10, which we will use to check it.
Click on the “Start” button (lower left corner of the screen) and select “All applications.
The list sorts applications alphabetically, so we find the letter “K” and go to “Camera”.
In the window that appears requesting access to the camera, select “Settings”.
You can also go to settings through “Start - Settings - Privacy” and here on the left we find “Camera”.
Select this item and in the “Allow applications to use the camera” column, move the switch to the “On” position.
Now go to “Start – Applications – Camera” again and everything should work and you will see the image from the webcam.
This application has buttons for viewing photos (top left), adjusting brightness (top center), and a button to take a photo and record a video (right).
This way we can check whether the webcam will work in other applications.
If any problems arise, there are several options for solving them.
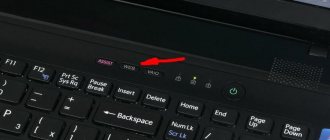
Older laptops often have camera buttons or switches of some kind.
The buttons are usually located near the power button and are marked with a schematic image of the camera, and the switches are usually placed on the end near the TouchPad.
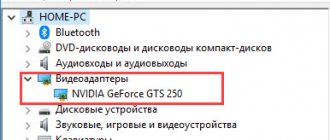
Next, go to the system “Start – Settings – System”, go down to the very bottom and on the left we find “About the system”. Here we also go down and select “Device Manager”.
In the device manager we find “Imaging device”, clicking on it, you can see your webcam.
To enable or disable it, you need to right-click on it and select “Enable”/“Disable”.
If the webcam is not present in the File Manager under "Imaging Device" and an undefined device is displayed with an exclamation point, it may not have drivers.
On this site you can find descriptions of how you can install all the drivers for most laptops, as well as for specific models.
You can also go to the official website of the laptop manufacturer. In our case, Acer (acer.ru).
Usually there are Russian sites, and there are European ones, and there are more European drivers. Therefore, if you did not find the drivers on the Russian site, try looking for them on the European one.
On the website we find the “Services – Drivers and Manuals” tab. We go to this page and here you can find drivers by serial number or laptop model.
If there are no drivers for Windows 10, you can look for them for Windows 8, 7; they are usually compatible.
You can also search for drivers by hardware id. To do this, go to “Device Manager” and right-click on the device, select properties.
Go to the “Details” tab, click on the “Device Description” drop-down list and select “Hardware ID”.
Your equipment ID will appear in the window. We copy it and enter it into any search engine with the note “...download drivers.” The search engine will return several sites where you can download drivers.
If it does not find it using the full ID, you can delete a couple of sectors in the ID.
As a result, you can determine the following options why the camera does not work.
- The switch/shortcut is not enabled on some older laptops.
- There are no drivers, or the wrong ones.
- Problem with Windows.
Source
Windows 10 webcam not working
Some users, more often after updating Windows 10 and less often during a clean installation of the OS, are faced with the fact that the laptop’s built-in webcam or a webcam connected via USB to the computer does not work.
Fixing the problem is usually not too difficult. As a rule, in this case, they start looking for where to download a driver for a webcam for Windows 10, although with a high degree of probability it is already on the computer, and the camera does not work for other reasons. This instruction details several ways to fix the webcam in Windows 10, one of which, I hope, will help you too. See also: webcam programs, Inverted webcam image.
Important note: if the webcam stopped working after updating Windows 10, look at Start - Settings - Privacy - Camera (in the "Application Permissions" section on the left. If it stopped working suddenly, without updating Windows 10 and without reinstalling the system, try the simplest option: go to the device manager (via right-click on start), find the webcam in the “Image processing devices” section, right-click on it - “Properties” and see if the “Roll back” button is active on the “Roll back” tab Driver". If yes, then use it. Also: look, are there any in the top row of laptop keys with a camera image? If there is, try pressing it or her in combination with Fn.
Programs for remotely turning on the camera
One of the most popular programs is RemCam2. It allows you to find out about everything that is happening at a distance, as it provides full access to the audio and video equipment of the remote computer. Designed for parental control.
WebcamXP is compatible with both IP and USB cameras. Works only with one stream and does not play sound remotely. However, it has a motion sensor, which allows you to start recording at the right moment. A recording made remotely is saved to a hard drive or broadcast to a website.
WebcamXP program for connecting to a remote camera
EyeLine Video Surveillance is another application for remote access to webcam. The utility has excellent functionality, a user-friendly interface, and is quite easy to use. Used for both personal and commercial purposes.
Note! The program has several types of licenses, which allows users to purchase only the functions they need without overpaying.
EyeLine Video Surveillance
To remotely record Skype audio and video, the Skype Parental Control program is used. It completely hides the presence of the recording from all interlocutors and sends the received files by mail or FTR.
Skype Parental Control
Webcams are popular and useful devices. Turning on and setting up is quite simple. You don't need any superpowers to work with them. Devices are combined and checked by many different programs. Allow users to always be in touch. They can be used for both business and personal purposes, and the ability to connect remotely will ensure the safety of your home and children.
Removing and re-detecting the webcam in Device Manager
In about half of the cases, in order for the webcam to work after upgrading to Windows 10, all you need to do is follow these simple steps.
- Go to the device manager (right click on the “Start” button - select the desired item from the menu).
- In the “Imaging Devices” section, right-click on your webcam (if it is not there, then this method is not for you), select “Delete”. If you are also offered to remove drivers (if there is such a mark), agree.
- After deleting the camera in Device Manager, select “Action” - “Update hardware configuration” from the top menu. The camera must be installed again. You may need to restart your computer.
Done - check if your webcam is now working. You may not need to follow any further steps in this tutorial.
At the same time, I recommend checking it using the built-in Windows 10 “Camera” application (it’s easy to launch it through a search in the taskbar).
If it turns out that the webcam works in this application, but, for example, in Skype or another program it does not, then the problem is probably in the settings of the program itself, and not in the drivers.
Purpose of the accessory
A webcam is a device not so much for filming as for live broadcasting. You can use it to take both photos and videos, but their quality will be below average. The exception is expensive, ultra-modern models. But they are usually used for professional online surveillance.
The task of a “home” webcam is to adequately reproduce the image during a conversation on Skype or in other instant messengers. Color rendition will be average, functions will be minimal, but if the picture speed matches the sound, the camera can be considered adjusted.
Installing Windows 10 webcam drivers
The next option is to install webcam drivers that differ from those currently installed (or, if none are installed, then simply install the drivers).
In case your webcam is listed in Device Manager under Imaging Devices, try the following option:
- Right-click on the camera and select Update Drivers.
- Select "Browse this computer for driver software."
- In the next window, select “Select a driver from the list of already installed drivers.”
- See if there is another compatible driver for your webcam that you can install instead of the one you are currently using. Try installing it.
Another variation of this method is to go to the “Driver” tab of the webcam’s properties, click “Uninstall” and remove its driver. After that, in the device manager, select “Action” - “Update hardware configuration”.
If there are no devices similar to a webcam in the “Image Processing Devices” section or even this section itself, then first try turning on “Show hidden devices” in the Device Manager menu in the “View” section and see if webcam in the list. If it appears, try right-clicking on it and see if there is an “Enable” option there to enable it.
If the camera does not appear, try these steps:
- See if there are unknown devices listed in Device Manager. If so, then: How to install the driver of an unknown device.
- Go to the official website of the laptop manufacturer (if it is a laptop). And look in the support section of your laptop model to see if there are drivers for the webcam (if there are, but not for Windows 10, try using “old” drivers in compatibility mode).
Note: some laptops may require model-specific chipset drivers or additional utilities (various types of Firmware Extensions, etc.). Those. Ideally, if you encounter a problem specifically on a laptop, you should install a full set of drivers from the manufacturer’s official website.
Installing webcam software through parameters
It is possible that for the webcam to work properly, you need special software for Windows 10. It is also possible that it is already installed, but is not compatible with the current OS (if the problem arose after upgrading to Windows 10).
To begin, go to the Control Panel (Right-click on “Start” and select “Control Panel.” In the “View” box at the top right, select “Icons”) and open “Programs and Features.” If there is anything in the list of installed programs that is related to your webcam, remove this program (select it and click “Uninstall/Change”.
After removal, go to “Start” - “Settings” - “Devices” - “Connected devices”, find your webcam in the list, click on it and click the “Get application” button. Wait for it to download.
Other ways to fix webcam problems
And several additional ways to fix problems with the webcam not working in Windows 10. Rare, but sometimes useful.
- In Windows 10, go to Settings - Privacy and select Camera on the left. Make sure your apps have camera access enabled, and in the list below, enable access for the Desktop Web Viewer. If there is a program in the same list in which the camera does not work, make sure that access is enabled for it too.
- Check if your webcam is being used by another application.
- Only for built-in cameras. If you have never used a webcam and do not know whether it worked before, plus it is not displayed in the device manager, go to the BIOS (How to enter BIOS or UEFI Windows 10). And check the Advanced or Integrated Peripherals tab: somewhere there may be an option to enable or disable the integrated webcam.
- If you have a Lenovo laptop, download the Lenovo Settings app (if you don't already have it) from the Windows App Store. Under Camera Controls, look for the Privacy Mode option. Turn it off.
One more nuance: if the webcam appears in the device manager, but does not work, go to its properties, go to the “Driver” tab and click the “Details” button. You will see a list of driver files used to operate the camera. If stream.sys is among them, this indicates that your camera driver was released a long time ago and it simply cannot work in many new applications.
And maybe this will be interesting:
Why not subscribe?
Distribution of new, sometimes interesting and useful, materials from the site remontka.pro. No advertising and free computer help for subscribers from the author. Other subscription methods (VK, Odnoklassniki, Telegram, Facebook, Twitter, Youtube, Yandex.Zen)
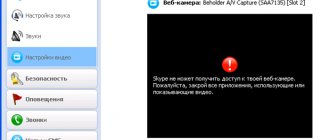
There is also a problem with the camera, it is connected to the PC, it can be seen in discord if you go to settings and turn it on, there is a picture, but in all other applications it does not work, I looked at it using Process_Explorer, the camera is not used anywhere in Streamlabs, there is a black screen if you go to the standard camera application there is a black screen in the registry I already prescribed a reset, I don’t know how to fix it. Has anyone solved this problem? win10
Have you checked your privacy so that apps have access to the camera?
I bought a new processor and motherboard, a Logitech C270 camera, installed the latest Windows 10 OS. And suddenly I ran into this problem. Before that, I simply didn’t know about its existence, since I didn’t use either 10 or webcams, but now I needed it for work. I reinstalled the driver through the settings, through the device manager, reinstalled the driver from the official website, made changes to the registry for both 32-bit and 64-bit, checked the privacy settings, allowed everything in the browser settings... I tried ALL the methods I could find on the Internet. Nothing helps. The funny thing is that the camera works, the image from it is transferred to the LogitechCamera program, but in Skype and on the platform I need there is a blank screen.
Apparently, I'll have to change the camera...
You don’t have to, there’s obviously something in the parameters, since everything is ok in Logitech Camera. If you have checked the privacy settings in Windows 10, then look in the settings of Skype itself.
Source
The best laptop camera test apps online
If instant messengers are not used, you still need to test the camera, especially since there are many applications on the Internet that allow you to carry out your plan.
The best test programs that work on the network:
- WebCamTest. It allows you to quickly control your device with just a few clicks.
You just need to go to the site and allow him access to the camera.
And if everything is connected and working correctly, an image will appear on the monitor in which you can see yourself.
- IObit. Free, fast and easy control of your camera and this software. Allow the platform to access your device to ensure it is working. The site does not record data received from the webcam. Everything happens online while respecting the user's privacy.
- Webcammictest. When the platform opens, click the "Check Webcam" button and allow access to it. The appearance of your image on the screen indicates that the device is working normally. The test app also allows you to center the camera, focusing it in the center of the screen.
- Toolmaker. The platform is in English with an intuitive interface. It works similarly to other testers; it starts the test immediately after access to the device is granted.
It works for free and does not require any additional software to be installed on your computer.
- OnlineMicTest. To use it, you need to open the service and click on the Play icon that appears on the black screen. The service will request access to the registration device and immediately after receiving it will begin checking.
With online testing apps, you can quickly and free test any webcam, regardless of its type, model, or configuration. Test applications do not require installation of additional software and are extremely easy to use. Just a couple of clicks and the verification process will be completed.
Introduction
The variety of options for processes in which a webcam is required to participate, and the types of outgoing information data, initiate the development of various software designed to fully reveal the potential of cameras. And increasing the capabilities of computer devices through the use of visualization tools significantly increases their attractiveness and helps users significantly diversify their daily use.
But not always a webcam, stationary as in laptops, or externally connected, as in personal computers, can work properly in the Windows 10 operating system.
.
And there may be several reasons for this. To resolve a variety of problems, you can use both regular troubleshooting solutions and a new system-wide option available in Windows 10
that completely controls access to your webcam across all installed applications. Further in our article we will dwell in more detail on the description of possible ways to correct problems with the correct functioning of the webcam.
The need to check the functionality of the device
The modern range of instant messengers and communication programs is diverse, and the popularity of contacting via video communication has been at its peak in recent years. Often, the need to check the functionality of a web camera arises during its initial installation, updating system software, purchasing and installing a device on a computer, or after purchasing a new laptop. Most confident users of computer devices know that laptops are modified with a web camera from the factory, and to communicate via video communication on a computer, you need to purchase an additional camera and connect it to the system. Of course, the easiest way to diagnose a camera is to make a video call to a friend to check the connection, but this option is not acceptable for everyone, since few people would like to look like a “loser” in the eyes of their friends, or to disgrace themselves in some sense if the device is unstable or doesn't function at all. Accordingly, the question of how to check a webcam on a laptop or an installed device on a computer yourself, without outside help, is more than relevant for many users.
Check the camera settings in the Windows 10 operating system settings
Basic system services and settings of the Windows 10
concentrated in the
Settings
, which allows you to fully manage permissions and control the overall functionality of the system from a single source. To troubleshoot a webcam, you first need to check whether the camera for the problematic application is enabled and whether access to it is allowed on this device. The verification process will not take much time and will require the user to consistently perform a series of specific step-by-step actions.
On the computer device to which the webcam is connected, open the Settings
in any convenient way.
For example, click on the "Start"
located on the
"Taskbar"
in the lower left corner of the desktop and open the main user menu
"Windows"
.
And then in the docked left sidebar, click on the “Options”
, presented in the form of a gear, and the application will open.
Users can also use the shortcut button from the Windows Action Center panel.
, use the search service, go from the
Windows
the Windows + I
key combination and open the
Settings
directly.
Windows Settings window
Move the scroll bar to the very bottom of the page and select the
“Privacy”
.
On the new page in the left sidebar, using the scroll bar slider, find and select the “Camera”
. The right pane of the window will display all the options and settings, and will also present several switches that enable or disable the webcam both on the device and across all applications. If the user turns off his webcam here, then even application applications will not be able to use it.
It would seem that the permission settings in the "Privacy"
should generally only affect new
Windows 10
installed from the
Microsoft Store
, also known as
UWP
. However, the stated webcam permission settings affect all applications.
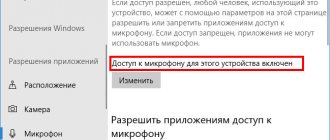
Therefore, if the webcam does not work, then in the right pane of the window in the section “Allow access to the camera on this device”
Make sure the settings are set to
"Camera access for this device is enabled
.
Otherwise, if access to the camera is disabled, click on the "Edit"
and in the new pop-up window, set the switch to the
“On” position.
.
When access to the camera is closed, operating system "Windows 10"
and installed applications will not be able to use it, even system services such as
Windows Hello
(a biometric facial recognition feature using the camera in
Windows 10
, which allows you to sign in to your device three times faster than with a regular password sign-in. ). After turning on the camera, its functionality should be restored instantly.
In addition, you need to make sure that in the "Allow applications to access the camera"
The switch is also set to the
"On" position.
.
When this setting is set to Off
, then no application on your system, including application applications, will be able to detect or use your camera.
However, Windows will
have the ability to use your camera for certain features, such as
Windows Hello
.
Allow apps to access your camera options
were changed in the April update to the
Windows 10
.
Previously, the function affected only applications from the Microsoft Store
and did not affect the performance of traditional application applications.
In the next section "Select apps that can access the camera"
Make sure that the application that needs to access your camera is not listed in the list of applications provided.
When you find an application in this list, you need to check the position of the switch in the line corresponding to the application and set it to “On.”
if the switch has been disabled.
Please note that standard application applications do not appear in this list. Only Microsoft Store
.
Traditional system apps can always access your webcam if the general settings in the Allow access to the camera on this device
and
Allow apps to access the camera sections
.
Once the above settings and permissions are enabled, the Windows 10
will not interfere with the full use of the webcam. However, if this solution was not enough, then follow other traditional camera troubleshooting steps presented in the following sections of our article.
Using online services
You can make sure that the video device is working using special resources on the Internet designed for controlling the camera on an online laptop. This is a universal method suitable for all versions and editions of Windows, but you must have Adobe Flash Player installed on your computer. There are many services themselves, so we will mention only the three most popular.
WebCamTest
A simple service that allows you to check the health of your webcam and microphone. To check, go to webcamtest.ru, activate Adobe Flash by clicking in the player window, and give the service access to your webcam and microphone. After this, an image should appear in the player window.
If there is no image, make sure that the flash player is configured correctly, so open its menu by right-clicking, select "Options", in the window that appears, click the camera icon and specify your video device in the drop-down list below. If the image does not appear after this, there may be a problem with the camera itself or with the drivers.
Webcam test
A service with a clear name that allows you to control your webcam online on your laptop. Go to webcamtests.com, wait for the device to be detected (you will receive a notification), click the "Test Camera" button and grant the application access to the camera. In this case, in the player window you will need to see what the camera sees. In addition, the service supports determining camera resolution, number of megapixels, stream type, brightness and brightness values, image aspect ratio, bitrate and many other parameters.
OnlineMicTest
The service in English is available at www.onlinemictest.com/webcam-test. To test the camera on a laptop that uses it, go to this link, click the Play button in the player window, and allow the web application to access your video device. If everything is ok, your image will appear in the player window and the frames per second will appear in the top right corner of the player window. The service also allows you to test the operation of the built-in microphone and keyboard.
Post Views: 518
Make sure your webcam is not disabled by other means
In the previous section, we looked at the main ways to disable a webcam on a computer device (personal computer, laptop, etc.) running the Windows 10 operating system.
.
In addition to the simple disabling options described, users can disable the webcam in the settings of the basic BIOS
or
UEFI
on some types of laptops.
This setting is more common in the system settings of business laptops because it allows enterprise system administrators to disable access to the webcam to improve security. And if the webcam in the system firmware “BIOS”
or
“UEFI”
was disabled, then you need to re-enable it in the corresponding section of the laptop system firmware settings.
It is also possible to disable the webcam in the Device Manager application.
.
Performing this operation will prevent the camera from fully functioning until the user turns it on again. If the user has disabled their webcam in this way, then they simply need to return to the “Device Manager”
and re-enable the video device.
Open the Device Manager
in
the Windows 10
you can do it in different ways.
For example, press the “Windows + X”
or right-click on the
“Start”
in the lower left corner of the desktop, and from the pop-up menu, select the
“Device Manager”
.
In the application window that opens, find the “Cameras”
, display a nested list of installed devices in the section (click on the black arrow to access the hidden list), right-click on the webcam name to open the context menu and select the
“Enable device”
.
The command will be executed instantly, the webcam will be turned on and completely ready for subsequent use.
Let's sum it up
There are several ways to check whether the webcam is working on a laptop. The simplest and most reliable are to use special online services or a standard application for Windows. Manually turning the camera on and off is done through the device manager. It also displays the status of the webcam and updates drivers. To expand the capabilities of the camera, numerous specialized programs are available - they allow you to apply effects to the image, improve and supplement it in every possible way.
Install or update webcam drivers
Service for installing and monitoring the performance of applications and connected devices of the Windows 10
tries to install drivers automatically whenever the user connects his device, and usually such actions are enough for its full functioning. But such an operation is not always successful and the device works properly. In some cases, you may need to download a new device driver installation package from the webcam manufacturer's official website and install it yourself.
First, the user can try to update existing camera drivers from the Device Manager application.
.
Use the algorithm described earlier and open the application, then right-click on the webcam and select the “Update driver”
.
If the problem persists, then go to the webcam manufacturer's website and download the latest driver package to update it manually. The manufacturer's website should also provide additional troubleshooting instructions for your specific webcam model.
Possible problems
If the gadget suddenly stops functioning, reinstall it from scratch. Make sure you installed the software correctly.
The camera stopped recording - the driver was damaged. In this case, update it or download the latest version.
When the camera does not turn on, it is quite possible that a virus has been detected on the PC or new programs have been installed that interfere with the functioning of the gadget. If you keep turning off and on your device, check the USB port and cable.
Sources
- https://WindowsTune.ru/win7/devices7/nastrojka-veb-kamery-windows-7.html
- https://nastoysam.ru/kompyutery/kak-nastroit-veb-kameru-na-kompyutere
- https://allomart.ru/veb-kamera-nastroyka-tsvet/
- https://a174.ru/kak-zapustit-web-kameru-na-windows-7/
- https://moicom.ru/kak-vklyuchit-veb-kameru-na-noutbuke-ili-kompyutere/
- https://nabludau.ru/kak-podklyuchit-veb-kameru/
- https://mywebpc.ru/windows/vklyuchit-kameru/
- https://ITpotok.ru/rabota-s-web-kameroi-na-kompyutere-s-windows-7/
- https://lumpics.ru/webcam-setup-software/
- https://os-helper.ru/windows-7/kak-vklyuchit-kameru-na-kompyutere.html
- https://mirinfo.ru/pk-i-noutbuki/windows-7-kak-proverit-kameru.html
- https://pcpro100.info/podklyuchenie-veb-kamery-k-kompyuteru/
[collapse]
Double check your webcam connection to your computer
If none of the applications detect your webcam, then it is worth checking whether it is connected correctly. While initially paying attention to troubleshooting possible problems at the software level, users quite often do not consider the situation when the device cable was not properly connected to the computer, despite the fact that this is a fairly common reason.
If the webcam has a “USB connector”
, then make sure that
the “USB cable”
of the webcam is tightly connected to the
“USB port”
of your computer.
Unplug and plug it back in to make sure it is secure and not loose. Some webcams have indicators that light up when devices are connected. If so, notice whether the indicator turns on after connecting the webcam. It's also worth trying a different "USB port"
on your computer, as possible problems with the port can cause connection problems and cause the webcam to not work properly.
If the webcam is built into the laptop case, you should make sure that the user does not accidentally close it. Newer laptop models include privacy shutters that slide along guide slots to hide the webcam when not in use.
Alternative causes of malfunction
Obviously, we cannot fail to mention those who, for technical reasons, do not have a webcam. Perhaps this is a defect in the camera itself (rare). Here you should already use the warranty or service center; Achieving a goal manually can be difficult.
Perhaps due to a laptop fall or improper assembly, the camera is not connected to the card. Perhaps the cable is simply not connected or has fallen off; It also happens that the thread wears out completely.
Another option, like installing a camera in Skype on a laptop, is to close the other application that is using it. Two parallel connections will interrupt each other, and as a result the program will simply not use the webcam. Additionally, applications like Skype require DirectX to be installed, which can also be a troubleshooting key.
By following the suggested solutions to the problem one by one, you will be able to watch how the camera comes into working condition and opens up new opportunities when communicating with your interlocutor.
Check your webcam settings in the app and select the required device
So, services of the Windows 10
do not block the user's webcam, the correct drivers are installed on the computer device and the camera is connected securely. Perhaps the reason the camera is not detected by a specific application lies in the settings of the application itself.
In this case, the user may need to configure the webcam settings in the application in which he is trying to use it. This step is especially necessary when several video capture devices are connected to the computer at once. Sometimes an application that uses a video camera may automatically select the wrong device option.
Therefore, open the required application, go to the settings page and set your preferred webcam model. For example, in the user communication application “Skype”
on the main page, next to the user name in the upper right corner of the left sidebar, click on the
“More”
, presented in the form of three horizontal dots, to access a submenu in which, from the list of possible actions, select the
“Settings”
.
In the settings menu in the left panel, go to the “Sound and Video”
, and then in the right panel set your preferred webcam by selecting the one you are looking for from the options provided.
If the webcam is not displayed in the application, then the application may not support this model. Microsoft Store apps
(also known as
"UWP"
) mainly only support newer types of webcams.
According to Microsoft
, webcams designed for
the Windows 7
may not work with Store apps on
Windows 10
. But most apps still support older types of webcams. Therefore, if the webcam is not in the lists of available devices in some applications, but is displayed in other applications, then the specific model is not supported by this application, and you should purchase a more modern version of the camera.
Skype application
however, it has some peculiarities.
the Windows 10
operating system, the downloadable version
of Skype
and the pre-installed version of
Skype
are almost the same.
But they have some differences, one of which is the greater number of supported types of webcams in the downloaded version of the application compared to the pre-installed one. This is because the downloadable version of Skype
is a desktop app, while the pre-installed version is a
UWP
.
Third-party applications for VK
Many useful utilities have been developed that work perfectly in the Windows 7 environment. Below are the best ones.
Splitcam
Has wide functionality. Among them, especially noteworthy are the options for zooming, recording video, conveniently taking screenshots and adding a large number of effects.
iSpy
iSpy is a video surveillance program with the function of transmitting footage over the Internet. Allows you to partially replace the more expensive IP video surveillance technology and can be used to protect premises and outdoor areas.
To work with iSpy, you can configure an unlimited number of web cameras, including those connected to different computers on the same local network. The recorded material is saved in Flash format and transferred to the server for storage. The user can view both archives and real-time images at any time, as well as remotely turn on or off the cameras.
iSpy is supported by all versions of Windows and has no special hardware requirements.
CyberLink YouCam
CyberLink YouCam is a multifunctional solution that allows you to apply many different effects, filters, stamps, etc. to the webcam image. Processing occurs in real time while the user uses the device in other applications. It is worth noting the function of improving image quality by adjusting some parameters. Both a simple mode is available, in which brightness, noise level, exposure and other parameters are adjusted, and an advanced one, where more advanced settings are available.
Another feature that many users love about CyberLink YouCam comes in the form of the “Face Beauty” feature. When activated, the system applies image processing algorithms, after which facial features become more attractive and natural. To personalize an image, you can use a huge number of tools: scenes, frames, particles, filters, distortion, emotions, gadgets, avatars, markers and stamps. In this case, both built-in content and additionally downloaded content can be used. The developers have optimized the solution for working with Skype - just select CyberLink YouCam as a camera in the application settings.
WebcamMax
It is very similar to the previous utility, but has much wider capabilities for applying effects.
WebCam Monitor
WebCam Monitor is designed to transform a webcam into a full-fledged video surveillance device and works on approximately the same principle as Live WebCam. The device is automatically activated when there is movement or noise in its field of view - this depends on the settings. It is possible to monitor both the entire area and certain parts of it. Setting up the webcam itself occurs instantly when it is connected. The developer claims that more than 100 models are supported without the need to install drivers.
Additional actions that will be performed when the device is activated, in addition to video recording, are also configured. These include taking a screenshot, sending a notification to the user's email, launching another application on the computer, playing any sound, and downloading media files. Captured videos can be saved to your hard drive or automatically sent to an FTP server. Among the shortcomings, it is worth highlighting the lack of a Russian-language interface, a limited demo version and a limit on the number of connected web cameras, which does not disappear even in the paid version.
ManyCam
Allows you to improve image quality. Adds funny effects.
The application specializes in video surveillance and has the ability to constantly stream video over the global network. Supports simultaneous operation of several VKs. All captured videos are saved on the server. Allows you to remotely control whether the camera is turned on or off.
LiveWebCam
LiveWebCam is a program for taking photographs using a web camera. Can work in manual and automatic modes. To use the latter, just adjust the time interval between shots. Images are automatically saved to disk and can be viewed as a slide show.
LiveWebCam is simple and free. To create a home security system based on it, all you need is a computer with Windows 7 and a very ordinary web camera.
Webcam still not working
If, after using the presented troubleshooting methods, the webcam still does not work in any application, then most likely it is simply broken. If it's an external webcam, try connecting it to another computer and see if it works.
And in the event of a malfunction, contact the service center for a free fix if the warranty period of your laptop (if it has a built-in camera) or the warranty period of the webcam (if it is an external device) has not yet expired.
Additional Tips
If you have multiple devices (webcams, video capture and everything in between) connected to your computer, the app you are trying to use may be trying to select the wrong device. Your application may not support the webcam you are trying to use. For example, new Windows 10 apps only support newly created webcams, so if you have an older version, it may not work with the new app. Most desktop apps are still compatible with older webcams. If you have an external webcam, connect it to another computer and see what happens.