Modern technologies allow you to connect a video camera to your computer and make video calls from it, maintain a video blog, or install a home video surveillance system.
To connect a webcam to your computer, you need to follow a number of fairly simple steps.
How to connect a webcam to a computer
Install webcam software
Before you can start using your webcam, you will need to install drivers on your computer. Depending on your webcam, you will either receive a CD with drivers or instructions on how to search for them online. Since many computers today don't have a disk drive, this may be moot and you'll need to skip to the No Disk section in this guide.
Using CD
Unless otherwise noted, insert the disk that came with your webcam before connecting it.
Windows will recognize that you are trying to install software and a wizard should appear to walk you through the driver installation process.
If this doesn't happen, simply go to "My Computer" or "This PC" in Windows 10 using desktop search or the Start menu and click on the CD drive (usually E:) to launch the files on the drive .
No disk? No problem! Plug and shoot
Increasingly, hardware (including some webcams) comes without a driver installation disk at all. There can be a variety of reasons for this, but the biggest one is that Windows has (usually) excellent capabilities for recognizing and installing hardware without the need for software.
If your webcam doesn't come with a software disk, just plug it in and see what happens. Most often, Windows will recognize it as new hardware and will either be able to use it or walk you through the process of finding drivers (online or on your computer) to use it.
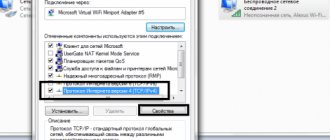
You can also use Windows Update to manually search for drivers. Type Device Manager into the search box on your desktop in Windows 10. The app you are looking for will be the first result.
When the window opens, you will see a complete list of devices on your computer. Find your webcam under Cameras or Imaging Devices. Right-click and select Update Driver from the menu that opens. Go through the wizard to see if Windows can find the drivers.
Of course, nothing may happen when you connect to the network, and Windows will not find the drivers. In this case, you should probably read the instruction manual or visit the manufacturer's website to find driver software for your webcam. This is also what you should do if you lose or throw away the disc that came with your webcam. In recent years, as disk drives have become less common, webcam manufacturers have become much more likely to offer the latest drivers over the Internet.
Microphone settings
Since the microphone in modern webcams is built-in, you can configure it through the same utility. Some webcam models do not have a recording device, so you should check at the purchasing stage whether the microphone is built into the camera.
If everything is done correctly, but there is no sound, then you may need to change the settings in the Windows mixer. In the mixer section, in the general properties, you need to move the checkbox in the “Levels” - “Microphone” section to the right side.
You should also check that the sound recording device is turned on. To do this, right-click on the microphone icon, select “Properties” and in the “General” section check whether the device is allowed.
If a malfunction occurs, first of all you need to check the mixer settings
Most brands provide webcams that are easy to connect and don't need to be configured—they work right after they're connected to your computer. If the webcam is installed for the purpose of using video communication or video recording, then you need to configure the camera and microphone in the program through which recording and calls will be made.
Find the webcam's USB (or other) connection
Most webcams connect via a USB cable or something similar. Make sure you find it on your computer. It's usually found on the front or back of your computer and looks like a tiny rectangle "ready to accept your USB cord."
Connect your webcam and watch the magic happen. Your Windows computer should either automatically open the installed software when you connect your webcam, or you can navigate to it through the Start menu when you're ready to use it.
Alternative causes of malfunction
Of course, we can’t help but mention those whose webcams really don’t work for technical reasons. Perhaps this is a defect in the camera itself (not common). Here you should already use the warranty or service center; manually achieving the goal can be difficult.
There is a likely situation when, due to a laptop fall or incorrect assembly, the camera is not connected to the board. It is possible that the cable is simply not connected or has fallen off; it is also possible that the wire has completely worn out.
Another option for setting up a camera in Skype on a laptop is to close another application that is using it. Two parallel connections will interrupt each other and, as a result, one program simply will not use the webcam. Also, applications like Skype require DirectX to be installed, which can also be the key to fixing problems.
By performing the proposed methods for solving the problem one by one, you will be able to watch how the camera comes into working condition and opens up new opportunities when communicating with your interlocutor.
Sources
- https://ya-rostislav.ru/cifrovaya-tehnika/web-cam/proverka
- https://www.orgtech.info/kak-vklyuchit-kameru-na-noutbuke-pod-upravleniem-windows/
- https://hd01.ru/info/kak-podkljuchit-vstroennuju-veb-kameru-na-noutbuke/
- https://vacenko.ru/podklyuchaem-kameru-do-svoego-pk-ili-noutbuka/
- https://WindowsTune.ru/win7/devices7/windows-7-kak-vklyuchit-kameru-na-noutbuke.html
- https://reedr.ru/elektronika/noutbuk/kak-vklyuchit-kameru/
- https://fintaxi.ru/kak-podklyuchit-kameru-na-noutbuke-aser/
- https://allomart.ru/nastroyki-veb-kamery-na-acer-aspire/
- https://a174.ru/kak-vklyuchit-veb-kameru-na-noutbuke-aser-windows-7/
- https://onoutbukax.ru/kak-vklyuchit-kameru-na-noutbuke/
- https://tvoykomputer.ru/kak-nastroit-veb-kameru/
[collapse]
Place the camera on a flat surface
You don't need to be a professional photographer to take effective webcam videos or photos, but some techniques do apply.
Your webcam should be placed on a flat surface to prevent your images and videos from appearing curved or distorted. Some people use a stack of books or even a tripod, especially if you're interested in setting up your webcam to capture video other than what's directly in front of your screen, and this is what many people prefer.
What if the VK is not detected in the device manager?
In this case, the equipment must be provided with suitable software.
Typically, Windows 7 itself does a good job of installing the necessary programs. You just need to click “Update Drivers”.
In the next window, it is recommended to click on the first option.
If it was not possible to install the appropriate software in automatic mode, you will first have to read the exact name of the VK from its accompanying documentation, and then install the drivers from the manufacturer’s official source.
Find the webcam clip
Depending on the style and model of your webcam, it may or may not have a convenient and adjustable clip to attach it to your monitor.
Most people prefer to mount their webcams to the top of their monitor because this allows them to record themselves while they look at the computer monitor. This is useful if you are recording a webcast, video diary, or communicating with friends or family via webcam.
Attach your webcam to your monitor
Once you are sure the clip is securely attached to your monitor, you are ready to install your webcam. If your monitor is very thin, securing it may require a little more creativity, but webcam manufacturers also take into account the existence of ultra-thin displays.
Tethering a webcam to a flat panel display is probably the most useful and versatile place you can place it. And, of course, it is easy to remove it and place it in another place if you need to.
In fact, this is one of the features that puts desktop webcams a step above standard laptop webcams, as they are typically fixed in one place - the center of the top of the monitor. Of course, the trade-off is that your laptop itself is portable.
Quick Guide
Connecting a webcam to a computer is quite simple. Both a schoolchild and a middle-aged person can cope with this.
- Remove the device from the package and unwind the cord.
- If you have a clip-on camera, securely attach it to your monitor. The stationary one is simply fixed with a leg on the table.
- Insert the plug into the USB connector.
- After the PC recognizes the webcam, check whether the microphone is configured.
By inserting the USB cable into the corresponding hole, you will see a pop-up window at the bottom right. Click on it and the “Hardware Update Wizard” will open. It will immediately prompt you to automatically install the driver. Click “Next” and just wait for the system to start. If this does not happen, the “Master” will notify you that there are problems with the device.
In the case when the OS “does not see” the web camera, manual installation of drivers is required. This usually happens with windows 7 or 8/8.1. There may be difficulties at this point, but in the end everything is surmountable.
Go to webcam software
Once you've connected your webcam and placed it where you want it, it's time to turn it on and see what it can do!
Since you've already installed the software that came with your webcam, using it is as simple as opening the Start menu and navigating to your webcam program, shown here as Logitech Webcam Software . Obviously, yours will be related to the make and model of your own webcam.
Windows 10 comes with its own Camera , which works very well with most brands if your webcam's native software is missing.
Procedure for connecting and setting up VK
Typically, the already built-in camera in laptops is in standby mode, that is, it is almost completely ready for full use. You just need to open any communication program, for example, Skype, and specify the required video settings in it.
Sometimes the application cannot detect VK. In this case, the camera must be turned on. In laptops, for this purpose, simultaneous pressing of the following two keys is often used: “Fn” and a button with a “camera” icon printed on it.
How to connect an outdoor VK
Most often, the connection is made using the supplied USB cable. You just need to insert the plug of the cable coming from the VC into the corresponding port on the computer.
If there is a complete absence of any reaction from the PC after connecting the VC, we can conclude that the wire or connector in the computer is faulty.
How to check the functionality of the latter? To do this, you will need to install some (known good) USB device into the connector, for example, a flash drive.
If the external media is displayed normally in Windows 7 Explorer, it means that everything is fine with the USB port, but you need to replace the defective cable or the VK itself.
External versions of webcam models are mainly equipped with a disk with software. Therefore, after connecting the device to the PC, you need to insert a “CD” into the optical drive and install the software.
Typically, proprietary programs have a wide range of settings, which significantly increases the ease of use of the equipment.
Possible problems and their solutions
Even a new device may be faulty or unable to be configured. If the camera does not want to connect to the computer, then the device may have a manufacturing defect.
You can check the serviceability in the “Device Manager” - if the purchased device is not displayed in the “Other devices” section, then it is faulty. When a name with a yellow triangle is displayed, you need to disconnect and reinsert the cord into the USB port - most likely the camera is not connected correctly.
Problems with webcam operation can arise of various types, but most can be solved without changing the device.
- The camera has stopped working, although everything was fine before - you need to reinstall the webcam from scratch, the software may be damaged or the operating system on the computer has been reinstalled.
- Some functions do not turn on or the webcam stops recording during operation - such faults are usually caused by a damaged driver. Solution: download the latest version of drivers from the official website and install.
- The software does not start or the camera operates problematically - the operation of the device may be affected by the installation of new programs or the presence of a virus infection on the computer. Reinstalling the device from scratch helps.
- The camera constantly turns off and on, or is no longer detected by the system - you need to check the operation of the USB port, it may be damaged. You should also check the cord.
Almost all problems associated with the operation of a webcam can be solved by completely reinstalling the software for the device and updating the drivers. In some cases, connecting to a different USB port helps. It is important to update the software promptly and regularly; sometimes new versions of drivers correct factory and software errors.