08/15/2018 Category: SettingsAuthor: Ekaterina Vasilyeva
All laptops are equipped with a built-in webcam. Users can use it as a tool for video chats in various instant messengers, for example, Skype. Windows 10 has a special standard Camera application that allows you to quickly launch it on your laptop like on a phone to take an instant photo or shoot a video. Today we’ll look at how to enable and configure the camera in the application of the same name, as well as how to give certain programs access to it. In addition, we list effective ways to troubleshoot problems with the web.
- Launching an application through the Start menu
Video: launching the Camera utility on Windows 10
- How to disable the webcam on a Windows 10 laptop
- How to set up a webcam on a laptop
- What to do if the camera doesn't work
Checking antivirus settings
- Update or install driver
- Rollback to a previous driver version
- Removing and Rediscovering a Webcam
- Troubleshooting issue code 0xA00F4246
Video: what to do if error number 0xA00F4246 appears when launching Camera
Method 1. Check the laptop camera driver
The most important point is that the webcam driver works correctly. If the driver is not installed or turned off, the camera will not work.
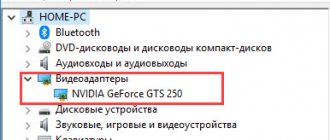
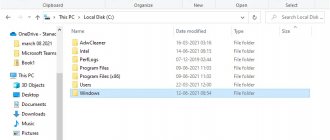
To check the driver, go to the device manager and look at the driver in the list of devices.
- Right-click on the Start button .
- Open - Cameras or Imaging Devices .
- Check to see if the camera driver is installed and enabled.
Open Device Manager in Windows 10
If the driver is turned off, then right
on the driver and click
turn on the device
.
Turn on the laptop web camera driver
If you have a problem with the webcam driver, you can contact me - leave a request for remote assistance.
Computer assistance services - leave a request in the VK group.
If the driver is turned on, but the web camera still does not show, check whether the camera is turned on, as shown below.
Key combination
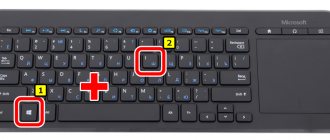
Most laptop and netbook models are equipped with so-called “Hot Keys”. With their help, the procedure for activating the video camera is simplified to just a few clicks.
The procedure will be as follows:
- Click on the buttonFN» on the keyboard and without releasing it, press the button with the camera icon. In my case it's " FN+ESC».
- After this, the standard camera control program should start.
If this method does not bring results, then you may have encountered one of two types of malfunctions:
- The keys are faulty.
- The required software is not installed.
Each option will be discussed in more detail below. In the meantime, I suggest moving on to the main ways to fix the problem.
Method 2. Check the camera using a standard Windows tool
Press Win+I to go to Windows 10 settings.
Hotkeys Win+I to open Windows 10 settings
Go to Privacy.
In Windows 10 settings go to Privacy
- In the left column, click - Camera .
- In the right column, click - Edit .
- Turn the switch to the On .
- Make sure the switch below is also On .
Enable access to the camera in Windows 10 settings
Scroll down the window and enable applications that require access to the camera. For example, I enabled the camera for the Skype and Camera apps.
Enable the camera for applications in Windows 10
After enabling the camera in the Windows 10 settings, let's check it through the Camera application.
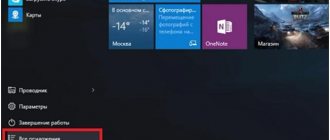
- To do this, go to Start .
- And launch the Camera .
Open the Camera application
If you did everything as above, then the camera should show the image.
Shows the image in the Camera app
Steps for connecting and setting up an external camera
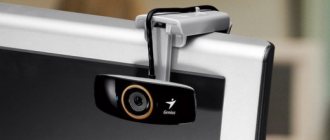
The camera is an external device. It is connected via the USB port of the computer. Different types have different designs and shapes, determined by the manufacturer. Almost all varieties are equipped with a built-in microphone, which can significantly save money.
For connection it is worth using active extension cables. They provide the device with additional power, which improves picture and sound quality. This cable also allows you to install the device at a distance of up to 10 meters. If you use a passive cable, then it is limited to five meters.
A disc is included with the camera. It contains drivers for installation and software from the manufacturer. To set up the camera, you need to:
- Connect it via USB port.
- If provided, press the button on the camera to turn it on.
- Install the disk and download the drivers.
Software from the manufacturer allows you to adjust the microphone volume, disconnect and connect the camera. Most often, driver installation is not required, since the system searches for them automatically after the camera is connected.
Settings for basic video parameters can be made in the window, the opening of which is described above. Here you can switch to photos or videos, set a photo timer, or switch to professional mode.
To make advanced settings, you need to click on the icon located in the top right corner. These settings allow you to:
- set the button hold parameters for taking videos and series of photos;
- select a framing grid and slow-motion mode for photo mode;
- select video recording quality and flicker reduction.
Method 3. Check the webcam through an online service
You can check the camera without installing any programs on your computer. To do this, it is enough to have an Internet connection.
Online service No. 1 - checking your webcam online
To test your webcam online, follow the link - webcammictest.com
The site will open, click check webcam .
Opening an online service for web camera testing
A window will appear asking for permission to use the camera, where you must click - Allow .
Allowing the use of the camera
If the camera is working and turned on, an image should appear.
Checking the camera image in an online service
Online service No. 2 - webcam test
Another online service for checking web cameras is ru.webcamtests.com
Click the test camera button and enable the camera as shown below.
Open the online service ru.webcamtests.com to check the web camera
There is an image - camera testing completed successfully
Trouble-shooting
In some cases, standard startup methods do not work and the imaging equipment remains inactive. There may be several reasons for this:
- If keystrokes are used, they may be faulty. Especially if liquid has been spilled on the keyboard or the laptop has not been cleaned for a long time. There are two solutions: either carry out repairs or cleaning, or use other methods of turning on the camera.
- There are errors in the system.
- Drivers are not installed.
- Driver software failure.
Let's look at each point in more detail.
Method 4. Checking the webcam in Skype
In Skype, the camera can be checked in the program settings. Go to settings as shown in the screenshot below.
Go to Skype settings
Go to the Sound and Video . An image from the web camera should appear.
Checking the camera on Skype
If the camera does not show, then move on to the next method.
How to connect and configure the device
The Windows system has settings that allow you to easily and quickly configure all elements responsible for sound, image and video. To open the camera in the Windows 10 operating system, you must:
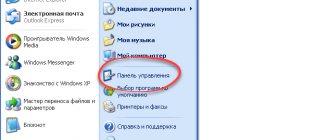
- Click on the “Start” button.
- In the general list of applications, find the “Camera” service and click on it. All applications in the system are sorted alphabetically, which allows you to quickly search.
- If the settings are correct, detailed information about the application will appear, it will be activated, and as a result you will be able to view the image from it.
After these steps, you can perform all necessary operations with the device.
Method 5. Turn on the camera using special keys on the laptop
You can turn on the camera on your laptop using hotkeys. I note that not all laptops can turn on the camera using the keyboard.
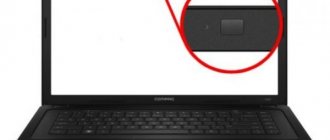
In any case, look for a key on your laptop keyboard that shows a camera or something similar to a web camera.
Asus laptop
On Asus laptops, the camera is turned on using the Fn+V .
Or Fn + key with a picture of a camera or camera.
Turning on the camera on an Asus laptop
Lenovo laptop
On Lenovo laptops, the camera is turned on using the Fn + Esc .
Or using the Lenovo Vantage program. To open this program, type in the search bar - lenovo vantage .
On a Lenovo laptop, open Lenovo Vantage
In the Lenovo Vantage app, turn on the camera by pressing the camera button.
Turn on the camera in Lenovo Vantage
MSI laptop
On MSI laptops, the camera is turned on using the Fn+F6 .
Enabling the webcam on an MSI laptop
On other laptop models, try these keyboard shortcuts:
- Fn+F8
- FN+F10
- FN+F5
Turning on the camera on a laptop using the Fn+F10 keys.
If you have problems with your computer or laptop, then you can contact me for help - subscribe to the group in contact https://vk.com/ruslankomp and leave a request for remote help.
I will help you solve a problem with your PC or laptop. Join the VK group - ruslankomp
Possible problems
Users periodically encounter difficulties when using a webcam. First, you need to clarify whether the laptop actually has a webcam, since some models (especially those with edge-to-edge screens) are produced without a camera. The tool can also be hidden in the sliding mechanism or under one of the buttons.
If any application refuses to show a picture taken on a webcam, it is important to check whether the appropriate permission has been granted to the program. To do this, use the “Privacy” section from the “Options” menu. If even the correct settings do not allow you to launch the webcam, you need to forcefully update the drivers:
- Open Device Manager.
- Expand the "Cameras" tab.
- Right-click on the name of the equipment involved.
- Click the Update Driver button.
After installing the latest software, the webcam should work. It would also be a good idea to test the operating system for viruses, since malware periodically affects the performance of some elements of the laptop.
Errors and damage to components
Very often, some OS functions stop working correctly as a result of a system failure. For example, after an incorrect or abrupt shutdown of the laptop, damage to the hard drive side, or the presence of viruses.
The last two options should be checked separately, after which you can begin troubleshooting steps:
- Launch the command line. Read more about how to open it in Windows 10. In the seventh version, the principle will be the same.
- Windows 10 users enter the command “DISM /Online /Cleanup-image /Restorehealth” and press “Enter”. After it is completed, run the command “sfc /scannow”.
- Windows 7 users type only “sfc /scannow” into the command line and click “Enter”.
- We wait for the procedure to complete and restart the laptop.
- All that remains is to check the file system errors. To do this, open “Computer”, right-click on the OS drive and go to “Properties”.
- Go to the “Service” tab and click on the check button.
- We check the boxes on the existing items and start the check. In the tenth version there are no additional checkboxes, so we just start checking.
- If the system asks to add a procedure to the scheduler, then add and reboot the laptop.
After this, we try to re-enable the webcam using the keys or from a special section in the Start menu.