When writing an article, the Word text editor underlines words, thereby indicating grammatical or punctuation errors. If a word is misspelled and already exists in the program dictionary, the word will be replaced (if autocorrect is enabled). There are cases when you need to check spelling in Word, but autocorrect is not turned on and the program does not underline words with mistakes at all. In this case, let's look at how to check a document for errors in words and punctuation.
Setting up automatic text checking
To automatically highlight places with spelling and grammatical errors, you need to:
- Go to the “File” tab and click on “Options”;
- In the left panel of the new window, select “Spelling”;
- In the “When correcting Word spelling” area, check the boxes “Check spelling as you type,” “Use... spell checker,” or “Mark grammar errors...”;
- You can check all the boxes in this subsection, since all of the listed variations will help in working with text.
Attention! If Word has stopped highlighting errors with a red line, then you must uncheck the boxes in the “Exceptions for file” subsection. Go to “File” - “Options” - “Spelling” and finally “Exception for file”. Uncheck the lines “Hide spelling and grammar... in this document.”
After this setting, the document will highlight not only spelling errors, but also punctuation errors.
A little history
Back in 2010, I created an entertainment resource about cinema, where I published film reviews, reviews of premieres, and biographies of actors. Four years later, more than three thousand articles were posted on the site. One day I decided to look at my first recordings and was stunned. I discovered a lot of grammatical and punctuation errors; the sentences consisted of many phrases and were not easy to read. At that time I did not check their spelling, but in vain. The first days I couldn’t calm down and edited old texts to bring them to mind.
This program has a very useful built-in functionality that highlights (underlines) incorrect input with a red or green wavy line. But the check does not always work automatically. You may need to enable it first in the application settings. How to do this - you will now find out!
How to enable automatic error checking
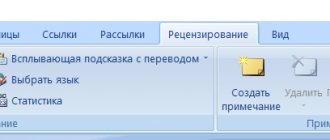
Thanks to this function, you can easily fix all errors at once. You can turn on “Check spelling and grammar in the text” using the F7 button or go to the “Review” tab - in the “Spelling” section - click on “Spelling”.
A new window will open and the first error made will pop up. You can correct it directly in the “Not in the dictionary” area, or specify the desired form in the “Options” section and click replace.
Attention! MS Word does not automatically correct punctuation marks. Therefore, if you see a green or blue wavy line throughout the text, you will need to make changes yourself, that is, manually. Moreover, the program gives hints after which word is missing a comma.
Next, a new window will pop up with a new error and this will continue until all errors are corrected. After all the changes, a window will pop up notifying you that the spelling check is complete, click on “Ok”.
Word will then provide readability statistics. We hide this notification by clicking on “Ok”.
Enable and configure spell checking in Microsoft Word
Using such a powerful word processor, it is foolish to turn to a dictionary to correctly spell controversial words and phrases. Let Word do this thankless job! But the editor does not react to outright provocations and pretends that our writing is an example of literacy in the Russian language. Realizing that this is not possible, we ask ourselves: how to enable spell checking in Microsoft Word? The answer is below.
Automatic spell check
To enable this function, click “File” – “Options” – “Spelling”. In the window that appears, check the required fields and click the “Save” button.
Adding unknown words
To add similar words to the software dictionary and exclude its underlining in the future, you need to select it (or a phrase), right-click and select “Add to dictionary” in the context menu. When you click on the “Skip” option, this lexical structure will no longer be highlighted in this document.
Enable spell checkers
If for some reason, when checking spelling, a notification appears with the text “Spell checking completed” or “Spell checkers for the language are not installed,” you need to do the following:
- Go to “This PC” – “Uninstall or change a program”.
Enable spell checking for the selected language
If you type in other languages, spell checking may not work. To enable it you need:
- Click on the language you are using in the bottom panel.
Manual error checking
A red underline means that the word is likely misspelled or the phrase is unfamiliar to Word and is not included in the dictionary. You can easily correct errors manually, as follows:
1) Right-click on the highlighted word and select the correct option in the window that opens.
2) Add a new word for Word to the program dictionary. Right-click on the incorrect word and select “Add to Dictionary” and the underline will disappear. If you continue to use this word, the underline will not appear.
3) Find the book with a cross at the bottom of the Word program (if there are errors) and click.
The correct spelling options will appear, you need to indicate the correctly spelled word.
Thesaurus. What kind of animal is it and why is it needed?
Surely many people have noticed the thesaurus and always brushed aside attempts to understand it, considering it unnecessary. This is in vain, because in some cases this parameter will be simply irreplaceable. Of course, the need to dispose of it entirely depends on the size of your vocabulary and knowledge of the language. If you had to write a text in an unfamiliar language, a thesaurus will help you avoid repetition and inappropriate use of expressions, since its main function is to select synonyms and antonyms.
To open the thesaurus, select the editable or inappropriate expression, right-click on it and find the “synonyms” command. This is where you will find this function. From the list of suggested expressions, select the most appropriate one and use it in the text.
These, in fact, are all the parameters responsible for the correctness of your text and its overall “readability”. Using these settings can greatly facilitate both your work and the reader’s perception of the knowledge you have presented.
How to set up Auto-Correction
The “auto-correct word” function is very useful, since when typing quickly, there are misspellings in words. This function will help you correct an incorrectly written phrase automatically; to do this, you need to make the following settings:
1) By clicking on the “File” section, select “Options”;
2) In the pop-up window on the left side, find “Spelling”, in the “AutoCorrect Options” section, click on the “AutoCorrect Options...” button;
3) In the “AutoCorrect” section, check the box next to “Replace as you type”;
4) Add a phrase that is often printed incorrectly. For example: “assistant” enter under the “replace” field as an incorrect option, and under the “to” field indicate the correct word form and click on “Add”. As shown in the picture below.
You can add any phrase and indicate its correct spelling. It can also be an abbreviation of everyday phrases, an abbreviation, or the name of a hotkey in English. Here are examples:
Permission
To resolve this issue, follow the methods in this article in the order they are presented. If you previously provided one of these methods and it did not help resolve this issue, you can skip this method and move on to the next one.
Method 1: Install spell checkers
To install spell checkers, follow these steps:
Close all programs.
Click the Start button and select Control Panel.
- In Windows 7, click Uninstall a program in the Programs section.
- In Windows Vista, double-click Programs and Features.
- In earlier versions of Windows, double-click Add or Remove Programs.
Select * *Microsoft Office * * edition * * * * , and then click Change .
In this step and in the next step, the * * Edition * * placeholder represents the edition of Microsoft Office installed on the computer.
In the * * Microsoft Office * * Edition * * * * dialog box, click Add or Remove Features, and then click Continue.
Expand General Office Features, click the icon to the left of the Proofing Checker, and then select Run everything from my computer.
Method 2: Enable the US English Proofing add-in
To enable the add-in, follow these steps:
Click the File tab, and then click Options.
On the left side, click Add-ons.
At the bottom of the Word Options dialog box, click the drop-down arrow under Manage, change the selection from com add-ins to Disabled Items, and click Go.
In the Disabled Items dialog box, check to see if the en-US Spelling (nlsdata0009.dll) option is available in the Select the one you want to re-enable box.
If the spelling file en-US (nlsdata0009.dll) is listed, select it and click Enable.
Click Close and then OK.
Method 3: Enable spell check as you type
To enable spell checking as you type, follow these steps:
Click the File tab, and then click Options.
In the Word Options dialog box, select Check Spelling.
In the When correcting spelling and grammar in Word section, make sure that the check spelling as you type option is selected.
Make sure all checkboxes are cleared in the Exception for section.
Click OK.
Method 4: Select a language and uncheck the "don't check spelling and grammar" checkbox.
To clear the "Don't check spelling or grammar" checkbox, follow these steps:
Select all document content.
On the Review tab, select a language in the Language group and click Set Proofing Language.
In the Language dialog box, select the desired language.
If the option to not check spelling or grammar is selected, clear the checkbox.
Click OK.
If this method resolves the issue, repeat steps 1 through 3 to reopen the Language dialog box, and then click Set as default.
Method 5: Changing the Registry
This article contains information about how to modify the registry. Before making changes to the registry, be sure to create a backup copy of it. Make sure you know how to repair the registry if a problem occurs.
To resolve this issue yourself, follow these steps:
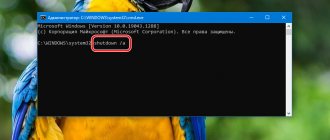
Click the Start button and select Run.
In the Run box, type regedit, and then press ENTER.
Locate and right-click the following registry subkey:
HKEY_CURRENT_USERSoftwareMicrosoftShared Toolsproofing Tools1.0Override
Click the Remove button.
Close Registry Editor.
Quit and restart Word.
How to change a phrase in the AutoCorrect list
You need to scroll through the entire list and find the phrase you need, highlight it so that it appears in the “replace” field and in the “to” field.
Now all that remains is to place the mouse cursor in the desired field and enter your own spelling of a symbol or phrase, replace and save. Let's look at an example. To quickly write a character(s) in the form of “@”, you first need to add and indicate which character will be replaced.
The actions are standard, as before when adding a new phrase. “File” - “Options” - “Spelling” - “AutoCorrect Options”. In the section where “AutoCorrect”, under the “replace” field, enter “(a)”, and in the “to” field, write “@”. Add and click “OK”.
Now is the time to check. We print the desired fragment of the article and write “(a)” (in the picture below), replacing it with “@” occurs after pressing the “)” final character.
Working with Word will become much easier if you make all the settings for autocorrecting different phrases. Just imagine that you can type (Moscow State University) in one second by just writing three letters “mgu”. Thanks to certain options, the user will be able to automatically check for correct punctuation, very quickly, considering that viewing a document of 10 A4 sheets manually will take a long time. In this case, we are talking about using the “Spelling” option in the “Review” section.
Readability Statistics
When writing an article, you should always consider the target audience. Even if technically simple material is described in complex language, the proportion of readers who cannot master it will be higher. For example, in the audience of the OSZone.net portal there are many schoolchildren who have not yet reached high school. But, say, they may well need material on creating a PowerPoint presentation. Therefore, efforts must be made to write articles in understandable language.
Statistical data collected by programs about your text will help you evaluate your work. They will be displayed after checking spelling if you check the "Readability Statistics" checkbox in the spelling options of Word 2010 (Figure 2) and/or Outlook.
In addition to information about the number of words and characters, the statistics include indicators of ease of reading.
Figure 11 - Based on reading ease indicators, this article should be understandable to a ninth grader
The findings about reading ease and the level of education required to understand the material are based on tests created by Rudolf Flesch and J. Peter Kincaid. Of course, these formulas were developed for the English language, and the level of education is focused on the USA, but this does not in the least interfere with evaluating the text.
Educational level can be thought of as the number of years of education (school, university, etc.) sufficient to understand the material. A score of 9.0 for this article means that you need to study for nine years to understand it without difficulty.
You can make adjustments for the level of school education in Russia and neighboring countries, depending on your knowledge in this area or the degree of patriotism. In any case, as I expected, to understand this article it is enough to have a school education.
Reading ease is calculated using a different formula. The higher the final value, the easier the text is perceived. Anything over 90 should be easy to read for an 11 year old. Texts with ease of reading in the range of 60 - 70 can be easily understood by a teenager aged 13 - 15 years. If the values fall below 30, then you won’t be able to understand the article without a university diploma (or a bottle).
In US government organizations, a minimum reading ease requirement is established for many documents and forms issued to citizens for completion.
The result of this approach is obviously an overall time saving, so it's not just Microsoft that includes readability statistics in its programs - Google Docs, for example, has the same feature.
However, you shouldn’t get hung up on statistics. If all the sentences in a document consist of two or three words, the numbers will show that it is enough to graduate from kindergarten to read it easily. But it is unlikely that such creativity will be highly appreciated by those for whom you are actually writing your article.
A little recommendation from Lumpics
When checking your written document for errors, pay special attention to those words that you most often misspell. Try to remember or write them down so as not to make the same mistakes in the future.
In addition, for greater convenience, you can set up automatic replacement of a word that you constantly misspell with the correct one. To do this, use our instructions:
Lesson: AutoCorrect Function in Word
That's all, now you know how to check punctuation and spelling in Word, which means that the final versions of the documents you create will not contain errors. We wish you good luck in your work and studies.
Describe what didn't work for you. Our specialists will try to answer as quickly as possible.