Guys, I clicked something in Word and now everything is written or deleted as an editorial change, I don’t know how to remove it.
I pay 10 bonuses for urgency. Thank you.
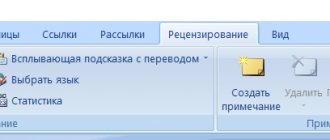
The review (or corrections area) in Word is removed as follows:
- Open the “Review” tab (it’s at the top, I have it sixth from the left):
If a confirmation window appears after this, click “ok”.
Very convenient thing Corrections. It will be possible to check something in Word and make your own notes so that another user can see their mistakes. Many beginners do not know how to remove these corrections.
And this is very easy to do, you will need to go to the “Review” section, and there you will find the “Record corrections” block. Next, select “No corrections.” This sequence is used in Word 2013; there may be slight differences in other versions.
In Word 2007, look for disabling reviewing like this.
Open the “Review” tab, find the “Changes” command, and here, accordingly, you need to select one of the “Accept” or “Reject” buttons. Select “Accept”, and then click “Apply all changes to the document”.
Microsoft Word has a special Review tab, which displays all the changes that have been made to the document. It has a Tracking section. And already there, most likely, the Correction button is pressed. In this case, each corrected letter will be highlighted in red.
To make all this disappear, you should pay attention to the Changes section. In this case, the user can accept the changes or ignore them.
To make everything disappear, you first need to press Changes. And only then go through the changes that were made to the document. Otherwise, the problem will return at the first correction.
The easiest way is to make a few mouse clicks in the corresponding column called “review”, which is located at the top of the panel. There is an interesting button “Corrections”, click on it, then select one of the proposed options. In our case, this will be to accept the corrections or reject them. After you have completed all these actions, the only thing left to do is usually reboot.
Reviewing a document in Word 2010 can be disabled in several ways:
- it's either accept the corrections,
- undo corrections
- use the “Changed Document” command - subcommands original or modified.
To do this, you need to go to the Review tab in the top menu, and then select the appropriate command.
I was sitting here racking my brain because they had thrown out a contract that had to be sent to an English-speaking subcontractor, who was horrified by the corrections in the Word document, which actually confused me at first with the abundance of erasures and notes. But I simply removed these corrections in Word out of sight by disabling them in the view: Tools -> Options -> Corrections -> set the “Use in markup and web document mode” field to “Never”
But how to explain to the burg, without having English MS Word at hand, where he could disable the viewing of corrections, was not entirely clear, so the only way to eliminate this terrifying appearance was the opportunity to accept these corrections, which is done as follows:
for office 2003: Tools -> Corrections -> in the toolbar that appears, select Accept selected corrections -> Apply all changes in the document
for 2007 office: Review -> Accept -> Accept all changes
After that, we send a normal document to a grateful clientele, without unnecessary headaches.
Accept or reject changes to a document
To complete the Corrections feature, you must accept or reject the corrections. To accept corrections, you must perform the following algorithm of actions:
- Select the desired edit or place the cursor at the beginning of the document.
- Select the “Review” menu.
- In the “Changes” command block, expand the list of possible options for the “Accept” command: for the entire document or for the current correction with options for moving to the next correction or not.
Sequential transition from one correction to another is performed using the “Next” or “Back” buttons.
If the corrections are not relevant, they must be rejected using the algorithm described above, but using the “Reject” button.
You can reject or accept the correction while reading the text. To do this you need:
- Place the cursor on the current fix.
- Right-click to open the context menu.
- Select the appropriate “Accept” or “Reject” option.
When the work of approving or rejecting changes is completed, the text of the document will return to its normal form.
We accept all changes immediately
So, we have already figured out how to remove the correction area in Word using step-by-step acceptance or rejection of comments, but what if all the comments in the text are appropriate, and you want to accept them all instantly. Or reject them all at once. Fortunately, this can be done.
To immediately accept all changes, you need to click on the arrow in the “Changes” tool group, which is located under the “Accept” button, and select “Accept all changes” from the drop-down list.
If you want to immediately reject them, then you need to do all the same manipulations with the “Reject” button.
How to remove corrections from a document
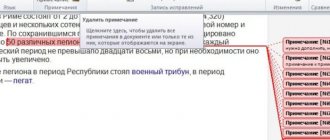
Details of each correction are contained in the callout located in the margin to the right of the text:
- reviewer's name;
- time and date;
- type of correction (deletion, addition, format change);
- text or indication of the edit format.
The disadvantage of displaying corrections with callouts is that they limit the text field and, for convenience, can be hidden when performing the following actions:
- open the “Review” tab in the menu;
- go to the “Show all corrections” section;
- in the “Callouts” line, select “Never”.
After this, the corrections are visible, but the margin callouts will be missing.
Interesting! Need to study it urgently!
Review modes in Word
If your document has a lot of edits, they can distract from the text while reading the document. Fortunately, there are several ways to set up the review mode in Word :
- Corrections: Shows the final version without any changes made. Red markers in the left margin indicate where changes have been made.
- All Corrections: Shows the final version with the changes made.
- No Revisions: This shows the final version and hides all edits.
- Original Document: Shows the original version and hides all edits.
How to hide tracked changes
- On the Review , click the Show for Review button. The Display for Review command is to the right of the Corrections command.
Review in Word - Selecting Review Mode
- Select the desired option from the drop-down menu. In our example, we'll select "No revisions" to preview the final version of the document before committing changes.
How to remove the correction area in Word
Nowadays, many experienced Word users use the Review tab. In addition, this is very convenient if several people need to work on a file. This feature allows you to create edits, leaders, and notes. The author of the file can either accept or reject them, or hide them. In addition, you can create comments for more productive work on the text.
Making an amendment
To enable the corrections area in Word, you need to go to the “Review” tab. If you don’t see one, press Alt then Shift+F10 and in the settings return the tab we need to the panel. After we have configured the panel and went to “Review”, select “Review Area”. A drop-down menu will appear in which you can select the display that is convenient for you. You can then make changes and comments. Anyone working with this text will see your notes. And the author will be able to agree with them, or not. This greatly simplifies working on the document.
Many edits may be hidden. If you want to display all or some of the elements, click on “Show corrections” and select the items that interest you. It is possible to print the document along with the comments made.
Removing unnecessary values
Now let’s figure out how to remove the review area in Word 2007, 2010. To remove all corrections or comments at once, you can simply accept or reject each of them. To do this, when viewing them, you need to click on the buttons of the same name in the “Review” tab. Clicking the Next button will easily move you to the next change and allow you to make a decision about it.
For very voluminous texts that have a large number of edits and notes, you can remove the correction area in Word in another way. Or you have a situation where all amendments and comments have ceased to matter. If you need to accept the edits in the document, click on the “Accept” drop-down menu. All you have to do is select “Apply all changes to the document.” Similar actions apply if edits to a file are rejected. Select the drop-down menu and click the corresponding “Reject all changes to document” button.
As you can see, this useful feature will be useful to many users of the Microsoft Word product. It will help facilitate the work on texts that are written in a team. And it will significantly reduce operating time. After all, each user will be able to view all the necessary tags in the file themselves.
Change mode in Word
To enable or disable the display of the corrections area in Word, you should find the “Review” tab in the top line of the Settings Ribbon and click on the button with the corresponding inscription. There is an arrow at the bottom of this icon, which means that clicking on it will open a drop-down list in which you can choose to display the review area. After that, you can make corrections and also insert comments into the text, and anyone who opens this file will see them, and the document creator can accept or reject them. If you are the author of this text, then you will just need to do this.
Sometimes such recorded changes are hidden when the text file is opened in a word processor. Then you will have to enable them from the same menu. Next to the button of the same name there will be a “Tracking” item. By clicking on it, you will receive a drop-down list in which you will need to mark all the proposed items. After this, the required elements will be displayed in full in the editing window. Actually, if you want to display not all the edits made and recorded, then select only the items that interest you in this menu.
Adding footnotes at the bottom of a page in Word 2007, 2010
It is much more convenient if, when you encounter an incomprehensible word, you can immediately look at the callout on the same page from below, rather than scrolling to the end of the entire text. Let's look at this moment. The following steps will help you create links in Word 2007 and 2010 at the bottom of the page:
1. Use the cursor to indicate the place that needs a note.
3. Select Insert Endnote.
A footer will appear at the bottom of the page, under which there will be all explanations for words or phrases that have the “Footnotes” sign throughout the text of the page.
4. It remains to add an explanatory fragment.
This method is called “Page by Page”. When creating a new page footnote, the listing will be sequential (i.e. in order).
The countdown of footnotes will start over if you start adding them on a new page. The pagination of footnotes can be arranged in different ways; in the “Links” tab, select the arrow in the footnotes section. Next, a window with parameters will open where you need to set the desired link format (option - Roman numerals).
How to change the color of a note in Word 2010?
Change the revision flag color
- Go to > Tracking.
- Select the More options item.
- Use the arrows next to the Color and Comments fields to select by author. You can also change color codes and change table cells.
Interesting materials:
How to go to the sticker store on VK? How to order Avon online? How to attach headers and footers in Word? How to pin a tab in Google Chrome? How to close a bottle of wine without a cork? How to close the Samsung Kids app? How to close a virtual desktop? How to close all unnecessary processes? How to pour slurry into Jul? How to make an appointment at Mreo through government services?
What happens if you delete purchased apps
Many users are worried that if they delete apps purchased from the Play Store, they will have to buy them again to use them later. This will of course never happen. You can delete a purchased app and then download it for free as many times as you like.
If you delete a purchased app, it will be marked as "Purchased" when you search the Play Store. If you want to use it again, just open it, click on the download button and you're done. No payment required.
As you can see, deleting apps is very easy, doesn't take much time, and can be done differently on most devices. Deleting apps you don't use is always a good thing, simply because it frees up space on your device and makes your app list less cluttered.
Enable edit mode
If the adjustment option is not available, you may need to disable document protection . Go to the Review and click on the Restrict Editing button. Next, select “ disable protection ” in the “ protect document ” field. You can also add an editor indicator.
In addition to the buttons on the panel, you can start the text file editing mode using the keyboard shortcut “ CTRL+SHIFT+E ”.
Word 2003
To start the editing mode in Word 2003, you need to go to the “ services ” menu and click the desired item.
Notes can be included in the Insert . They are necessary to point out errors and inaccuracies.
A panel will appear at the top that will allow you to change footnotes, add notes , comments.
To add a new note to a file, click on the corresponding button or select the Note in the Insert .
Disabling corrections in Word
After turning off the review mode, all corrections made to the text will no longer be marked. But the changes already specified will not be deleted.
To delete adjustments, use the Accept and Reject buttons. They are located in the Review tab in the Changes group.
The document editing program can be configured by going to the review section. All specified adjustments will be saved, and the type of edit will be displayed to the right of the window.
Deleting all recorded changes to a document is a two-step process: first disable change logging, and then accept or reject changes to the document. The result is a document that you can share with other users.
Go to Review > Check in Changes.
Deleting recorded changes
To permanently remove all revisions, accept or reject changes, and delete comments.
Click View > Next > Accept or Decline.
Word saves or deletes the change, and then moves on to the next one.
To save all changes at once, click the arrow below the Invite button and select Apply All Changes.
Deleting notes
Select Note and click Check > Delete.
To delete all comments at once, click the comment, and then under Proceed to Review, click the arrow below the Delete button and choose Delete all comments in the document.
Tip: To perform a final check, run the Document Inspector. This tool checks for corrections and comments, hidden text, personal names in properties, and other information. To launch the Document Inspector, select File > Details > Check for Issues > Check Document.
Go to Review > Check in Changes.
Deleting recorded changes
To permanently remove all revisions, accept or reject changes, and delete comments.
Click View > Next > Accept or Decline.
Word saves or deletes the change, and then moves on to the next one. To save all changes at once, click the arrow next to the Save option and select Apply all changes.
Deleting notes
To remove comments from your document, delete them.
Select the note and go to Review > Delete.
To delete all comments at once, click the comment, then go to Review and click the arrow next to Delete, and then click Delete all comments in the document.
see also
Note: This page has been automatically translated and may contain inaccuracies and grammatical errors.
It is important to us that this article is useful to you. Was the information useful? For convenience, we also provide a link to the original (in English)
In this short tutorial we will continue the topic of tracking revisions in Excel workbooks. And today we'll talk about how to review edits made by other users, as well as how to completely remove them from a Microsoft Excel document.
View your changes in review mode
The edits made in the review mode in Word are in reality only suggested changes. They can be either accepted or rejected. Since the original author may not agree with some of the corrections and reject them.
How to accept or reject changes
- Select the change you want to accept or reject.
Review in Word - Selected Edit
- On the Review , click Accept or Reject.
Review in Word - Accept or reject a revision
- The highlight will disappear and Word will automatically move on to the next change. You can continue to accept or reject each change until you have reviewed them all. Use the "Back" and "Next" buttons to navigate through the changes.
Review in Word - Revision Navigation
- When you're done, click the Corrections command to turn off review mode .
Review in Word - Disable Review Mode
To accept all changes at once, click the arrow at the bottom of the Accept command, then select Accept all changes. If you no longer want to track changes and want to remove reviews in Word , you can select “Accept all changes and stop tracking.”
Review in Word - Accept all corrections
How to delete a note
Step 1. To delete, right-click on a specific note and click “Delete Note”.
Right-click and click “Delete Note”
Step 2. To completely delete all comments in a file, you must:
- Go to “Review”, find the “Notes” subgroup.
Go to “Review”, find the “Notes” subgroup - Select the drop-down menu under “Delete”.
Select the drop-down menu under “Delete” - Click “Delete all comments in document.”
Click “Delete all comments in document”
Why do you need edit mode?
The editing mode will allow you to see new data that was entered by colleagues or the user himself into the document. Sentences and individual paragraphs can be viewed and deleted , or changes can be applied to them. When reviewing is activated, the deleted text will be crossed out and the added text will be underlined. Corrections made by several authors will stand out in different shades .
Thanks to the option, the user will be able to leave comments and make notes. Then the file, if necessary, is sent to another user, who, if desired, makes his own adjustments and forwards it to the final address. Collaboration takes place along the chain .
When editing mode is disabled, the latest data will not be registered , but the colored strikethroughs and underlines will not disappear. To see corrections in the document text, go to Review - Record corrections - Display for review .
If the user wants the adjustments to be indicated by red marks in the margins, click on the edit item . For a more precise indication, select “ all corrections ”.
How to remove notes in Word
When several people work on a document in the Microsoft Word text editor (one wrote it, the second checks it, the third adds material), then during the work it is very convenient to create notes in the text to indicate what needs to be changed or corrected. The result is one corrected file, which takes into account all the comments. But what to do now with these comments that remain in the margins of the text?
Let's figure out in this article how to delete them, whether it is possible to simply hide this area, and how to get rid of such remarks in Word made by a certain user.
If you want to view the file without any corrections made, then you can simply hide the callouts. To do this, go to the “Review” tab and click on the “Show corrections” button. Then, in the drop-down list, uncheck the box next to “Notes”.
After this, all blocks with them on the fields will disappear.
If you have Word 2013 or 2016, then you can do as written above, to remove the field, you can simply use the “Show notes” button on the “Review” tab.
When it is greyed out, comments in the margins are shown; when the button is not highlighted, they will not be displayed in the document.
If you need to not just hide, but rather delete remarks that are displayed on the side of the document page in Word, then click on the unnecessary one to select it. Then, on the Review tab, click Delete and it will disappear from the document.
You can immediately select the one you want to get rid of, right-click on it and select “Delete note” from the context menu.
Another method of removal is the check area. It is displayed either at the bottom or side of the page. There you can view all the made callouts. Find the unnecessary one, click on it so that the cursor appears there, and right-click on it. In the context menu that appears, select “Delete note”.
If you no longer need all the comments made by any users, then on the “Review” tab, click on the arrow on the “Delete” button. A small list will open in which you need to select “Remove all comments in the document”. Now all of them will be removed from the document.
If all such remarks were added to the document by not one, but several different users, then you can remove those made by a specific person. Each comment on pages from a specific person is highlighted in a certain color. Let's remove the ones marked in pink in the example.
To do this, go to the "Review" tab and in the "Record corrections" group, use the "Show corrections" button.
In the drop-down list, select “Reviewers”, and then uncheck the boxes next to the users who left comments. The checkbox should only be in front of the person whose remarks you want to delete.
Only our experimental subjects, highlighted in pink, remain in the document. Click on any one, then click on the arrow on the “Delete” button and select “Delete all displayed notes” from the list.
Click "Show fixes" again and turn on visibility from other users. As you can see, what you need remains, and what you don’t need has been removed.
That's all. We have learned how to remove the comments area in Word, or delete those in the document that are no longer needed. As you can see, there is nothing difficult about this.
Afterword
When working with text fragments in Word, you need to take into account that for ease of reading, the author or other users could make the notes and comments made hidden from other authors. Since your word processor won't display these things by default when you open a file you've received from another user, you may not know they're there until you turn them on. Accordingly, before working with it or transmitting it anywhere, you should check for the presence of reviewed areas, and if available, accept or remove them from the text. In Word, this is done in just a couple of mouse clicks.
At the same time, you must remember that there is only one way to protect your edits from prying eyes: make copies. The fact is that any user can remove corrections and comments from a Word document, since there is no distributed editing model in this word processor; this would be too much of a complication of the model. Therefore, if you want to make notes and edits just for yourself, then create a separate copy for yourself. But this approach also has a disadvantage, because then you will have to track changes in the copy that you left for public use.
Set up AutoCorrect in Office applications
The autocorrect function works by using two parallel lists of words. The first word is the one the user enters, and the second is the word or phrase that the program inserts to replace that word.
The AutoCorrect list is common to all Microsoft Office applications that support this feature. This means that adding or deleting a word in the list of one Office application affects all other applications in the suite.
You can add multiple entries that will result in the same text being replaced in the "to" section. For example, you can configure the replacement of “big”, “big” and “large” with “big”. Just add a separate entry for each of these changes.
Important: If you think that the AutoCorrect feature is not working, check that the Replace as you type checkbox is selected on the AutoCorrect tab. Adding an entry to the AutoCorrect list, changing it, or deleting it
Adding an entry to the AutoCorrect list, changing it, or deleting it
To add an entry, follow these steps:
- Open the AutoCorrect tab.
- In field Replace
Enter a word or phrase that you often misspell, such as
custom
. - In field On
Enter the correct spelling of the word, for example
usually
. - Click the button Add
.
To change the replacement text for an entry, select it from the list and enter the new text in the field on
.
To delete an entry, select it in the list and click Delete
.
Note:
The Exceptions
list contains words that the spell checker identifies as misspelled but should not be automatically replaced. If a word is automatically replaced and you have verified that it is not in the AutoCorrect list, add the word to the exceptions list to prevent this from happening again in the future.
Adding an entry using the Corrector
If you have an Office 365 subscription and have the latest updates installed, you should see the Editor feature in the desktop Office apps. If Office detects a misspelled word, it will be underlined with a red wavy line. Right-click the misspelled word to open a context menu with correction options. If you want to add a pair of misspelled words and a correction to the AutoCorrect list, simply click the arrow next to the desired correction and select Add to AutoCorrect
.
We accept changes
Before telling you how to remove the correction area in Word, you must first familiarize yourself with the toolbar. In the “Review” tab, you are interested in only one group - “Changes”. It is here that you will find the tools that will help you say goodbye to the area of corrections in the document.
So, before you there is a document that has been edited using the Corrections tool. You understand that you need to correct the text and want to remove the reviewer’s comments. To do this, in the “Corrections” tool group, click the “Next” button. You will be taken to the first comment. There are two options: you can click on the “Accept” button or the “Reject” button.
After clicking on the “Accept” button, the changes made by the editor will be accepted and the text will be corrected. If you do not agree with the comments and want to leave the text the same, then click the “Reject” button so that the text correction (Word) does not occur.
So, methodically, one by one, delete the note, accepting it or, conversely, rejecting it.
Wintering
In the second half of September, wild geese wintering in the north take flight. At the end of October, those who spend the winter in warmer climes set off. Flights depend on the type of bird. Thus, the bean goose waits out the winter on the shores of the Atlantic, and gray geese fly to Africa, Asia and warmer places in Europe.
With the arrival of autumn, geese head to warmer climes for the winter.
The polar goose leaves for the winter on the Pacific coast, the white-necked geese - in the western United States, and the white-fronted goose - in countries with a subtropical climate. Another species, the lesser white-fronted white-fronted duck, migrates to Greece, China, the Caspian Sea and the Black Sea coast.
Displaying corrections
In order for the user to familiarize himself with the innovations in the document, you need to go to the Review in the Record corrections . Next, click on Display for verification .
For check
To indicate adjustments with red lines in the margins, select the editing section.
This solution allows you to see in which part of the document adjustments were made. To switch to another mode, perform similar actions.
All fixes
A tab reflecting the corrected information will help you see all the changes more accurately.
Check area
Additionally, the user can display an area at a specific location. To do this, go to the Review , in the section Recording corrections , click on the arrow next to the Review area . Then select the desired location.
How to remove the correction area in Word – Editing mode in Word – Like in the office...
Coordination and approval of documents always leads to the introduction of corrections, additions and amendments to the text of the document. The Word text editor has convenient functionality for working with corrections. When the correction editing mode is enabled, it saves the entire history and names of users who made changes to the document.
- Editing mode in a Word document: How to enable correction editing mode;
- How to enable do not disable tracking.
- Display for review;
Editing mode in a Word document
The editing mode differs favorably from editing in that the entire intermediate process of working on a document is visible directly in its text. Used when several users collaborate on one document.
Visually, all edits are highlighted in red and have their own designation in a special font with callouts containing information on each of them. For example, the deletion of text will be highlighted with a strikethrough or a balloon with the deleted text, depending on the selected mode for displaying edits.
How to enable do not disable tracking
As noted above, all corrections when the Corrections mode is enabled are tracked and noted in the text. To avoid uncontrolled corrections to the text, the document author must enable a disable option to disable correction tracking.
This action is carried out as follows:
- Select the “Review” menu tab.
- In the “Write corrections” command block, expand the list of the “Corrections” buttons.
- Select the command “Prohibit disabling tracking”;
- In the “Block registration” window that appears, enter the password twice.
- Confirm your intention with the “OK” button.
To remove a ban, the user must enter a password.
Show changes to a document
There are 3 modes for displaying corrections, each of which determines the appearance of the corrections displayed on the screen and limits certain types of corrections.
The commands are located to the right of the Corrections command in the Review section.
Each mode has several options, which can be selected by clicking the arrow on the right and selecting the desired option from the drop-down list.
Accept or reject changes to a document
To complete the Corrections feature, you must accept or reject the corrections. To accept corrections, you must perform the following algorithm of actions:
- Select the desired edit or place the cursor at the beginning of the document.
- Select the “Review” menu.
- In the “Changes” command block, expand the list of possible options for the “Accept” command: for the entire document or for the current correction with options for moving to the next correction or not.
Sequential transition from one correction to another is performed using the “Next” or “Back” buttons.
If the corrections are not relevant, they must be rejected using the algorithm described above, but using the “Reject” button.
You can reject or accept the correction while reading the text. To do this you need:
- Place the cursor on the current fix.
- Right-click to open the context menu.
- Select the appropriate “Accept” or “Reject” option.
When the work of approving or rejecting changes is completed, the text of the document will return to its normal form.
How to remove corrections from a document
Details of each correction are contained in the callout located in the margin to the right of the text:
- reviewer's name;
- time and date;
- type of correction (deletion, addition, format change);
- text or indication of the edit format.
The disadvantage of displaying corrections with callouts is that they limit the text field and, for convenience, can be hidden when performing the following actions:
- open the “Review” tab in the menu;
- go to the “Show all corrections” section;
- in the “Callouts” line, select “Never”.
After this, the corrections are visible, but the margin callouts will be missing.
To the author: how to work in correction mode
Revision tracking mode flags all changes to the text. We at the “By Rules” editorial bureau check the text only in this mode - it allows customers and our specialists to control all changes in the file and leave visual comments on the text.
Word Revision Recording Mode: How to Enable Change Tracking and Customize the Type of Revisions
In recent versions of Word, change tracking is enabled as follows: tabbed ribbon → Review → Corrections. You always receive files from the bureau with the correction mode already turned on.
When the Corrections button is disabled, edits are not highlighted. When enabled, new words and characters are typed in colored font, and deleted ones are placed in the fields marked “Deleted” or crossed out, depending on the settings for the type of corrections. Scroll through the examples:
The type of corrections (in text or in callouts) is configured in the Show corrections → Callouts menu of the Review tab:
How to interact with the editor
You have received a text edited by an editor. It looks something like this:
Review your changes. If you are not happy with any editorial changes, discard them and either make your own or write a note. There is an editor's note - respond or correct the text accordingly.
How to approve and discard revisions
To approve the editor's edits or save the original version without edits, select the fragment with the corrections and click the Accept or Reject button on the Review tab:
For the same purpose (accept/reject), you can right-click on the correction and select the desired one:
You don’t have to mark the editor’s approved corrections in any way—the editor himself will accept the edits at the proofreading stage.
If you want to see what the changed text looks like, you can hide the edits for a while: they will remain in the text, but will not be highlighted in color. In the Review panel, click the Change View mode drop-down list and select Revisions (the text will be clean, but the comments will remain visible) or No Revisions (the comments will also be hidden):
There you can also select the Source document mode to see the original author's text. As you work, you can switch between “was” (Original Document) and “now” (No Corrections) to see the difference. Scroll through:
How to work with notes
- If the editor has questions and misunderstandings, then the reader will likely have questions as well. We ask that you correct the text directly, taking into account the editor's note, rather than writing a comment to the editor. It is better to leave a note, and make the associated edit while tracking corrections is active: the person who asked the question will both see the edit and remember what caused it. Let us remind you that this mode is already active in all files that we send to authors.
- When the editor suggests a wording option in a comment, you can agree with it or not. If you agree, make a correction to the text; if not, write about it in your note (the word “no” is enough) or delete the note with the option.
- If you want to discuss an editor's note, create a new one next to it. The editor will see both his question note and your answer note. It is very clear and clear who said what.
To leave a comment or ask a question, select the appropriate piece of text, click the Create a note button and write down your thought. The second option is to hover over the editor's comment and a button will appear to add a response.
Notes will be visible in the margins if you select Show corrections in callouts and Show only comments and formatting in callouts in your revision appearance settings, or pop up when you move your cursor over text with a colored background if you select Show all revisions in text. Scroll through the examples:
Reference
Don't have Word for Windows? The principle of operation in change tracking mode is generally the same in all popular text editors. Here are links to some instructions:
Enable edit mode in Word 2003 version
In this release of Word, you can correct errors from the Tools menu, and comments are found under Insert. Other settings work the same way.
Notice that when you clicked the button to activate the tool, the background of the button changed color. This means that this feature is active and therefore any changes made from this point will be tracked and flagged
Please note that if you click on the Track Changes button image, you will activate this option, but clicking on the text for this feature opens a menu of options. Click "Edit Tracking Options" to see everything you can customize. On the screen that opens, you can select the form that is most convenient for displaying changes from among the available ones.
How to remove corrections in Word
If you disable this feature, you can edit text without marking it with callouts. The editing mode is deactivated by clicking on the button with the corresponding name in the “Review” panel. To remove corrections in , press CTRL+SHIFT+E
.
Enable change tracking mode
To use Track Changes, all you need to do is turn on review mode when you open a Word document and before you start editing.
- Go to Review on the ribbon.
- In the middle of the “ Record corrections ” group, click the “ Corrections” , after which all changes will be recorded .
Now, if you make any changes to the document, such as deletions, inserts, and formatting, they will be recorded.
How to make a comment in Word
While comments are not part of change tracking, they are necessary for document review, so we'll mention them here as well.
To leave a comment on a document:
- Hover your cursor over the place where you want to leave a comment, or highlight the text you are commenting on.
- Go to Review on the ribbon.
- In the Notes group, click New Note .
Show changes in Word
Sometimes you may only want to view certain types of edits. For example, maybe you've made a lot of formatting changes, such as making text bold, but you only really need to see insertions and deletions. There are ways to reduce the amount of markup you see!
DISPLAY FOR REVIEW
Show for review is an option that allows you to see simple markup, all markup, no markup, or original.
- Corrections : Collapses the markup and shows changes integrated into the text. The only indication that a line has been changed is a red stripe to the left of the affected lines.
- In All Corrections : Shows all markup, including tooltips for formatting changes.
- Unedited the text without indicating where those changes were made. This and simple markup are good if you want to switch to a "clean" version of the modified document and read it without the distraction of markup.
- Source Document : Shows the original text before any markup has been done. This is a great way to switch between edited and unedited versions of a document to see how they differ.
SHOW MARKING
There is a second option to customize what types of edits you see for your markup. Let's say, for example, that you don't care about formatting changes, but want to see insertions, deletions, and comments.
When you click on the Show Corrections , a drop-down list allows you to enable or disable markup for:
- Notes
- Ink notes (changes made using the drawing options in Word, such as on a tablet)
- Additions and deletions
- Formatting
You can also use the Callouts and Specific Users in the list to change them if any markup appears inside or as balloons on the sides of the document, and focus only on specific reviewers if your document has been marked up more than one person.
HOW TO ACCEPT AND REJECT CHANGES
Once you're done editing, or if you receive an edited document with change tracking enabled, you can accept or reject individual changes.
- Go to Review in the Ribbon
- In the Changes , click Accept or Reject .
- From the drop-down list that appears, you can perform actions such as Accept/Reject and Move to Next, Accept/Reject all changes (or all rendered), and Accept/Reject all and stop tracking.
- You can also use the back and next buttons on the ribbon to move from one change to another.
- To immediately accept or reject the current change, click the top half of the buttons (no drop-down options).