4.8 / 5 ( 46 votes)
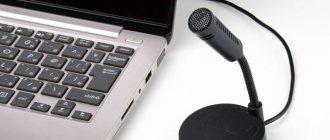
So, you bought the best new microphone for yourself, connected it to your PC or laptop. Now is the time to check how well the purchased headset works. This can be done in several ways:
- through “Settings” and “Sound Control Panel”;
- through "Sound";
- in Realtek HD manager;
- through “Sound” on earlier versions of Windows;
- through standard sound recording on earlier versions of Windows;
- by turning to third-party programs and online services.
Next, we’ll look in detail at how to check the microphone on a computer.
Checking the microphone through Settings in Windows 10
You have a Windows computer - how to check the microphone? The process is quite simple - owners of PCs and laptops with “ten” just need to follow the simple instructions:
- Go to “Sound”, located in the parameters. Method for beginners: right-click on the speaker icon on the right side of the system tray. A context menu will open - select “Open sound options”. Method for advanced users: type the combination Win + I, in the pop-up window move to “System”, and from there to “Sound”.
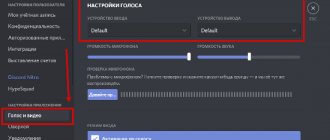
- So, you find yourself in “Sound” - scroll down the right side of the menu to “Input”. Select the required microphone and click on “Device Properties”.
- In the new window, you can enable/disable the microphone with one tick and adjust its volume: for most users, comfortable values are 80-90.
- Return to the “Sound” section, stop at the “Related Settings” submenu - click on the “Sound Control Panel” inscription.
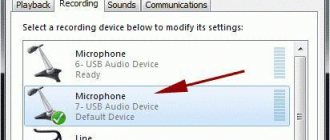
- In the new window, go down to the “Recording” tab. Check that the microphone icon has a check mark with a green outline. This means that the headset is connected and ready to use.
- If instead of a check mark there is a black down arrow in a white circle, the device is deactivated. Fix this: Right-click on the microphone name and select “Enable” if the microphone is not working. Click "Apply" and "OK".
- Using the same method, call the context menu again - you will need “Properties”.
- How to check the microphone on 10? Go to Levels to check the volume. If the device is quiet, move the slider or enter the desired value in numbers in the special field.
- Work with “Gain” carefully: if you set the value too high, the recording will be conducted with backgrounds, crackles and annoying noises.
- Look at the blue speaker icon on the right side of the sliders - it shouldn't be disabled. That is, there should not be a red o on the icon.
You now know how to test the microphone on your computer. This way you will make sure that the headset is connected and operating at a volume that is comfortable for you, with the gain you need. You can start checking the audio recording.
Using the Voice Recorder app
In older versions of Windows, Voice Recorder was often used to control the microphone, but in version 10 this program is no longer available. Instead, the “Dictaphone” application appeared in the operating system (in the Russian version this application can be called “Dictaphone”).
You can also use this app to control your microphone. To do this, open the Start menu, find Voice Recorder and launch the found application.
After launching the application, press the large button in the middle and allow access to the microphone (if necessary).
After that, say something into the microphone to check and end the recording.
The entry you created will appear in the application. To listen to a recording you've created, simply tap it directly in the app.
This way, you can quickly control the microphone on your computer without installing third-party software.
Checking the microphone through standard audio recording in Windows 10
How to check the microphone on Windows 10 in another way? To make sure that voice recording is going as it should, follow these simple instructions:
- Type Win+I, go to “Options”, and then to the “Privacy” section.
- Go directly to "Microphone".
- Go down on the right side of the menu to the “Allow access...” block: activate it by moving the slider to “On”.
- Now you will see a list of applications on your computer, for each of which you can activate/deactivate microphone access.
- In the above list, find the Voice Recorder program. Enable headset access for her.
- Go to the main Start menu, find this application by entering the name in the built-in search bar.
- How to check the microphone on a Windows 10 laptop? Go to “Voice Recording” and tap on the central image of the microphone.
- Say a few sentences into the headset, then press “Stop” to stop the recording.
- If you are wondering how to check the microphone on a Windows 10 PC, this same life hack will come in handy.
- You can immediately listen to the recording by clicking on the “Play” icon.
Method 3: via Skype
Some time ago we published an article about setting up a microphone in Skype. So, approximately the same method can be used to check the operation of the microphone as a whole - even if you don’t need it specifically for Skype.
Skype has two verification methods - a faster one and a longer one. To quickly check the microphone, you just need to select any contact from the list of added ones and click on the “Call Quality Data” button. A window with microphone settings will open, where you should select your microphone from the list and click “Test”. The program will record a few seconds and then play back the recording.
Another way to check your microphone via Skype is to call a special audio testing service. Select the “Echo / Sound Test Service” contact, which is automatically added when registering an account, and click “Call”.
After a short message, a recording of 10 seconds will begin, after which the result will be played back automatically. It is worth noting that this method requires Internet access.
You can follow our website updates on Vkontakte, Facebook, Twitter, Odnoklassniki or Google+, and we also suggest subscribing to them by email.
Microphone check via Realtek HD Manager for early Windows releases
How to check the microphone on a Windows 7 computer. Let's consider checking on earlier versions of Windows - "seven" and "eight". The easiest way to do this is through the built-in sound manager:
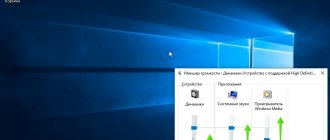
- As soon as you connect the headset to your laptop or PC, a notification will appear that will ask you to select the type of device that you connected. In this case, Fr.
- Then the manager window itself will open, where all connected devices will be displayed.
- Scroll down to the Microphone tab. There will be two controls in front of you, through which, if desired, you can adjust the recording volume level.
- How to check microphone on Windows 7? Move the slider to start speaking into the microphone. If it is in working order, you will hear your voice through the headphones or speakers.
- You can adjust the sensitivity of the headset and sound amplification if you are not satisfied with the result.
Method 2: Voice Recording
The operating system has a separate program that allows you to record voice from a connected microphone.
- In Windows 10, open “Start” and in the main programs under the letter “Z” we find the application “Voice Recording”. In Windows 7, it is located there in “Start” - “All Programs” - “Accessories” - “Sound Recorder”.
- A warning window will open asking you to agree to use the built-in microphone.
- Click on the microphone icon.
- Start saying something. At the end, click on the square to stop recording.
- A recording window will open, just click on the “Play” button.
Checking the microphone through Sound for earlier editions of Windows
How can I check if the microphone works on my computer in other ways? The following technique is for earlier versions of Windows:
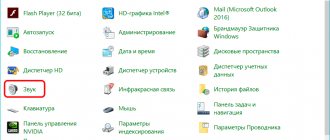
- Go to "Control Panel".
- Go down to the “Hardware and Sound” section and to the “Sound” subsection.
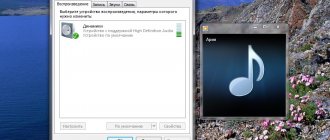
- In the window that appears, click on the “Record” tab.
- Select the desired headset with the mouse, then click on the “Default” button.
- A sensitivity scale will appear next to the microphone name. Say a few words into the headset. If the device is working, the scale will begin to vibrate and fill with color.
- If nothing happens, go to Levels. Make sure there is no o in the speaker icon (on the right side of the slider). Otherwise, click this icon to activate the microphone.
Using Windows Tools
The operating system has built-in elements for proper configuration of equipment.
Microphone settings
If the “Sound” window remains open, the following parameters are assigned to the microphone:
- Are common.
- Listen.
- Levels.
- Improvements.
- Additionally.
Sound recording
The OS has a standard program that allows you to test voice, music, speech, etc. To do this, simply enter “Sound Recording” or “Voice Recording” in the Start menu.
You can test sound recording using the standard OS program.
To record a speech, you need to do the following:
- Select "Start".
- Say words into the microphone.
- To finish, click on “Stop”.
You will then be prompted to save the created audio file. To do this, you need to select a path, name the file (instead of “Unnamed.wma”) or leave everything unchanged and click “Save”.
Dispatcher "Realtek"
This program in the OS displays the sound card settings. It, like Windows tools, allows you to assign the properties of an electroacoustic device:
- volume control;
- purpose of connectors;
- Suppression of static background noise and echo;
- activation of the directional recording function;
- combining input jacks of the same type.
You can open the program through a search in the system by entering “Realtek Manager” in the line, or by selecting it in the “Hardware and Sound” section.
Device properties
The main parameters can be indicated through the “Properties” button when selecting equipment in the “Sound” section:
- In the “Listen” tab about.
- If the scale opposite the microphone shows low rise or there is none, to fix the problem in “Levels”, set the volume to maximum and set the gain to at least +20 dB.
- Open “Enhancements” and check the boxes for “Beamforming”, “Noise Reduction”, “Echo Suppression”.
Record audio online using a microphone.
Free flash application “ Online microphone ”. Designed to record audio from your computer online. The finished recording can be listened to and downloaded in mp3 . The application does not require registration and is available directly in the browser. Simply put, this is a simple and convenient online voice recorder .
At the very beginning
of online, the microphone will ask for access to your audio device.
Confirm your consent by clicking on the “Allow” button. After this, make sure that the device is receiving a signal. To do this, tap the microphone, blow into it, or make some sound. If green waves appear on the sound indicator in the application (and the lights on the microphone body blink), then everything is in order. To start recording , press the round “Rec” button (in the center of the microphone) or the spacebar. The number of seconds is displayed on the upper display. Microphone sensitivity can be adjusted before or during recording using the vertical slider (right). You can end the recording by clicking on the square (which appears instead of “Rec”) or on the space bar. After this, you can listen to the resulting online microphone recording and download the finished mp3 file.
The application for recording audio through a microphone requires Adobe Flash Player to be installed. If sound is not recorded, we recommend checking that the device is connected to the computer correctly. If everything is in order, but there is still no sound, right-click anywhere in the application, then select “Options”, click on the microphone and make sure that the desired device is selected in the settings.
Actions if the microphone does not work
The device can be disabled in Device Manager. The easiest way to launch the Manager is to right-click on the My Computer icon, go to Properties and select the appropriate item. Next, you need to try to activate all sound-related devices.
If after this it does not work, you may need to install additional software (drivers). The necessary software is downloaded from the laptop manufacturer’s website in the drivers section.
If this does not solve the problem, the built-in or connected microphone may be damaged. It is recommended to replace it with another audio recording device.
Online Microphone
Online Microphone will help you quickly check the operation of your microphone. Registration is not needed, open the resource, activate access to sound and record your voice. If during recording the indicator displays green waves and the lights flicker in the picture, your device is working normally.
The right slider is used to adjust the volume sensitivity. Use it if there is sound, but it is weak. A quiet sound with crackling and rustling sounds is a sign that the microphone is not of very high quality or is old.
Connection to PC/laptop
The first thing to start with is properly connecting the headphones to the computer. First, you must have a sound card installed (all home PCs usually have one).
Do you have a sound card on your computer and what model is it:
Secondly, the headphones have only 1-2 plugs (and, it would seem, what should you connect here? ☺) - there are a couple more nuances here (many users don’t even pay attention to this!). Nowadays on home computers/laptops, in addition to the classic jacks (for microphone and headphones), there is a headset jack (see Fig. 1)! Near the headset jack, there is usually a small icon of headphones with a microphone.
Rice. 1. Classic (left) and headset (right) jack(s)
The point here is that you cannot connect regular headphones (with two plugs) to the headset jack, just like headset headphones cannot be connected to classic audio jacks. For proper connection it is necessary to use special adapters.
Rice. 2. Adapter for connecting classic headphones with a microphone to the headset jack
Note!
If you don’t know what kind of headphones you have, then pay attention to the number of contacts on the plug: if there are 4 of them, these are headset headphones, if 3 are classic ones (an example is shown in Fig. 3 below).
Rice. 3. Headset (left) plug and classic (right)
More information on this topic is covered in this article:
I will assume that the headphones and microphone were connected correctly, the wires are fine and the connectors are fine too. By the way, it would be a good idea to test your microphone on another PC (to be sure that the microphone is working at all...).
How to set up a microphone?
There is a speaker icon in the lower right corner of the screen. If you right-click on it, a menu will appear where you can select the “Sounds” or “Sound Recorders” section.
A window will open showing all recording and playback devices. The microphone should be enabled and assigned by default. Otherwise, you should right-click on it and select the “Enable” option through the menu. Through the same menu you can enter the settings of the sound recording device. Within the window there is a volume slider, which is recommended to be set to the maximum value, and a decibel booster (this helps increase sensitivity).
Setup begins by connecting the microphone.
Possible problems
Attempts to test the microphone may fail. For example, what could go wrong?
- The most common reason for failures is errors in the Windows system settings. You should definitely check which microphone is used by default on the system. Very often, users forget to switch the checkboxes on their laptops, and by default the built-in microphone continues to be used, and not the one in the headphones.
- It also happens that the application in which you want to use your voice is denied access to the microphone. Just check the appropriate settings. So, for example, it will be impossible to use voice search in a browser if access to the appropriate equipment is not provided.
To set it up correctly, click Start > Settings (gear icon) > Privacy > Microphone. Next, next to the item “Allow applications to use the microphone,” move the slider to the “On” position. Below in the list of applications include those in which you plan to use communication or voice commands.
- Also, software problems may be due to the lack of the required driver in the system, or the version of the sound card driver being used is outdated and requires updating.
- Other common causes relate to hardware problems: the microphone or cable itself may be faulty. To be sure of the technical condition of the device, it is better to try connecting it to several computers one by one, if possible, and check each time whether it will work.
Additionally, an article on why the microphone in Windows 10 headphones may not work.
Basic verification methods
After the user has completed all the necessary manipulations to configure the device, he can check using the following ways:
- Check the power connection. Often the main problem is the lack of batteries or an interrupted connection to the mains. Checking the microphone connection to the power supply
- Be sure to remove the microphone before testing. There are some differences between female connectors and so-called USB connectors.
Note! So, in the first case, you need to check whether your device recognizes the types of devices with such a plug. Naturally, it is better to do this before purchasing a microphone.
In the second case, you need to connect the purchase to a USB connector and wait for the notification on the screen:
- 5 Word online services: we work with documents online without leaving the browser
- Check the availability of the appropriate driver on the computer itself. This can, in principle, be done using different methods, but the simplest and most logical is to try connecting the microphone to another computer. If in this case the device connects without any problems, then the problem is most likely in the driver. Checking the drivers for the microphone
- Installing microphone software. We are talking about special discs that are usually provided with the product. Often suitable software can be found on the Internet by entering the full model name into a search engine. Installing microphone software
- Volume control. Sometimes the problem can lie in the simplest things. So look for the volume control on the microphone, and make sure that its lever does not reduce the sound to an absolute minimum. Checking the volume control
- Choosing the right socket. Usually this problem affects owners of system units; you need to read the manual and find out exactly which connector is for the microphone.
Important! Remember that if the software is installed incorrectly, the microphone will also not function.
As for laptop users, in this case the device must usually be connected through a special connector for audio input, that is, a microphone. But on the modern market there are also devices in which there is only one universal connector - for both headphones and a microphone.