05/21/2019 windows
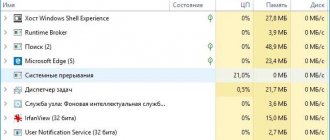
Owners of NVIDIA GeForce video cards may notice two instances of the NVDisplay.Container.exe process in the task manager, and after recent driver updates, sometimes high CPU load from this process.
First, what this process is: NVDisplay.Container.exe is designed to run the “NVIDIA Control Panel” item in the Control Panel (it can also be launched from the desktop context menu). But with the latest versions of the driver, it has also been used to collect additional telemetry data (in addition to what the NvTelemetryContainer.exe process collects), which sometimes leads to high CPU load.
If necessary, you can either fix the high CPU load caused by NVDisplay.Container.exe or disable this process altogether (however, this will prevent the NVIDIA Control Panel from launching) - both options are discussed later in the instructions.
How to fix high CPU load regsvr32.exe
c http-equiv=”Content-Type” content=”text/html;″>lass=”remon-after-2nd-h2″ id=”remon-1753389198″>
Note: Before proceeding with the steps below, try simply restarting your computer or laptop. Moreover, for Windows 10 and Windows 8, keep in mind that it is a reboot that is required, and not a shutdown and startup (since in the latter case the system does not start from scratch). Perhaps this will be enough to solve the problem.
If you see in the task manager that regsvr32.exe is using up the CPU, it is almost always caused by some program or OS component calling the registration server to act on some DLL, but this action cannot be performed ("stuck" ) for one reason or another.
The user has the opportunity to find out which program called the registration server and with which library the actions leading to the problem are performed and use this information to correct the situation.
I recommend the following procedure:
- Download Process Explorer (suitable for Windows 7, 8 and Windows 10, 32-bit and 64-bit) from the Microsoft website - https://technet.microsoft.com/ru-ru/sysinternals/processexplorer.aspx and run the program.
- In the list of running processes in Process Explorer, identify the process that causes load on the processor and expand it - inside, most likely, you will see the “child” process regsvr32.exe. Thus, we received information which program (the one within which regsvr32.exe is running) called the registration server.
- If you move your mouse pointer over regsvr32.exe you will see the line “Command line:” and the command that was passed to the process (I don’t have such a command in the screenshot, but yours will probably look like regsvr32.exe with the command and library name DLL) which will also indicate the library on which an attempt is made to perform actions that cause a high load on the processor.
Armed with the information received, you can take certain actions to correct the high load on the processor.
These could be the following options.
- If you know the program that called the registration server, you can try to close this program (cancel the task) and start it again. Reinstalling this program may also work.
- If this is some kind of installer, especially not a very licensed one, you can try to temporarily disable the antivirus (it may interfere with the registration of modified DLLs in the system).
- If the problem appeared after updating Windows 10, and the program that calls regsvr32.exe is some kind of security software (antivirus, scanner, firewall), try removing it, restarting the computer and installing it again.
- If you're not sure what the program is, do a web search for the name of the DLL you're working on and find out what the DLL is. For example, if it is some kind of driver, you can try to manually remove and install this driver, first ending the regsvr32.exe process.
- Sometimes booting Windows into safe mode or a clean boot into Windows helps (if third-party programs are interfering with the proper operation of the registration server). In this case, after such a download, just wait a few minutes, make sure that there is no high load on the processor and restart the computer in normal mode.
In conclusion, I note that regsvr32.exe in the task manager is usually a system process, but theoretically it may turn out that some kind of virus is running under the same name. If you have such suspicions (for example, the file location is different from the standard C:\Windows\System32\), you can use CrowdInspect to scan running processes for viruses.
And maybe this will be interesting:
Method 3. Install original OEM drivers on your PC
An effective solution to the problem is to install original OEM drivers for the video card of your PC. Do the following:
Get-WmiObject win32_bios
And press enter. The displayed parameters will contain “SerialNumber”, the value of which will need to be entered into the corresponding search field on the website of the manufacturer of your device. You will have the opportunity to download drivers and other updates for your laptop.
- Download drivers for the version of your Windows OS (do not confuse 32 or 64-bit versions). The specified drivers may be of an earlier date than the drivers you already have installed, but that’s okay;
- First install the drivers for the Intel video card;
- Then install the drivers for your Nvidia video card. Make sure you do a clean installation for Nvidia drivers;
- Restart your PC.
If you are worried that Windows will install its drivers again, you can disable this feature. To do this, go to, then to “System and Security”, then “System” - on the left “Advanced system settings” - the “Hardware” tab - “Device installation options”. Here, select the “No” option, click on “Save”, and restart your PC.
How to disable nvdisplay.container.exe?
Some people want to get rid of the process forever (or at least not have to go to the Task Manager every time they use the computer). It's not that difficult - just follow the instructions:
- We press the Win + R key combination - the “Run” window opens in front of us.
- Paste the following there (without quotes): “services.msc” - the “Services” window should appear.
- We look for “Nvidia Display Container LS” in the list - double-click on the line with the left mouse button.
- A new menu opens, in which we select the “General” / “Basic” tab.
- For a single stop, press the “Stop” button.
- To completely disable it, in autorun we find the column “StartUp Type” / “Startup Type”.
- In the slide-out menu, select “Disabled” / “Never” (depending on the operating system and its version). Disabling the Nvdisplay.container.exe process
It is important to understand that if the autorun process is stopped, the video card settings menu will not be open. If you really need it, you should perform all the above manipulations and move the slide-out list column to the “Always” position. After restarting the computer, the process will return, along with the ability to configure Nvidia
After restarting the computer, the process will return, along with the ability to configure Nvidia.
Best practices for resolving NVDisplay issues
A clean and tidy computer is the key requirement for avoiding problems with NVDisplay. This means running a scan for malware, cleaning your hard drive using 1cleanmgr and 2sfc /scannow, 3uninstalling programs that you no longer need, checking for Autostart programs (using 4msconfig) and enabling Windows' 5Automatic Update. Always remember to perform periodic backups, or at least to set restore points.
Should you experience an actual problem, try to recall the last thing you did, or the last thing you installed before the problem appeared for the first time. Use the 6resmon command to identify the processes that are causing your problem. Even for serious problems, rather than reinstalling Windows, you are better off repairing of your installation or, for Windows 8 and later versions, executing the 7DISM.exe /Online /Cleanup-image /Restorehealth command. This allows you to repair the operating system without losing data.
To help you analyze the NVDisplay.Container.exe process on your computer, the following programs have proven to be helpful: ASecurity Task Manager displays all running Windows tasks, including embedded hidden processes, such as keyboard and browser monitoring or Autostart entries. A unique security risk rating indicates the likelihood of the process being potential spyware, malware or a Trojan. BMalwarebytes Anti-Malware detects and removes sleeping spyware, adware, Trojans, keyloggers, malware and trackers from your hard drive.
How to delete a process?
You perform this action at your own peril and risk - deleting the system process of the video card can provoke sudden crashes and lags in the operation of the PC. Although, such “possible problems” are caused by only one line.
To begin with, call the command line by entering “cmd.exe” (without quotes, like the next line) in “Run”. There we enter the following line: “sc.exe delete “NVDisplay.ContainerLocalSystem”” - after closing the window, you don’t even have to reboot the device.
If access is denied, run the CS as an administrator. We recommend that you stop only at disabling, the method is provided for familiarization.
How to disable Protected Mode
We found out what needs to be done if plugin-container.exe loads the processor, but if you disable this process, then all plugins will stop working, in particular Flash Player, and it is necessary, at a minimum, to watch videos on websites . Now we will tell you what needs to be done so that it continues to work, even after plugin-container.exe is disabled.
- If you are using a 32-bit operating system, open the system drive, go to the “Windows” folder, then to “System32”, then to “macromed” and finally to “Flash”.
- If you are using 64-bit Windows, then instead of the “System32” folder, you need to enter the “SysWOW64” folder, the rest of the path remains the same.
- Open the file "mms.cfg". If you don’t find it in the folder, then create a new text document with this extension.
- Enter the line "" (without quotes) into the file.
- Save the document.
After this, the Flash Player plugin will start even with the process disabled.
A simple computer blog for the soul)
Hi all. We are looking at the case of nvcontainer.exe, today I have to find out what this process is and tell you about it. Well, I think it’s already clear that the process is related to NVIDIA drivers, and to be more precise, it’s something like NVIDIA Container. I found out that if you remove nvcontainer.exe from startup, the NVIDIA GeForce Experience program may freeze.
The nvcontainer.exe process is launched from this folder:
C:Program FilesNVIDIA CorporationNvContainer
It can also be launched from here:
C:Program Files (x86)NVIDIA CorporationNvContainer
So guys, I find out that it turns out that the nvcontainer.exe process can significantly load the hard drive. I learned this on a foreign forum. There, one person said that removing GeForce Experience (a program that selects the optimal settings for your games, these are not drivers) can help. One person wrote that he simply takes and ends the nvcontainer.exe process.
One person wrote that for this reason he uses an older version of GeForce Experience 2.x., maybe you should try it too? Well, if you have such a problem. So far I just don’t see anything more reasonable. So I found a picture and yes, I see that the third version has now been released:
So he can actually install version GeForce Experience 2.x., especially since the person said the settings for games are still installed normally =)
Guys, that's all. There is no information, no matter how hard I looked for it. I think that the most reasonable thing is to remove GeForce Experience 3.x and install 2.x, nothing else comes to mind. Good luck to you!
Some system processes interfere with computer performance by eating up computers' RAM and CPU. This material will tell you about a separate service nvdisplay.container.exe, which can often load the system. What is this process, is it necessary and how can it be disabled if necessary?
NVIDIA Share
NVIDIA Share processes (NVIDIA Share.exe) - and yes, there are two of them - are also part of GeForce Experience. This service helps you share screenshots and videos of gameplay.
When you disable "On-Game Overlay" from GeForce Experience, these processes will also disappear from your system.
However, if you end both NVIDIA Share processes and then press Alt+Z, the overlay will open again and you will see that the NVIDIA Share processes are now running again. This demonstrates that the ShadowPlay assistant serves as a shortcut to the keyboard and then moves on to the NVIDIA Share processes that handle the overlay.
Mapping an Nsight Compute host installation into a container
So far, I've described how to add Nsight Compute to a Docker or Singularity container image. Sometimes, it may be easier to use the existing Nsight Compute installation from the host inside the container.
An Nsight Compute installation on the host can be mounted into a container at runtime but this may not work properly if the required Nsight Compute dependencies available on the host are not available inside the container.
Nvidia geforce experience driver
For example, if the host Nsight Compute is installed on the host at /opt/nvidia/nsight-compute/2020.1.0/, you can add the following command-line options to temporarily make Nsight Compute available inside a container.
Solution 3: Disable Nvidia Telemetry Container and Scheduled Jobs
Telemetry Container is a service included in NVIDIA software, primarily used to monitor some of your logs, behavior, and collect other such data. It can send information to NVIDIA servers about errors in graphics and related programs.
By disabling jobs scheduled by the service or the entire telemetry container in general, you can reduce the CPU load.
Open Control Panel, switch View at the top right of the window to Large Icons. Go to the “Administration” section, then click on “Task Scheduler”.
The tasks are in the Planner Library." Find all tasks whose name begins with “NvTm”, right-click on them and select “Disable”.
After disabling tasks, you need to disable the launch of the NVIDIA Container telemetry container. This should solve the high CPU load issue.
Open the Run dialog box using the Win+R key combination. Type the command services.msc and click OK.
Find the telemetry container (NVIDIA Telemetry Container) in the list, right-click on it, open the context menu and select Properties. If this service is running (you can check the status message next to it), you need to stop it by clicking the Stop button.
Switch the Startup Type to Disabled. Confirm any dialog boxes that may appear when changing the startup type. After this, the load should decrease significantly; check in the Task Manager how much the container is loading the processor.
If you want to start Telemetry Container again, you may receive an error message:
"Windows was unable to start the service on Local Computer. Error 1079: The account specified for this service is different from the account specified for other services in the same process."
If this happens, follow these steps:
In the Service Properties, go to the “Login” tab and click on “Browse”.
In the “Select names of selected objects” field, enter the account name, click “Check names”. Wait until the name becomes available and click OK. Then enter your password. After this, the NVIDIA Telemetry Container service will start without error.
Setting the default theme
In many cases, we start seeing the error after installing a new theme. So change it to the default Windows theme.
To do this, expand the context menu by right-clicking on the desktop and select the “Personalization” option. In the left navigation pane, go to the Themes tab. Select one of the themes presented in the "Default Windows Themes" section.
After the change, restart your computer and check if the Nvidia Share error that indicated the application is not responding is gone.
Plugin-container.exe - what is it?
As we already said, plugin-container.exe is a plugin for the Firefox browser. It is required to run other plugins separately from the browser. This allows Firefox to continue running even if the extension throws an error.
However, this approach also has disadvantages. One of which is the large expenditure of computer power to ensure the operation of this system. If the PC has powerful hardware, then there will be no freezes when opening the web browser, but on a weak computer this is very noticeable, even to the point of a complete freeze in the event of a critical overload of the central processor.
In such cases, it would be wise to disable the process. We will tell you how to do this later in the text.
What is the process Wuauclt.exe?
In fact, Wuauclt.exe is not a virus, but a very important system process that is responsible for updating Windows. It starts when the computer starts and most of the time it does not manifest itself in any way, although it is displayed in the task manager. But sometimes it automatically contacts Microsoft servers in order to receive information about the latest patches for holes, of which there are a lot in Windows. If you have automatic download and installation mode set in your update settings, then wuauclt.exe will do this, thereby loading the processor.
It would seem that the situation has been clarified - you can safely forget about it. But that was not the case - I’m telling you, it’s not that simple! The fact is that even though Wuauclt.exe is not a virus, Trojans planted on a computer can use it, since it is a system file, which means the level of trust in it from built-in security systems is maximum. Having penetrated it, Windows will not be able to do anything, since it cannot remove itself?
As I already said, the wuauclt.exe file is activated only when Windows updates are received.
Let's do the most basic check to see if it is a clone of the main system process - to do this, open "Start - Task Manager"
Go to the “Details” tab. Here, in order to quickly find the Wuauclt.exe process, sort the “Name” column alphabetically. Find this file, right-click on it and go to “Properties”
We look carefully at the “Location” line - there should be “Windows/System32”. If the value is different, then this is definitely a virus that “mows” under the system file.
Launching the video card through device manager
If you are running a Windows operating system, the reason for the "nvidia display settings are not available" problem message may be based on disabling part of the video card in your device manager.
After updating, reinstalling the system, or speeding up the computer, the system can automatically set the initial settings of the components.
To check the status of the GP and enable it, follow the recommendations:
- Open the search menu on the system desktop.
- Enter “Device Manager” in the text line; Let's open our result.
- Let's go to the video adapters tab, there will be several components in the list. Find the NVIDIA device and right-click on it.
- In the open special menu you can view the status of its operation. If the adapter is disabled, there will be an “Enable” field in the menu. Turn it on and wait a couple of seconds.
- Even if the system displays that NVIDIA GeForce is working, we recommend connecting the device again. Click on "Disconnect" and then again on "Connect". In this way you can return to normal operation. If this doesn’t help you, let’s move on to another method.
Uninstalling GeForce Experience
GeForce Experience is a special program that updates GeForce GTX video card drivers, optimizes game parameters and allows for the exchange of screenshots and videos from games. It itself does not in any way affect the quality of the driver, but sometimes you have to remove it to eliminate processor overload.
This is done in several steps:
- Using the “Start” button, activate the Control Panel (for Windows 10, just click on the gear icon).
- At the top of the window on the right, change the “View” parameter to “Category”.
- Open the "Programs and Features" tab.
- Find the name GeForce Experience, right-click on it and select “Delete”.
- To complete the uninstallation process, follow the instructions that appear on your monitor screen, and then reboot.
You should definitely check whether the load on the PC processor has decreased.
Part of GeForce Experience is the NVIDIA Share, NVIDIA ShadowPlay Helper and NVIDIA Web Helper processes. The first is intended for sharing screenshots and videos from games, the second is responsible for hot keys (Alt + Z), which allow you to quickly activate GeForce Experience, while the third is needed for downloading and installing new drivers in auto mode, as well as for logging into your NVIDIA account. The functioning of these processes occurs at the expense of processor resources, which can cause processor overload. To avoid this, processes can be stopped.
To do this, go into the “General” settings of GeForce Experience and change “On-Game Overlay” to “In-Game Overlay”. The three above processes will be stopped in a guaranteed and safe manner.
Rollback to a previous driver version
Very often, the PC begins to “slow down” after downloading new versions of video card drivers. If this happens, then nvcontainer is forced to use a large amount of resources and increase the load on the processor. And this, in turn, is due to the not entirely normal operation of the installed driver.
In this situation, it is recommended to revert to the driver that previously existed on the device and wait until NVIDIA itself downloads the necessary update. To do this, you need:
Open the Windows search bar and write “Device Manager” in it.
Another option is to hold down the Windows + R keys at the same time. This will bring up the Run dialog box. Write “devmgmt.msc” in it, confirm by clicking “OK” and launch the Manager.
In the Device Manager, go to the “Video adapters” subsection, select the video card and use the right mouse button to select “Delete”.
The system will issue a series of notifications to confirm the action. You must click “OK” and wait for the process to complete. The video card driver will be removed.
Procedure for removing a service from Windows
For Local System, the process can be deleted, but this should not be done without obvious reasons, since this action can lead to errors in the operation of the software components of the video adapter. Therefore, if this process does not eat up all the RAM or does not try to load the CPU to the maximum, there is no need to change the system organization.
Using the “Run” menu, enter the command line (cmd.exe) as an administrator and enter the following entry: sc.exe delete NVDisplay.ContainerLocalSystem. After this, the service will be permanently removed from the OS, but it can be restored by replacing the appropriate driver. It is enough to download the required version of the distribution from the official Nvidia product support website and perform a “clean installation”.
Reasons causing this condition
It is quite logical that if GeForce Experience error 0x0003 occurs, then it is initially worth understanding the reasons for its occurrence. Indeed, thanks to this understanding, you can often independently discover the most effective way to eliminate it.
In this case, there are many root causes of this problem:
- Lack of proper interaction between the desktop operating system and the proprietary telemetry of the developers of this software.
- Inactive state of such important services as: Nvidia Display Service, Nvidia Local System Container and Nvidia Network Service Container.
- Problems with drivers that are necessary for the installed graphics card to operate.
- The network adapter is not working correctly or malfunctioning.
- The system automatically installed the next update package, which led to the replacement of a high-quality video driver with an incorrect version.
So, we have identified what causes this unpleasant condition. We will move in the same consistent manner to get rid of such a failure.
Removing a process
Disabling the program may cause problems with your PC in the form of glitches and sudden shutdowns, although this does not happen often.
To fix this, you need to open the command line by entering “cmd.exe” (do not enter quotes), then click “Run”. There we enter the line “sc.exe delete “NVDisplay.ContainerLocalSystem””. After we close the window, it is not necessary to restart the computer.
It happens that this process denies access; to do this, you need to launch the CS from the administrator panel. It's best to simply disable the program if you don't use it.
So, Nvdisplay.container.exe – what is this process? As you already understand, it is responsible for the operation of the video card and if it interferes greatly, for example, by overloading the system, then it can be disabled using the method suggested above. Do not be afraid of the shutdown process, it does not affect the operation of the video card in any way. Problems arise only after complete removal, which affects settings and additional utilities.
Method 3: Reset the network adapter
Geforce Experience error 0x0003 can be resolved by resetting the network adapter software to its default settings. This procedure is also known as "resetting Winsock" or reinstalling network protocols.
Display the Run window by pressing Win + R together. In the input field, type cmd and press Ctrl + Shift + Enter to open a command prompt with administrator rights.
To reset the network adapter, enter the following command and confirm its launch with Enter:
netsh winsock reset
After the command is processed successfully, restart your computer and check if error code 0x0003 is resolved.
How to install an Appx or AppxBundle file of a UWP application
As with certificates, there are two common ways to install a universal app.
How to install an Appx or AppxBundle file through the App Installer
Starting with Windows 10 1607, the system comes pre-installed with a special utility called Application Installer. It allows you to install the program in just a couple of clicks. In some editions of Windows 10, the utility may not be available. In this case, you will have to download it from the Microsoft Store first.
How to install the Application Installer on Windows 10
- Press Win + R. On tablets, you can tap and hold your finger on the Start button, and then select Run.
- Type the following command and press Enter or OK: ms-windows-store://PDP/?ProductId=9nblggh4nns1.
- Install the utility. If the Store shows that the product is already installed, simply close it.
If you don't have the Microsoft Store app, you can download the utility's AppxBundle file and install it using PowerShell (instructions are located a little lower). Once you have verified that the Application Installer is already on the system, do the following:
- Open the folder with the Appx/AppxBundle file in Explorer.
- Double-click on the desired file.
- If you have SmartScreen Filter enabled, Windows will issue a warning to prevent a suspicious application from running. Click More details and then Run anyway.
- Uncheck or check the box next to Run when ready, and then click Install.
- Wait a while.
How to install Appx or AppxBundle file via Powershell
Unlike importing a certificate, you need to use Powershell: the command line is not suitable.
- Open the folder with the Appx/AppxBundle file in Explorer.
- Click on the File button, then on Run Windows Powershell - Run Windows Powershell as an administrator.
- Enter the following command: Add-AppxPackage
. - Start typing the name of the application installation file.
- Press the Tab key on your keyboard to have Powershell type the full file name for you.
- Press Enter and wait.
If errors occur, restart your computer. If this does not help, contact the person who provided you with the application package for assistance.
Checking your computer for viruses
We also recommend scanning your computer for viruses before installing the new GeForce Experience. Their different types often disable a number of programs in Windows in order to gain access to important components in the system. It is best to check your PC with one-time scanning antiviruses from Dr.WEB, Kaspersky, Microsoft. You can try checking the system with this one.
Free scanning utility from Kaspersky Lab
Open startup in Windows and enable GE in programs that start with the operating system. To do this, press together: Ctrl + Shift + Esc . If Nvidia GeForce Experience shows error 0x0003 or 0x0001 on startup, you need to try to enable the program in startup.
Try also running the application as an administrator. This can be done by right-clicking on the program shortcut and selecting the appropriate item. It is also worth trying to open it in compatibility mode, choosing different operating systems.
Let's figure it out
ntvdm.exe is the NT Virtual DOS Machine process. It runs when DOS programs are used. What's most interesting is that the process can remain hanging in memory, even if the DOS program is no longer running, in case the DOS virtual machine is needed again.
The wiki says that the component is only contained in 32-bit versions of Windows:
Also from the information above we see that... one ntvdm.exe process is responsible for executing one DOS program.
In general, everything is clear - ntvdm.exe is a process/component that is needed to run the old DOS program, in other words, an emulator.
What is this process?
CompatTelRunner.exe is the executable file for the Microsoft Compatibility Telemetry service. It is used to identify possible compatibility issues, collects diagnostic data (telemetry) and sends it to Microsoft servers to improve the quality of the software.
CompatTelRunner.exe is also used to update the system to the latest OS version and install the latest updates.
But sometimes the process overuses system resources, resulting in poor PC performance. In the Task Manager we see that CompatTelRunner.exe loads the processor and disk to almost 100%. If the load caused by this process does not decrease over a long period and interferes with comfortable work on the PC, then try disabling it or completely removing it.
But it will not be possible to remove it using simple methods. You will encounter the "Access Denied" message because CompatTelRunner.exe is located in the C:\Windows\System32 folder and is owned by TrustedInstaller, which is responsible for securing access to system files and has the Read-Only attribute.
Why blue light is bad for your health
three confirmed species
- Short-wave radiation has less penetrating ability through the thickness of the eyeball than long-wave radiation, and therefore part of it is scattered along the way, reducing the clarity of the image entering the retina.
- The energy of short light waves is higher than long ones, therefore, when they hit the retinal receptors, they cause intense chemical reactions, as a result of which metabolic products are released in quantities that do not have time to be utilized by the epithelium.
This can lead to a decrease in the sensitivity of the retina over time. - Blue light can have a suppressive effect on the synthesis of the hormone melatonin, which is necessary for normal sleep.
Excessive use of a smartphone before bed can result in insomnia.There is also evidence that excess blue can increase the likelihood of diabetes and even cancer.
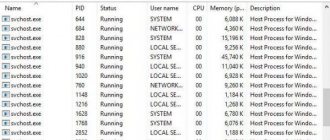
What if it's a virus? How to distinguish a malicious svchost from a normal one
The malware can:
- Create a copy of yourself on your hard drive under the name svchost.exe, which will be located anywhere except the \Windows\System32 directory, since it contains the system file of the same name. That is, to disguise itself as a system process.
- Inject your dynamic libraries into one of the legitimate host processes.
- Modify (patch) the svchost.exe system file by placing your own executable code in its body.
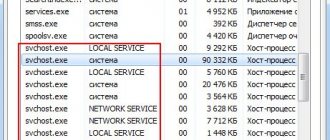
Some users are afraid of what they consider to be too many running host processes. In fact, this indicator does not mean anything bad. The number of svchost processes in a normally operating system is 8-9 or more. Each of them runs one or more services - this can be seen in the task manager. Services are divided into groups depending on the level of access to resources they need, so there are several processes.
Most normal host processes run on behalf of the system, network service, and local service. Before the release of Windows 8, any host service launched on behalf of the user was automatically recognized as a virus, but now this is only true for Windows 7 and its predecessors. In G8 and 10, one service host working on behalf of the user is the norm.
The fact that the host process is running or being used by a virus is indicated by at least one of the following signs:
- The host process file is NOT located in the \Windows\System32 folder.
- The process is running an unknown service or has a non-system library (.dll) loaded into it.
- On Windows XP-7 the host process is running on behalf of the user, and on Windows 8-10 there is more than one host process on behalf of the user.
- The Parent process of a normal service host is always the Services.exe application. When infected with a virus, anything can happen instead.
The screenshots show Process Explorer running as administrator. To view the list of .dlls loaded into the service host, select the last one with a mouse click and press Ctrl+D on the keyboard. To find out its parent process, click the “Properties” button in the top panel of the program and open the “Image” tab.
What to do if svchost.exe is infected with a virus
It is important to figure out where exactly the infection is hiding: in the system file svchost.exe itself or in the one that uses it. If a system file is infected, do not delete it under any circumstances, but replace it with a clean one, taking it from a similar copy of Windows (for this you will have to boot the computer from another medium)
Malicious libraries, on the contrary, must be completely removed.
Mass calculation
Taking measurements
You need to use a non-elastic, but soft measuring tape. It is applied tightly to the animal’s skin, not taking into account the fur of furry animals. An error of a couple of centimeters will be irreparable, so it can be ignored.
You need to measure two parameters:
chest volume along the middle of the ribs;
straight length of the body from the collarbone to the hip.
This measurement technique is meaningless for foals, pregnant females, overly emaciated or well-fed specimens.
Using special tape
To find out how much a horse weighs, you can use a tape invented specifically for estimating the weight of livestock. This tape allows you to measure weight without calculations and weighing, although its error is slightly higher - 15-20%. Tapes vary by weight type: they are produced separately for draft horses, riding breeds and ponies. You need to measure the circumference of the chest along the ribs; the division on the tape will indicate the weight of the ungulate.
Motorin formula
The method is universal and suitable for all types of horses without exception. You need to measure the chest circumference of the horse in centimeters and substitute it into the following formula:
Y = 6* N – 620, where Y is the desired weight, and N is the chest volume (girth) in centimeters.
Durst formula
The method is highly accurate, but it is necessary to take into account the coefficients when calculating. The formula looks like:
Where M is the required mass, V is the chest circumference in centimeters, K is a coefficient depending on the breed. For heavyweights it is 3.5; for medium - 3.1; for lungs – 2.7.
Formula for sports and working animals
Horses of this type have a large amount of muscle tissue, which should also be taken into account when measuring weight. Such formulas are more complex: you need to take measurements from the chest and take into account the length of the torso along an oblique line. Multiplying these values, you need to subtract 20% for racehorses and 30% for workers. Also, to reduce errors, the height at the withers and the girth of the metacarpus are taken into account.
Why does Ntoskrnl.exe use a lot of system resources in Windows 10?
If your question is why Ntoskrnl.exe is using so many system resources in Windows 10, then the answer is simple - it is not due to its own flaw, but it causes problems with other components. The executable file includes a memory manager, cache manager, executive, security monitor, kernel, task scheduler. It is quite a misconception that Ntoskrnl.exe increases CPU load and uses more memory. Let's see why.
Ntoskrnl.exe is responsible for communication between the processes mentioned above. When you open an app, it sends information about all the processes to run, and Windows 10 starts compressing the data in memory, unlike previous versions where it directly wrote it to the hard drive. This means that Windows 10 is similar in technology to Linux. Therefore, Ntoskrnl.exe does not have any contribution to increase your memory or CPU usage. Sometimes, a corrupted driver file or malware starts writing data into the available executable space, which is why Ntoskrnl.exe experiences problems between processes. Interrupt makes your CPU usage more and more, memory also starts eating more MB.
Instead of a total
If we draw the line, it remains to be said that many users simply do not want to delve into the settings of this package, but they should, since there is no other way to reduce the load on the system. Some people don’t even know that the antivirus can be paused without turning it off for certain periods of time. It goes without saying that all this information applies exclusively to those cases when an antivirus is installed on the system. If it is not there, but the process is active, you will have to immediately scan your computer for threats using portable or disk utilities.
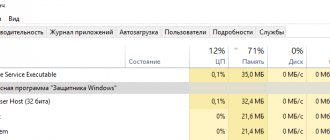
Why does MsMpEng.exe load the processor and use a lot of RAM?
Even during normal operation, Antimalware Service Executable or MsMpEng.exe can use a significant percentage of the processor resources and the amount of RAM of the laptop, but as a rule this does not happen for long and in certain situations.
During normal operation of Windows 10, this process can use a significant amount of computer resources in the following situations:
- Immediately after turning on and logging into Windows 10 for some time (up to several minutes on weak PCs or laptops).
- After some time of inactivity (automatic system maintenance starts).
- When installing programs and games, unpacking archives, downloading executable files from the Internet.
- When starting programs (for a short time at startup).
However, in some cases, there may be a constant load on the processor caused by MsMpEng.exe and independent of the above actions. In this case, the following information may help correct the situation:
- Check if the load is the same after “Shutting down” and restarting Windows 10 and after selecting “Restart” in the Start menu. If everything is fine after a reboot (after a short burst of load it decreases), try disabling Windows 10 Fast Startup.
- If you have an older version of a third-party antivirus installed (even if the antivirus databases are new), then a conflict between two antiviruses may cause the problem. Modern antiviruses can work with Windows 10 and, depending on the specific product, either stop Defender or work together with it. At the same time, older versions of the same antiviruses can cause problems (and sometimes they are found on the computers of users who prefer to use paid products for free).
- The presence of malware that Windows Defender cannot “handle” can also cause high CPU load from Antimalware Service Executable. In this case, you can try using special malware removal tools, in particular, AdwCleaner (it does not conflict with installed antiviruses) or antivirus boot disks.
- If your computer is experiencing problems with the hard drive, this may also be the cause of the problem in question, see How to check your hard drive for errors.
- In some cases, conflicts with third-party services may cause the problem. Check if the high load remains high if you perform a clean boot of Windows 10. If everything returns to normal, you can try turning on third-party services one by one to identify the problem.
MsMpEng.exe itself is usually not a virus, but if you have such suspicions, in the task manager, right-click on the process and select the “Open file location” context menu item. If it's located in C:\Program Files\Windows Defender, you're probably fine (you can also look at the file's properties to make sure it's digitally signed by Microsoft). Another option is to scan Windows 10 running processes for viruses and other threats.
Check the user directory name
Make sure that the name of the user directory located along the path C:\Users\User Directory (the latter will be called differently) does not contain Cyrillic or numeric characters. If there are any, it is recommended to rename the specified user directory, restart all Nvidia services, and check the functionality of GFE.
You may also be wondering what to do when the message “Nvidia installation cannot continue” appears.
Opting out of automatic Windows updates
A common cause of System process activity with a load on the hard drive or processor is receiving and installing Windows updates. System in conjunction with active Windows Defender Antimalware Service Executable processes and installing Windows Modules Installer Worker updates can completely paralyze the computer. To absorb all system resources, this trinity sometimes does not even need the activity of third-party user programs. In this case, you can refuse automatic system updates and take complete control of this process. It will be necessary to periodically, for example, leave the computer turned on at night and manually search for and install system updates.
In Windows 8.1, automatic updates are turned off in Update Center inside Control Panel.
There you can also start searching for and installing updates manually.
In Windows 10, the option to completely refuse to install updates, present in earlier versions of the system, has been eliminated, and instead, users have the alternative of deferring updates for non-security related updates.
You can completely opt out of Windows 10 updates by disabling the Windows Update system service. Select it in the “Services” snap-in.
Stop, disable, apply changes.
Container Runtime Interface
System idle process loads processor windows 10 problem solution
Kubernetes is one of the most popular orchestration systems. With the rise of container runtimes, Kubernetes aims to be more extensible and interoperable with more container runtimes beyond Docker.
Kubernetes originally used the Docker runtime to run containers, and it continues to be the default runtime.
However, CoreOS wanted to use Kubernetes with the RKT runtime and offered patches for Kubernetes to use this runtime as an alternative to Docker.
Instead of changing the kubernetes codebase when adding a new container runtime, the creators of Kubernetes decided to create CRI (Container Runtime Interface), which is a set of APIs and libraries that allow you to run different container runtimes on Kubernetes. Any communication between the Kubernetes core and the supported runtime is done through the CRI API.
Here are some of the CRI plugins:
CRI-O:
CRI-O is the first container runtime built for the kubernetes CRI interface. Cri-O is not intended to replace Docker, but it can be used instead of the Docker runtime on Kubernetes.
Containerd CRI:
With cri-containerd, users can run Kubernetes clusters using containerd as a base runtime without Docker installed.
gVisor CRI:
gVisor is a project developed by Google that implements about 200 Linux system calls in user space for added security compared to Docker containers, which run directly on top of the Linux kernel and are isolated using namespace.
Google Cloud App Engine uses gVisor CRI to isolate clients.
The gVisor runtime integrates with Docker and Kubernetes, making it easy to run isolated containers.
CRI-O Kata Containers
Kata Containers is an open source project that creates lightweight virtual machines that connect to the container ecosystem. CRI-O Kata Containers allows you to run Kata containers on Kubernetes instead of the default Docker runtime.
How to disable nvdisplay.container.exe?
Some people want to get rid of the process forever (or at least not have to go to the Task Manager every time they use the computer). It's not that difficult - just follow the instructions:
- We press the Win + R key combination - the “Run” window opens in front of us.
- Paste the following there (without quotes): “services.msc” - the “Services” window should appear.
- We look for “Nvidia Display Container LS” in the list - double-click on the line with the left mouse button.
- A new menu opens, in which we select the “General” / “Basic” tab.
- For a single stop, press the “Stop” button.
- To completely disable it, in autorun we find the column “StartUp Type” / “Startup Type”.
- In the slide-out menu, select “Disabled” / “Never” (depending on the operating system and its version). Disabling the Nvdisplay.container.exe process
It is important to understand that if the autorun process is stopped, the video card settings menu will not be open. If you really need it, you should perform all the above manipulations and move the pull-out list column to the “Always” position
After restarting the computer, the process will return, along with the ability to configure Nvidia.
Was Sie bei NVDisplay Problemen tun können
Ein aufgeräumter Computer ist die beste Voraussetzung, um NVDisplay Probleme zu vermeiden. Hierzu sollten Sie einen Malware-Scan durchführen, Ihre Festplatte aufräumen (mit 1cleanmgr und 2sfc /scannow), nicht mehr benötigte 3Programme deinstallieren, Autostart Programme überprüfen (mittels 4msconfig) und 5Windows Updates automatisch installieren. Denken Sie immer daran ein Backup oder zumindest einen Wiederherstellungspunkt zu erstellen.
Bei einem konkreten Problem überlegen Sie bitte, was Sie als letztes getan bzw. installiert haben, bevor das Problem das erste Mal auftrat. Nutzen Sie den Befehl 6resmon, um diejenigen Prozesse zu ermitteln, die Ihr Problem verursachen. Selbst bei schwerwiegenden Problemen sollten Sie anstatt einer Windows-Neuinstallation lieber eine Reparaturinstallation oder ab Windows 8 den Befehl 7DISM.exe /Online /Cleanup-image /Restorehealth ausführen. Damit wird das Betriebssystem ohne Datenverlust repariert.
Zur weiteren Analyse haben sich folgende Programme als nützlich herausgestellt: Der ASecurity Task Manager untersucht den aktiven NVDisplay Prozess auf Ihrem Computer und zeigt anschaulich was der Prozess macht. Das bekannte Tool BMalwarebytes Anti-Malware sagt Ihnen, ob die Datei NVDisplay.Container.exe auf Ihrem PC lästige Werbung einblendet und so Ihren PC ausbremst. Solche unerwünschten Adware Programme werden oft von einer Antivirus Software nicht als Virus eingestuft und deshalb nicht erkannt.