Coordination and approval of documents always leads to the introduction of corrections, additions and amendments to the text of the document. The Word text editor has convenient functionality for working with corrections. When the correction editing mode is enabled, it saves the entire history and names of users who made changes to the document.
- Editing mode in a Word document: How to enable correction editing mode;
- How to enable do not disable tracking.
- Display for review;
How to enable edit mode in Word 2007 or 2016: available methods
There are several ways to enable edit mode in Word. Try the following:
- In the document, go to the “Review” tab.
- Click the "Corrections" button.
If you have a 2003 version, look for the required inscription in the “Service” tab.
You also have the key combination Ctrl+Shift+E at your disposal. There is no need to press pluses or switch the layout to English.
How do I view corrections?
By default, Word's settings for displaying deleted or moved passages and formatting changes are set to place corrections in callouts. Other corrections appear in the text.
1. In the open document window, go to the “Review” tab.
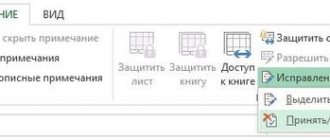
2. In the “Record corrections” group, open the menu of the “Display for verification” button and select:
- "All corrections";
- "Corrections";
- "No corrections";
- "Original document."
Displaying patches for review
How to work in edit mode in Word
In recent versions of Word, you can track changes as follows: Tabbed Ribbon → Review → Corrections. When the Corrections button is disabled, edits are not highlighted. When enabled, new words and characters are typed in colored font, and deleted ones are placed in the fields marked “Deleted” or crossed out, depending on the settings for the type of corrections. The type of corrections (in text or in callouts) is configured in the menu.
For example, you received a text with edits: review the changes. Not satisfied with the editor's correction? Cancel it and either add your own or write a note. To interact with edits, simply right-click on them. There is an editor's note - respond or correct the text accordingly.
Expert opinion
Popov Anton Valerievich, Word consultant
If you have any questions, ask me!
To approve the editor's edits or keep the original version without edits, select the fragment with the corrections and click the Accept or Reject button on the Review tab. If something doesn’t work out, contact me and I’ll help you figure it out.
For the same purpose (accept/reject), you can right-click on the correction and select the desired one. You don’t have to mark the editor’s approved corrections in any way—they will be seen at the final proofreading stage.
What is the Revision Area?
The review area displays all revisions currently in the document, the total number of revisions, and the number of revisions of each type. This is a very convenient tool that guarantees that all corrections made will be deleted from the document and no one will see the document with them.
Importantly, the corrections area helps you control whether there are any corrections left in your document or not, because you can send the document with corrections to the client. But it’s not a fact that he needs to know all your current work with your colleagues on the document.
The top section of the review area displays a summary of the exact number of visible revisions and comments remaining in the document.
Screen where the correction area and correction mode are enabled
How to view the original document in edit mode in Word format
It's easy to view the source document in current editing mode if you use Word's functions. In the “Review” tab, look for the “Tracking” section, and then “Source document”.
Below in the panel you can find tools for work and view a specific type of correction:
- Notes and handwritten notes;
- Additions and deletions;
- Formatting;
- Selecting the correction area.
Sorting by reviewer is also available, which makes your work easier. You can also open the Review Area and see the different types of changes and edits.
It is very convenient to make corrections in the form of callouts. To do this, find the corresponding button in the “Reviews” section and click it. You will see an option to Show edits in callouts, Show edits in text. All you have to do is choose the one that suits you and use the service. If you have any questions, ask them on the forum.
Ask a Question
Show changes to a document
There are 3 modes for displaying corrections, each of which determines the appearance of the corrections displayed on the screen and limits certain types of corrections.
The commands are located to the right of the Corrections command in the Review section.
Each mode has several options, which can be selected by clicking the arrow on the right and selecting the desired option from the drop-down list.
Display for review
Allows you to see the text in different editions. When this option is enabled, the user can choose:
- Modified document: show corrections. Edits are shown relative to the final text, highlighted in color, and displayed in callouts in the right margin. This mode is used to view the text after making edits.
- Modified document. In this mode, the screen shows the final version of the document without corrections. Used to make a revised document easier to read.
- Source document: show changes. The original edition with a visual display of all the changes made. This version of the text is the most difficult to read, as it is overloaded with information, but it allows you to clearly see the whole picture of the corrections.
- Original text. Display the original text before making edits. Allows you to return to the original version without affecting existing corrections.
All fixes
This mode controls what types of corrections should be displayed in the text. To select, you need to check the boxes next to the required types or names of individual reviewers.
Check area
Displays edits in a separate screen window in the form of a list. The Review Area panel displays a summary and list of revisions in chronological order, showing complete information for each revision made to the text. When this mode of displaying edits is enabled, the user can choose the location of the panel: either at the bottom of the screen or to the left of the text screen.
Note. The activation of the above modes is marked in yellow.
Why edit mode is better than standard editing
The editing mode helps the editor not to redo the text after the author, but to point out mistakes. Thanks to it, the entire intermediate process of working on a document is visible directly in its text. This mode in the program helps multiple users interact.
When looking at a document, it is not difficult to distinguish edits, since they are designated in a special font with callouts containing information about each of them. For example, the deletion of text will be highlighted with a strikethrough or a balloon with the deleted text, depending on the selected mode for displaying edits.
Reference
Don't have Word for Windows? The principle of operation in change tracking mode is generally the same in all popular text editors. Here are links to some instructions:
Services and prices - main page
Microsoft Word offers a host of unique tools for sharing and reviewing documents, with the Editing mode playing a key role. This mode allows you to make corrective edits to text, notes and comments, after which you can transfer the document to another person. He, in turn, will familiarize himself with all the corrections made, make the appropriate adjustments if desired, and transfer the text to the final point, or send it back to the reviewer by email for re-review. This makes it possible to collaborate on Microsoft Office documents.
Reviewing through the eyes of an editor
Let's see how these features work in practice when the document is in the capable hands of an editor.
Notes
With notes everything is very simple. You need to select the text, click the “Create Note” button and add your comment.
Figure 2 – Note to the text
Notes are located in callouts, which by default are placed in the right margin of the document. Each note is automatically signed with the initials of the user who left it. All these parameters can be changed, and this will be discussed below.
Corrections
At first glance, there are only four buttons in the Tracking group. But each of them opens a list with additional options.
Figure 3 – Change tracking and patch options
Correction tracking is activated by clicking on the “Corrections” button, which immediately turns golden, thereby signaling that the mode is enabled. This is where Word 2010 remembers all insertions and deletions, as well as changes to document formatting. If you click the bottom of the button, an additional menu will open, the first item of which enables or disables tracking.
By clicking the Revision Options button, you can customize the appearance of your edits—colors, line types, document layout. Here you can also configure the location of notes - you can place them in the left margin of the document and set the width of the callouts, as well as turn off the display of lines that connect them with the text.
All corrections are associated with the user name, which is set in the personal settings of Word 2010. The “Change user” button leads directly to them.
Figure 4 – User’s personal parameters
Notes, as you have seen, use initials, but deletions and insertions use the full name.
Reviewing in Word
Did you know that Microsoft Word has built-in tools to track your changes, edits, and comments as you review your document? If you want to return an edited document to someone with the changes highlighted so they can accept or reject the suggested changes, keep track of the changes they made for you.
Enable change tracking mode
To use Track Changes, all you need to do is turn on review mode when you open a Word document and before you start editing.
- Go to Review on the ribbon.
- In the middle of the “ Record corrections ” group, click the “ Corrections” , after which all changes will be recorded .
Step Three: Adding Notes
Sometimes highlighting the fixes is not enough for the other user to understand what their mistake is. In this case, it would be good to describe the reason. It is for this purpose that the program has the “Create a Note” tool, which can only be used when the editing mode is turned on.
It's very easy to use. You need to initially click on your correction, and then on the “Create Note” button, which is located on the toolbar, not far from the “Corrections” button. You can see the exact placement in the picture below.
After this, an additional area will appear on the right side of the document where you can enter an explanation. You can do this with all changes, but you cannot create a note that is not linked to them.
If we talk about how to remove the edit mode in Word, then it’s quite easy to do. You just need to click on the "Corrections" button again.
Coordination and approval of documents always leads to the introduction of corrections, additions and amendments to the text of the document. The Word text editor has convenient functionality for working with corrections. When the correction editing mode is enabled, it saves the entire history and names of users who made changes to the document.
- Editing mode in a Word document: How to enable correction editing mode;
- How to enable do not disable tracking.
- Display for review;
Editing mode in a Word document
The editing mode differs favorably from editing in that the entire intermediate process of working on a document is visible directly in its text. Used when several users collaborate on one document.
Visually, all edits are highlighted in red and have their own designation in a special font with callouts containing information on each of them. For example, the deletion of text will be highlighted with a strikethrough or a balloon with the deleted text, depending on the selected mode for displaying edits.
How to enable patch edit mode
All corrections are registered in the Word text editor on the “Review” tab through a group of commands in the “Record Corrections” and “Changes” sections.
In the 2003 edition of Word, the Corrections feature set is located in the Tools section, with available commands displayed in the toolbar.
An alternative way to open the edit mode is the combination “Ctrl” + “Shift” + “E”.
After enabling this mode, you can make changes to the text.
How to enable do not disable tracking
As noted above, all corrections when the Corrections mode is enabled are tracked and noted in the text. To avoid uncontrolled corrections to the text, the document author must enable a disable option to disable correction tracking.
This action is carried out as follows:
- Select the “Review” menu tab.
- In the “Write corrections” command block, expand the list of the “Corrections” buttons.
- Select the command “Prohibit disabling tracking”;
- In the “Block registration” window that appears, enter the password twice.
- Confirm your intention with the “OK” button.
To remove a ban, the user must enter a password.
Show changes to a document
There are 3 modes for displaying corrections, each of which determines the appearance of the corrections displayed on the screen and limits certain types of corrections.
The commands are located to the right of the Corrections command in the Review section.
Each mode has several options, which can be selected by clicking the arrow on the right and selecting the desired option from the drop-down list.
Display for review
Allows you to see the text in different editions. When this option is enabled, the user can choose:
- Modified document: show corrections. Edits are shown relative to the final text, highlighted in color, and displayed in callouts in the right margin. This mode is used to view the text after making edits.
- Modified document. In this mode, the screen shows the final version of the document without corrections. Used to make a revised document easier to read.
- Source document: show changes. The original edition with a visual display of all the changes made. This version of the text is the most difficult to read, as it is overloaded with information, but it allows you to clearly see the whole picture of the corrections.
- Original text. Display the original text before making edits. Allows you to return to the original version without affecting existing corrections.
All fixes
This mode controls what types of corrections should be displayed in the text. To select, you need to check the boxes next to the required types or names of individual reviewers.
Check area
Displays edits in a separate screen window in the form of a list. The Review Area panel displays a summary and list of revisions in chronological order, showing complete information for each revision made to the text. When this mode of displaying edits is enabled, the user can choose the location of the panel: either at the bottom of the screen or to the left of the text screen.
Note. The activation of the above modes is marked in yellow.
Accept or reject changes to a document
To complete the Corrections feature, you must accept or reject the corrections. To accept corrections, you must perform the following algorithm of actions:
- Select the desired edit or place the cursor at the beginning of the document.
- Select the “Review” menu.
- In the “Changes” command block, expand the list of possible options for the “Accept” command: for the entire document or for the current correction with options for moving to the next correction or not.
Sequential transition from one correction to another is performed using the “Next” or “Back” buttons.
If the corrections are not relevant, they must be rejected using the algorithm described above, but using the “Reject” button.
You can reject or accept the correction while reading the text. To do this you need:
- Place the cursor on the current fix.
- Right-click to open the context menu.
- Select the appropriate “Accept” or “Reject” option.
When the work of approving or rejecting changes is completed, the text of the document will return to its normal form.
How to remove corrections from a document
Details of each correction are contained in the callout located in the margin to the right of the text:
- reviewer's name;
- time and date;
- type of correction (deletion, addition, format change);
- text or indication of the edit format.
The disadvantage of displaying corrections with callouts is that they limit the text field and, for convenience, can be hidden when performing the following actions:
- open the “Review” tab in the menu;
- go to the “Show all corrections” section;
- in the “Callouts” line, select “Never”.
After this, the corrections are visible, but the margin callouts will be missing.
Review mode in Word. Most often, the review function is used by authors who write articles and need the services of an editor. After writing another article for publication on some resource, the author sends his work in Word format to the editor. The editor checks the work, adds his own notes and corrections, and sends the article back to the author for correction. This process may be repeated several times until the author and editor's options are agreed upon. This process is called peer review.
The Review tab is sixth on the tool ribbon. By going to this tab you will see something like this:
On this tab, 2 tools are mainly used to carry out reviewing:
notes
And
corrections
:
Notes.
Used when creating comments on the text. The editor can leave various comments on the text, for example, if the same error is repeated many times, instead of correcting all of them, the editor will leave a note to the author so that he corrects all the errors.
Notes are also used for the editor to record alternative versions of phrases that he will recommend for use by the author. In general, in the notes the editor can indicate any information intended for the author to make the article relevant to the resource on which it will be published.
Corrections.
This tool is used to make amendments and changes to a document. When viewing a document by the author, he can view both his version of the document and the version in which an editorial amendment was made. If the editor has made an amendment to your text, you are strongly recommended to adhere to this correction option.
Let's look at an example of how reviewing occurs through the eyes of the author. For example, we have the text:
Even from a layman's point of view, you may notice that the text has poor readability and contains errors. Imagine that you are an editor. To create a note, you need to select a part of the text and click the “Create note” button and create a comment on the fragment:
As a result, on the right side of the document you will have a so-called callout, where you can see the editor's note.
To create corrections, you will need to click on the “Corrections” button and make the necessary corrections. You can do whatever you want with the document, even if you delete parts of the text, they will just be crossed out, nothing will be deleted:
After completing the correction, click on the “Corrections” button again to exit the correction mode.
When the editor or editors have made many changes to a document, the presence of many corrections makes the text difficult to read. However, you can choose the document type that is convenient for you:
- modified with corrections;
- modified without corrections;
— original with corrections;
- original without corrections.
Using this functionality you can conveniently view all notes and corrections.
There are also other tools in the Review tab. Some of them aren't even worth mentioning since you often use them for simple editing, but some are still worth adding.
If you agree with the editor's changes, you can accept the changes by clicking the "Accept" button in the "Changes" section. You can accept changes all at once or separately:
This section also allows you to navigate between changes in the document.
If you sent the editor a copy of the document. You can compare your original and edited document using the "Compare" function in the "Compare" section, or combine edits made by several authors:
That's all. You learned the basic review functions in Microsoft Word. If you have any questions, write them in the comments.
Microsoft Word 2010. Working with correction mode. Revision mode is used to track changes made to a document. This is especially in demand in cases of working with large documents, documents on which several authors work, or documents in which the document is created by the author and reviewed by the editor. Microsoft Word 2010 features allow you to track every insertion, deletion, move, format change, or comment so that the user can later review all changes made. Moreover, the user can accept or reject the changes he views.
Setting the correction mode To customize the correction mode, such as changing the color or type of correction underlines, the color of cells, or the position of leader lines, do the following:
1. Open the “Review” tab; 2. In the “Tracking” group, open the “Corrections” button menu; 3. In the list of commands that opens, select “Repair Options”; 4. In the "Patch Options" window that opens, make the necessary changes and click "OK"
Scope of Fixes If you do not want a certain type of fix to be counted, do the following:
1. Open the “Review” tab; 2. In the “Tracking” group, open the “Show corrections” button menu; 3. In the list of commands, uncheck the items you don’t need
Displaying patches 1. To set the way patches are displayed, do the following:
2. Open the “Review” tab; 3. In the “Tracking” group, open the “Show corrections” button menu and go to the “Callouts” item; 4. In the list that opens, select the desired item: • “Show corrections in callouts” – corrections are displayed in the notes area behind the document fields; • “Show all corrections in the text” – all corrections are displayed directly in the text, so if you have added a number of comments, only their numbers and the initials of the “Reviewers” will be visible, and the text of the comment itself will be visible when you hover over it; • “Show Notes and Formatting in Balloons Only”—Corrections such as adding or removing punctuation, grammatical or spelling errors will appear directly in the text, and notes and formatting changes will appear in the notes area.
Correction mode indicator If you work as an editor, or want to track changes made yourself, and at the same time be able to enable or disable the mode for recording changes made in online mode, you need to place the correction mode indicator on the status bar, so you can activate or disable patch recording mode. To do this, do the following:
1. Open a document and right-click on the status bar; 2. In the context menu, select “Corrections”
Enabling the repair mode And since we have already talked about the repair mode, now we will look at how to enable it. To do this, do the following:
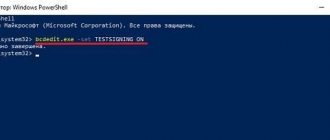
Method 1: 1. On the status bar, left-click on the repair mode indicator. Its default state is “Off”, that is, turned off, after clicking on it, its state will accordingly change to enabled - “On”. By clicking on the indicator, you can quickly disable/enable this mode and track changes in the document where you need it. Method 2: 1. Open the “Review” tab; 2. In the “Tracking” group, open the “Corrections” button menu; 3. In the list of commands, click on the “Corrections” item; 4. Make the necessary changes to the document, then, to finish recording, click the “Corrections” button again. The document text or callouts will contain red text underlined with a line of the same color. Method 3: 1. Open the document 2. Press the key combination to enable recording, and press this combination again to turn it off
Review Area The Review Area shows all corrections currently in the document, the total number of corrections, and the number of corrections separately by type. This allows you not only to control the changes made to the document, but also allows you to delete these corrections, thus allowing the owner of the document to hide this information from prying eyes. At the top of the review area, a summary is shown showing the exact number of visible corrections and comments remaining in the document.
Position of the inspection area The inspection area can be placed horizontally or vertically, it all depends on what is more convenient for you. To position the review area, do the following: 1. Open the “Review” tab 2. In the “Tracking” group, click the “Review Area” button 3. In the menu that opens, select the desired layout method: • “Vertical review panel” – located vertically, on the left parts of the document window; • “Horizontal review panel” – located horizontally at the bottom of the document window
To close the review area, click the cross in the upper right corner of the area, or click the “Review Area” button in the “Tracking” group of the “Review” tab.
View revisions By default, Word 2010 displays corrections in callouts to display changes that involve deleting, moving, or formatting changes. Other corrections appear directly in the text. To set a view of revisions other than the default, do the following: 1. Open the Review tab 2. In the Tracking group, click the Show for Review button 3. In the menu that opens, select: • Modified Document: Show Revisions » – shows the modified document, where the corrections are highlighted accordingly (depending on the settings); • “Changed document” – similar to the previous mode, but in this case the changes made are not highlighted, that is, plain text is displayed, without highlighting or underlining; • “Source document: show corrections” – shows the source document and the changes made to it, which are highlighted accordingly, that is, all changes in the source are displayed; • “Original document” – shows only the original document, all changes made are hidden. In other words, if you added a few paragraphs in the source, but want to view the document in its original form, you just need to turn on the display of the source document, quickly re-read it, and then make the missing corrections in the modified document (again, go to the default display mode)
Accept/reject changes made Corrections made during recording are not deleted from the document. There is little choice; we can either accept or reject the correction. To do this, do the following: Method 1: 1. Open the “Review” tab; 2. In the “Tracking” group, click the “Show for review” menu open button and select “Changed document: show corrections”; 3. Place the cursor on the correction and click the right mouse button; 4. From the context menu, select Accept the correction or Refuse the correction. If the correction is in a callout (note, format change), you can click directly on the callout (callouts show formatting changes, notes, and deleted portions). If the correction is associated with a format change, then in the context menu the command will sound slightly different - “Accept format change” and “Refuse format change”, respectively. Method 2: 1. Open the “Review” tab; 2. In the “Tracking” group, click the “Show for review” menu open button and select “Changed document: show corrections”; 3. Place the cursor on the desired correction; 4. In the Changes group, click the Accept or Reject buttons to accept or reject the changes. Use the "Back" and "Next" buttons to quickly navigate through the corrections. When you accept all the corrections in the document, the following window will appear (Figure 7), confirming that you have accepted all the necessary corrections and deleted the comments.~~Accepting all the corrections in the document If you are happy with the changes made to the document, you can accept them all at once. To do this, do the following: 1. Open the “Review” tab 2. In the “Tracking” group, click the “Show for Review” menu open button and select “Changed document: show corrections”; 3. In the “Changes” group, click the button to open the menu of the “Accept” button; 4. In the list that opens, select “Apply all changes to document”
Rejecting all corrections in a document In this completely opposite case, you can reject absolutely all corrections.
To do this, do the following: 1. Open the “Review” tab 2. In the “Tracking” group, click the “Show for Review” menu open button and select “Changed document: show corrections”; 3. In the “Changes” group, click the button to open the “Reject” button menu; 4. In the list that opens, select “Reject all changes to document”
Step two: making corrections
In fact, this point could be skipped, since it all comes down to the fact that you are correcting the document, and instead of completely editing it, simply edits are made, without changing the source. But it’s still worth telling how exactly this happens.
Let's say you see that some word in the text is superfluous. In this case, it would be wise to remove it. Do so, but it will not disappear, but will only be crossed out, which will make it clear to the other user what you meant. The correction will also be highlighted in red to attract attention.
The same will happen if you enter some other word - it will stand out so that the author of the text can understand what exactly he missed.
The editing mode in Word is very helpful if you are working with someone at a remote distance. In this case, instead of words of complaint, you will just need to send him a document with corrections.