06/09/2018 Category: SettingsAuthor: Denis Dolgopolov
By default, the hard drive in any version of Windows is divided into two partitions. One of them is allocated to system files, and the second to user elements and programs. But other combinations are also possible, when it is worth splitting the disk into more partitions or, conversely, merging existing ones.
- How to partition a disk
during system installation - Using the built-in service
Video: how to partition a disk using the built-in Windows program
- Video: How to use Aomei Partition Assistant
- Video: How to change the drive letter
Why partition a disk?
Any disk has a finite number of gigabytes of memory. It can be divided into separate portions, creating sections with a suitable number of megabytes. In this case, there will always be one hard drive, and the so-called drives C, D, etc. will become its partitions.
Only one section is required - the system one. The operating system itself and the programs built into it are installed on it.
The disk does not need to be divided. Then both Windows and all user files will be stored on one partition. But this is a bad practice because shuffling the elements will confuse both the human and the computer, which can result in poor performance.
By creating new partitions, you can also redistribute space between existing disk blocks. Only first you will have to format or partially clear the filled partitions, since only free space can be distributed.
The disk can be divided into any number of partitions for different user needs
You can split the disk any way you want. For example, you can allocate one section for the system, the second for programs, and the third for photographs and videos. Also, sometimes a disk is split to create a new empty partition and install a second operating system on it without erasing the first.
How to partition a disk
There are several methods by which you can redistribute disk space between partitions. Some allow you to do this during system installation, while others allow you to do this while Windows is already running. Windows 10 has both built-in services and third-party programs for this purpose.
When distributing space between partitions, remember not to trim the system partition too much, even if there is free space on it. Give it at least 40 GB of memory, since in the future it will host not only the system, but also some files of third-party programs. If the system partition becomes full, Windows will start to slow down and freeze.
During system installation
At one stage of installing Windows 10, the program asks the user to indicate the partition on which to place the system. It is at this step that memory reallocation can be performed. Please note that this method will not allow you to take away its unallocated memory from a partition and give it to another. Here you can format the partition, delete it, and only then redirect its volume, that is, you will have to first erase all data:
- Click on the “Disk Settings” button to bring up a list of tools.
Click the “Disk Setup” button - New buttons will appear with which you can change sections. We are only interested in two of them: “Delete” and “Create”. In the list of partitions you can see how many blocks the disk is currently divided into and how much space is allocated to each of them. All unallocated space is placed in the “Unallocated disk space” section. Only from unallocated space can you create new partitions. To replenish your free space, delete a partition you no longer need - all data from it will be irretrievably erased, and the volume available on it will be moved to unallocated space.
Click the “Delete” button - To create a new disk block, select the unallocated space and click on the “Create” button. Indicate how many megabytes you want to give and confirm the action. Done, the new partition will be created.
Click the “Create” button
If you leave any part of the unallocated space without creating partitions from it, then it will remain unused, that is, some disk space will be idle. For this reason, it is recommended to calculate and distribute all available space between sections.
Using the built-in service
Windows 10 has a built-in program by default through which you can not only delete partitions and distribute unallocated space, as is done during system installation, but also take away unallocated megabytes from a partition and transfer them to another without formatting the partition being reduced.
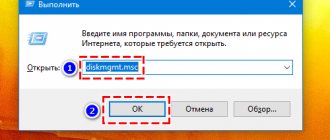
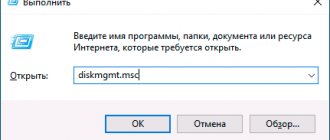
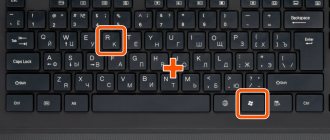
- Press the Win + R combination on your keyboard to bring up the Run window. Give it the command diskmgmt.msc to proceed to partition management.
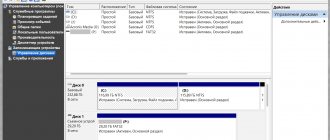
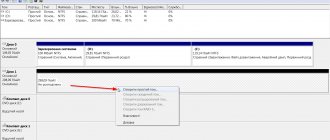
Run the command diskmgmt.msc - The program window will open: in the upper part there are partitions (volumes) of the selected disk, and in the lower part there is a list of disks connected to the computer. There's likely only one drive in your build, so that's why it's selected by default. The black block shows how much memory is currently unallocated - only from this block can you take megabytes and assign them to any partition. You can replenish it in two ways: delete or shrink the partition. To delete a volume, right-click on it and select the “Delete Volume” function. After confirming the action and waiting for processing to complete, you will see that the unallocated memory has increased and the erased partition has disappeared. Please note that the system partition cannot be deleted.
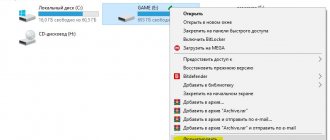
Click the “Delete volume” button - To shrink a partition, right-click on it and select “Shrink Volume”. A window will appear indicating how many free megabytes are available and how many will remain after compression. Set how much memory you want to take and confirm the action. You shouldn’t take up all the free space from a partition, even if you don’t intend to use it. Partitions filled to the brim slow down the disk and, accordingly, the entire system. Leave at least 5–6 GB.
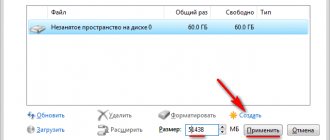
Select the “Shrink volume” function - Right-click on the black block and select “Create Simple Volume.”
Select the “Create simple volume” function - A window with settings for the new section will appear. Assign a letter to it and indicate the number of megabytes allocated for it.
Specify the letters and amount of partition memory
After waiting for the partition to complete, you will see that the new volume has appeared in the list. You will also notice a new section on the main page of Explorer.
Video: how to partition a disk using the built-in Windows program
Using Aomei Partition Assistant
This program is similar to the built-in Windows disk management application, but it is more functional and convenient. You can download its free version from the official website. When installing, you should select the Russian language, since the program is translated into it.
All actions with sections are performed using the buttons located on the left side of the window. For example, by clicking on the “Split Partition” line, you can create two volumes from one. There are also buttons that allow you to quickly trim or expand a partition, merge or copy volumes.
All actions with sections are placed on the left side of the window
Video: How to use Aomei Partition Assistant
Partitioning the main disk using the Windows PE boot shell
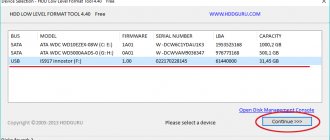
If you decide to install a new operating system or completely update the old one, and the existing partition sizes of the main HDD do not suit you or do not meet the necessary requirements, then it is better and easier to reformat by logging into the computer from a special simplified Windows PE .
If desired, various versions of Windows PE can be downloaded from the Internet, and they are freely available there and are equipped with a set of all the necessary portable programs for working not only with storage media, but also have a whole set of various useful utilities. For example, you can take the distribution kit from the site https://diakov.net/8305-adminpe-30.html, which does not require additional registration from the user.
Having loaded Windows PE onto a USB or CD/DVD drive, we boot the system using the key to call up a menu in which there is a choice of boot device. As a rule, this is the function key F11, after pressing which we select our Windows PE .
After loading portable Windows PE, a desktop will appear that almost completely replicates the familiar Windows shell, but with pre-installed software modules.
We open a universal program for working with various storage devices and work according to the example given earlier in the background and without unnecessary reboots.
The main advantage of the Windows PE is that the software modules are in no way connected to hard drives, which allows you to perform all possible operations to reformat them in any possible way without any restrictions.
How to merge sections
Merging partitions can be done using any of the above methods for partitioning the disk. When installing Windows, it is enough to delete two volumes, and then, having received unallocated space, create one large partition. In this case, it will not be possible to perform the operation without losing data from the partition.
Using the built-in system program, you can right-click on the volume and select “Extend Volume”. The system will ask how many megabytes you want to add. At the same time, you can only expand a partition with unallocated space, so you will first have to delete one of the volumes, and then add the resulting unallocated memory to any volume, thereby performing a merge.
We indicate how many megabytes to give to the partition
Using the third-party program Aomei Partition Assistant, merging is easiest: just click on the “Merge Partitions” button, specify two volumes and allow them to merge. Using this program is the only way to merge partitions and not lose data from them.
We indicate which sections should be merged
EaseUS Partition Master
EaseUS Partition Master stands out from other developments with its versatility. It works on both modern versions of Windows and older ones (but not lower than XP). The application is also compatible with Microsoft server operating systems (requires 2003 or later).
Even in the free version, you can fully process disks up to 8 terabytes in size. The following operations are supported:
- preparing a new disk in operation by creating partitions;
- removing no longer needed volumes;
- redistributing space by resizing, merging volumes, or splitting a partition;
- viewing and checking data.
The full paid version has no restrictions on storage capacity. You can also use it to expand the range of available operations - for example, transfer an installed copy of Windows to another drive or launch actions from the terminal.
EaseUS Partition Master recognizes and successfully interacts with various types of drives - regular disks, external devices, memory cards.
- Pros : ability to work in various OS versions, including server versions, abundance of tools for working with disks.
- Cons : auxiliary software imposed during installation, lack of translation into Russian, limited functionality in the free version.
We recommend similar articles on our website:
- Hard drive performance testing.
- Checking hard drives.
- Recovering BAD blocks of a hard drive.
- Defragmentation of hard drives.
How to rename a section
If for some reason you want to change the letter of a disk partition:
- Go to the built-in program (in the “Run” window, called using the Win + R combination, enter the command diskmgmt.msc), right-click on the desired volume and select the “Change drive letter or path” function.
Select “Change drive letter or path” - In the window that appears, specify any unoccupied letter from A to Z. You can only use letters of the English alphabet.
Specify a new drive letter