05/10/2020 windows | for beginners | programs
If for one reason or another you need to delete hard drive or SSD partitions in Windows, you can do this either using the system’s built-in tools or using third-party partition management programs. With the exception of some cases, this does not cause problems.
This instruction details how to delete a disk partition in Windows 10, 8.1 and Windows 7 in Disk Management, the command line (Diskpart) and using third-party free programs, as well as possible problems with deletion. If you need to delete all partitions on a hard drive or other storage device without exception, and the disk is not a system one, you can use the separate instructions How to delete partitions on a flash drive (suitable for other disks as well).
- How to delete a disk partition in Windows Disk Management
- Removing HDD or SSD partitions in the command line
- Removing an extended partition
- Programs for managing disk partitions
- Problems and errors when deleting partitions
- Video instruction
How to delete a disk partition in the built-in Windows Disk Management utility
All latest versions of Windows have a built-in utility for working with disk partitions; its use is very simple and in the basic case, to delete a partition you will need to follow these simple steps:
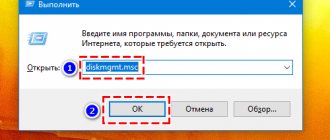
- Press the Win+R keys on your keyboard, type diskmgmt.msc and press Enter.
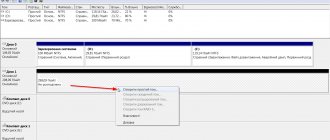
- In the Disk Management utility that opens, right-click on the partition that you want to delete - this can be done both in the list of partitions displayed at the top and in the graphical representation of disk partitions at the bottom. I prefer to use the second option.
- Select "Delete Volume".
- Confirm deleting the partition.
- In the future, you can use the unallocated space to create new partitions or to attach to other existing partitions; you can read about this, for example, here: How to enlarge drive C at the expense of drive D.
Everything described works without problems, provided that the partitions are not system or otherwise used or necessary - in this case, the “Delete volume” item may not be active or missing; we will consider such cases in the section about possible errors.
There are also nuances for logical partitions located on an extended partition. In this case, such partitions in disk management will be located in the area highlighted in green and about them - in a separate section of the instructions.
How to create a recovery partition
Deleting the Recovery directory is undesirable for a number of reasons. Mainly because the recovery disk is not a very reliable medium. Modern PCs are produced without an optical drive. This means that a flash drive will be used as such a drive, the contents of which can be accidentally deleted. In this case, problems with Windows performance can only be solved by using the operating system distribution, which also contains the Recovery directory.
If you are not happy with this scenario, and the recovery partition on the system drive was deleted, this can be fixed.
And again, the easiest way to do this is using software from a third-party manufacturer, for example, the AOMEI OneKey Recovery utility (link to the download page from the official website - https://www.aomeitech.com/onekey-recovery.html).
ADVICE. It is advisable to create a Windows recovery partition on a clean OS with drivers and programs installed. Otherwise, all the “garbage” that has accumulated in Windows at the moment will end up in the recovery partition, which is not good in itself and will also increase the volume of the partition.
The procedure itself is very simple: launch the utility, click the “Create recovery partition” button. Note that the disk must have at least as much free space as is currently occupied by the system. The utility will begin creating a backup copy of the system and, at the end of the process, will mark the partition as hidden.
As a result, you will see a new item in the Windows boot menu - AOMEI OneKey Recovery, which you should use if problems arise with the operating system.
Now you know how to create or delete a recovery partition on a disk in Windows 10. And if you have already performed these operations on your computer, then please share your experience in the comments.
Removing HDD and SSD partitions using the command line
You can also delete partitions from a hard drive or SSD on the command line using the DISKPART utility. Be very careful , if you mix up the partition numbers you can delete important data:
- Run Command Prompt as Administrator. In Windows 10, this can be done as follows: find the command line through the search on the taskbar, right-click on the result found and select “Run as administrator”. Other methods are described in this manual.
- In the command prompt that opens, type DISKPART and press Enter.
- Next, we use the following commands in order, pressing Enter after each:
- list disk - the command will display the numbers of connected disks. Remember the number of the disk from which you want to delete the partition, then N.
- select disk N
- list partition - the command will show the partition numbers on the selected disk, remember the number of the partition that needs to be deleted, then M.
- select partition M
- delete partition
- exit
As a result, the partition we selected will be deleted from the disk, and unallocated space will appear on it, which can be used to create new partitions or join existing ones.
Local Group Policy Editor
Another method where we need a local policy editor. We launch it like this: the key combination Win+R and enter the command gpedit.msc in the line.
In the editor that opens, follow the path: User Configuration, Administrative Templates, Windows Components, Explorer. In the last “folder”, select “Hide selected drives...” and double-click with the left mouse button.
We place the marker opposite “Enabled”, and in the lower section of the combinations we indicate the drive that needs to be hidden. We confirm the action with “OK”, exit the editor, go to Explorer – and look at the results. If the selected drive is not hidden, try restarting your computer.
Removing an extended partition from a disk
Many users, especially on MBR disks, have extended partitions, which are highlighted with a green frame in Disk Management, and in DISKPART their type is indicated by executing the list partition command. Within these partitions there are logical partitions - if we delete a logical partition, then attaching the freed space to the main partitions will not be available, since this space will remain within the extended partition.
If desired, we can delete the extended partition using the following method:
- In disk management, first delete all logical partitions inside the extended partition without exception, using the “Delete volume” item in the context menu. Then open the context menu of the extended partition and select “Delete partition”.
- In DISKPART - just as described above, one by one, using the commands from steps 7 and 9, delete all logical partitions, and then, using the same method, delete the extended partition that contained them. An example is shown in the screenshot below.
- In some programs it is possible to convert an extended partition into a main one (for example, in Aomei Partition Assistant), but I do not know of any utilities where this function would be available in the free version of the program. Moreover, such a conversion will be possible only if the number of primary and logical partitions does not exceed the limit for the number of primary partitions of a given type of disk (for MBR - 4 primary partitions).
Registry Editor
You can hide your hard drive using Registry Editor. We launch it using one of the methods described in this article. Go to the section indicated in the screenshot. Create a new parameter in the Explorer folder: right-click on the empty area, select DWORD, call the parameter “NoDrives”.
Let's start with a table of decimal values for each drive letter, and then explain what that means.
Double-click on the created parameter with the left mouse button. We need to set the decimal number system and enter in the value field the number corresponding to the letter of our drive. For example, we hide drive C. Enter the number 4 in the value field.
To hide several hard drive partitions, add up the numbers corresponding to each letter and enter their sum in the field.
After creating a new parameter, close the registry editor and check the results in Explorer. If there are no changes and the disk is still visible, restart your computer.
Programs for managing disk partitions
There are many programs that allow you to delete partitions on disks. Among those where this functionality is available for free are Aomei Partition Assistant Standard (in Russian) and Minitool Partition Wizard Free (without Russian). Perhaps for some people this kind of program will be more convenient than the built-in tools of Windows 10, 8.1 and Windows 7.
All actions in these programs can be carried out using the main and context menus in the interface, followed by clicking the “Apply” button. Unfortunately, most of the cool features (like converting an extended partition to a main partition) are blocked in the free versions, but simply deleting partitions works.
Another useful feature of these utilities is the creation of a bootable drive and the subsequent launching of disk partition management from it: this will allow you to perform operations on those partitions that for some reason are blocked in the running Windows. But be careful - such disk partitions may be necessary for normal system operation.
What are virtual devices in Windows 10 and what are they for?
Virtual devices are software codes that imitate physical devices, fully or almost fully implementing their functionality . Examples of this kind of devices that are most often used in everyday life are:
- virtual (on-screen) keyboard;
- virtual drive;
- virtual hard disk (VHD).
Virtual keyboards are needed if it is impossible to use physical ones; they are not capable of more. For example, if the real keyboard is broken or a person with disabilities is using the computer, you can display the input device on the screen and use the cursor to enter a key combination or type text.
Using the virtual keyboard, you can fully enter data
Virtual drives are designed to connect CD and DVD images to a computer and then interact with them. Disk images are often used when installing software products: applications, games and system shells.
Virtual drives are designed to mount disk images and then interact with them
Virtual hard disks are the most widely used. First of all, because the virtual hard drive partition is very easy to encrypt or protect with a password. This significantly increases the security of documents and other important data. In addition, VZD is a convenient environment for testing software, scripts and other software development products. Virtual disk technology makes it easy to back up data, clone physical media, and much more.
Possible problems and errors when deleting partitions from a hard drive or SSD
Below is a list of typical problems and errors that you may encounter when trying to remove an unnecessary partition from a disk using the built-in tools of Windows 10 and other versions:
- The "Delete Volume" button is inactive or missing. In Diskpart, in this case, you will receive either the message “Virtual Disk Service Error. The device is already in use" or "Deletion is not allowed for the current boot or system volume, as well as volumes with paging, crash dump, or hibernation files" - most likely, this is the system partition, or a partition containing the elements specified in the message above - the paging file, crash dumps or sleep and hibernation files. In case this is a system partition that you do not want to see in Explorer, you can simply delete the letter from the drive (in Disk Management, example of actions: How to hide the recovery partition in Windows). If you still need to delete a partition, and it is not a system one, try to find which system elements (swap file, hibernation, etc.) were placed on it and remove them from there. This might help: Page file Windows 10, 8.1 and Windows 7.
- The message "A simple volume is currently in use. To force delete this volume, click Yes" in Disk Management - usually indicates that there is something currently running on this volume (perhaps in the background). You can get the same error if you select this section as the installation partition in the Windows 10 Store application installation options. Usually, deleting a partition goes without problems, but their probability is not zero.
- Virtual Disk Service error "Extended partition is not empty" - occurs if all logical partitions within the extended partition have not been deleted.
- Unable to delete a protected partition without forcing protected settings - usually occurs when trying to delete hidden partitions with the bootloader and recovery environment of the current partitions. If you need to get rid of this section in File Explorer where it started to appear, simply remove the letter from that section without deleting the section itself.
And finally, if you encounter I/O errors when working with partitions, it may be a faulty drive or problems connecting it to the computer.
Possible problems
When trying to liquidate a HDD partition, various types of errors may occur. If the Delete Volume button is displayed without color, it means it is in inactive mode. Most likely, the error is related to the partition where system files necessary for the operation of the OS are stored. Here all that remains is to reinstall Windows, making the necessary changes during installation. As a last resort, you can try to find these files and remove them from the volume.
If the user sees a message on the screen “Simple volume is currently in use. To delete this volume, click the "Yes" button, which means it contains a file that is currently running or running in the background.
The "Extended partition is not empty" message warns that after deleting the volume, not all logical partitions within the object were destroyed. The occurrence of I/O errors while deleting a partition is most likely due to a malfunction of the drive or connection to the gadget.
There is no particular difference when choosing a method for uninstalling a disk partition. You can choose built-in operating system tools or download a third-party program. The last option is convenient because the partition is immediately deleted with all files irrevocably. In addition, this method will be needed when the operation cannot be performed through Disk Management.
Source
What is the “MSR (Reserved)” section for?
When installing/reinstalling the Windows operating system, many may have noticed one or several small partitions (from 100 to 500 MB) located among the familiar and familiar local drives C, D, etc. As a rule, this is the section “Reserved by the system”, “Recovery” and “MSR reserved”. When dividing your hard drive into local partitions during OS installation, you may notice that they are created automatically.
In this article we will take a closer look at the MSR (reserved) section. You will find out what it is, what it is for, when it is created and whether it can be removed.
Purpose of the section
Today, under Windows OS, there are two main standards for file layout of hard drives. These are MBR and GPT. We have already talked about them in previous articles. So the MSR (reserved) section is found only on GPT.
This is a hidden system reserved area of the hard drive that can be used for various needs of the operating system and its file storage. For example, to convert a simple volume to a dynamic one.
Many people mistakenly believe that the MSR partition contains the Windows boot loader/boot record (similar to the hidden “System Reserved” partition on the MBR partition). But that's not true.
