Windows 07.12.2021
After using your computer for a long time, you may encounter a low space warning, which prevents the system from running smoothly.
This unpleasant situation can be corrected by not only running disk cleanup, but also by adding more space to the existing volume. And for this you need to know how to properly redistribute disk space in Windows 10.
- 3 Ways to Expand a Volume Disk Management
- Command line
- PowerShell
MiniTool Partition Wizard
Root directories are usually used in the following mode - lightweight applications are placed on partition C, larger ones are placed on partition D. To redistribute memory between hard drives C and D, several methods are used. Using the MiniTool Partition Assistent application is considered one of the most convenient.
Instructions:
- download the add-on from the official website (it is important to use only trusted sources and files to avoid infecting your PC with various types of viruses);
- install and run the utility;
- after the first screen appears, click “Launch Application” (in some versions – “Disk / Partition Manager”);
- select the volume thanks to which it will be possible to perform the extension (if it is not deleted, call the context menu with the right mouse button and select “Delete”);
- then call the context list of the volume whose volume needs to be changed, go to the “Extend” line;
- in the window that opens, you need to specify the volume that will be added (if you need to use all the freed up space, simply move the slider to the right point);
- then press successively – “OK”, “Apply”, “Yes”.
It will take a couple of minutes to complete the operation. Upon completion, a notification will appear.
Difference between system and boot partitions
According to many, the system partition is the disk on which the operating system is located, but this is incorrect.
- This System Partition the main partition containing files to boot Windows, files include Ntldr, Boot.ini, Ntdetect.com, bootmgr, BCD, etc.
- This Boot partition is the partition where Windows is installed, it contains the operating system folder/directory.
Before Windows 7, the system and boot partitions are the same - drive “C:”. But from Windows 7, the newly added BitLocker requires an unencrypted partition, so the system partition is separated from the C drive.
To make things easier, we consider the system partition as drive C.
AOMEI Partition Assistant
An additional application that is used as an alternative to the previous method if you need to increase the media size. Russian-language interface is available.
Stages of working with the application:
- download and run the installation file;
- select the system disk whose space will be used to increase the volume (you will also need to delete it, as when working with the previous utility);
- in the notification window, check the box next to “Delete partition quickly”, then “OK”;
- call the context menu of the media whose volume will be increased, select “Change partition/move partitions”;
- set the required size (manually or with a slider), click “OK”;
- Click the “Apply” button (located at the top of the working window).
The “Delayed Operations” window will appear, continue with the “Go” button, “Yes”.
A message will pop up when the operation is complete.
Attention! MiniTool Partition Wizard and AOMEI Partition Assistant are paid programs. However, the trial version is suitable for adding space to the selected partition.
How to install Windows 7
- Most read sections:
- Friends, a total of 2000 articles have been published on the site for you!
- Windows 10
- Windows 10. Part two
- Windows 8.1
- Windows 7
- Windows XP
- Keys for Windows
- Windows 10 Recovery
- Restoring Windows 8.1
- Upgrade to Windows 10
- Creating your own Windows distribution
- Surviving on a weak PC
- Live CD Sergei Strelec
- How to hide Windows
- Data encryption
- Technologies: Compact OS and WIMBoot
- Removing viruses
- Computer components
- Browsers and Internet programs
- Video card - problem solving
- Bootable USB flash drive
- Bootable USB hard drive
- BIOS UEFI: booting from disk and flash drive
- Hard drives - malfunctions
- Victoria-hard drive repair
- Aligning HDD partitions
- Drivers - how to find and install
- USB ports don't work
- Recovering Deleted Data
- Backup
- Acronis True Image 2015
- Acronis Universal Restore
- Acronis Disk Director
- AOMEI Backupper Standard
- Exiland Backup backup
- AOMEI Universal Restore
- AOMEI Partition Assistant Standard
- The sound disappeared on the computer
- Creating a Windows 7, 8.1 distribution
- Transferring Windows 7, 8.1, 10
- Solid State Drives SSD
- Virtual machines
- PC optimizers and tweakers
- Reset Windows Password
- WinNTSetup
- WinSetupFromUSB
- Rufus
- Restoring factory settings
- All about laptops
- Adapters
- Remote PC control
- Setting up WI-FI routers
- RAM
- Windows PowerShell 2.0
- Remote PC control
- Creating a RAID array
- Virtual disks VHD, VHDX
- All about torrents
- Disk Cleanup (C:)
- Let's buy a laptop together
- Questions on any topic
- Updating to Windows 10 version 1703
- Updating Windows 7, 8.1 to Windows 10
- How to assemble a computer yourself
- Selection of computer components 2017
- How to choose a processor and video card for a laptop in 2017
- Processor performance comparison
- AMD or Intel. What's better!
- Which laptop to buy in 2022
- Where to get the key for Windows 10
- How to update BIOS on a laptop
- How to update BIOS on a simple PC
- Replacing HDD with SSD on a laptop
- Computer won't turn on
- How to remove ads in your browser and remove all viruses
- The best free antivirus
- One of the best paid antiviruses
- How to remove a banner
- Websites won't open
- I can’t log into Odnoklassniki
- How to buy a laptop correctly
- How to buy a computer correctly
- How to transfer Windows 8.1 from HDD to SSD
- How to install Windows 7 instead of Windows 8.1 on a laptop
- How to install Windows 8.1 on a virtual disk.
- How to install Windows 8.1 on a virtual machine
- Installing Windows 8.1 on a GPT disk
- How to transfer Windows 8.1 to another computer
- How to reinstall Windows 8.1 on a laptop
- How to create a multiboot flash drive containing five operating systems at once: XP, Windows 7, Windows 8, 8.1, Linux and any set of your programs!
- Search by torrent trackers
- How to get to Rutracker
- Setting up routers
- How to configure ASUS RT-G32 router
- How to set up a D-Link DIR-300 NRU router
- How to set up a D-link DIR-615 router
- Copying discs
- creating, recording images, and so on.
- How to create a disk image
- How to Burn an ISO Image to Disc
- How to copy from disk to disk
- CD-ROM is missing
- Job
- with VIDEO
- Digitizing videotapes yourself
Acronis Disk Director how to use
Acronis Disk Director how to use. Acronis Disk Director is designed specifically to partition a disk. Moreover, it was possible to partition the disk after installing the operating system. From previous articles, you already know that it is best and most correct to partition the disk when installing Windows, since the installer does it correctly, correctly, and creates partitions in accordance with the needs of Windows. Read these articles “How to partition a disk during the installation of Windows XP” and “How to partition a disk during the installation of Windows 7”. But what to do if Windows is already installed. Everything works well, but the partition or partitions are created completely differently from what you need?
Acronis Disk Director will help you partition your disk without reinstalling Windows if you only have one partition or resizing partitions if there are several. The program works in any version of Windows from 7 to 10. The essence of this program is to tear off a piece of free space from one partition and add it to another. You can only manipulate the entire free space. If you are going to resize partitions, then even before you start resizing, you need to defragment the disk from which you will tear off a piece of free space. As a rule, this is drive “C”. This is necessary precisely so that files scattered across the disk move to the beginning of the disk and are grouped there. And the free space became whole and not divided into pieces. Then it will be available to you in full.
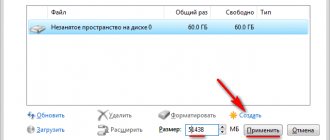
After downloading the program, you will see a window as shown in the first picture. The table will contain a list of created partitions or “unallocated space” if the disk is completely new. To make it easier to see what is shown in which rows, you will need to move the columns a little further. This can be done in the table header (marked with a red rectangle). As soon as you click on any row in the table, the “Operations” menu will open on the left and an additional “Disk Management” button will appear in the top menu. As shown in the picture below.
Acronis Disk Director how to use 1
When you click on this "Disk Management" button, you will get exactly the same menu as "Operations" in the left column. See the picture below.
Acronis Disk Director how to use 2
Exactly the same menu can be obtained by right-clicking on any row in the table. See below.
Acronis Disk Director how to use 3
Creating partitions or changing their sizes is done in the first menu item “Resize volume”. Now we will look at the operation of resizing partitions using Acronis Disk Director, but from it you will also learn how to create partitions. To get free space, first click in the list on the partition or disk from which you will take free space. As a rule, this is drive “C”. And so click (select) drive “C” and then click on the “Change volume size” button.
Acronis Disk Director how to use 4
In the window that appears, you see a disk (Volume) size control bar at the top. There is also all the necessary information about the disk: the disk name and letter, the partition type and its size, as well as the maximum size that can be set for this disk. The circles at the edges of the ruler are like handles, allowing you to hook the mouse and pull the ruler in any direction. If you drag the left circle to the right, the size of the section will begin to decrease, and free space will appear on the left, that is, in front of this section. But you don't need it.
Pull the right circle to the left and you will begin to free up space on the right, that is, after your section. You can also manage the volume size in the “Volume Size” window by clicking on the down and up arrows, as well as in the “Unallocated space before volume” and “Unallocated space after volume” windows. All these windows are interconnected. And if something goes wrong in one window, then everything can be easily corrected in another window. But for me it’s better to manage the line. There you can clearly see where things are being reduced and where things are being added. And so you drag the right circle to the left.
Acronis Disk Director how to use 5
When your partition size is reduced to the required size you will stop (in our case it is 25 GB required for Windows 7). You will have drive “C” and unallocated space located on the right, that is, after your drive. Which will be displayed in the lower part, where now there is only a piece reserved by the system and two volumes “C” and “D”, as well as in the window in the middle on the right. Next, click the “OK” button.
Acronis Disk Director how to use 6
The size control window disappears and in the main window you have partition “C” with the desired reduced size (in our case 25 GB) and unallocated space after it, which will need to be attached to partition “D”. In the line below the top menu, instead of “Run,” there is a button “Apply pending operations” and the number of operations (now only 1). There is no need to press this button yet. Now attach the free space to the “D” drive.
Acronis Disk Director how to use 7
To do this, select the partition (volume) “D” and click the “Resize Volume” button.
Acronis Disk Director how to use 8
Now in the size control bar you can see the free space in front of the partition, the size of the partition “D” and the maximum size to which you can increase. Click on the left circle with your mouse and drag it all the way to the left.
Acronis Disk Director how to use 9
All unallocated space was added to volume “D” and its size increased. Click the “OK” button.
Acronis Disk Director how to use 10
There are only two sections left in the list “C” and “D” with changed sizes and the button above “Apply pending operations” now displays two operations. Click on this button.
Acronis Disk Director how to use 11
The Pending Operations window opens. Move the scroll bar so that the entire contents of the window are visible. Are you checking to see if you did everything correctly?
Acronis Disk Director how to use 12
In the window you see two operations awaiting execution: the first is to shrink the “C” partition, the second is to increase the “D” partition. Click the “Continue” button.
Acronis Disk Director how to use 13
In the same window, two indicators “Performance of the current operation” and “General progress” will appear, and the execution of the operations you ordered will begin. When all operations are completed, the window will disappear.
Acronis Disk Director how to use 14
Only sections with new sizes will remain in the list. This completes the procedure for resizing partitions using Acronis Disk Director.
I think you now understand how you can create disk partitions or resize already created partitions using Acronis Disk Director.
You can by
Disk management
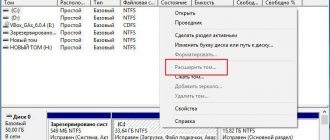
You can increase the volume of the required hard disk volume without the help of additional programs. Instructions for redistributing available space:
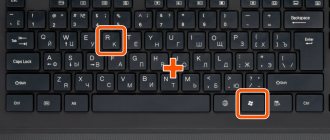
- by right-clicking on the Start button, go to the Disk Management section;
- remove the media whose volume will be used to increase the size of the system volume (using the context menu);
- right-click on the desired partition and go to the “Extend volume” item;
- The “Wizards” window will appear, click “Next”;
- configure the available disks (replaceable disk, required size) and click “Next”.
After that, click “Finish” and wait until the process of editing the data of the Windows operating system is completed.
Is data lost when expanding disks?
No matter how large the volume of storage C is, there comes a time when it is filled. Not only does the ability to save new information disappear as a result, but malfunctions begin in the operation of the system itself. The performance of your computer (laptop, tablet) decreases. The question arises, how can you increase the partition space without damaging the existing data on the drive? There is an exit. For these purposes, you can use special third-party programs.
Disk Management
Any interference with the functionality of the hard drive may result in the loss of some information recorded on it. More often this happens when using tools preinstalled in the Windows OS. The fact is that when partition D is compressed, free space is formed not in front of disk D, but after it. That's why moving it to a place next to C without loss will not work. The data on D will be lost, or rather the user will clean it himself with the “Delete volume” button. After this, free space will appear on the right side of drive C. It can be used to increase the storage size. To correctly expand one drive at the expense of another, it is better to use a third-party utility.
Attention! Before starting operations with the hard drive, it is strongly recommended to make a backup copy of the system image.
Recovering data lost due to disk resizing
Changing the system's internal storage space settings sometimes results in data loss. To recover the necessary information, you will need an additional program - Hetman Partition Recovery.
The application is also used in other cases:
- recovery after reinstalling or formatting the hard drive;
- formation of images;
- error corrections;
- working with some file formats and others.
To use, you need to download and activate the installation file, then follow the instructions offered by the pop-up windows.
Method #02: Using the Command Line
This method may come in handy if you are in Safe Mode or Recovery Mode and are having trouble accessing your drives. Let's take a quick look at the procedure.
Press Ctrl + Shift + Esc on your keyboard to launch Task Manager. Now click on "File" in the top left corner and select "Run New Task".
Now enter “CMD” in the empty text box and check the “Create this task with administrator rights” checkbox. When finished, click OK.
An elevated Command Prompt window will appear on your screen. Type the following command and press enter.
diskpart
You have now entered the disk partition menu for the command line. Type the command below and press Enter again.
disk list
You will now get a list of all available drives installed on your system. Locate and identify the drive that you want to use to expand the current volume. Make sure you remember its name.
Now type the following command and press Enter again. Replace "" with your disk number.
select drive
Now we need to find the volume. Enter the following command to list the current volumes on the selected drive.
detailed disk
Now it's time to write down the volume number you want to use to increase your desired volume. After that, enter the following command and replace "" with the volume number of your choice.
select volume
Now enter one of the following expansion commands depending on your needs.
- extend: Use this if you want to use all the unallocated space in the selected volume for extension.
- extension size = 0MB: Use this if you only want to use some of the unallocated space for expansion. Replace "0" with your desired size.
Just press "Enter" to execute the commands.
That's all! Now the desired volume should be increased. Simply type "Exit" to close the Command Prompt.
Related: How to Stop Pop-Ups in Windows 11
Why can't you expand the volume of drive C in Windows 10?
In the seventh and tenth versions of Windows, the “Extend Volume” button may not be available. This means that you cannot work with the section - the required line will be faded in color (the “Inactive” state).
Reasons why the extension fails:
- unallocated amount of disk space;
- errors in the file system;
- The selected volumes are physically located on different media.
You need to work with each situation separately - find out the reason, try to fix it. If you don’t have enough experience working with disks, you should contact a specialist.
To add space to one of the hard drive volumes, use additional applications (MiniTool Partition Wizard and AOMEI Partition Assistant) or built-in functions. If possible, information from the media is copied so as not to be lost, or restored.
Unable to delete volume
Another problem that you may encounter when editing disks is that the “Delete Volume” button is inactive. It can occur for two reasons:
- The partition that you cannot delete contains the page file. You can verify this by looking at the information in brackets in the “Status” column. The way out of this situation is to delete the swap file or move it to another partition. The first option is better, since this file is important for the system, it helps it run games and applications for which the computer does not have enough RAM;
- the partition contains several volumes that must be deleted before erasing the entire partition.
The inactive “Delete volume” button cannot be pressed
Sources
- https://HDDiq.ru/windows-i-diski/kak-rasshirit-disk-c
- https://pc-consultant.ru/raznoe/kak-na-diske-s-uvelichit-mesto/
- https://compsch.com/obzor/instrukciya-po-uvelicheniyu-obema-pamyati-diska-s.html
- https://www.remnabor.net/rasshirit-disk-s-windows-7
- https://mchard.ru/windows/adding-a-new-hard-disk-in-windows-7-how-to-add-a-new-hard-disk/
[collapse]
Method #03: Using Powershell
Press Windows + S on your keyboard and search for PowerShell. Click "Run as administrator" when it appears in the search results.
Type the following command and press enter.
Get-Partition
You will now see a list of all available disks and volumes on your system. Make a note of the drive letter as well as the volume or partition number you want to use for your current extension.
Now type the following command and press enter. Replace '' with the drive letter you noted in the previous step.
Get-PartitionSupportedSize -DriveLetter
Powershell will now show you the maximum and minimum size supported by the current disk for reallocation. These numbers will be important since you will not be able to expand your drive beyond its "Sizemax" value.
Finally, type the command below and press Enter. Replace '' with the letter of the drive you want to expand, and replace '' with the size of the unallocated space you want to use for expansion. Likewise, use MB or GB depending on the size of the unallocated space. You can also use "TB" if you are dealing with large amounts of unallocated space.
Note. "" cannot be greater than the "Sizemax" value supported by the selected drive.
Reszie-Partition -DriveLetter -Size MB/GB
Wait for the process to complete. Once completed, simply type “exit” to close Powershell.