With the ever-evolving cameras on our iPhones, the problem of running out of memory comes up. Typically, photos taken on an iPhone can be between 2 and 8 MB in size depending on the number of pixels in the image.
The iPhone 11 series introduced some amazing camera features like telephoto and sliders, and the latest iPhone 12 series offers even more features. Follow the instructions in this post to learn how to reduce the file size of a photo on your iPhone and iPad.
Using this method, you can resize your images the way you like. So if you're looking forward to printing that fantastic family portrait, consider adjusting it to the optimal size and highest quality using these steps and avoid a blurry or pixelated image.
How to find out photo data on iPhone
This is difficult without downloading a special program. But it all depends on which iOS model is on the phone.
If this is version iOS 13 or higher, then all the data can be viewed in the phone itself, without downloading certain programs, quite simply and easily. If the phone version is an order of magnitude lower, then the user will have to download programs that allow him to view information about the file.
Built-in features
In order to view photo data on iOS 13, you need to apply the following algorithm:
- Go to the gallery on your phone. It is usually located on the main screen. The icon is signed with the word “Gallery”;
- After this, you need to go to the photo whose data you would like to see;
- Next comes the most important step - you need to save the photo in Files. To do this, click on it and click on the “Share” icon, which is located in the lower left corner. Through it we go to the window where we select the “Save to Files” option, then select a convenient location. Now this photo is saved in the place where the user saved it. The photo will not disappear from the gallery.
- Then open the “Files” application on your phone. As a rule, they are also located on the main screen;
- Having gone into them, we find the file that we shared and hold it for a long time. After this, select the “Information” item that is offered by the system;
- In the text window, click on the “Open more” item and study all the data that is given about the photo.
The data includes not only the type of photo, but also the size and resolution—everything you need to know. If a person has a different version of iPhone OS, then he needs to download the application. You can watch the video in more detail about this.
https://www.youtube.com/watch?v=43GgLHr-qRk
This way you can get all the information about the photo.
Compress photos with ease on your iPhone or iPad
This way, you can reduce the file size of images on your iOS device. As stated above, these apps are fully equipped to do more than just fill a void. Besides compressing images quickly, they also do not degrade quality. This way, your photos will continue to look good even after compression.
While the stock photo app has some useful enhancements such as image sorting, photo filtering, and even video editing, it lacks a useful compression tool. Hopefully Apple will add it sooner rather than later.
By the way, which of these apps did you choose to reduce the size of image files on your device? Also tell us if the app met your expectations.
Source
How to reduce photo size on iPhone
Reducing the size of a photo on your phone may be necessary for various reasons, starting from simply using this photo for your own purposes, removing some fragment, and sometimes even because many applications do not accept photos of the wrong size.
Of course, you can reduce the size of a photo using the built-in functions of the iPhone, but they do not allow you to maintain the required resolution, which is why additional utilities and programs are suitable in such moments. One of these is Image Resizer.
This program is one of the best because you can get not only data about a photo, but also change its data, including reducing its size.
It is worth noting that the interface is quite intuitive:
- It’s immediately clear that you need to upload a photo first
- Then use the “Resize” button to change the size.
- Also in the program you can select your own format or apply those that are already installed.
After completing all stages of processing, you can save the photo in the gadget using the “Save” button and select the location where to save it in the device’s memory.
Changing the frame width on iOS
Resize Photo shows the original width of the frame, allowing you to understand how much the command will resize it. Also, Resize Photo only asks for width, but doesn't ask for height. This way she manages to maintain the proportions of the frame without disturbing them. However, if such a need arises, you can always add the appropriate script to the command by looking at how the developer did it.
Subscribe to our channel in Yandex.Zen. You will not regret.
News, articles and publication announcements
Free communication and discussion of materials
Longreads for you
The M1 MacBook Air can be overclocked by placing a thermal pad on its processor so that it is in contact with the lid. Then the aluminum back will act as a large radiator, which can effectively cool the chip and prevent it from throttling
It turns out that you can even be tracked through email ✉ mail. One small element in the letter will tell the sender both the time and even the place where the message was read. Let's figure out what this mechanism is and how to disable it
Buying an iPhone in installments is the only way to get a smartphone here and now, and pay for it over several months or even years without overpaying. However, not everyone knows how to use this financial instrument correctly. Filling the gap
What is the default photo format on iPhone?
The usual format that phones take photos in by default is HEIC. This format is very inconvenient because it is practically not used anywhere, that is, if a person needs to view a photo on another device, a person simply cannot do it - the format is not suitable, and therefore there is no way to open it.
A more familiar JPEG in a photograph is what is needed. This format is very convenient and opens on almost every device. Developers use a different format due to the fact that it takes up quite a bit of space than JPEG.
You can make sure that photos are taken in a convenient format, but the user must be prepared for the fact that such files will require much more space than the usual one, that is, the iPhone will need more memory than before. This is due to the fact that the translated code weighs quite a lot, so you need to reserve a certain place for new pictures.
Description
This is your number one app to convert image file formats on your iOS device. Other features provided in the app include: -Image resizing -Image compression -Batch conversion
You can convert FROM these formats for online conversion (READ/OPEN): 3FR, 3G2, 3GP, A, AAI, AI, ART, ARW, AVI, AVS, B, BGR, BGRA, BGRO, BIE, BMP, BMP2, BMP3, BRF, C, CAL, CALS, CANVAS, CAPTION, CIN, CIP, CLIP, CMYK, CMYKA, CR2, CRW, CUR, CUT, DCM, DCR, DCRAW, DCX, DDS, DFONT, DJVU, DNG, DPX, DXT1, DXT5, EPDF, EPI, EPS, EPS2, EPS3, EPSF, EPSI, EPT, EPT2, EPT3, ERF, EXR, FAX, FILE, FITS, FPX, FRACTAL, FTP, FTS, G, G3, G4, GIF, GIF87, GRADIENT, GRAY, GRAYA, GROUP4, HALD, HDR, HEIC, HISTOGRAM, HRZ, ICB, ICO, ICON, IIQ, INFO, INLINE, IPL, ISOBRL, ISOBRL6, J2C, J2K, JBG, JBIG, JNG, JNX, JP2, JPC, JPE, JPEG, JPG, JPM, JPS, JPT, JSON, K, K25, KDC, LABEL, M, M2V, M4V, MAC, MAP, MASK, MAT, MATTE, MEF, MIFF, MKV, MNG, MONO, MPC, MPEG, MPG, MRW, MSL, MSVG, MTV, MVG, NEF, NRW, NULL, O, ORF, OTB, OTF, PAL, PALM, PAM, PANGO, PATTERN, PBM, PCD, PCDS, PCL, PCT, PCX, PDB, PEF, PFA, PFB, PFM, PGM, PGX, PICON, PICT, PIX, PJPEG, PLASMA, PNG, PNG00, PNG24, PNG32, PNG48, PNG64, PNG8, PNM, PPM, PS, PS2, PS3, PSB, PSD, PTIF, PWP, R, RADIAL-GRADIENT, RAF, RAS, RAW, RGB, RGBA, RG BO, RGF, RLA, RLE, RMF, RW2, SCR, SCREENSHOT, SCT, SFW, SGI, SHTML , SIX, SIXEL, SPARSE-COLOR, SR2, SRF, STEGANO, SUN, SVG, SVGZ, TEXT, TGA, THUMBNAIL, TIFF, TIFF64, TILE, TIM, TTC, TTF, TXT, UBRL, UBRL6, UIL, UYVY, VDA , VICAR, VID, VIFF, VIPS, VST, WBMP, WEBP, WMF, WMV, WMZ, WPG, X, X3F, XBM, XC, XCF, XPM, XV, XWD, Y, YCbCr, YCbCrA, YUV, MDC
How to change the photo format on iPhone to JPEG
On an iPhone, you cannot change the format of a frame that has already been captured. There are only two ways to do this:
- Either through a computer;
- Or through specialized utilities.
Image Resizer, which was described above, can also change the frame format, its size and, in general, all the data that is on it, so you can download it and use it, changing the necessary data.
Via computer
If we talk about the first method, it is much more complicated, since it requires connecting the phone to the computer.
Since photos are automatically sent to HEIC, you can transfer them to your computer as JPEG. This is done using the settings:
- Open settings on your phone. They are located on the main screen of the iPhone and look like a gear on a gray background;
- By clicking on them, go to the “Photo” item and scroll through the menu to the end.
- At this point we open the “Transfer to PC” section and the user is given two options to choose from: automatically and leave original. This section is responsible for the data that will be assigned to the photo after connection and transfer to the computer;
- Select "Automatic".
This setting will allow you to re-encode the file. Next, the user just needs to connect the cord to the computer and start transferring images. This can be done both through iTunes and through the control center. You just need to connect the cord to your phone and then to your computer. The device will be immediately detected and transferring files will be easy.
More details about the transfer can be seen in this video.
This way you can change and recode a photo without using third-party programs, but using a computer. This is convenient in cases where the user immediately needs to send a file in a certain size and format, so that later they can immediately use it in the desired one.
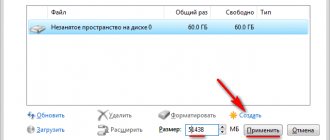
Reducing the weight and resolution of photos
Third-party applications and standard functions will help you reduce the weight of photos on your iPhone. The size of the images and their resolution are closely related to each other. The higher the resolution, the more space the photos take up in your phone's memory.
A finished image that has a lot of weight cannot be changed using standard adjustment tools. But third-party applications can easily free up memory by saving the file.
Image Resizer Free
Using this application it is possible to compress the size of a picture. It is known that the worse the quality, the lower the resolution of photographs. This means a small amount of memory is required to store them.
So, to work with the program we perform the following steps:
Now, for the changes to be applied, you need to upload the edited image to the phone's memory. You can do this by clicking on the circled arrow sign. Next, in the window that appears, press the Save Image button, or “Save image.” The procedure is completed.
You can resize and compress photos using third-party applications. It is worth noting that the AppStore has other applications that can change the quality of photos on the iPhone. The presented program was considered as an example only.
Source
How to set default photo saving in jpg format
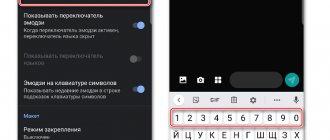
To avoid problems later with saving photos and re-encoding them on a PC, it is enough to set a certain function in the camera settings so that they are set to jpg by default.
To do this, you need to go to the system settings, which are also located on the main screen of the phone, and then look for the “Camera” item.
Next, after going to this item, look for the “Format” section and click on it.
The user sees the “Camera Capture” item in front of him, which displays the necessary settings. If the frame is usually HEIC encoded, the “high-efficiency” option will be indicated. It is necessary to change this item to “Most compatible”, which indicates the required code.
After switching to another mode, the user will have all photos displayed in the format he needs, so after shooting there will be no need to convert frames to other codes, because they will be automatically set in the system settings.
Vyacheslav
For several years he worked in mobile phone stores of two large operators. I understand tariffs well and see all the pitfalls. I love gadgets, especially Android ones.
Ask a Question
Question to the expert
What is the difference between HEIC and JPG?
The most important and significant difference that encouraged developers to use this particular format and not another was that it weighs much less. This is the main difference. This format also supports many functions and also stores information about the image, which JPEG cannot do.
What is the advantage of JPG?
The main advantage of this code is that it is suitable for all applications and programs. If you need to import a frame into the program, a problem with the wrong format may arise, that is, the program simply will not accept the format in which the photo is currently located. To prevent this from happening, one standard is automatically applied to all utilities - JPG. Although it takes up quite a lot of space, it perfectly preserves the quality of the image.
Will the quality change when changing the code?
No. The format does not affect the quality and resolution of the picture in any way.
This way you can not only reduce the size of the photo, but also change it, convert it to other codes and much more.
4.8/5 — (29 votes)