Windows operating systems
16.04.20194969
A computer owner who prefers the classic generation of operating systems from Microsoft and has already figured out how to install Windows 7 can easily customize the working environment for himself. In a few clicks, he can change the screen resolution, set a new password and define user rights, as well as enter startup and speed up the OS. Where is Windows 7 autorun located and how to view it - let's try to figure it out.
How to view Windows 7 startup?
Windows 7 Autorun is a system partition, as well as a separate folder, protected from viewing by non-administrators. It is a list of programs and executable scripts installed on the computer, which, by default or at the user’s request, should start automatically - immediately after turning on the operating system.
Although each such application usually takes a fraction of a second to start, simultaneous loading of a large number of elements significantly slows down the preparation of a computer or laptop for work, and in some cases leads to non-critical failures that require an OS restart. To avoid these troubles, you should check the autorun menu - fortunately, doing this is no more difficult than learning about ways to restore the Windows 7 system.
Important: although you can view the Windows 7 startup list and enter the mentioned system directory using standard tools, you should keep in mind that some applications and utilities will remain hidden from the user. To get to a truly complete autorun menu, you should use applications from third-party developers; one of them will be discussed below.
On Windows 7, you can find the autorun menu in three simple, time-consuming and not requiring special knowledge ways; The first of them is using the system command “Run”.
Run command
Using this command is simple and safe; Not a single antivirus for Windows 7 will block the user’s actions, and the process itself will take, taking into account the settings for autorun programs, no more than ten to fifteen minutes.
To enter the Windows 7 startup list using the Run command, the user must:
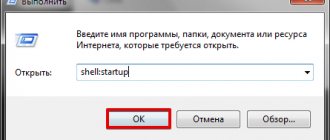
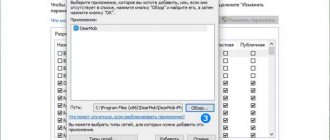
- Run the msconfig command. You can do this by opening the Start menu.
- By entering msconfig.exe in the search bar without spaces, quotes or other changes and clicking on the magnifying glass icon on the right. Now all that remains is to select the top item in the list of found files by clicking the mouse and begin setting up autorun programs on Windows 7.
- A similar result can be achieved by holding down the Windows keys (Win is the button with the OS logo flag) and R at the same time, then entering the msconfig command in the only editable field of the Run window and clicking OK.
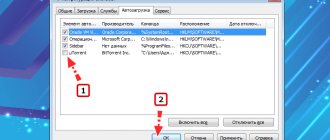
- In the window that opens, the user must go to the “Startup” tab.
- And get acquainted with the list of programs launched without his participation. As mentioned above, only a portion of the applications are presented here; You shouldn’t expect to find a complete list using the system command.
- To disable one or more programs that start with Windows 7, just uncheck the checkbox located to the left of its name. If you want to cancel the automatic launch of all applications presented in the menu, you need to click on the “Disable all” button.
- You can turn the entire list back on by using the button next to it with the appropriate name.
- After setting up Windows 7 startup is completed, click on the “Apply” button and then click on “OK”.
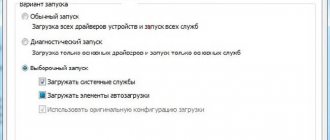
- An easier way to run Windows 7 without any "unnecessary" software is to go to the General tab again.
- Place a circle opposite the lower “Selective launch” item contained there.
- And uncheck the “Load startup items” checkbox. By clicking on the “Apply” and “OK” buttons, the user can significantly reduce the time the next time the operating system is turned on.
A user who often installs new applications, some of which inevitably end up in the Windows 7 startup menu, will find it useful to use the following trick, which allows you to run the msconfig command without extra effort:
- Create a regular text document in any directory, or best of all, on the Desktop.
- Open it and enter it inside without changing the syntax or adding symbols - start msconfig.exe.
- Save your changes and close the document.
- Now you need to change the file extension. By default in Windows 7 it will be hidden.
- To correct the situation, you need to open the “Start” menu, type “Extension” in the search bar and find the position “Show and hide file name extensions” in the list of found ones.
- In the window that opens, go to the “View” tab.
- And uncheck the “Hide extensions...” checkbox, and then click on the “Apply” and “OK” buttons.
- Having completed the described manipulations, the owner of the computer or laptop must return to the created text document and change the extension from .txt to .bat - always keeping the period after the main name.
- The changes made should be confirmed by clicking on the “Yes” button.
- The executable file is ready. Now, to run the mentioned command, the user just needs to double-click on it with the left mouse button - or select it with the right one and select “Open” or “Run as administrator” in the context menu.
- You can edit the contents of a text document by using the “Edit” option in the same context menu.
Tip: to make it easier to find the created file, you should rename it according to the user’s imagination and abilities - for example, call it “Startup”.
Command line
This method is not too different from the previous one; You can view the list of startup programs on Windows 7 using the command line as follows:
- Open the Start menu and enter “Command Prompt” in the search bar.
- Or, if you’re not too lazy to switch to the Latin alphabet, cmd, then left-click on the top item in the list of results.
- In the classic command line window that opens, enter msconfig.exe or msconfig without changing anything, and then use the Enter key.
- Having completed all the steps, the user will find himself in the already familiar system window, where he can continue configuring the launch of applications.
- If for some reason you cannot find “Command Prompt” using the described method, you should open the “All Programs” list in the “Start” menu.
- Go to the “Standard” directory.
- And find the necessary utility there.
Tip: to make it easier to log into Windows 7 startup in the future, the user can create a “Command Prompt” shortcut and place it on the “Desktop”.
CCleaner
A convenient, extremely easy-to-use and safe program, which can be downloaded completely free of charge on the manufacturer’s website, allows a Windows 7 user to view the startup list as follows:
- Launch the application and go to the “Tools” section.
- And then go to the “Launch” tab.
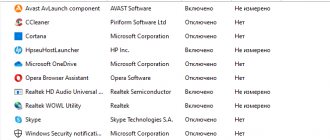
- Here the PC owner will see a list of all programs that start immediately after turning on the operating system.
- You can disable any item by selecting it by pressing the left mouse button and using one of the buttons on the right.
Tip: by moving to the “Context Menu” tab, the user can view and, if necessary, disable individual items in the list that appears when the right mouse button is pressed.
Instead of results
As you can see, startup in Windows 7 is not located in a specific place - there are several mechanisms and ways to add an application to startup and they all have the right to life. Of course, in Windows 10 I like the approach to organizing this process much more - everything is much simpler and clearer, but our user is in no hurry to switch from the obsolete 7, so we have to strain our memory and write notes of this kind! If you have anything to add or have any questions, be sure to leave a comment.
- Facebooksit
- Tweet
- Share
- Cool
Where is the Startup folder in Windows 7?
To go to the startup directory and disable autostart of programs in Windows 7 there, the user needs to:
- Open the Start menu and select My Computer in the right column.
- Double-click the C drive icon.
- By default, some system folders are not accessible to the user; These include “Startup”. If no changes have been made previously, the user must use the method described above to open the “Show and hide file name extensions” window and on the “View” tab, mark the “Show hidden files, folders and drives” item with a circle, and then successively click on the “Apply” buttons and "OK".
- Now you can move further: from the system drive to the “Users” folder.
- Then - to the directory of the current user.
- Then - to the AppData folder.
- Roaming.
- Microsoft.
- Windows.
- "Main menu".
- Here, in the "Programs" folder.
- The “Startup” directory contains shortcuts to applications that are launched by default.
Tip: you can disable any of them by simply deleting the corresponding shortcut, and add a new one by copying the link to the executable file to the Startup folder.
Method No. 2. Via CCleaner
As you know, CCleaner is a very multifunctional program that allows you to clean your system of junk and unnecessary files.
But besides its main function, this program performs many auxiliary tasks. One of them is editing the startup folder.
Downloading the program
The latest version of CCleaner can be downloaded completely free of charge on the official website by clicking on the inscription “CCleaner” (in Figure No. 7 highlighted in blue).
Rice. No. 7. CCleaner official website and program download page
As you can see, there are also versions for Mac OS and Android.
Advice! Download the full version of CCleaner, not CCleaner Portable or CCleaner Slim, as these are stripped-down versions and may lack some features. To do this, click exactly on the inscription that is highlighted in Figure No. 6.
Another proven link - after clicking on it, you need to click on one of the links under the inscription “Download from” in the “CCleaner Free” column (highlighted in Figure No. 8).
Rice. No. 8. CCleaner download page on piriform.com
You should run the download file and wait for the installation to complete. This process is quite standard here and usually does not take much time.
Using CCleaner to Access Startup
After launch, select the “Service” tab in the menu on the left. Next, you just need to go to the “Startup” tab in the CCleaner services menu.
These points are highlighted in red in Figure 9.
Rice. No. 9. Access to startup downloads via CCleaner
Using CCleaner to work with startup programs is somewhat different from what we saw in the standard Windows system configuration window.
Here, to remove a program from startup, you need to click on it in the list, and then use the set of commands located on the right side.
In Figure 8 they are highlighted in yellow.
There are commands “enable” (available only for programs that are currently turned off), “turn off” (available only for programs that are turned on) and “delete”.
I will teach you how to repair your computer!
Hi all!
My article will be devoted to the topic “How to open Windows 7 startup”. Many of you know that a lot depends on startup. For example, the speed of your computer will depend on the number of automatically loaded programs. The startup system is convenient in that it allows you to turn on user-selected programs immediately when you turn on the PC. This significantly saves time if you had to turn on each program manually. However, there are some nuances here too. When downloading new applications, there are also those that are independently integrated into the list of automatically downloaded programs, which significantly slows down the loading and the process of operating the operating system itself. After all, each program takes up a certain amount of RAM and affects the speed of the computer. But this is only one of the factors that can “slow down” the operation of a PC.
- For example, a registry clogged with temporary files also affects the speed of the computer. To clean the registry and work with startup programs, I recommend an excellent program – Сcleaner.
- It is understandable even for a novice user and allows you to optimize your PC.
Another method and some subtleties
There is a third option that allows you to see the programs that automatically start when you turn on your computer. To do this, you will again need the command line. It is opened through the Start menu or the combination Win + R. After that, enter regedit .
As a result, the Registry Editor will appear on the screen. Finding startup here is somewhat problematic, since a very extensive tree is displayed on the left. There are two main columns worth checking:
- HKEY_CURRENT_USER\Software\Microsoft\Windows\CurrentVersion\Run.
- HKEY_LOCAL_MACHINE\SOFTWARE\Microsoft\Windows\CurrentVersion\Run.
Sometimes problems arise when using this or one of the previous methods because folders such as Programs may be hidden. To solve this problem, you will have to work with the configuration. In the “View” column you can find additional parameters where you need to o.