Gmail.com (Gmail or gmail) is the world's largest email site. It belongs to the Google search engine and here you can create a box for free, and also get a Google account with it. And that means Drive, YouTube, Google Play, and access to other services.
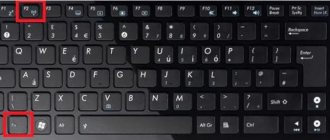
1. Open the website gmail.com. Click on “Create an account” below.
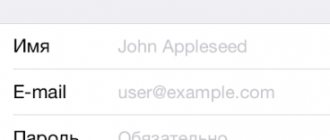
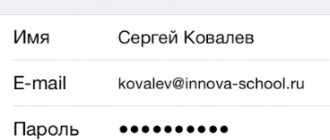
2. Fill out the form on the right side.
First and last name. Here you need to provide your details, preferably real ones. After all, if you suddenly have difficulties logging into the mailbox in the future, then thanks to this information you will be able to regain access. If desired, this data can later be hidden.
Username. A very important field - this will be the name of your mailbox (login). It should consist only of English letters; you can also use numbers and dots. You just need to come up with it and print it.
This is the email address (e-mail) where letters will be sent. This is exactly what you will need to tell the person so that he can send you something.
There may be problems choosing a username. The fact is that each such login is unique - it belongs to only one person. And many names have already been registered, which means they cannot be selected.
Let's say I want to get the umnik login. I type it into the field and press the Enter button on the keyboard. The system does not allow such a name - it says it is too short.
Okay, so I add a couple more letters and press Enter. But Google doesn’t like it again: it turns out that this name has already been taken by someone.
Just below the system shows logins that are free for registration. Google automatically combined them from my first and last name, and also added something similar to what I came up with.
You can choose any of them. But I advise you to work a little more and choose something better - shorter and easier to remember. The fact is that this name will no longer be changed.
Of course, you can then register another mailbox and set up mail forwarding to it from the old address. But why such difficulties if you can immediately choose a normal name.
To simplify the task, after entering the desired login, press the Enter button and see what the system offers. It will show a different free title after each click. Maybe something will do.
If the name is free for registration, then after pressing Enter, the field for entering it will not be highlighted in red.
Many people don't realize at first how important it is to have a good address. Of course, if mail is needed not for correspondence, but for something else (registration in Google Play, for example), then any name will do. But if you plan to receive letters to it, then the address is very, very important.
Ideally, it should be simple and not too long, so that it can be dictated over the phone. Preferably without numbers and dots. And no “babies”, “beauties” and “pussies”!
It’s very funny when a serious guy’s business card says puzatik45.
Password and password confirmation. Here you need to print an alphanumeric code with which you will open your box. It can only contain letters of the English alphabet and numbers, and must be at least eight characters long. It is highly desirable that the letters be of different case (both large and small) - this will make it more difficult for hackers to hack the mailbox.
Be sure to write this password down in a safe place!
It’s been verified: it’s forgotten instantly, but you simply won’t be able to log into your email without it.
Date of birth, gender These fields are also required. Information from them will not be used anywhere. As with the first/last name, it is better to indicate your real data. This will make it easier to regain access to the mailbox if problems arise with logging in.
Other information. Mobile phone, spare email address. mail and country - this data may not be specified.
3. After filling in all required fields, click “Next”. If the system does not let you in, it means that some field is not filled in as it should. It will be highlighted in red, and just below it will be written what is wrong with it.
4. A window will appear in which the conditions for registering with gmail.com will be written. They must be accepted, otherwise you will not receive the box.
The “I Accept” button will become available only after you have read them.
That's all! The mailbox is registered and Google is happy to provide its address. We write it down in a safe place and click on “Go to Gmail service”.
Immediately after this, your new mail will open.
Why have a Gmail mailbox?
Gmail is a free, feature-rich and secure email service from Google. Together with your email address you get access to all online products:
- Google Drive. Save and load any files. Copy the link and share with everyone. Each user is given 15 GB for free, additional space must be purchased.
- Documents and tables. Write resumes, articles, make reports, lists, budgets directly online. By allowing access to certain people, you can create a remote office without spending a ruble.
- Google Play. Catalog of applications, games from all over the world. There are paid and free options.
- Blogger. Here you can start a blog without programming knowledge.
- Google Keep. Save important data with one click.
- Calendar. Records of important tasks are synchronized on any device.
- Google Hangouts. Calls to colleagues, friends, customers.
- Google Translate. Translation from more than 30 languages of the world.
- Google Search Console. Find out information about your site's ranking in search engines.
- AdWords. Attract traffic and customers with contextual advertising.
You can also create a YouTube channel in a couple of minutes and become a video blogger.
In addition, no Android phone can be fully used without Gmail.
Inbox tab
Categories . The only thing worth noting here is that by checking the necessary checkboxes, you can set up tabs for sorting mail into categories, and the remaining letters will be sent to “Unsorted”.
Significance markers . Since I mark emails that are important to me using the stars discussed above, I chose the “Turn off” option, because markers perform a similar function.
Filters. Setting up sorting of significant messages.
Choosing the right name for your email address
Whatever you name the ship, that’s how it will sail – this is also connected with the mail. For business accounts, internet marketers, freelancers, it is better to use your real first and last name.
If they are busy, as in my case, then use lower spacing, dot, dash or numbers (birth year, month, etc.) Examples of good addresses or [email protected]
The Translit-online service will help you find out how your first and last names are written correctly in English letters.
I advise YouTubers to name their email address creatively and briefly so that it is easy to remember. Examples: Snailkick, YuraReshaet and the like.
Conclusion
Gmail.com email is an excellent tool for working with messages both as a personal mailbox and as a corporate email. A convenient web interface allows users to solve basically any problem; it can be customized to suit themselves and perform the necessary operations with mail. Creating and using gmail is not difficult: I hope you are convinced of this.
Perhaps I did not consider some functions and “tricks” of Gmail - tell us what was left “behind the scenes” in my review? What kind of box do you use?
By the way, highlight how I ran with a hose during combat deployment in the volunteer fire brigade?
How to Get Gmail Email
Step 1. Go to the Google search start page, select “Mail” at the top. You can type “Gmail” into the search engine or go from your bookmarks.
Step 2. We don’t have anywhere to log in yet, so click “Create an account” below.
Step 3. You will be prompted to enter data:
- Name;
- last name;
- username – the name of the mailbox up to @gmail.com, which you come up with yourself;
- login password - use letters of different case, numbers to avoid hacking.
You can click on the crossed out eye next to the line and make sure that you entered the password correctly both times.
Due to the popularity of the service, some titles may be taken. In this case, only adding other symbols will help. If you do not want to attach numbers to your last name, then use a period or indicate the name in the dative case. For example, [email protected]
Step 4. To avoid spam and fake profiles, Google will ask you to write your phone number. Don’t worry, they won’t charge you any money for SMS. You will receive a code that begins with G. You only need to enter numbers.
Step 5. Re-enter your phone number and another email to recover your password if you lose or forget it.
Step 6: Google will ask if you want to use your phone number for online services. By default, it is needed for messages, video calls, and personal advertising offers. But you can change this by clicking “More options”.
Step 7. Here the choice depends on your preferences. Go with the second option if you want to secure your email. Each time you log in, you will be asked for a code via SMS. For those who like all options, the last answer is suitable.
Click “Finish” to complete registration.
Step 8 : Congratulations! You succeeded in registering! Wait a moment while the service loads.
Choose the email list design that you like best. I like the “default” version, where the format of attachments is immediately visible.
Is it easier when they show it clearly? Then watch the detailed video instructions.
We admire the interface of our new e-mail, set it up, and read the letters. You have been given 15 GB. They are spent on attachments, archives - in general, everything that fills the mailbox.
If you create an account with Google, you will receive email in addition. And Google Drive allows you to register separately from Gmail.
General Tab
Maximum page size . Here I set the “Number of threads on one page” value to 100 in order to see all the correspondence at once.
Default text style . Edit the font, its size and color as you wish. Personally, I like to read mail without looking closely at the letters.
Chains of letters . I set it to "Enable" because this is one of the cool features that Gmail has implemented. As a result, all correspondence with one contact will be saved in strict sequence.
Stars . If you look closely at your incoming emails, you may notice the outline of a star on the left. If you click on it, then this letter will be copied to the “Starred” folder.
If one star is not enough for you, you can specify a larger number in the settings, which will replace each other when clicked.
Button labels . I had to set “Text” to make the name of the mail account buttons clear.
Signature . I recommend using some kind of signature at the end of the emails you send, which includes both a link to the blog and a ref. link or advertisement.
How to log in and check your email
Step 1. Open the Google home page, click “Mail” at the top.
Step 2. Your e-mail will appear in the list; if you have visited before, click on it. If it is new, but there were old ones, select “Change account”.
Step 3. Enter the password you created, you will be logged in in a matter of seconds.
Now you can check your mail. Delete unnecessary emails, mark important ones and reply to them.
For security reasons, do not forget to log out of your profile if you log in from someone else’s computer or leave it on unattended.
Lab Tab
In this area you will find new features from Google that are still at the testing stage.
I liked this feature called “Answer templates”.
With its help, you can create a template for answering any question from a client or reader, and then insert a ready-made answer into a letter using this function.
However, for me, it’s somehow buggy and doesn’t want to work correctly, I hope the developers will fix it soon.
How to forward emails from old mailboxes
Are you afraid of losing letters or contacts that were left on your old e-mail? Google took care of this too. You can import emails or even forward them to Gmail in a couple of minutes.
Step 1. You need to log into your profile. Click on the cog above the letters.
Step 2. Select “Settings” from the pop-up list.
Step 3. Go to the “Accounts and Import” tab, scroll to the middle. Find the treasured item “Receive mail from other accounts” and select “Add”.
Step 4. In the window that appears, enter your previous email address and click “Next”.
Step 5. We are offered 2 options:
- Synchronization using Gmailify is necessary for those who are going to continue to use the old e-mail. You simply connect it to Gmail and you will send and receive correspondence directly from it.
- If you just want to save messages and contacts, but do not intend to use your old e-mail, select import (POP3).
When you've made a decision, move on.
Step 6. You will be redirected to the site of the previous e-mail. Enter a password to authorize and confirm import.
Step 7. You will see scary words: SMTP protocol, access and delete emails - agree. This is permission so that you can work with mail from another mailbox without restrictions.
Step 8 : Congratulations! Now you can read all messages from one site/application.
If for some reason you want to stop receiving correspondence from other mailboxes, click “Disable” in the settings.
After you merge your account with your previous email, notifications will automatically turn off.
Working in Google mail offline
Jimail email allows you to work offline. This function is useful in cases where there is no Internet connection or the speed is very low. You can compose an email and it will be stored in Gmail for 30 days. If during this time a stable Internet connection appears, it will be automatically sent to the recipient.
Log in to the Gmail email service and click on the “gear” sign in the upper right corner to open an additional menu. Select the “Settings” section.
On the page that opens, select the “Offline” tab
An additional menu will open in which you will need to select the number of days for storing letters, which is carried out using the internal memory of the computer, as well as the option for saving information.
By clicking on the “Save Changes” button, you set the offline mode on your Gmail mailbox.
Reference! Working offline is practically no different from normal, but currently not all functionality is available when the Internet is turned off .
Settings
Newbies often get confused by the versatility of Gmail. I decided to show the basic settings that will be useful to everyone.
Decor
It’s hard to continue working with a dull design. Even a ten-year-old computer looks better with a new screensaver. Let's put a beautiful picture on the background. Go to: Settings → Themes → Install.
From the gallery, select a picture that you think is attractive. I missed summer and greenery so much that I chose bright grass. You can upload your image by clicking “My Photo”. The main thing is that it is of high quality. To save the result, click “Save”.
If there are no changes, reload the page.
Now my mailbox is pleasing to the eye. It's your turn. How often do you change your background? Tell us in the comments.
Template signature
Do you conduct business correspondence and are tired of constantly putting “Regards”, “All the best”? Then assign a signature that will automatically be placed at the end of any message. To do this, go to: Settings → General → Signature.
Don't forget to click “Save changes”, otherwise everything will remain the same.
Safety
Two-step authentication will reduce the likelihood of hacking by 90%. To log in you will use the password and code from the SMS. If you are checking messages from your home computer, you can set it to “Trusted” to make the process easier.
To enable two-level protection, you need to go to: Settings → Accounts and import → Change password recovery settings.
Enable two-step verification.
They will tell you about the features of this function. Click “Start”.
If you previously logged in from your phone, its model will be displayed. This mobile phone will receive information about which IP and device your profile was visited from. Click “Send Notification”.
You will receive a message, enter the code. You have made it more difficult for scammers and now you don’t have to worry about your profile.
You will find an overview and instructions on settings in this video.
Sorting emails into folders
Google is smart enough to categorize posts. But this happened a couple of times when emails from hh.ru and Pinterest ended up in spam. In addition, it is more convenient to have your own folders. Special - for memories, hobbies, correspondence with a loved one.
To create a folder, click “Create Shortcut”.
In the pop-up window, give it a name and click on the “Create” button.
Click on the arrow icon and select “Create” at the bottom.
The folder, that is, the shortcut, will be in the left menu below the draft.
By clicking on the square to the right of the shortcut, you can change the color of the icon, rename it, delete it, or even hide it.
I show you how to move a letter to any shortcut.
Place a checkmark next to the desired letter by clicking on the square on the left. Click on the folder icon with the arrow.
In the list that opens, select the name of the shortcut where we want to move it.
If everything went well, the message “A label has been assigned to the chain” will appear in the lower left corner.
In this video I show how folders are changed and deleted.
Changing account
You can have multiple profiles in the system. For example, create separate offices for work and personal use. To change one to the other, you need to know how to log out of Gmail mail.
This is very simple to do: click on the icon with the first letter of the name and press the corresponding button.
Log in from the desired account (step-by-step instructions are given above) and continue.
How to install Gmail on your phone or tablet
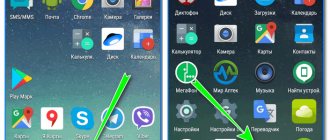
By default, Android already has an email client. If it is not there, then let's download the application and create an e-mail.
We go to the Play Market.
Type “gmail” in the search and click on the first position in the list with the logo.
Click “Install”. We wait a couple of minutes.
When it’s downloaded, launch it directly from the Play Store with the “Open” button.
I already used the application, so my e-mail was saved. And in order to create a new email address, you also need to indicate your login, password, first name, last name.
Write down your email
To exchange information with the customer, we give him our virtual address. It consists of a login and a registrar prefix. Let's consider where to watch it.
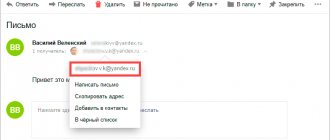
First you need to log in to your email or register on Google (if you are creating a new mailbox). In the upper right corner of the screen we find an icon with your photo or the first letter of your name.
Left-click on it and copy the address.
This is your contact information. It is enough to transfer it to the client in a convenient way (on a business card, booklet, via Viber, Skype, through social networks or freelance exchange chat).
What is the difference between corporate mail and regular mail and how to create it
Corporate mail is paid e-mail addresses with your own domain instead of the usual @gmail.com. For example,
Here are some other features of a work mailbox:
- twice as much space;
- data recovery in case of loss;
- connecting up to 50 accounts to a common network;
- access of all email addresses to Google Docs, spreadsheets, presentations;
- video chat and calls directly in mail;
- 24/7 technical support;
- access to correspondence without the Internet.
The “Basic” package costs $5 per month, and the “Enterprise” package costs $25. If you pay for a year in advance, you can get a good discount.
To create a corporate mailbox, you do not need to register a new one; change the old one in the settings. Search: Accounts and import → Do you use it for work? → More details.
Trial two weeks - free. You just need to fill out a form about your business. Click “Start Here” to subscribe.
Again the page with the presentation, and we pass it with the “Next” button.
Next, you answer questions about your company: number of employees, type of activity, etc. After this, you automatically receive a two-week “Basic” package.
You can choose your old email address or create a new one. If you did not purchase a domain, you will need to pay for it separately.
Google Drive feature
As we said earlier, several services are linked to your Google account, one of them is Google Drive. This is a virtual storage of text documents, Excel spreadsheets, projects, photos and much more. You can use up to 15 GB of memory for free, and if necessary, you will need to pay for the service to increase it. Disk expansion up to 30 TB is allowed.
If you work a lot with such documents, then this service will help save your computer from memory overflow, and the function also allows several users to simultaneously make edits to the text and leave comments.
All files stored on the disk are reliably protected from viewing by third parties. You can independently choose access to each document at your discretion. For example, when creating a project, provide it to the head of the organization with the “view only” or “edit” function.
To do this, in the document at the top right, click on the “Access Settings” button.
A window will appear in which you can copy the link or specify the recipient's email address or name in their Google account. Then you need to set the viewing and editing mode.
Attention! When creating documents on Google Drive, saving occurs automatically. Even if your power is suddenly turned off, the text you have typed will not be lost.
You can also use Google Drive to store, for example, personal photos and family video archives. To do this, select the “Create” section in the side menu.
In the list that appears, go to the “Upload files” or “Upload folder” section, and then select the required documents.