Software developers always insist that only the latest, current versions of their programs can work properly. And yet, many of us successfully use old web browsers, which almost never fail and work quite quickly. If the reader is a fan of the Yandex browser and wants to continue using its current version for a long time, we recommend completely disabling auto-update. We will be able to update the Yandex web browser manually at any time, but only if we personally wish, and not necessarily, as was the case before. Three simple ways to disable the Yandex Browser update are described below.
How to disable Yandex Browser updates
> Settings
18.01.2020
- 1 On the computer
- 2 On the phone
Modern software is developed with an eye to further development.
Because of this, most developers include an automatic update feature in their products.
This feature can start updating the browser at the most inopportune moment, for example, when the user has limited traffic or if the Internet speed is limited. Especially for such cases, you can disable updating the Yandex browser.
On the computer
There are two ways to disable updates. The first is the simplest and most intuitive, carried out in several steps within the program.
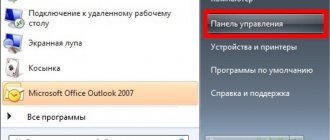
- The first step is to open the browser menu.
- After this, you need to open the “Settings” item.
- The next step is to select the “System” item.
- The last point is to uncheck the “Update the browser even if it is not running” option.
After this, the browser will stop updating automatically, but only when the browser is not running. Yandex is cunning, so the first method of disabling auto-updates will not allow you to completely get rid of background downloads of new versions.
To make the browser more stable and updates predictable, you will have to go into the “secret room” of the browser settings, or rather, open the directory where the files responsible for this are stored.
- Check the browser location directory. In the case of the author, the files are stored at: C:\Program Files (x86)\Yandex\YandexBrowser
- We open folders with a bunch of numbers in the name, alternating with dots. The names of these folders correspond to the browser versions that were installed automatically on this computer.
- service_update.exe in the folders . If there is nothing besides it, as most often happens, you can safely delete the directory, nothing will change.
- Enable the display of hidden files and folders if it was not enabled before. We have already told you how to do this.
- The next step is to open the Yandex browser folder in user documents. As a rule, it is located at: C:\Users\USER_NAME\AppData\Local\Yandex\YandexBrowser\Application.
- Here we also need folders with a set of numbers separated by dots. Here you should delete all folders except the one whose name corresponds to the current version of the browser. This is very easy to find out: such a folder will have the latest modification date.
- After this, you need to open the folder with the current version and delete the files service_update.exe and yupdate-exec.exe .
After this, automatic updates will be disabled and the browser will work stably. It should be remembered that after each manual update the function is automatically activated, so the process must be repeated after each installation of a new version.
On the phone
For mobile devices, the issue of background updates is different.
If you do not disable it, then in addition to constantly loading the network and a general decrease in operating speed, the battery life may decrease, since downloading and installing applications requires additional energy consumption. This is precisely why modern smartphones allow you to disable everything unnecessary at the system level, including automatic updates.
Android
Implementing your plans on Android will require performing a small number of simple steps, however, as elsewhere. The algorithm here is as follows:
- launch Google Play;
- go to the application menu by clicking the designated button in the search bar;
- open the item “ My applications and games ”;
- go to the “ Installed ” tab;
- we find the application we need, now it is “ Yandex Browser ”, and open its page on Google play;
- click on the vertical ellipsis at the top right;
- Uncheck the “Auto-update” checkbox.
That's all. Automatic Yandex browser updates on Android are disabled. It's time to move to the apple system.
iPhone
On Apple devices, disabling updates is no more difficult than on Android; in addition, there are two ways that lead to the same result. The first, in the author’s opinion, is simpler and faster, so let’s start with it.
- Open the iOS settings menu.
- In the search bar, enter “Yandex” or “Yandex”, it depends on the installed system language.
- Find the application in the list and open its personal page.
- Set the “ Content Update ” switch to disabled.
The next option will lead to the same result, but it will take one minute longer to complete. It is recommended to use it if you do not trust the search bar in the iOS settings.
- Open the “General” item in iOS settings.
- Find “Content Update” and open it.
- We scroll through the list of applications to the one we need, now it is Yandex.
- Set the switch to the off state.
That's all. It is noteworthy that on smartphones, after a manual update, auto-update is not reactivated.
How to disable Yandex Browser updates Link to main publication
Source: https://ya-browsers.ru/nastrojki/kak-otklyuchit-obnovleniya-yandeks-brauzera
Restore Point to the rescue
You can remove the latest version of Yandex Browser using a restore point or archive copies. If you have any, the problem will be solved - the browser will switch to the previous version. However, there is no guarantee that it will no longer be updated automatically. Immediately after the rollback, delete the file that is responsible for the update. We'll talk about this below.
In this case, nothing will happen to your manually downloaded files (for example, folders or Word documents): they will remain in their places. There's no need to worry about this.
How to disable updates completely and partially in Yandex browser 3 Methods
Good afternoon friends.
How to disable updates in Yandex browser? The creators of programs constantly update them, as they try to protect their creations, and with the help of updates they close various holes in the software.
But, despite this, some users prefer browsers of older versions, to which they have long been accustomed, and which function quite quickly on the computers of these users.
If you like a certain version of the Yandex browser, you can make the browser stop updating altogether. In other words, we will turn off updates automatically. Of course, the user will be able to enable these updates if he wishes, without any obligation, as was the case before. I offer you 3 methods on how to do this.
Should I turn off browser updates?
Let's think about this. This issue needs to be thought through more carefully. Before we start applying this action. After all, disabling updates has both its pros and cons.
Benefits of disabling updates:
- You will save traffic. Of course, this is a plus only if you have Internet limits;
- The load on the processor and OS as a whole will be reduced. Since such updates take up some of the computer's resources;
- You will work in the familiar version of the browser, where everything is familiar, familiar, understandable, and convenient to you.
Disadvantages of turning off Yandex updates:
- Some modern functions will disappear;
- Little functionality. When the browser version is older, the system resources are usually much higher and the processing of heavy information is more stable;
- The security of your information is at a lower level.
This is due to the old browser's cybersecurity gaps; - Old browsers do not integrate well with other Yandex programs.
So, if the disadvantages do not scare you, and the advantages seem higher than the disadvantages, then we will directly deal with the options for disabling updates for this browser.
How to disable Yandex browser update 3 options?
What these options will give you:
- Option 1 will make it so that the browser will not update if it is not functioning, that is, it is in an inactive state;
- Option 2 makes it possible to completely block all automatic updates. At the same time, a person can update it manually;
- Option 3 will block all paths to Yandex hubs. As a result, it will not be possible to update any elements of this browser. In addition, the path to other Yandex programs is hampered.
Option 1 Disable browser when inactive
This functionality is present in the browser settings. Hence, amateur performance is not needed here.
So, let's start disabling updates on the Yandex browser machine when it is inactive:
- We need to click on the shortcut in the upper right corner, which consists of 3 horizontal lines. Select “Settings” in the context menu;
- In the new window, go to the very bottom and find the command “Update the browser, even...”;
- Uncheck the box above this command.
After the work has been done, if we launch this browser, it will begin to look for updates and download them. This method is not acceptable for those who are thinking of updating or blocking the browser at will.
Option 2 completely disabling browser updates
If you want to completely remove the automatic update of this program for the entire period of its use, then it is advisable for you to use this option. So, we turn off Yandex browser self-updating for the entire time.
- We enter “Explorer” at the address C:\Program Files (x86)\Yande x\YandexBrowser (This means a 64 bit system. If you have a 32 bit, then enter the Program Files folder without x86);
- This folder should contain folders with Yandex update options. You need to select them all with the left mouse button. After that, right-click on these three folders and select “Delete” from the drop-down menu;
- You may receive a message that one of the folders cannot be deleted because it is open in another program. In this case, you need to turn off Yandex Browser and try again;
- In addition, a message may appear stating that administrator rights are required to delete a certain folder. I hope you have them;
- Now we need to uninstall hidden folders. We follow the path C :\ Users \Computer name\ AppData \ Local \ Yandex \ YandexBrowser \ Application ;
- Now we need to enter the folder, which has a name in the form of a number (there may be several of them). So, we enter each of these folders and delete elements there with the names service-update.exe and yupdate-exec.exe
Important! This option makes it possible to block automatic updates for a given browser. But, at the same time, you can update it manually. Therefore, it is better not to go to the “About” tab of the Yandex browser.
Option 3: block visits to Yandex using the hosts folder
This option gives us the opportunity not only to remove all YandexBrowser , but also to block the path to its Web services. If you perform this operation, you will not be able to directly apply search from Yandex. In this case, you need to use a VPN .
Our actions:
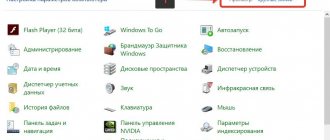
- So, let's open the folder C:\Windows\System32\drivers\etc ;
- Double-click to launch the hosts element;
- You will see a window: “How exactly do you want to open the file?” You need to select the notepad program;
- We open this element through notepad. At the end of the text document we need to insert two lines
- 0.0 browser.yandex.ru 0.0.0.0 yandex.ru
- To save the changes we have made, double-click Ctrl + S ;
- Now we just have to restart our PC.
Conclusion: now you see how to disable updates in Yandex browser.
At the same time, I would recommend that you use the second option because this method does not block your access to other Yandex programs and functions regardless of the current situation in Yandex Browser. But, in some situations, you may need the other two options. Good luck!
Sincerely, Andrey Zimin 12/11/2019
Source: https://info-kibersant.ru/yandex-browser-otklyuchit-obnovleniya.html
Return to previous version
The website of the web browser developers contains information on how to set up reading mode in the Yandex browser, but there is no information about rolling back to one of the previous versions. To return to the previous state, you will have to use non-standard methods. Among the ways to roll back a Yandex browser update, the most often used is switching the new interface to the old one in the settings menu.
You can return one of the previous versions using an archive copy. To do this, you will have to use the restore point by opening the context menu of the web browser shortcut and selecting the appropriate item. This should be done before removing the Yandex browser update. The shutdown is performed after the rollback.
The last way to cancel Yandex browser updates and at the same time return the previous version is to reinstall the program. The technique can be called quite simple and fast. However, when downloading older versions of the web browser from third-party resources, the risk of malicious code and viruses entering the system increases.
How to completely disable Yandex browser updates
Software developers always insist that only the latest, current versions of their programs can work properly. And yet, many of us successfully use old web browsers, which almost never fail and work quite quickly.
If the reader is a fan of the Yandex browser and wants to continue using its current version for a long time, we recommend completely disabling auto-update. We will be able to update the Yandex web browser manually at any time, but only if we personally wish, and not necessarily, as was the case before.
Three simple ways to disable the Yandex Browser update are described below.
Is it worth disabling auto-update of Yandex browser
The question has two sides to the coin. It is worth weighing the pros and cons before starting the procedure, because the action will lead to both some advantages and disadvantages.
If you are ready to put up with the shortcomings, and the pros outweigh all the cons, we can move directly to methods of blocking self-updating of the browser from Yandex.
How to disable system browser updates from Yandex
What each method gives:
- The first method causes the browser to not update while it is in an inactive state. All update procedures are launched along with the web browser.
- The second way helps to block absolutely all automatic updates, but we can still perform the upgrade manually.
- The third option blocks access to Yandex servers. Result: update files cannot be downloaded, but access to other company products is also limited.
Method 1: Turn off self-updating of an inactive web browser
The necessary function is in the browser settings, so you don’t have to invent anything yourself.
How to disable automatic updating of Yandex browser in an inactive state:
- Click on the icon with the three stripes sign in the upper right corner and click on “Settings”.
- We scroll through the list to the end, where we find the item “Update the browser even if it is not running.”
- Uncheck the box in front of the specified line.
If you launch a web browser, it will begin searching and downloading the update on its own. This method is not suitable for those who want to completely block the update function.
Method 2: completely turn off the update
To deactivate self-updating of the Yandex browser for the entire time you use it, we recommend using this method.
How to disable Yandex browser update permanently:
- Open the directory on the PC C:\Program Files (x86)\Yandex\YandexBrowser .
- Inside there are folders with the names of browser versions, select them all with the left mouse button.
- Press the Del key on the keyboard. Confirmation of deletion may be required.
- Go here C:\Users\PC Name\AppData\Local\Yandex\YandexBrowser\Application .
- Go to a directory with a numeric name, something like 19.7.1.114.
- We look for the file service-update.exe , right-click on it and select “Delete”.
- Repeat the previous step with the yupdate-exec.exe .
Important! The method allows you to disable auto-updating of the Yandex browser, but manual updating remains possible. If you don't want to accidentally update your web browser, we recommend avoiding going to the About Browser page.
What to do if the error “Updates are disabled by the administrator” appears
The error “Updates have been disabled by the Yandex Browser administrator” appears if updates from official Yandex servers are prohibited on your computer.
If the VPN service is running on your PC, you need to disable it and search for the update again. hosts file was previously edited , delete all entries with Yandex servers from there.
The error may also appear due to regional peculiarities. Yandex servers may be prohibited in certain countries, for example, in Ukraine. A VPN service can solve the problem - in the form of a separate program or browser extension, for example, the Dot VPN or Hola VPN .
There are several ways to block an update. In the settings, you can disable the option that is responsible only for background updating. If you need to constantly open Yandex Browser, you should choose the second method - deleting special files. Blocking access to Yandex servers is useful in case there is no need to work with branded search engines.
Option 1 Disable browser when inactive
This functionality is present in the browser settings. Hence, amateur performance is not needed here.
So, let's start disabling updates on the Yandex browser machine when it is inactive:
- We need to click on the shortcut in the upper right corner, which consists of 3 horizontal lines. Select “Settings” in the context menu;
- In the new window, go to the very bottom and find the command “Update the browser, even...”;
- Uncheck the box above this command.
After the work has been done, if we launch this browser, it will begin to look for updates and download them. This method is not acceptable for those who are thinking of updating or blocking the browser at will.
Disable Windows 10 Update (updated so it doesn't turn on automatically)
As you may have noticed, usually the update center is turned on again, the system also brings the registry settings and scheduler jobs to the state it needs, so that updates continue to be downloaded. However, there are ways to solve this problem, and this is the rare case where I recommend using a third-party tool. First of all, I recommend trying a program for which I have published separate instructions - How to disable Windows 10 updates in Windows Update Blocker.
UpdateDisabler is a very effective method to completely disable updates
UpdateDisabler is a simple utility that allows you to very simply and completely disable Windows 10 updates and, perhaps, at the current time, this is one of the most effective solutions.
When installed, UpdateDisabler creates and starts a service that prevents Windows 10 from starting downloading updates again, i.e. the desired result is achieved not by changing registry settings or disabling the Windows 10 Update service, which are then changed again by the system itself, but by constantly monitoring the presence of update tasks and the status of the update center and, if necessary, immediately disabling them.
The process of disabling updates using UpdateDisabler:
- Download the archive from https://winaero.com/download.php?view.1932 and unpack it to your computer. I do not recommend the desktop or document folders as a storage location; then we will need to enter the path to the program file.
- Run Command Prompt as an administrator (to do this, you can start typing “Command Prompt” in the taskbar search, then right-click on the result found and select “Run as administrator”) and enter a command consisting of the path to the UpdaterDisabler file .exe and the -install parameter, as in the example below: C:\Windows\UpdaterDisabler\UpdaterDisabler.exe -install
- The Windows 10 update disabling service will be installed and launched, updates will not be downloaded (including manually through the settings), and they will not be searched for. Do not delete the program file, leave it in the same location from which you installed it.
- If you need to enable updates again, use the same method, but specify -remove as the parameter.
At this point in time, the utility is working properly, and the operating system does not enable automatic updates again.
Change Windows Update service startup options
This method is suitable not only for Windows 10 Professional and Enterprise, but also for the home version (if you have Pro, I recommend the option using the Local Group Policy Editor, which is described below). It consists of disabling the Update Center service. However, starting from version 1709, this method stopped working in the form described (the service turns on itself over time).
Once you disable the specified service, the OS will not be able to automatically download and install updates until you enable it again. Recently, Windows 10 Update began to turn on itself, but you can bypass this and disable it permanently. To disable, follow these steps.
- Press Win+R (Win is the OS logo key), type services.msc into the Run window and press Enter. The Services window will open.
- Find the Windows Update service in the list and double-click on it.
- Click Stop. Also set the “Startup Type” field to “Disabled” and apply the settings.
- If you leave it this way, after a while the Update Center will turn on again. To prevent this from happening, in the same window, after applying the settings, go to the “Login” tab, select “With an account” and click “Browse”.
- In the next window, click “Advanced”, then “Search” and select a user without administrator rights from the list, for example, the built-in user Guest.
- In the window, remove the password and password confirmation for the user (he does not have a password) and apply the settings.
Now the system will not automatically update: if necessary, you can restart the Update Center service in the same way and change the user from which it is launched to “With a system account.” If something remains unclear, below is a video with this method.
Instructions with additional methods are also available on the site (although the above should be sufficient): How to disable Windows 10 Update.
Windows Update Troubleshooter
Before proceeding with resetting the Windows Update configuration, we strongly recommend that you first try a simpler and more effective tool for automatically fixing problems in the Windows Update service - the Windows Update Troubleshooter.
Download and run Windows Update Troubleshooter for your version of Windows:
- Windows 10 – wu10.diagcab (https://aka.ms/wudiag) (or run the local version of the tool: Start -> Settings -> Updates and Security -> Troubleshooting -> Windows Update (Start -> Settings -> Updates and Security -> Troubleshoot -> Windows Updates Troubleshooter);
- Windows 7 and Windows 8.1 - WindowsUpdate.diagcab (https://aka.ms/diag_wu).
Wait while the Windows Update Troubleshooter scans your system and attempts to automatically fix any errors in Windows Update and related components.
In my case, a potential bug in the Windows Update database was discovered and fixed. After this, all that remains is to restart the computer and try to search for updates. If updates do not download or install, continue to the next step.
Second way
Connect to the Internet and open Play Market.
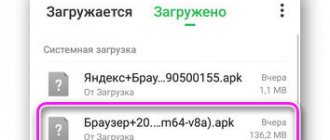
Use search to find the application you need. Here you see the “Delete” button, only in this case, since the application is built-in, only updates will be deleted. Click.
Confirm the removal of updates.
An “Update” button appears, indicating that you have removed the updates.
If you want to roll back an update to a specific version, you can only do this by installing an apk file. But we would not recommend doing this, since installing files from unknown sources can be dangerous for your smartphone.
Next, return to “Settings” and in the “Device” section, go to the “Applications” page. Find the program you need in the list provided.
Update.exe file information
Process 7z Console SFX or Product Updater or Windows Service Pack Setup or VIRUS or Gonzales Update or product updater or DRSTUB.exe or Windows Update
belongs to the program Avira Product Family or DoNotTrackMe Add-on or Microsoft Windows Operating System or Slack or Bitdefender Antivirus Free Edition or Flickr Uploadr for Windows or 7-Zip or
from Microsoft (www.microsoft.com) or Avira Operations GmbH & Co. KG or Igor Pavlov (www.7-zip.org) or Slack Technologies or Teknum Systems AS (www.handybits.com) or Paul Betts or Avira GmbH (www.avira.com) or Bitdefender (www.bitdefender.com/) .
Description: The process named update.exe appears as part of one of several different programs. Many malware call themselves update.exe. Please check your file.
Detailed analysis: Update.exe is not essential for Windows and often causes problems. The Update.exe file is located in the subfolders "C:\Users\USERNAME". The following file sizes are known for Windows 10/8/7/XP 1,601,536 bytes (7% of all cases), 1,498,608 bytes and . This is not a Windows file. The process starts running when Windows starts (See registry key: Run, MACHINE\Run, User Shell Folders). No information on the file. Update.exe is capable of monitoring applications and recording input. Therefore the technical reliability rating is 55% dangerous
.
Recommended: Identify Update.exe related issues
- If Update.exe is located in a subfolder of "C:\Program Files", then the security rating is 28% dangerous
. File size 2,278,616 bytes (9% of all cases), 2,333,744 bytes and . This is not a Windows system process. The application is not visible to users. A digital signature has been provided. This is a file signed by Verisign. Update.exe is capable of monitoring applications. - If Update.exe is located in a subfolder of C:\Windows, then the security rating is 64% dangerous
. File size 755,576 bytes (30% of all cases), 13,179,660 bytes and . This is not a Windows file. The application is not visible to users. No information on the file. Located in the Windows folder, but it is not a Windows kernel file. Update.exe is capable of recording input, hiding itself, manipulating other programs, and monitoring applications. - If Update.exe is located in a subfolder of "C:\Program Files\Common Files", then the security rating is 32% dangerous
. File size is 19,456 bytes (80% of all cases) or 912,344 bytes. - If Update.exe is located in a subfolder of the C:\ drive, then the reliability rating is 31% dangerous
. File size is 14,336 bytes (50% of all cases) or 368,640 bytes. - If Update.exe is located in a subfolder of C:\Windows\System32, then the security rating is 48% dangerous
. File size is 9,216 bytes (50% of all cases) or 450,560 bytes. - If Update.exe is located in the Windows folder for storing temporary files, then the reliability rating is 74% dangerous
. File size 238,080 bytes. - If Update.exe is located in the C:\Windows folder, then the security rating is 70% dangerous
. File size 331,697 bytes. - If Update.exe is located in the C:\Windows\System32 folder, then the security rating is 76% dangerous
. File size 1,141,248 bytes.