If you're importing music from your CD collection, you can set iTunes to automatically name albums and tracks using the online Gracenote CD database. To activate, go to iTunes>Preferences>General and make sure the "Automatically retrieve CD track titles from the Internet" checkbox is selected. The catch is that Gracenote isn't perfect. Sometimes it will misidentify all sorts of things, from album and track names or even the number of discs, and this can cause your iTunes library to get very messy, very quickly.
The solution is to manually correct the information yourself before importing the album, or use an iTunes companion app such as Song Sergeant (£20) to identify albums and tracks with inconsistent titles.
See:
10 Amazing Tips and Tricks for Using iTunes on Mac
How to delete a U2 album]
Next step "
Advertisement Next Previous
If you're importing music from your CD collection, you can set iTunes to automatically name albums and tracks using the online Gracenote CD database. To activate, go to iTunes > Preferences > General and make sure "Automatically retrieve CD track titles from the Internet" is checked.
The catch is that Gracenote isn't perfect. Sometimes it will misidentify all sorts of things, from album and track names or even the number of discs, and this can cause your iTunes library to get very messy, very quickly.
The solution is to manually correct the information yourself before importing the album, or use an iTunes companion app such as Song Sergeant (£20) to identify albums and tracks with inconsistent titles.
See:
10 Amazing Tips and Tricks for Using iTunes on Mac
How to delete a U2 album]
Alternative copy method
Uploading videos via iTunes can be called a classic way to transfer videos to a tablet. But there are other methods that are just as easy to use. Recently, copying using cloud services has been gaining popularity. Among these utilities we can highlight the well-known cloud storage Dropbox. But before you download movies to your iPad without iTunes via the cloud, you need to make sure you have free space in your storage.
The course of action is elementary:
- Create a new folder on your PC.
- We add the film strip that we want to move to the device to the folder.
Then the video can be watched directly from the folder or after downloading to the tablet’s memory. And to open the file on the device, go to the “Video” application on the main screen and find the copied video.
How to Delete Music from iTunes
Sooner or later, any song, even a once madly liked one, gets boring or is replaced by a new, even more beloved one. Therefore, every music lover periodically “cleanses” the playlist of his gadget. Here we will tell all users of Apple devices how to delete music from iTunes - selectively or all at once.
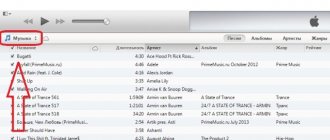
To remove from your library only those songs that you are pretty tired of, go to iTunes and in the context menu section, through the “Media Library” section, go to the “Music” subsection.
Next, select the path to the deletion objects. If you use sorting when downloading music software, go to the desired songs through the “Albums” or “Artists” tabs (depending on which sorting method you prefer). If sorting was not used, we look for files that are subject to cleaning through the “Songs” tab.
We mark the songs selected for deletion (with the cursor, the “Shift” or “Ctrl” keys) and delete them. The latter can be done in several ways. The first way is through the “Edit” menu section. We go into it, select “Delete” from the drop-down list. The second way is using the right mouse button. Click on the selected file and select “Delete” from the drop-down menu. The third way is to simply press “Delete” on the keyboard. In response to our actions, the program will ask us to confirm our intention to delete the selected songs, to which we respond by clicking on the virtual “Delete Item” button.
These methods for deleting music content from iTunes are equally suitable for both “wholesale” and single deletion. However, please note that during the process of synchronizing your device via iTunes, all the music on it will be replaced with the contents of the music library of this program. That is, the playlist and your iPhone or iPad will be “cleaned” automatically.
Removing music from iTunes
Comrades, novice users of iPhone, iPad and iPod, I welcome you to the waves of the iBobr.ru project. Today we will learn how to delete music from iTunes. There are several ways to remove music from this program. We will delete all the music at once, but we will also help those who want to delete only some songs. Deleting a song from iTunes is also very easy.
There is a section in iTunes called Music, this is where all previously downloaded music tracks are stored. By the way, music is added to iTunes in almost the same way as a video is downloaded, although it is not necessary to install QuickTime. To get to the Music section, in the upper left corner of the iTunes program, click on the Media Library context menu and select Music (as in the image above). For those who use the left side menu even easier, select the Music section in it and see the entire music collection, which we will now remove a little.
How to Delete All Music from iTunes
If you decide to completely update your music collection, take and delete all the music from iTunes, then keep the two fastest ways:
Method 1. To use this method of deleting all music or individual albums, turn on sorting by albums (Album tab, right above the music).
- Use the mouse cursor to select all albums (or some, while holding the Ctrl button)
- Right-click on the selected albums and select – Delete
Method 2. The second method of deleting all music can be used while in any music tab of the iTunes program - Songs, Albums, Genres, and so on.
- Click the context menu Edit
- Click – Select all (selects all the music in iTunes)
- Click the Edit menu again
- Click – Delete
Using the first or second method of deleting music, iTunes will display the following:
Are you sure you want to remove selected items from your iTunes library? These items will also be removed from any iPod, iPhone, or iPad that syncs with your iTunes library.
Select the button – Delete objects, and goodbye music. Even a child can delete music from iTunes, we’ve sorted that out, now we’re trying to delete individual songs from iTunes.
How to Delete a Song from iTunes
If you do not want to delete your entire music library, but want to remove only some annoying songs from iTunes, then choose one of two methods:
1. If you sort your music in iTunes by albums, then delete songs like this:
- Click on the album with the annoying song
- Select a song, if you want to select several songs, then hold Ctrl
- On one of the selected songs, right-click – Delete
One or more songs are removed from the album you selected in iTunes.
2. For those who do not sort music by albums, but simply throw a bunch of music into iTunes, we offer the following method for deleting individual songs:
- Sort music by songs (Songs tab, see above)
- Select songs, one or more
- Right-click on the selected song
- In the list, select – Delete. Or you can press the Delete key on your keyboard after selecting
As in the case of deleting all music, iTunes will ask you again:
Are you sure you want to remove selected songs from your iTunes library? These songs will also be removed from any iPod, iPhone, or iPad that is synced to your iTunes library.
Since we no longer need these songs, we click – Delete songs, and the iTunes program erases them from its library. Well, everyone has sorted out individual songs and all the music, delete for good measure, but know that by deleting a song (or all music) from iTunes, the music file is not deleted from the computer, so if you no longer need any song or album , then remove them from your computer's hard drive.
If you have forgotten where your songs are on your computer, then before deleting you can look at the path: in iTunes, right-click on the song, select - Information, in the window that appears, in the Browse tab at the very bottom the path where you can find the music file is indicated .
Finally, we can recommend that you familiarize yourself with other removal instructions that will be useful to owners of iPhone phones, iPad tablets and iPod users:
Remember that when you sync music, the content on your iPhone or iPad is always replaced by the music content in iTunes. Therefore, if you delete a song from iTunes, then after synchronizing the music, it will be deleted from the iPhone’s memory.
The entry was published in the INSTRUCTIONS section and tagged music, using iTunes. Bookmark the permalink.
How can I delete music from iTunes?
The iTunes utility simplifies working with video and audio files, allowing them to be found online, recorded, stored in a designated location, played, organized and synchronized with mobile devices. With its help, it is easy to operate with records on phones and smartphones and, if necessary, delete them.
You can delete music from iTunes through the program’s library all at once, in separate blocks, or as single files. A reminder for beginners who do not have proper experience with iTunes: to get to the Music section, you need to open iTunes, click “Media Library” in the upper left corner, then select “Music” from the list. Or select the Music section from the left side menu. All music recordings stored in the program will open, with which you will then work.
Deleting all tracks at once in one step
Open the Edit menu and find the “Select All” option. After highlighting all the files in the same Edit menu, click “Delete”
Or use the CTRL+A key combination to highlight everything and press the Delete key.
You can delete all tracks from any music tab: Albums, Songs, Genres.
Before deleting, you will have to confirm your intentions in the small window that appears. The program asks the constant question: are you mistaken and does it really need to carry out such a ruthless act of destroying all records?
If your hand does not tremble, you will have to press the left button.
And if your hand still trembles and it becomes a pity to erase all the records at once, you need to press the right button and apply the following method.
Deleting selected albums in one go
Enable sorting by albums, hold down the Ctrl key and carefully select all the albums that have become unnecessary. Right-click anywhere in the highlight, open the context menu and select “Delete”
Reminder: when you destroy items in your iTunes library, they will disappear from any device synced with it: iPod, iPad, iPhone.
Selective deletion of individual records
When storing tracks in the program as albums, you need to select the “Albums” tab. In the desired album, hold down the Ctrl button on the keyboard, sequentially mark all the tracks that you decide to destroy, and through the context menu called up with the right mouse button, turn to the usual cruel and ruthless command.
As many songs are highlighted, as many will disappear. Deleting is done in the same way through the “Songs” tab. The only exception is that the menu called up will look slightly different.
Without additional confirmation, it will not be possible to carry out the act of destruction. Again you will have to “talk” to the program dialog box and confirm your intention.
The window is the same as the one that appears when you erase all tracks, only now instead of objects it talks about songs.
The second difference is the window. It says “Don’t ask again.” If you check the box next to it, the program will no longer communicate with you through such a window, but will immediately delete songs. This is true if files are deleted without using the Ctrl key, not several at a time, but one at a time. A check mark will speed up the process; you will not need to confirm your intention after each click.
The Delete key on the keyboard or the Shift+ Delete combination performs an action similar to the left button of the dialog box. You can press these keys rather than the button to confirm the deletion. This is relevant for those who prefer to control actions from the keyboard and not be distracted by the mouse.
Memo
Everything deleted disappears only from iTunes; all recordings are saved on the computer. To make them disappear from your computer, you need to find their location and forcefully delete it from your hard drive. If the user has forgotten where the songs are located, before deleting in iTunes, call up the context menu on any file, select “Information”, a window appears, at the bottom of which the path to the file is indicated. Along this path you can find the storage location.
When you sync music files, the contents of your iPhone and iPad are replaced with your iTunes library.
After deleting records from iTunes and subsequent synchronization, they disappear from the memory of mobile devices.
Delete all music or individual songs in iTunes
The iTunes application is a universal tool for working with media content, which is then transferred to Apple devices. Considering the number of different files, it is better to always keep the contents of your iTunes library in order, otherwise at some point you will simply get lost in it. Let's first figure out how to delete music from iTunes if you no longer intend to listen to it.
General information
All downloaded audio recordings are stored in iTunes in a special “Music” section. To get to it, you need to open the “Media Library” context menu on the top panel and select the appropriate section.
All the actions described below will be performed only in the “Music” section, which you will clear from audio recordings and entire albums.
Delete all music
So, you have decided to completely update your music collection, having first cleared your library of old audio recordings. This can be done in two ways, which we will now consider in detail.
Sorting by albums
- In the “Music” section, enable sorting by albums.
- Use the cursor to select all available albums (you can select specific music folders by holding down the CTRL key).
- Right-click one of the highlighted albums and select “Delete.”
In the window that appears on the screen, click “Delete objects”, starting the process of cleaning your music collection.
Edit menu
If you don't want to manually select albums and want to get rid of absolutely all songs, follow these steps:
- Expand the Edit menu and click Select All. All music available in iTunes will be highlighted.
- Open the Edit menu again and click Delete.
A warning question will appear on the screen. If you haven't changed your mind, click Delete Items to completely clear your library.
Deleting an individual song
If you do not want to completely clean out your rich media library, but only want to get rid of individual songs, then the methods described above are not suitable for you. To delete one or more songs, there are two other options, depending on whether you're sorting songs by album.
Music is divided into albums
- Open the album that contains the song you no longer need.
- Select the annoying song (you can select several at once by holding down the CTRL key and marking with the left mouse button).
- On one of the marked audio recordings, right-click and select “Delete”.
The application will clarify whether you really want to erase the selected songs. Click "Delete Songs" to confirm your intentions. The songs will be erased from the library.
Songs are in random order
If you haven’t gotten around to putting things in order in your media library and the audio recordings are scattered in a chaotic order, use the following instructions:
- Open the Music section and use the Songs tab to sort your audio recordings.
- Select one or more songs.
- Right-click one entry and select Delete. Confirm your intentions.
Remember that all the methods described only allow you to remove music from iTunes; the music files themselves will remain on the computer.
To finally get rid of boring or unnecessary music, erase it from your hard drive. If you don't remember where these music files are, follow these steps:
- Before deleting a song in iTunes, right-click on it and select “Info.”
- A window will appear on the screen where, on the overview tab, you can see the path to the file. Remember it and go to the specified path through Windows Explorer.
Once you find unnecessary files, delete them, freeing up space on your computer and at the same time cleaning iTunes of unnecessary music.
Using the above methods, you can delete music from iPhone via iTunes. To complete this procedure, you need to synchronize your device with the application. It is important to configure iTunes correctly by specifying synchronization parameters.
What is stored in the backup?
- information about purchases: applications, music, books, movies and TV shows (but not the purchases themselves, however, they will be downloaded automatically);
- photos and videos on devices unless iCloud Photo Library is turned on;
- settings of the device itself;
- application data;
- even the order of applications on the screen is remembered;
- SMS and iMessage messages are stored;
- ringtones (where would we be without them);
- visual voicemail messages.
Keep in mind that the backup only contains data stored on your device, not documents stored in iCloud or iCloud Photo Library. That is, photos, contacts, iWork documents, notes are not stored in the backup copy... But this does not mean that iCloud is not a helper for us here. Read on.
When you delete a photo or video from your iPhone, the file first goes to the Trash. It will stay in this Trash for 40 days, after which the system will completely delete it.
First, it makes sense to check your shopping cart. You may find deleted photos and videos there.