The capacity of hard drives is becoming larger and larger every year in both computers and laptops, but for some reason they are still always filled with data for most users. Lack of space has been an eternal problem since the existence of the first computer. And if you are using a solid state drive (SSD), which offers much less space, then low disk space messages are almost like home.
I will not try to explain why the disks still fill up completely, even with increasing volumes, this is not the point of the material. I would like to share with you my thoughts on possible methods of freeing up additional space for files and programs, removing unimportant system junk, and trying to explain why you need to keep your disks clean and not clutter them. I present to you 7 ways to free up space on your hard drive in Windows.
Where does disk space go?
During the process of computer operation, system updates, installation of programs, visiting websites and other actions, many unnecessary files accumulate on the disk, which are often called garbage or junk. In addition, we often download some files ourselves, and then, when they are no longer needed, we forget about them.
Extra files not only take up disk space, but also reduce system performance. The disk takes longer to find the necessary files, and some of them may take up space in RAM and use processor resources. In addition, viruses often like to live in temporary files.
For stable, fast and reliable operation of your computer, you must keep the disk clean and tidy. Nowadays, the problem of lack of space on SSD drives, the volume of which is very limited, is also relevant.
In this article we will try to comprehensively solve the problem of lack of disk space. To achieve good results, we recommend that you read the entire article and follow all the tips in the order in which they are presented.
Cleaning up after ourselves: learning to delete data from HDD and SSD
Thanks to scientific and technological progress, controlling data is becoming more and more difficult every year. And it’s not just about the development of network technologies. If previously, in order to be sure of your own safety, it was enough to burn several letters with piquant content, but today, when deleting documents that compromise you from your hard drive or SSD, you cannot be 100% sure that they cannot be recovered. We will talk about why this happens and what methods exist to ensure the destruction of information in today’s material.
System utilities for safely deleting files from the HDD
We'll start with classic hard drives and software methods of data destruction. It's no secret that when you delete files through a standard manager, the supposedly erased information actually doesn't go anywhere. All that happens is that the corresponding sectors are assigned the status of free, so that they will be overwritten in the future. However, until this happens, files can be restored without much difficulty using specialized programs.
The conclusion suggests itself: in order to guarantee the deletion of a particular file, we should initiate a forced overwrite of it. There are many utilities for these purposes, but the easiest way is to use the standard tools of your operating system.
Windows
Starting with Windows Vista, Microsoft operating systems by default overwrite the contents of the selected partition with zeros once during a full format. You can set the number of rewrite cycles yourself, but to do this you will have to resort to the command line:
format d: /fs:NTFS /p:10
In this example, we format volume D into the NTFS file system, while instructing the operating system to first overwrite the entire partition with zeros 10 times, using the /p (“passes”) parameter, which specifies the number of passes. Windows, unfortunately, does not allow you to overwrite a specific file or directory on purpose. However, this cannot be considered a serious drawback: if you are going to store confidential information, which at some point may need to be destroyed, on a PC, then this should be done, at a minimum, on a specially designated partition, and best of all, on a separate drive , which can be quickly cleaned directly from your OS.
Linux
Operating systems of the Linux family traditionally offer their users much more space. So, for example, if you need to quickly and reliably delete one or more files, you can use the shred console utility:
shred -u -n 40 /private/file.txt
In this example, we overwrote the file file.txt with random data 40 times in a row (the -n option, by default shred makes 25 passes) and then deleted it (the -u option, since by default shred does not delete files, but overwrites them immediately). The utility also supports deleting files by a mask (for example, *txt) or processing several files at once within one command - to do this, you need to specify the absolute paths leading to them, separated by spaces:
shred -u -n 40 /private/file.txt /private/file2.txt
If you want to additionally hide the fact of “stripping”, you can use the -z parameter:
shred -u -z -n 40 /private/file.txt
The only drawback of shred is that this utility cannot work with directories. Therefore, if you need to destroy the contents of an entire directory with subfolders, you should use wipe:
wipe -rf /private/*
In this example, we issued a command to recursively (-r) delete everything located in the private folder, and also disabled the confirmation request for deleting folders and files (-f), which wipe displays by default. Among the interesting additional options supported by the utility, it is worth highlighting the forced execution of chmod for directories and files protected from overwriting (-c), operation in silent mode (-s) and the ability to force wipe to follow symbolic links (-D, conflicts with -r) .
MacOS
In operating system versions 10.4 through 10.10, you could initiate file overwriting by moving them to the Recycle Bin and then selecting the “Empty Trash Permanently” option in the Finder, but Apple has since abandoned this option. Up until version 10.11, you could use the srm console command to securely delete data:
srm -rm /private/
In this example, we recursively delete the contents of the private folder (-r), overwriting each file with random data 7 times in a row (-m). You can also choose to overwrite files once (-s) or not specify this parameter at all - in this case, the utility will perform 35 passes.
In current versions of Mac OS, you can initiate secure deletion of files from your hard drive using Disk Utility (to do this, click on the “Security Options” button and set the number of overwrite cycles), or through the terminal, using a construction like:
rm -P /private/file.txt
The -P option is specific to Mac OS and tells the utility that the files being deleted must be overwritten three times.
As you probably noticed, by default, only the format utility built into Windows OS offers one-time file overwriting, while all other secure file deletion tools perform from 3 to several dozen runs at a time. The situation is similar with free and commercial software from third-party developers. But what is this connected with and who is right here?
State standards for the protection of secret data in various countries could very well help us understand this, but in reality such documents do not bring any clarity. Judge for yourself. In the United States, until 2006, DoD 5220.22-M was adhered to, according to which secret files were required to be rewritten three times: once using any character, a second time with its XOR compliment, and a third time using pseudo-random data. However, now drives with classified information are ordered to be physically destroyed.
A similar approach is used in Canada (all regulations are set out in the Guide to the Destruction of Confidential Information on Hard Drives G2-003), with the only difference that during the third pass, a sequence of characters is cyclically written to the HDD, which is encoded information about the version of the software used for data destruction, as well as the date and time of the procedure. But this technique is considered suitable only for documents of categories A/B/Confidential, while media containing classified information are completely destroyed.
In Germany things are still stricter. The BSI Verschlusssachen-IT-Richtlinien (VSITR) specifies a 7-fold rewrite of the confidential level data: the first 6 passes alternate between a symbol and its XOR complement, and the 7th uses a pseudo-random sequence. But if secret information was stored on the HDD, then it must still be destroyed.
It’s time to grab your head: is it really possible to extract data from a hard drive even after repeated rewriting and all software methods are useless? Well, the Pentagon and the Bundeswehr really can’t make mistakes? We hasten to reassure you: the utilities we have cited, like many of their other analogues, cope excellently with the task assigned to them. At the same time, the military departments of world powers know their business very well. Seems contradictory? Actually, no, if you clearly understand two facts.
First: previously, data from a HDD could actually be recovered even after it was overwritten, using the edge magnetization analysis method, in which they try to read information from the spaces between tracks. This method could have worked in the 80s or 90s, when the volume of hard drives was still measured in megabytes, but with an increase in recording density, it almost completely lost its relevance.
Second: when it comes to classified information, no one wants to be on the extreme side and get caught in the event of leaks of information constituting a state secret. When working with such materials, everyone will be much calmer if the decommissioned hard drive is not just erased, but also crushed, melted, and then dissolved in acid. Plus, recycling allows you to solve the problem of storing decommissioned equipment, since such hard drives cannot be sold on eBay for obvious reasons either.
Not convinced? In this case, you can follow the example of the US military and destroy the hard drive itself. Fortunately, doing this is by no means as difficult as it might seem at first glance.
Radical approach: destroying the hard drive
In combination with preliminary software deletion of files, physical destruction of the drive completely eliminates the possibility of data recovery from the HDD, even with the use of special means. There are many ways to deal with a hard drive, but they can all be divided into three broad groups:
- Mechanical destruction
We are purely interested in the destruction of magnetic plates, since the DRAM buffer, in which data is cached, is cleared automatically after the HDD is de-energized, and the only ROM available on the hard drive is used only to store the firmware on it. Let’s immediately say that hitting a hard drive with a sledgehammer is practically useless: yes, you can destroy the textolite boards, break the case (its plastic part) and seriously damage the pancakes, but a professional will still have a chance to recover the information. To achieve the desired result, you can resort to the services of a specialized shredder.
The main problem with such devices is that they are extremely expensive and take up a lot of space. For example, even for the simplest unit of the Ideal 0101 HDP level you will have to pay more than 200 thousand rubles, but all that such a “baby” with overall dimensions of 850 x 495 x 470 mm and weighing 63 kg can do is make through holes in hard drives, which although it disables hard drives, it cannot be a 100% guarantee of data destruction.
A more serious device like the HSM StoreEx HDS 230, which literally crushes drives into dust, will cost you 1.7–1.8 million rubles. This “beauty” has dimensions of 3x1x1.7 meters and a weight of 1.25 tons, but it successfully copes with a 3.5-inch HDD in about 20 seconds, and not a single expert will undertake to extract information from a recycled storage medium.
Of course, when it comes to risks to reputation, freedom, health or even life, any means are good, but let’s look at things soberly: finding an extra couple of million and space for such a unit will be beyond the power of even many business representatives, not to mention about private individuals.
An alternative to a shredder is a hand-held grinder.
With its help, you can quickly remove a ferromagnetic layer (its thickness is only a few tens of nanometers) from the surface of the pancakes, after which no one can restore your data, since the aluminum base does not retain traces of the magnetic field. In fact, this is perhaps the best method of mechanical “stripping”: it is inexpensive, reliable, relatively safe for the operator and does not require special skills.
- Thermal destruction
Compared to mechanical recycling, this method has one very interesting advantage: by choosing it, you don’t have to worry about first erasing data using specialized utilities. Let's remember the definition of a ferromagnet. Ferromagnetic materials are crystalline compounds capable of maintaining magnetization in the absence of an external magnetic field at temperatures below the Curie point. Upon reaching the latter, the ferromagnet loses its properties, so that all recorded information is guaranteed to be deleted.
Next is some simple math:
- The Curie point of the chromium oxide ferromagnetic coating used in hard drives is about 386 degrees Kelvin, or 113°C;
- the melting point of aluminum, which the plates themselves are made of, is 660°C;
- The flame temperature of a propane-butane burner, which can be purchased at any hardware store, reaches 1300°C.
The advantages of this approach are ultra-low cost and the ability to “process” the drive at home, the disadvantages are the duration of the procedure and the fire hazard. So if you are determined to “bake pancakes”, you should get a compact muffle oven in advance.
Such a device will cost you about 20 thousand rubles, will provide heating up to 1250°C (which, again, is more than enough for our purposes), and the chamber volume of 5 liters will allow you to simultaneously “process” an entire RAID array.
- Chemical destruction
A mixture of concentrated nitric and hydrochloric acids, taken in a ratio of 1:3, better known as “regia vodka,” can easily dissolve a hard drive even entirely, leaving no trace of either the stored data or the drive itself. However, HNO3 does a good job of coating pancakes even solo.
All of the methods we have listed are quite effective, although they are not without a number of disadvantages. Firstly, such manipulations are potentially traumatic, especially in conditions of lack of time: if in a hurry you can seriously damage your hand even with a grinding machine, then what can we say about acid or a torch? Secondly, you will need to purchase special equipment, and to work with acid you will need to have a mini-laboratory with good exhaust hood. Thirdly, they are not suitable for situations where “they have already come for you”: any of the above methods takes a lot of time, part of which will have to be spent on disassembling the hard drive.
But what if you show a little ingenuity, unscrew all the bolts holding the HDD cover in advance, and put it on tape, so that if something happens, you can quickly tear off and remove the pancakes? Although this will indeed help save valuable time, it is not a sound idea.
If we are talking about an “air” drive (this includes models with a capacity of up to 6 TB inclusive), opening the device will negatively affect its reliability. Even though such hard drives are not sealed, even they are assembled under sterile conditions, and the barometric hole present in the body of each disk, designed to equalize pressure, is reliably protected by a microfilter that retains moisture and fine particles. By the way, for greater reliability, a recirculation filter is also installed inside the HDD, which ensures air purification in the hermetic zone during operation of the device.
After opening the disk, dust will inevitably seep into the hermetic zone, which will first lead to the appearance of multiple read/write errors caused by heating of the sensors under the influence of the friction force that occurs when dust moving at high speed begins to touch their surface, and then to the complete exit of the hard drive from building, since fine particles, like an abrasive, will damage the ferromagnetic layer and grind down the read/write heads themselves. After all, do not forget that the dimensions of modern hard drives do not exceed 120 nanometers, and the gap between the sensors and the surface of the pancake is only 12–15 nm, as a result of which hard drives are extremely vulnerable.
If you try to open the same WD Red Plus WD80EFBX with a capacity of 8 terabytes, then, firstly, you will have to try very hard, and secondly, the drive will fail after such intervention. The thing is that high-capacity hard drives are created on the basis of the HelioSeal platform and are filled with rarefied helium - an inert gas whose density is 7 times less than air. This approach helped to significantly reduce the resistance of the gas environment and turbulence indicators inside the hermetic zone, which, in turn, made it possible to reduce the thickness of the magnetic plates and add additional ones, achieve greater recording density using the CMR method due to increased accuracy of head positioning, and reduce energy costs for spindle rotation.
As a result, helium drives are not only more spacious, but also almost 50% more economical and 4–5°C cooler than their “air” counterparts, which makes such devices an ideal solution for use as part of servers and network storage systems operating 24/7. 7. But at the same time, in the event of depressurization, you will no longer be able to write a single bit of information to such a disk, although all previously recorded files will still be available.
This is explained by the very principle of operation of modern hard drives, the writing heads of which literally float above the surface of the pancakes at a certain height due to the screen effect: with the rapid movement of magnetic plates under the pylons of the head block, an air cushion is formed, providing the necessary lifting force. If a HDD created using HelioSeal technology is opened, helium instantly evaporates, being replaced by denser atmospheric air, which causes the distance between the read/write heads and magnetic plates to increase several times. Under these conditions, the strength of the magnetic field created by the writing module is no longer sufficient to write data, although there are no problems with reading. This nuance was provided for when developing the helium platform, so that in case of emergency situations you could transfer information from a drive damaged for one reason or another to a working one without any problems.
In light of all that has been said, the listed methods of dealing with a hard drive can only be considered as measures of systematic disposal, when no one knows about the information you have and no one is coming for you. For urgent data destruction, only electromagnetic devices for the emergency destruction of hard drives are suitable.
Inside the body of such a device there is a solenoid that, when activated, generates a magnetic field with a strength of over 500 kA/m, which completely demagnetizes the pancakes, and at the same time burns out all the electronics, so that after cleaning the disk becomes unsuitable for use. Preference should be given to models with cylindrical solenoids, since such a coil geometry ensures the most uniform distribution of the magnetic field, guaranteed to erase data on all magnetic plates.
Shredders are available in a variety of options, including modules with SATA/SAS interfaces and active cooling, so they can be used as hard drive cages, saving precious seconds in emergency situations. Advanced modifications can boast many additional options, such as activation from the remote control, via SMS, or when crossing a protected perimeter. The only drawback of such solutions is the price from 40 to 100 thousand rubles (and even higher), so if time is not pressing, the same muffle furnace turns out to be a more interesting choice in terms of price and reliability of data destruction.
Woe from Wit: Destruction of Data on SSD
Compared to classic hard drives, solid-state drives have a number of advantages, the main ones being high performance, protection from mechanical stress and energy efficiency, and the principle of their operation is radically different from HDDs. So maybe SSDs will be the best choice for storing confidential information?
In general, the answer to this question can be affirmative, but there are several nuances. When it comes to data destruction, solid state drives do outperform hard drives in many aspects, but even they cannot guarantee instant and permanent erasure of stored data. And the main problem is that such devices are too “smart”.
For greater clarity, let's remember how flash memory works in general. Encoding of information bits occurs by changing the amount of charge in the so-called CTF cells (Charge Trap Flash - “charge trap”) due to quantum tunneling of electrons through the dielectric layer, caused by a high electric field strength. From a physics point of view, we are dealing with the phenomenon of a reversible avalanche-like breakdown. Accelerating in an electric field, electrons receive sufficient kinetic energy for impact ionization of dielectric molecules, resulting in the appearance of a pair of elementary particles carrying an opposite charge, which are also accelerated by the electric field, and the process is repeated many times, with the number of charge carriers increasing exponentially (hence Name).
It is not difficult to guess that such processes cause gradual wear of the dielectric layers, as a result of which the likelihood of charge leakage into neighboring cells increases, which in turn leads to damage or even complete loss of data. Moreover, further reduction of the technical process only aggravates the situation, because the price for increasing the density of information storage is also reducing the thickness of the dielectric.
You can combat the wear of flash chips in various ways, including at the level of chip architecture, but it is impossible to completely eliminate damage to the insulating layers. At the same time, the situation is further aggravated by how exactly data is written to the SSD, because all available flash memory cells are combined into pages, and the pages, in turn, into blocks, while information is written page by page, and erased block by block. . Because of this, each memory cell experiences a much greater load, since any write or erase operation on a file can trigger a cascade of programming/erasing cycles. Schematically it looks like this.
Even though the new data that we want to record takes up two pages in the block, only one is actually free: although the old page (highlighted in yellow) was deleted by the user earlier, in fact the recorded information has not gone away. To make room for new data, the controller initiates a procedure known as Garbage Collection, removing unnecessary data and redistributing existing data. To do this, all pages, with the exception of unnecessary ones, are copied to a second, free block, while the first one is completely erased. Then the current pages are transferred back to the first block, deleted from the second, and only after that the new data takes its rightful place.
In the example above, in order to write a couple of pages, 2 blocks of six pages each had to be completely rewritten twice. In fact, the garbage collection process will look much more complicated and the number of rewrite cycles will be much greater. The real picture can only be assessed by knowing the Write Amplification factor, which shows how many times the actual load on flash memory exceeds the calculated one. This indicator can be equal to one only when recording information on an absolutely clean, freshly formatted disk; in all other cases, its value will vary from 2 to 25. Moreover, even for seemingly identical drives, it can differ significantly, since depends on the model of the controller used and the features of the firmware.
It is not difficult to guess that such a complex procedure for deleting and writing data negatively affects the performance of solid-state drives. To solve this problem, they resort to a simple trick: as long as there is enough free space on the SSD, new files are immediately written to free pages, and garbage collection is postponed until the drive is idle, which allows you to avoid wasting time shuffling previously saved data.
In turn, Wear Leveling helps solve the problem of excessive cell wear due to excessive rewriting. In general, this process looks like this: You bought a brand new SSD and as long as there is free space on it, information will be recorded in free blocks. As you use it, you begin to delete unnecessary files, and the garbage collection mechanism cleans them up in the background, but they will be used for recording only after there is not a single block left on the disk into which data has not been written at least once. Since operating systems use a logical mechanism for addressing data blocks (LBA), while the controller itself operates with physical addresses (PBA), correlating them with logical ones, implementing such a mechanism is not particularly difficult.
All of the above determines the strengths and weaknesses of SSDs in relation to the scenario of destruction of confidential information. The advantages of solid state drives include the following:
1. If information has actually been erased from the drive's memory, it cannot be restored under any circumstances.
No definition of edge magnetization or other “technomagic” will help here: CTF either carries a certain charge that encodes data bits, or it does not.
2. Even if the garbage collection procedure has not been completed, an outsider will not be able to access the uncleaned cells in the usual way.
When attempting to access formally (but not physically) cleared cells, modern SSD controllers return the same set value (Deterministic TRIM, DRAT) or are guaranteed to return zeros (Zero Return After TRIM, ZRAT).
3. As long as the SSD receives power, garbage collection will continue to occur.
Even if your SSD falls into the wrong hands, time will be on your side, because while the attacker is studying the available files, the controller will continue to inexorably destroy the erased data, and again, it is impossible to stop this process using standard means.
However, all of these advantages are negated by a serious drawback: even you will not be able to manage garbage collection. Taking care of you, the SSD controller will independently select the optimal time and intensity for cleaning unused memory cells, and this process can last quite a long time. If third parties get to the drive, they will be able to count the “garbage” that the controller has not yet managed to collect by unsoldering the flash chips and accessing them directly. Of course, you won’t envy the one who will do this, because the researcher will have to solve the problem of not only physical, but also logical fragmentation of data, but it is quite possible to do this.
For this reason, you should not rely on simply deleting critical data through the operating system’s file manager, even when working with an SSD, and shredder programs will not help here. However, in the case of solid-state drives, everything turns out to be much simpler and more reliable, since to permanently erase information it is often enough to use a proprietary utility offered by the drive manufacturer itself. Thus, owners of Western Digital SSDs can use Western Digital SSD Dashboard for these purposes.
This application exists in several variations, adapted for different series of devices, taking into account their specifics. For example, the WD_BLACK SSD Dashboard, designed for monitoring and maintaining high-performance NVMe drives SN750 and SN850, aimed at gamers, professionals and enthusiasts, received support for “Gaming Mode”. When such an SSD is switched to gaming mode, the energy-saving functions of the APST (Autonomous Power State Transition) group are completely disabled, which allows you to get the most out of the drive by minimizing the latency when initially accessing data. In practice, this allows you to get rid of freezes caused by loading textures, even in the most heavy (or poorly optimized) AAA games, or to further speed up the process of rendering videos or 3D models when it comes to content production.
Versions of Western Digital SSD Dashboard for SATA drives and mid-budget NVMe SSD SN550, naturally, did not receive such an option (and, frankly, they don’t need it), however, the basic functionality of all listed versions of the application is almost identical. In addition to operations such as updating firmware, monitoring performance or tracking the wear of flash chips, the utility allows you to forcefully delete all recorded data (the “Sanitize” function or, in the Russian version of the program, “Cleaning”, which is located in the “Tools” section, or aka “Service”).
After running the wipe procedure on the selected device, the mapping table is not simply deleted, as with normal formatting, but all recorded data blocks are also cleared. A non-system SSD can be cleaned directly through the utility. If you need to delete all data from the system drive, you will first have to create a bootable USB flash drive using the “Create a bootable USB-drive to perform Sanitize” option.
Depending on the storage capacity, the erasing process may take quite a long time. However, upon completion, you will be 100% sure that all critical information has been irretrievably deleted and cannot be restored.
Removing unnecessary programs and games
First of all, remove all programs and games that you no longer need. This will not only free up disk space, but will also speed up the system.
Press the “Win+R” key combination, type “appwiz.cpl” and press “Enter” or use the “Uninstall programs” shortcut from the “Links” section.
In the window that opens, carefully review the list of installed programs and games and remove all that you are unlikely to use in the near future.
To remove a program, right-click on it and select “Delete”.
Do not delete anything whose purpose you do not understand or if you are not sure.
After that, manually find and delete the save folders of the deleted games, as they can take up a lot of space. You can easily find out where the saves of a particular game are by searching on the Internet.
Many online games also retain their distributions (installation packages) during updates, which are no longer needed, but at the same time take up a lot of space. For example, the Mail.Ru game center saves distributions in the “Distrib” folder, and the “World of Tanks” game – in the “Updates” subfolder. Files in such folders can occupy tens of gigabytes and can be safely deleted.
Clearing cache
Modern browsers cache viewed Internet pages, that is, they store copies of them in memory. This makes sites you visit frequently load faster, so it's a convenient feature. Over time, memory becomes clogged, information about new pages is not cached, and this leads to slow loading sites. The internet seems to be slower than usual. To view photos or videos, you have to wait a long time for loading. All this data must be deleted.
Thanks to the cache clearing operation, you will delete copies of pages from old sites from there, where you will never return. True, along with caching of old pages, information about new ones will also be cleared. But it's not scary. Current sites will be saved in memory again.
The easiest way to clear the cache is to use the aforementioned CCleaner program. It is worth considering that when clearing the cache, information about logins and passwords is deleted if you overlook and do not uncheck the “logins and passwords” field.
The cache can be cleared in the browser itself. This is done differently in different browsers. Let's consider everything.
Google Chrome browser
Sequence of actions: 1. Press Ctrl + Shift + Del simultaneously; 2. In the window that appears, select the files needed for cleaning;
3. Clear history.
Opera and Mozilla Firefox browsers
The command and actions in the two browsers are similar to those in Google Chrome.
Internet Explorer
1. Find “service” in the browser panel and click the mouse. 2. A menu will appear in which you need to find the lines “internet options”, “general”, “browsing history” in order. 3. Check the box and click “delete”.
4. In the window that opens, check the boxes required for deletion and click “delete” again.
Finding and deleting unnecessary files
It often happens that some old unnecessary files take up a lot of disk space, but we forgot about them and don’t know where they are. In order to find them, I recommend using the “TreeSize Free” utility, which you can download in the “Links” section.
After launch, the program will scan your disk, determine the sizes of files and folders and sort them by size.
This way you can easily determine which folder contains the files that take up the most space. Delete any files you no longer need. If you think you might still need some of them, burn them to disk. Selecting the disk to scan (C, D, etc.) is done in the “Scan” menu.
You can transfer large and rarely used files (disk images, program installers, videos, etc.) to an external drive, which is also useful for storing a system backup and personal files.
Hard drive Transcend StoreJet 25M3 1 TB
What else can you do
If Windows has two system drives, then when installing programs, especially modern games that can take up a huge amount of memory, point to the path to the second drive. By default, everything is installed on the system drive and it often turns out that drive C is full and D is empty.
Check the list of installed programs and remove unnecessary or not used ones.
It may be that you don’t remember what’s on your computer - this will free up a huge amount of memory. It is necessary to carry out such cleanings and remove all kinds of garbage using the same CCleaner or similar software, and it is better to do this regularly, without waiting until the memory becomes full.
Transfer user files and folders
If you have a second disk or partition (for example, disk “D”), then first of all transfer to it all the files from the desktop and user folders such as “My Documents”, “My Music”, “My Videos”, etc. ., since they are all physically located on the “C” drive.
You can move files manually by creating folders for them on another drive or partition in advance. But it is more correct to change the location of the user’s folders using the operating system. Then all new files that you or any programs save on the desktop and in user folders will automatically end up on another disk partition, without causing the system partition to overflow.
4.1. Transfer user folders to Windows 7, 8.1, 10
Go to the folder “C:\Users\Name”.
Right-click on the “My Documents” folder and go to the “Location” tab.
Replace the drive letter with the one where you want to move the folder (for example, "D") and click OK.
Agree to move the files, and then repeat all the steps for the Desktop folder and other user folders.
4.2. Transfer user folders in Windows XP
In Windows XP there is no function for automatically moving user folders and we will use a special utility “XP Tweaker”, which you can download in the “Links” section.
Install the utility and run it. Then in the left pane, select the “Windows XP” section and go to the “System Folders” tab.
Select the "My Documents" folder with the mouse, change the drive letter to the one where you want to move the folder (for example, "D") and click the "Change" button.
Follow the same steps for the “My Pictures”, “My Music”, “Desktop” folders.
After that, go to the folder “C:\Documents and Settings\Name”.
And manually move the “My Documents” and “Desktop” folders to the new location “D:\Documents and Settings\Name”.
Entering sleep mode
Surprising but true! A few extra gigabytes (!) can be “eaten up” by going into sleep mode! Unfortunately, the system in this case is imperfect, so you can help it become a little better. To do this, go to the power settings through the control panel and disable putting the PC into sleep mode.
Some experts recommend simply deleting the hidden hiberfil.sys file, which is responsible for the standby mode, but I do not recommend doing this, since you may still need the file.
Disk Cleanup Using Windows
All versions of Windows have a Disk Cleanup feature. Using it, you can clean up any partition of the disk (C, D, etc.), but it is most effective for cleaning the system partition (drive “C”), since this is where most temporary files are stored.
If you have Windows 7, then before performing the following steps, we recommend installing update KB2852386, which is designed to clear the system of backup copies of updates. You can download it in the “Links” section.
Right-click on drive “C” and select “Properties”.
Click the Disk Cleanup button.
Click the "Clean up system files" button (Windows 7, 8.1, 10).
Check all the boxes and you will see how much space will be freed up when deleting temporary files.
The volume of temporary files can reach 5-10 GB. Click the "OK" button and all temporary files will be deleted.
If your drive is chronically low on space, it's time to think about replacing it or installing a second hard drive or SSD.
Hard drive Western Digital Caviar Blue WD10EZEX 1 TB
Disk cleaning programs
There are many good programs for cleaning your system from unnecessary files. I recommend using them only when necessary. The disk is full - there is not enough memory, install one of the programs, clean the disk, and then remove it. There is no need to fanatically delete 100-200kb of temporary files using programs every day.
Standard Disk Cleanup
The program is included in Windows, but like all standard programs, it performs tasks at a minimum. However, you can use it to clean up the disk a little.
To run it, you need to open the properties of drive C and click the “disk cleanup” button.
CCleaner
With it, you don’t have to delve into the question of how to clear memory on your computer; the program already knows which files can be deleted without harm to the operating system. You just need to launch it, select the necessary items and start cleaning.
But check the boxes carefully. The program can delete typed addresses in the browser, history, and even window sizes. After cleaning you will have to get used to it again.
WinDirStat
The program scans your computer's drives and visually shows which files and folders take up the most memory. With its help, you can quickly remove the largest folders from unnecessary ones.
Without it, you would have to manually go into the folders and open the properties each time, evaluate how much deleting this or that folder will help, in general, you would have spent a lot of time and effort.
Glary utilities 5
This is a whole package of utilities for computer maintenance. This program has a good data analyzer that can be deleted.
There is also an uninstallation manager in which you can select all the programs that you want to remove by ticking and with one click start the process of freeing memory from them.
Unlocker
When deleting some files and folders, you may encounter “no rights” or “file open in another program” problems. In this case, Unlocker will unlock the file and it will be quietly deleted.
Deleting a hibernation file
The hibernation file (hiberfil.sys), which can be close in size to the amount of RAM, is located on the “C” drive and is used for sleep mode. If you do not use this mode, but turn your computer on and off in the usual way every time, then this file can be safely deleted, since it takes up a lot of space.
The system will not allow you to manually delete this file, and even if you do this using a special utility for deleting files, the system will create it again. Therefore, to correctly delete the hibernation file, you need to disable sleep mode.
Launch Command Prompt as administrator and run the following command:
powercfg -h off
After this, the system itself will delete this file and will no longer create it.
If you don’t know how to work with the command line or don’t want to bother, you can download the command file “Deleting a hibernation file” in the “Links” section.
All you have to do is right-click on it and run it as Administrator (except for Windows XP).
Browser cache
Each browser has a folder in which it stores its cache files. They are used to speed up page loading. The browser saves page elements once and then does not load them from the computer's memory. With each site visited, the cache grows and can take up quite a lot of space, plus it slows down the browser itself and creates operational problems.
In all browsers, clearing the cache is in the settings. This can also be done using CCleaner.
Disable or change the page file size
The paging file (pagefile.sys), which can be one and a half times the size of RAM, is located on drive “C” and is used by many programs to compensate for the lack of RAM.
If you have a fairly large amount of RAM and a small “C” drive (for example, an SSD), many enthusiasts advise disabling the page file.
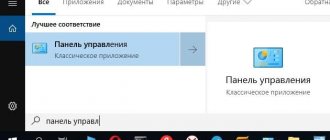
Press the Win+R key combination, type "sysdm.cpl" and press Enter, or use the System Properties shortcut from the Links section.
In the window that opens, go to the “Advanced” tab and in the “Performance” section, click the “Options” button.
In Performance Options, go to the Advanced tab and click the Change button.
Uncheck “Automatically select paging file size”, check the “No paging file” checkbox and click “OK”.
After restarting the computer, the paging file will be deleted and a lot of space will be freed up on the C drive.
But keep in mind that the system’s operation is tightly tied to the page file, and some programs may not even have enough 8 GB of RAM. Therefore, out of memory errors may begin to appear.
In this case, I recommend setting the minimum paging file size equal to half the amount of RAM, and the maximum to its full amount.
You can try completely disabling the paging file if you have 16 GB or more of RAM, but I still would not recommend doing this.
Additional disk space can be obtained by installing an SSD disk, which will also give a real increase in the speed and responsiveness of the operating system.
Hard drive A-Data Ultimate SU650 120GB
Windows update files
For older Windows operating systems, it is important to have unused folders left after a system update. As a rule, their name begins with the letter “$”, so such folders can be safely deleted. Just be careful not to delete anything important.
*****
Finally, I can’t help but notice that almost no one deletes temporary files manually these days. And this makes sense, since third-party programs can do this for you. You don’t need to look far for an example - take the same CCleaner. However, it depends on the taste and color, as they say...
If you have any questions about the topic of the article, please contact us.
Disabling System Restore
The recovery service makes backup copies of system files and stores them in a special hidden folder, which can take up a lot of disk space. At the same time, the built-in recovery tool does not always work correctly, and viruses like to hide in the backup folder.
To free up disk space, I recommend turning off System Restore and making backups using a third-party program and storing them on another drive, external media, or another computer.
Press the Win+R key combination, type "sysdm.cpl" and press Enter, or use the System Properties shortcut from the Links section.
In the window that opens, go to the “System Protection” tab, select the “C” drive and click the “Configure” button.
Check the “Disable system protection” checkbox and click “OK”.
After this, all backup copies of system files will be deleted and additional disk space will be freed up. This way you can free up 5-10 GB of valuable space on drive “C”.
Using specialized software
What to do if the described actions seem complicated. Install the CCleaner application. Launch the program. Open the first tab "Cleaning". Further:
Fixing problems with the registry
Go to:
Click "Fix". Further:
Select a directory to save the backup.
Correct any errors found.
Proper removal
I recommend uninstalling unused CCleaner software.
Open the "Service" tab. Find the program you don't need. Click "Uninstall".
Disabling the Recycle Bin
You can disable the Recycle Bin on drive “C” so that it does not take up space on it. To do this, right-click on the trash can icon and select “Properties”.
Set the “C” drive to “Destroy files immediately after deletion” and click “OK.”
After this, if you delete large files from folders with game distributions or any other, they will not end up in the trash and will not take up space on the “C” drive.
Cleaning up the backup storage
To clear the system file backup storage in Windows 8, 8.1, 10, I recommend running the following command at the command line as Administrator.
Dism.exe /Online /Cleanup-Image /StartComponentCleanup
For this purpose, you can also download the “Cleaning backup storage” command file in the “Links” section and run it as Administrator.
Remove unused drivers
The OS in the “FileRepository” directory contains copies of the drivers. When updating, the old versions remain. Used to roll back drivers. Clear this directory.
Back up your OS drivers.
Clearing "FileRepository"
In the Command Line, write: The command will create a document “driver.txt” with a list of driver packages, in the “FileRepository” directory.
Remove unused ones with the command: pnputil.exe /d oemXX.inf Instead of XX - the number of the driver specified in the created document. For example, oem26.inf.
Automatic disk cleaning and acceleration
There are special utilities to automatically clean the disk from temporary files. One of the best that I recommend is CCleaner.
It can be set to clear temporary files every time you boot your computer, which will help maintain free space on your C drive and also give you a little extra protection since temporary folders are a favorite place for viruses.
But you need to configure it correctly, otherwise this utility will not clean up what you need, but leave what you need to remove. Since the utility’s settings are quite extensive and it has many additional useful functions, I decided to talk about it separately in the next article.