To get into the local storage of an iPhone, it is not enough to connect a USB cable, as is done with Android devices. Apple mobile products are highly secure, which imposes some restrictions on synchronization methods. For this reason, developers recommend setting up a physical connection only through iTunes and iCloud. Recently, alternative third-party applications for synchronizing devices have appeared. Their security level is also high. There is also a way to transfer information via Wi-Fi.
The synchronization principle is identical for all versions of iPhone. True, it may differ slightly depending on the type of operating system on the PC.
How to connect iCloud on iPhone and iPad?
iCloud cloud storage is an integral part of the Apple eco-system and, as a result, its management is in the iOS and OS X system settings.
- On your iPhone or iPad, go to iCloud Settings.
- Tap on the line “ [email protected] ” or, if your device has iOS below 8.0, on the first line, and enter (aka the primary email address specified when registering your account).
- Then, in the “Required” field, enter the password for your account and tap on “Login.”
- After checking your Apple ID and password (if the information entered is correct, checkmarks will appear in front of the corresponding fields), you will be asked to merge the Safari data on your device with the data in iCloud.
- In the next step, you will be asked to enable Find My iPhone and location services for this feature. Turn it on without thinking.
If you have forgotten the password to your account, you can use it. To do this, follow the active link “Forgot your Apple ID or password?”.
In the same menu, you can create a new Apple ID, to do this, tap on the words “Create Apple ID”. Remember, when you create an Apple ID this way, you must have a valid credit or debit card. only possible when downloading any free application from the App Store.
After connecting iCloud to your iPhone or iPad, in the menu of the same name you will see your personal data (last name, first name, Apple ID) and iCloud functions.
If you have a Mac connected to iCloud, when you connect your iPhone or iPad, your Mac will be notified.
How to connect iCloud on Mac in OS X?
If you are the proud owner of a Mac computer or installed OS X on an x86 computer (Windows PC), connecting iCloud in OS X is as easy as pie.
- On a Mac in OS X, go to “iCloud System Preferences” and enter your account information in the appropriate “Apple ID” and “Password” fields. After the fields are filled in, the “Login” button will become active, click on it.
- Next, you will be asked to enable synchronization of email, contacts, calendars, reminders, notes and Safari, as well as enable the Find My Mac function. Without hesitation, check the boxes and click “Next”.
- In the next step, enable your Mac's location service; you can enable it immediately or configure it later.
- To enable iCloud Keychain, you'll need to enter your Apple ID password again and then use your security code or ask for confirmation on any other iCloud-connected device. You can set up a keychain at any time, so if you don’t want to or don’t know what it is, click the “Cancel” button. We will certainly talk about the keychain a little later.
Once you connect iCloud on your Mac, all your data (contacts, iCloud email (@icloud.com), notes, calendar events, Safari bookmarks and data, reminders) will be synced to the cloud storage. Any changes you make on a Mac connected to iCloud will be automatically applied to all devices connected to the storage.
How to connect iCloud on Windows?
iCloud for Windows, unlike Mac OS X, is very limited. In the Macrosoft operating system environment, you can access iCloud features such as iCloud Drive, Photos, and Bookmarks from Internet Explorer. iCloud email, Contacts, Calendar, Reminders, and Notes stored in the cloud can be accessed from a web browser at https://icloud.com/.
- Launch iCloud for Windows and enter your account information in the “Apple ID” and “Password” fields, and then click the “Login” button.
- After authorization, you will have access to the iCloud control panel, where you can specify what data to download from the cloud storage to your Windows computer. Only 3 functions are available: iCloud Drive, Photos and Bookmarks from Internet Explorer. All other features are available from a web browser on the official iCloud website.
How to synchronize data through a third-party program?
There is a way to synchronize not through the original iTunes application, but using a program from a third-party developer. Most often, the popular iFunBox application is used for synchronization. It has gained popularity due to the absence of various restrictions; in particular, iFunBox supports two-way synchronization.
to download iFunBox. The application is easy to work with different systems of different operating systems. It even supports data transfer in any direction from a flash drive. Another useful feature of the program is that you can initiate the installation of applications from the App Store on the iPhone from a PC.
Shrinking your iCloud library
This section of the service uses it to share content on all Apple gadgets. This applies to photographs, videos and other things. Surely, among the variety of information stored on your device, there is a lot of unnecessary information
For example, these may be photo frames of poor quality or identical photos. Such junk can be easily removed from the photo application in absolutely any iOS gadget.
In addition, we can competently manage space in iCloud using the storage optimization function. This option is available in the device settings. When actively using it, the photo application automatically clears space, replacing photographs and videos with modified versions in the form of copies. Basic versions of photos in full format are saved in the cloud, and if necessary, the user can always upload them to the device’s memory.
Photos and videos that have been deleted are moved to the Recently Deleted Content album. From here they can be returned back within a month after removal. But if you want, you can permanently erase these files faster, without waiting 30 days. To do this, we need to click on the select button and decide on the elements that we want to delete. Then you need to confirm your decision by clicking on the delete button.
If after this there is no free space left in iCloud, all deleted photos and videos will be permanently deleted. Moreover, their copies will not be saved anywhere, including in an album with recently deleted photographs.
Below we will once again describe step by step the algorithm for deleting various content from the iCloud media library. In addition, we will tell you how to do this on the resource of the service itself.
Setting up icloud storage
To activate the extension, you will need to update the firmware version to the latest available build. Further, the algorithm of actions is identical for all devices to be paired.
- Configure the algorithm separately for each gadget.
- Log in to the vault using the same Apple ID from different devices.
After automatic synchronization, calibration is completed.
Where is downloaded music saved?
Unlike other files that end up in iCloud Drive, music remains exclusively in the iPhone’s memory. The exception is the one that the user downloaded on the site and sent to “Downloads” himself. If it is a song purchased from iTunes or downloaded while listening to Apple Music, it will be located on the iPhone, reducing its memory capacity. There are several ways to find it.
Via Settings:
- Scroll through the main menu to the “Music” line.
- At the very bottom, find the “Downloads” block. The top line shows how much memory the downloaded songs occupy.
- Click on it to see what exactly is downloaded to your iPhone.
There are few actions available for this section: the only thing the user can do is delete what is not needed: through the “Change” button or by swiping along the track to the left.
Another option is to find what’s downloaded to your iPhone in the Music app itself.
Algorithm:
- Open the application on the main page, find the “Edit” button at the top right.
- In the list of ways to sort tracks that opens, select the bottom one – “Downloaded music”. Mark it with a checkmark and click “Done”.
- After this, a new line in the media library will appear on the same main page. Click on it to see the music saved on your iPhone. Here it will also be sorted by genres, artists, songs.
An alternative way to find out which songs have been downloaded requires using a computer and iTunes, so it is rarely used. Typically during data synchronization or when clearing large volumes.
Scheme of work:
- Connect the device via USB to your computer, launch iTunes (for macOS 10.15 – “Music”).
- Find your gadget on the left, in the right corner there will be a “Synchronize settings” button - click on it.
- In the window that opens, select the “Music” block and “Manage storage” on the right.
- In the drop-down panel, find “Songs”: a list of all that are loaded on the gadget will appear, indicating their weight.
There are also few available actions here: just delete or leave. Next to “Songs,” you can view downloaded audiobooks and podcasts.
Description
We have a unique service. We're talking about iCloud. What it is? And what is the corresponding option used for?
iCloud cloud is a service that allows you to synchronize data with devices of a particular Apple ID. With its help, you can transfer information from your phone or tablet to new Apple devices, as well as view them or restore them if necessary.
Apple's cloud service is an ordinary, albeit very convenient, data storage. When setting this option, a person will be able to choose how information is saved and synchronized. We'll talk about this later.
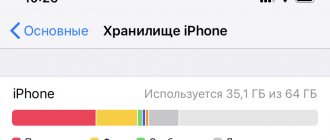
How to free up space on iCloud
There are several ways to free up cloud storage memory. We highly recommend using them all. Unnecessary files can be located in any of the device programs.
Cleaning up the image library
According to statistics, photos take up the most space in iCloud. To free up memory, go to the photo stream and manually delete unnecessary pictures and their duplicates, previously taken screenshots. Those who constantly post photos on Instagram may not notice that the filtered versions are saved in the phone's memory.
But that's not all. Deleted files continue to be stored on the phone for some time. This is done so that the user can find and restore a file erased by mistake. Therefore, to completely clear memory you need to:
- Go to the image library.
- Open folder display mode.
- Find the Recently Deleted folder.
- Confirm action.
You can remove duplicates using third-party programs, for example, Gemini.
Transfer photos from storage to PC
If all the photos on the device have not lost their relevance, you can not delete them, but transfer them to your computer. How to do it:
- Go to iCloud settings on your device.
- Select the Manage Storage tab.
- Next, go to “Photos”, click on the “Disable and Delete” button.
- Back up your photos to your PC or transfer them manually by connecting the device via a cord.
- Delete all photos from iCloud.
New photos will still be saved to iCloud. You can disable this option in the cloud storage settings.
Delete old and backup copies of the device
To find out if your device has old backups, go to iCloud settings. Next you will need:
- Click "Manage Storage".
- Select "Backup".
- Click on the unnecessary copy, then “Delete backup”.
- The last step is to click the “Disable and Delete” button.
Before deleting old copies, it is best to create a new one by connecting the gadget to iTunes on your computer.
Change backup settings
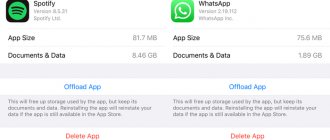
If the user has iCloud backup enabled, all installed programs will be automatically saved in memory. To see which applications are taking up storage space, go to the “Backups” section.
Next, click on the icon of your device. The screen will display a list of all programs whose data is saved in the cloud.
You must select those applications that do not need to be archived.
Note! If several devices are synchronized under one iCloud account, each of them takes up memory. Check the settings of each device by going to the archiving options
Clearing files from iCloud Drive
Clearing iCloud Drive will also help free up memory:
- Open iCloud Settings.
- Select the Manage Storage tab.
- Go to iCloud Drive.
- A list of all files stored in iCloud Drive will open.
- Find the unnecessary file, slide it to the left with your finger and delete it.
Clearing messages and their attachments
Those who use the iMessage service may not realize that photos, voice messages and other attachments are saved along with their backup copy. You can delete them while saving the correspondence:
- Go to iMessage.
- Select the message thread you want to delete and click the corresponding button.
- To erase only attachments, click Details.
- A special menu will open where all files will be displayed.
- Click "More", select several photos or videos and delete them.
All text messages will remain in iCloud storage. You can also delete old conversations, freeing up even more space. To erase files from What's Up, select this option from iCloud storage. You can also do this manually in the program itself.
How to increase cloud size
As mentioned above, each owner of an Apple device is entitled to use no more than 5 GB of iCloud free space for free. At the same time, he can expand it by switching to another tariff plan. You can do this online in your smartphone settings, following the instructions:
- Sign in to your Apple ID account.
- Open iCloud settings.
- Click on the “Storage Management” button and go to the section.
- Here select the “Change storage plan” option.
- On the next page, review the available offers, select the appropriate rate, and then confirm payment.
From this moment on, a subscription will be issued to a specific account, and a monthly subscription fee will be charged. If you no longer need to use additional storage space, you can cancel the tariff plan by disabling the option. Before choosing a new tariff, you should make sure that you have the required amount of money on your balance.
Where is downloaded music saved?
As mentioned earlier, to find downloaded music files, you don’t need to look for the download folder on your iPhone. Music, like all other supported files, is loaded into a directory specially provided for it. But it’s worth answering the question right away: is it possible to download music from a computer by simply copying it? You can, but only through iTunes or iTools.
This method upsets users by not allowing them to simply copy music from their computer. But there are also advantages to these difficulties. The media library is organized and all data is in its place, allowing the built-in player to handle music files correctly.
So, the downloaded music files end up in the following folder: /private/var/mobile/Media/iTunes_Control/Music. Movies are also stored in the same folder. Ringtones are saved in the same path, but not in the “Music” folder, but in “Ringtones”.
Where is downloaded music saved on iPhone?
Images from computer
How to view a cloud on an iPhone? The answer to such a question will no longer cause any problems. What should you do if you want to study images copied from an Apple device to a cloud service on your PC?
There is a solution! To do this you need to perform the following steps:
After a few minutes, a list of images uploaded to the cloud will appear on the PC display. Fast, simple and very convenient!
What functions does Aicloud hide?
iCloud cloud storage is essentially a small amount of disk space on Apple servers that is provided to a smartphone for uploading important data. By default, iPhone syncs its settings, phone book, calendar events, photos and short messages. If you use more than one Apple device, but also, for example, an iMac and an iPad, files from them will also be uploaded to the cloud. Moreover, all gadgets are connected by a single ecosystem; if you take a photo on an iPhone, without any action on the part of the user, this image will appear in the iPad gallery.
iCloud has quite significant capabilities for synchronizing data from a device:
- Music library, list of installed programs, text documents.
- Photos from the gallery.
- Current smartphone settings.
- Temporary application files, such as account information, saves, bookmarks, etc.
- Themes and design.
- User messages: SMS, iMessage, MMS.
How to set up synchronization via iTunes?
iTunes is often used to connect a smartphone to a computer. The method differs in implementation - both devices are connected via cable. This means that the method does not impose restrictions on the weight of transmitted data, as is the case with the cloud. Files are transferred directly from your computer to your iPhone, and not through a third-party service.
The key disadvantage of this method is that it is only possible to synchronize data from a PC to a phone. Reverse synchronization does not work in this case.
Through iTunes you can stream:
- Application and game data;
- Information from your notebook and calendar;
- Photos, music and videos;
- Tutorials sourced from iTunes U;
- Any text files;
- Favorites from the browser.
Important! An iPhone can only sync with one PC and iTunes on it. If you try to connect to another computer, the procedure will end in failure. The data is erased.
iTunes Instructions:
- Connect your computer to your smartphone via cable.
- Install the application on your PC (relevant for Windows, OS X already has it).
- Go through the application installation process and launch it.
- After a short time, the application will detect the device. You need to select it in the left menu.
- By switching through the thematic tabs on the left, you can add the corresponding files to your smartphone.
- To display the transferred data in the smartphone’s memory, click on the “Synchronize” button.
How to transfer photos from iPhone to computer via the Internet
There are a number of ways to transfer photos from iPhone to computer without connecting it with a cable. Let's look at the simplest and most convenient options.
Via iCloud storage
Every iPhone user who has their own Apple ID gets several gigabytes of free iCloud storage space. One of the things you can use it for is storing photos. In order for photos from iPhone to be uploaded to iCloud, you need to configure it accordingly:
- Go to settings on your iPhone and click on your Apple ID;
- Go to the iCloud section;
- Here you need to set up automatic uploading of your photos to iCloud. To do this, click on the “Photo” item;
- Select the “iCloud Photos” switch and set the desired mode for uploading photos from your smartphone to cloud storage.
This completes the iPhone setup. Now all photos will be stored in iCloud. To download photos from iCloud to your computer, you need to install cloud storage, or you can use the storage site. The first option is preferable if you often transfer photos from your iPhone to a specific computer, and the second is more convenient, for example, if you need to download several photos from time to time.
Important: If you decide to install iCloud on your computer, download it only from the official Apple website. Consider the option of transferring photos from iPhone to computer using the cloud version of iCloud
Go to www.icloud.com and log in with your Apple ID
Let's consider the option of transferring photos from iPhone to computer using the cloud version of iCloud. Go to www.icloud.com and log in with your Apple ID.
Next, a list of available iCloud cloud services will open. From the options presented, you need to select “Photo”.
After that, select the photos you want and click on the “Download selected item” button to download them to your computer.
Please note: To select multiple photos in iCloud cloud storage, you must click on the objects while holding down the Ctrl key
Through other services and applications
iCloud cloud storage is provided on every iPhone for uploading photos and other data. But there are various other ways to transfer photos from a smartphone to a computer.
Go to the photos section on your iPhone and select any photo. Click on the "Submit" icon in the lower left corner of the screen.
A list of services through which you can send this photo will appear. To send it to your computer, you can use, for example, email, the VKontakte application, Telegram or other available services. Select the desired option, then send the selected photo, and then download it from this service on your computer.
Please note: It is convenient to use various cloud storages in a similar way to transfer photos from iPhone to a computer running Windows: Dropbox, Yandex.Disk, Google Drive and others
How to access the cloud on an iPhone and which cloud storage service to choose
After reading these instructions, you will be able to understand the popular issue of transferring and saving photos to the cloud on an iPhone, additional settings for your phone, and choosing the data storage service that is most convenient for you.
Every year, the development of cloud storage for saving personal photos or documents is becoming more popular among iPhone users. This may be due to the small amount of memory on the device or, conversely, to the convenience that online data storage services offer us.
Results
We got acquainted with the iCloud service for iPhone. Moreover, it is now clear how to work with this cloud utility. There is no need to download separate data clouds to Apple devices.
Is it possible not to use iCloud? Yes, but then problems may arise when working with an Apple device. For example, you won't be able to activate the Find My iPhone option. Otherwise, work with third-party cloud services on Apple products does take place.
Source