Installing ADB on Linux
The ADB program is included in the standard set of Android SDK utilities. You can install this environment and get the required utility. But you don’t always want to drag an entire execution environment onto your computer. Sometimes you only need one program. It can be very easily installed separately. On Ubuntu, you can do this by running the command:
sudo apt install android-tools-adb
For Red Hat, CentOS the command will be slightly different:
sudo yum install android-tools-adb
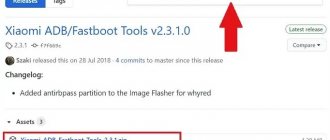
If you need to install ADB on Windows, you will have to download the Platform Tools SDK from the official website.
Hard and symbolic links
In Linux, including Android, there is such a thing as links - which in normal, familiar language sounds like a “shortcut”. There are two types of links:
- Hard links
- Symbolic links or symlinks
What are the differences between hard and symbolic links?
Hard links - Create an exact copy or current snapshot of a file or folder. This is very similar to copying, but it is still not copying.
Symbolic links - create a shortcut that indicates the exact location of the file or folder where the shortcut links. If you move a file or folder, the symbolic link will be broken. To clearly understand what a symbolic link is, in Windows XP or Windows 7 there are program shortcuts on the desktop that link to the folder with the program, or more precisely an exe file.
Preparing your smartphone
In order for you to be able to use adb with your smartphone, you need to enable USB debugging mode. This feature is hidden in all versions of Android starting from 4.2. To become a developer, first go to “Settings” -> “About phone” and click on “Build number” :
“For Developers” will appear in the main settings menu :
Here you need to check the box next to the section “Allow USB debugging” :
Now your phone is ready to work with adb. Connect it via USB to your computer and let's get started.
Getting root
- We connect the phone to the computer in MTP file transfer mode
- Upload the Magisk zip file downloaded above from github to your phone
- Boot into TWRP.
To do this, reboot the phone in fastboot mode (see point 2 of the instructions above on how to unlock the bootloader) and on the computer execute: $ fastboot boot twrp.img downloading 'boot.img'… OKAY [ 0.565s] booting… OKAY [ 0.464s] finished. total time: 1.044s - In TWRP, select Install and install the Magisk zip downloaded onto the phone.
- After installation, TWRP offers to clear the cache (wipe). This is not necessary, just reboot
- After the reboot, the Magisk Manager application appears. If this does not happen, try using a different version of TWRP and repeat the process.
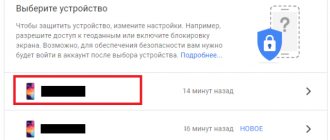
That's it, now with the help of Magisk Manager you can give root rights to applications that request them, and also hide from other applications that this device is rooted, so as not to break Android pay.
Useful ADB commands
Before we can control the device, there is one more thing we need to do. The adb command requires a special service to communicate with Android and needs to be started. To do this, use the following command:
adb start-server
After completion of work, you can disable the service so that it does not consume unnecessary resources:
adb kill-server
Now you can run adb commands for android.
Device list
First of all, let's look at the list of devices connected to our computer. To do this, use the devices command:
adb devices
If several smartphones are connected to the system, then by default the actions will be applied to the first one. But you can specify the desired device name using the -s option. For example:
adb -s 0123456789ABCDEF logcat
You can also specify the name of the device to which you want to apply adb program commands using the ANDROID_SERIAL variable:
export ANDROID_SERIAL=0123456789ABCDEF
Then all adb commands will be applied to the device specified in this variable.
Device status
With the get-state command you can find out the state of the device:
adb get-state
The command will return one of the following values: device - running, bootloader - loading, offline - disabled. You can use the status-window command to constantly monitor status:
adb status-window
View logs
The most common action that mobile application developers and testers have to do when searching for errors is viewing system and application logs. To do this, use the logcat command:
adb logcat
The utility displays the contents of Android logs in real time, so you will immediately see all error messages. You can also write everything to a file:
adb logcat -d > ~/android.log
Using the -c option, you can clear all logs on the device:
adb logcat -c
It is not always necessary to look at the full system log; sometimes it will be enough to just see the messages of the desired program. To do this, simply specify the package name:
adb logcat com android.settings
Using the --log-level option, you can set the message detail level, the following options are available: V, D, I, W, E, F, S. To select the output detail, specify the desired letter separated by a colon after the application name:
adb logcat com android.settings:E
Or we will display only errors for the entire system:
adb logcat *:E
Transferring files to your device
If you need to quickly send a file to a device, you can use the push command to do this. Here is its syntax:
$ adb push /address/local/file /address/remote/file
For example, let's download a file from the home folder to the device:
adb push ~/file /sdcard/file
The file will be instantly transferred to the device and you can verify it. Additionally, you can use the -p option to display progress, as well as the -a option to preserve the original timestamp.
Uploading a file from your device
In the same way, you can download a file from your device. Pull command syntax:
$ adb push /address/remote/file /address/local/file
For example, let's copy the sent file back:
adb pull /sdcard/file ~/file1
Installing applications
Using adb you can directly install applications. This feature can be very convenient for developers. The install command only needs to pass the address of the apk file:
adb install ~/Momentum_apkpure.com.apk
After this, the application is installed and ready to work on your device. If you need to update the application to a newer version, then use the -r option. It is very important. Otherwise you will get an error:
adb -r install~/Momentum_apkpure.com.apk
The options -s are also available for installation on a USB flash drive and -d for downgrading the program version.
Uninstalling apps
Uninstalling the app is also very easy. To do this, just pass the name of its package to the uninstall command. For example, let's remove the Firefox browser:
adb uninstall org.mozilla.firefox
Backup
You can create a backup copy of your firmware and all Android system files so that you can restore it very easily and quickly. To do this, use the backup command. Let's look at its syntax first:
$ adb backup options packages
Options indicate what data should be copied. Each option can have the prefix no, which means that this data does not need to be copied. Let's look at the main options:
- -apk — save apk files for programs, disabled by default;
- -obb — save extensions of installed apk file extensions in obb format. Disabled by default;
- -shared — save application data from the SD card or phone memory, disabled;
- -all — save all installed applications;
- -system — save system applications, these applications are already included in the all list.
The last parameter allows you to specify which applications should be saved. If the all option is specified, then naturally this parameter is not needed. Thus, the command to backup the system would look like this:
adb backup -apk -obb -shared -all -f backup.ab
Using the -f option we specify the name of the archive file; it will be saved in the current folder. If you do not set it, the default name will be backup.ab. You will need to confirm the creation of a copy on your phone; you can enter a password for encryption:
To restore from a backup, use the restore command. All she needs to do is pass the file address:
adb restore android.ab
Restarting the device
The adb utility even has commands to reboot the device. You can simply reboot your smartphone using the reboot command:
adb reboot
You can boot into recovery mode:
adb reboot recovery
Or to bootloader setup mode:
adb reboot bootloader
Android Console
Using the shell command, you can log into the Android console and perform the necessary actions there. Most of the Linux commands we are familiar with are available here. We looked at all the available commands in detail in the Android Terminal Emulator commands article. Now let's talk about the shell command itself and give some examples. To enter the console, type:
adb shell
Next, the adb command prompt on Android will open. If you don't need the console, but only need to execute a command and return the result, then you can pass the command immediately after the shell:
adb shell ls /system
For example, with this command you can take a screenshot:
adb shell screencap -p /sdcard/screenshot.png
And this is how you can record your smartphone screen on video:
adb shell screenrecord /sdcard/video.mp4
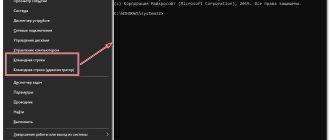
How to create an ADB file Devices.cmd and launch the console via the command line?
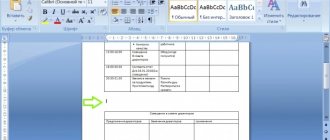
In order not to constantly have to navigate to the necessary folders, you can do it much easier by creating a command line file in Notepad for a quick start.
Enter the content shown in the image above, save the file directly in the ADB directory, selecting “All types” as the format and adding the CMD extension after the name manually. After this, all that remains is to simply run the file for execution as administrator.
fastboot devices
If you put your Android phone or tablet into bootloader mode, the adb will no longer work. Here you need to use fastboot commands.
To check whether PC and Android can see each other, use the command:
fastboot devices
After entering it, the serial number of your device should appear.