Manufacturers of Android smartphones and tablets simply love to install uninstallable built-in applications on their gadgets. It's good when they are useful. But in most cases it’s just slag, taking up space and annoying with its advertising.
Advanced users can get root access on their device and uninstall all these programs. However, many do not risk resorting to this method - due to reluctance to lose the warranty, the prospect of no longer receiving OTA updates, or for other reasons.
Fortunately, you can remove built-in programs in Android without root. For beginners, the methods may seem complicated, but if you carefully follow the instructions, everything will work out.
Never delete applications whose purpose you do not understand. You can damage the smartphone's operating system, and you will have to reflash it.
In addition, before delving into the system settings, be sure to back up photos, music, videos and other important data from your smartphone’s memory.
How to Prepare to Uninstall Built-in Apps on Android
First you need to enable USB debugging. This is done quite simply.
- Open your smartphone’s settings, find the “About phone” section there and click on the “Build number” item until the system displays the message “You have become a developer.”
- Return to the main settings menu and click on the “For Developers” item that appears there.
- Find the USB Debugging option and enable it.
Find out more ⌨
- How to enable USB debugging on Android
Unused LTE frequencies
Smartphones can support a huge number of LTE bands, which is actually useful if you travel internationally and use SIM cards from local operators abroad. This way, fast internet is guaranteed, no matter where you are.
What's wrong with LTE frequencies
Scanning extra frequencies is an extra waste of energy for your device. Turn off unused frequencies, and your Android smartphone will stop doing nonsense and last a little longer on a single charge.
How to disable unused LTE frequencies on an Android smartphone
This is not always possible. The disabling method only works on devices with an MTK processor, but in some devices the engineering menu is simply cut out of the firmware.
- To disable LTE frequencies, you will need access to the engineering menu, which is called up by typing the combination *#*#3646633#*#* on the keyboard.
- Next, go to the BandMode item without touching anything else. For Russia, you can leave only frequencies 3, 7, 20, 31 and 38, although depending on the region and operator, only part of these ranges will be needed - it is better to check with your local telecom operator about the supported frequencies.
- After editing the frequencies, click on the lower Set button (save settings), then close the engineering menu.
If there are problems with communication, it is recommended to re-enable previously disabled frequencies, or turn on each frequency one by one, using the method of elimination to find out which LTE band is necessary for the network to operate.
In the case of a smartphone with a Qualcomm Snapdragon chipset, it’s better to forget about turning off frequencies: it’s time-consuming, complicated, and in most cases impossible without root rights.
How to remove built-in apps using ADB App Control
This is a method for those who do not want to spend a lot of time understanding the settings. All you need to do is check a few boxes and press a button.
Install ADB App Control
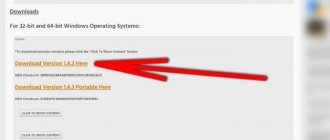
Go to the application website and download the latest version. The program is packaged in a ZIP archive - you will need to unpack it into any folder convenient for you. It is best if it is located in the root of your system drive - for example, like this: C:\ADB_AppControl_162
If you are a Windows 7 or Windows 8 user, you will also need to download and install the ADB driver from here. Download and run the ADB Driver Installer program.
After all the preparations, run the ADBAppControl.exe file. Click the “Don’t show training again” checkbox and the “I got it!” button. The application is ready to use.
Download ADB App Control →
Connect your smartphone to your computer
Connect your smartphone to your PC via a USB cable (preferably the one that came with it). It is better to connect directly to the motherboard rather than through the front connectors of the case. Select the “No data transfer” mode and agree to use USB debugging, always allow it on this computer.
ADB App Control may ask you to install an additional application on your smartphone. It's optional, but it allows you to display application icons and names rather than package names. Therefore, unlock your smartphone screen if it is disabled and click “Yes” in the ACBridge window.
If the installation automatically fails, copy the com.cybercat.acbridge.apk file from the C:\ADB_AppControl_162\adb folder to the smartphone’s memory, disconnect the USB cable and install the file manually, like a regular program. To do this, you will need to allow installation from unknown sources.
After installing ACBridge, reconnect your smartphone to your PC.
Remove unnecessary apps
Click the "Get App Data" button on the right panel in the main ADB App Control window. A request for memory access will appear on the screen of your smartphone - provide it.
Now select the checkboxes for the programs you want to get rid of. From the drop-down menu on the right, select the “Delete” option. Click the red "Delete" button, then "Yes" and OK.
Common Questions
Is it possible to cleanse your Android phone or tablet of unnecessary Google services?
Yes, you can do this, but to do this you will have to obtain root rights, with which you will not be able to count on warranty service for the device.
Why do Android device manufacturers distribute gadgets with pre-installed software?
Thus, they free the user from having to independently search for and install useful applications. In addition, by installing partner products, the company advertises them, which earns money.
How to Remove Built-in Apps Using Android Debug Bridge
This option is suitable for command line lovers. The principle of operation is the same.
Install ADB
We will need the ADB (Android Debug Bridge) utility. For different operating systems, the installation procedure is approximately the same. Select the ADB version for your OS and then do the following:
- Download the ZIP archive from ADB.
- Extract its contents to some folder without Russian letters in the name. On Windows, it is best to do this at the root of the system drive - C:\platform‑tools . On macOS and Linux, you can simply extract everything to your desktop. The platform‑tools folder will appear .
- Open Command Prompt on Windows or Terminal on macOS/Linux. In Windows, you need to run the Command Prompt as an administrator - to do this, right-click the Command Prompt icon and select Advanced → Run as Administrator.
- Now you need to open the platform-tools . Type cd /path/to/your/folder/ and press Enter.
If you don't know which path leads to your folder, do this:
- On Windows, right-click on the folder while holding down Shift and click “Copy as path.” Then paste the copied line into the terminal.
- On macOS, hold down Alt and right-click the folder, then select “Copy path to...”.
- Or on macOS or Linux, simply drag the platform‑tools into a terminal window.
Now ADB is ready to go.
- Download ADB for Windows →
- Download ADB for macOS →
- Download ADB for Linux →
Find out the package names
Now we need to figure out what we actually want to delete. To do this, install the App Inspector application on your smartphone. Open it and look for pre-installed programs that you don't need.
Click on the name of the program in the list - and information about it will appear in front of you. We are interested in the Package name section - it contains the name of the package you do not need. It will look something like this: com.android.browser .
You need to write down the names of the packages you are going to remove somewhere. App Inspector makes it easy to copy a name by simply clicking on it. You can collect this data in some text file or document in the cloud, so that you can easily operate it on your computer.
Application not found
Connect to your computer
Now connect your smartphone to your computer via a USB cable. Then run the following commands in the terminal line that we opened in the previous paragraph:
- Windows: adb devices
- macOS: .\adb devices
- Linux: ./adb devices
The serial number of your smartphone or tablet will appear in the command line. This means that the device is connected correctly.
Remove unnecessary apps
Now remove unwanted programs. To do this, enter the following commands:
- Windows: adb shell pm uninstall -k --user 0 package_name
- macOS: .\adb shell pm uninstall -k --user 0 package_name
- Linux: ./adb shell pm uninstall -k --user 0 package_name
For example, if you need to remove the Google Play Music application, the command would be:
adb shell pm uninstall -k --user 0 com.google.android.music
Press Enter. The message Success should appear, indicating the successful completion of the uninstallation.
When you're done, simply close the terminal window and disconnect your smartphone from your computer. If the applications do not disappear from the gadget immediately, try rebooting it.
Why is it recommended to disable automatic updates on Android?
How to turn off the keyboard sound on Android - detailed instructions
There are several common reasons for this circumstance:
- Due to constant updates, the gadget’s operating system may crash. In this situation, you will need to reflash the device using various methods;
- Applications refuse to work after downloading software. This is one of the most common reasons forcing users to disable third-party downloads. However, this problem can be solved by restarting the smartphone;
- The time and date on the phone are lost. The situation repeats after setting these parameters;
- high power consumption. This fact is especially relevant for users whose smartphones have a small battery capacity. When downloading updates, the battery charge is quickly consumed, which forces you to constantly recharge your device;
- Auto-updates consume a large amount of phone RAM. This circumstance negatively affects the performance of the gadget; crashes and freezes are observed during its operation.
It is possible and even necessary to turn off automatic updates in some situations.
Note! There may be more reasons to refuse to download updates. Much depends on the specific case and brand of smartphone.
What to do after removing built-in applications on Android
Finally, you should turn off USB debugging. And finally, if you are annoyed by the “For Developers” option in the settings, open the list of installed applications, find “Settings” there, click on it and select “Clear data”. And the “For Developers” menu will disappear.
Good luck cleaning up Android junk. And be careful not to remove anything unnecessary.
Possible difficulties when disabling updates on Android
The process of banning updates for a smartphone may be accompanied by certain difficulties:
- Problems activating the “For Developers” mode. On some versions of Android OS, this function may be hidden in the gadget settings. It will take a lot of time to find her. However, it is not a fact that a positive result will be achieved. On such smartphones, you can disable application updates only through the Google Play Market or by downloading third-party software that allows you to cope with this task;
- Problems obtaining administrator rights. On many Android OS shells there is a ban on carrying out such an action;
- It is not possible to disable the loading of third-party software. We are talking about the impossibility of deactivating the “Automatic updates” mode. Reflashing the device or resetting its settings to the factory level will help to cope with this problem;
- After going to the “Build Number” tab, the “For Developers” line does not appear in the main device settings. This circumstance indicates a system failure, which can be resolved by rebooting the phone or activating safe mode;
- errors that occur when switching to Google Play Market. This problem is relevant for those who decide to turn off auto-updates of this or that software through the Google application store.
Android smartphone freezing
There are several types of errors when logging into Google Play, each of which has its own solution. There is no need to dwell in detail on solving these problems in this section.
Problems and solutions
Applications stopped working
This is logical - a lot of software is not available offline, so to use the programs you need to find the nearest Wi-Fi network and connect to it. In large cities there are many free access points that allow you to access the Internet without paying any money. Such services use SMS authorization, so you will need to confirm your phone number by entering the code from the message.
You can also download data used by some applications in advance. For example, nothing prevents you from downloading maps of your region from Google Maps before turning off the Internet in order to use them without a network.
Force LTE Only app not working
The program uses different methods to change the connection settings, but they are not compatible with all versions of Android. We advise you to pay attention to similar applications:
- 4G LTE Switcher (no ads)
- Force network mode
- Force 4G LTE Only Mode Switcher
- Force 5G
If any of these applications helped you, please share information about the software and the device you are using in the comments - this way you will help other readers of the site.
On Android, it is easy to set up an Internet connection, as well as completely disable it. Many services will stop working after this.
Share link: