Everyone knows that spending a long time at the computer is bad for your health. This especially affects human vision. The fact is that a person is not able to see the flickering frequency of the monitor screen, but the eye catches this frequency, and over time, vision weakening may occur. When using a computer, your eyes gradually get tired and stop focusing clearly on the image. But for many, a computer is a job, which means it’s impossible to avoid this harm. In order to reduce it as much as possible, proper adjustment of the monitor color, as well as its resolution, is required.
Configuration using AdobeGamma program
To display colors optimally, you need to make adjustments using a special program called AdobeGamma. The first step is to install it on your computer. After installing the program, you should set the screensaver on your desktop in a solid gray color. Setting monitor colors in Windows 7 for the desktop is in the “Personalization” section, which appears in a pop-up window when you right-click on its splash screen (background). There you need to select the “Desktop Background” item and in it the “Image Location” drop-down menu, in which there is a “Solid Colors” menu item. The gray color can be seen immediately.
Now it's time to proceed directly to the procedure itself. After launching the AdobeGamma application, setup is carried out using the setup wizard (you need to select this option), a special program that allows you to go through the entire process step by step. The next step is to select a “color profile”. It is generally recommended to leave the default profile (for inexperienced users). Now you need to click on the “Next” button to continue and set the contrast to the maximum value. The brightness should be adjusted so that the square, which is located inside another square, is as close to black as possible, but still stands out a little from its background. You can simply skip the next step.
Next, you need to configure the gamma correction using the bottom tab of the general settings window. If the program for adjusting monitor colors is not localized, it will be called WindowsDefault. To the right of it there is a small field where you are prompted to enter the value of the Gamma parameter. The most commonly used is 2.2. In the same window, you need to uncheck the ViewSingleGammaOnly parameter to display gamma values by color. Now, using the mouse, you need to bring the result to such a state that all three squares become absolutely indistinguishable from their background. At the next stage, the color temperature is set, which should be 6500K. The setup is now complete. After completion, it is possible to compare the obtained result with the original value. To do this, use the Before and After buttons. Adjusting the colors of a Windows 10 monitor is done in a similar way, the only difference being that the versions of the AdobeGamma program may differ.
How to adjust sharpness on a computer monitor?
After the optimization has been carried out, you can begin the setup itself through the operating system. Let's look at the example of the Windows operating system - the algorithm of actions is as follows:
- Start.
- Control Panel.
- Screen.
- Sharpness.
IMPORTANT. The procedure may differ in some versions of the Windows operating system. This is due to the high frequency of updates, however, you can always check the setup information on the official Microsoft website or on the Internet.
A context window will open in front of the user with the ability to change sharpness. Simply by changing the position of the slider, you can change the characteristics of the image.
Three standard modes will be available for the user to choose from, with the ability to further adjust sharpness - these are the values:
- 0;
- 50;
- 100.
Having chosen the optimal value, activate the “advanced settings” tab, you can make the desired changes, making the picture clearer or blurrier. After this, you need to save the changes made and the monitor is ready for use.
Adjusting the Image Using Monitor Functions
Almost all monitors have special functionality (menu) with which you can quickly make color adjustments. The interface of such a menu is as clear as possible and is translated into Russian for most devices, so to change the contrast, color or brightness of the screen, you just need to select the appropriate item using the buttons located below. For more detailed information, you can refer to the manufacturer's instructions, which usually come with the device. For example, setting the color of a Samsung monitor is done using a special Menu button located under the screen, when pressed the monitor menu drops down. It has two main sections responsible for color rendering - Picture and Color, which will help you make all the necessary settings. These sections may be called differently for different manufacturers and different models, but ultimately the meaning is still the same.
What is the main difference between a bad monitor and a good one?
The main component of the monitor responsible for image quality is the matrix. Its type and quality of manufacture determines how colors will behave on the screen under different lighting and viewing angles. For example, one of the most popular matrices in the early 2010s was TFT. TFT-based monitors were cheap and easy to manufacture. However, with the slightest change in viewing angle, the picture on the screen looked completely different. Screen color and brightness changed radically, and therefore such monitors were in no way suitable for working with images and videos. On the contrary, one of the best types - IPS - has high viewing angles (up to 178 degrees), at which color reproduction does not change. It makes sense to calibrate such monitors, since the set screen parameters will be correctly displayed on the display.
Image adjustment via the system
Windows itself also provides functions that allow you to adjust the color of your monitor. There is a program for this called “Calibration”, which can be found by searching in the “Start” menu. The application itself will tell you what to do next after launching it. An important parameter is the correctly selected screen resolution, which is optimal for the monitor being customized. Typically, in the drop-down menu listing acceptable screen resolution values, it is marked as “Recommended”. This is the one you should choose. This parameter is located in the video card settings. To get there, you need to right-click on the desktop and select the appropriate item in the menu that appears. Different video card manufacturers call it differently, for example, for NVIDIA you need to look for a line called “NVIDIA Control Panel”, and for Radeon – “Radeon Graphics Specifications”. All other color settings are also located there. To achieve the best result, in addition to the correctly selected screen resolution, you must select the highest color depth of 32 bits. As a rule, this setting is always located in the same place as the screen resolution setting, so it won’t be difficult to find it.
Adjusting screen brightness
Surely many have noticed that the monitors standing on the stand in the store have visually different images. On one it is dimmer, and on the other, on the contrary, it is too bright. This is due to different color settings for each individual device. If the buyer is not satisfied with the default color settings of the monitor, he can change them. To do this, you need to click the button called Menu and in the panel that appears, select the Picture value, where the brightness and contrast settings are located with the adjustment sliders located to the right of them. It is worth noting that for different models and manufacturers the names of these parameters may vary or even be marked with schematic figures, but the general meaning is always clear to the end user.
After finding the desired settings, you need to take a blank white sheet of paper, place it in front of the monitor, create a regular blank document using the Notepad program and compare the color of the sheet of paper with the white background of the document in the program. This procedure is carried out to evaluate and subsequently adjust the white color of the monitor. Next, for the slider responsible for the brightness of the picture, you need to find a position so that the white color on the monitor matches the white color of the sheet of paper on the table.
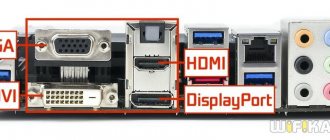
Correct connection
To connect the monitor to the system unit, different cords can be used, depending on the model of the video card and the availability of corresponding ports on both devices.
The traditional analog VGA port (blue) is considered obsolete and has some disadvantages compared to digital DVI (white) and the more modern HDMI and DisplayPort.
To ensure the best image contrast, it is recommended to use digital ports. If they differ on the monitor and the system unit, it is acceptable to use adapters.
Adjusting the screen contrast
To adjust the contrast, 2 images of identical shirts of different colors can help: one shirt is black and the other is white. The main thing is that the colors are monochromatic. Both images need to be opened and placed next to each other. Now you should move the contrast slider until the folds on both shirts become clearly visible. Once this effect is achieved, you can adjust the brightness a little more. At this point, the process of completing the brightness and contrast adjustments can be considered complete. The white color obtained as a result of these manipulations may differ from the monitor settings that were set by default at the time of purchase. However, experts say that this is just an optical illusion caused by the eye getting used to the original values.
Geometry and meshes
These tests are designed to verify the correct geometry and fit of the image being reproduced by the monitor.
Image Clipping
Not every display actually shows you every pixel that is sent by the video card to the monitor. This test will show you how part of the image is missing. If your monitor is set up correctly, you should see a white line on the outer edge of all the numbered rectangles around the entire edge of the screen. If some rectangles are missing the outer white line at the edge of the screen, this means that the edge of the image is being cut off. The number of such a clipped rectangle shows how many pixels are missing on this edge of the screen.
16:9 format
The test example above is designed to test widescreen displays with a 16:9 aspect ratio. Here you should see a grid of 16 identical squares horizontally and 9 identical squares vertically. Regularly shaped circles should be visible at the corners. If you do not see them or they are clipped or distorted, then your monitor either does not support the corresponding mode, or you need to adjust the image scaling, which may be in the display service menu.
Run tests
Setting the color of a laptop using Windows
Laptops have long become an integral part of our lives. It is enough to configure the laptop correctly once, so that later there are no unnecessary problems and you do not have to waste additional time. Setting the colors of a laptop monitor is not much different from setting a regular monitor. They are located in the “Color Management” section of the Windows Control Panel. Having entered the section, you need to select the “Details” tab and then click on the “Calibrate screen” button. Then simply follow the instructions provided by the setup wizard.
Welcome
monteon is a service for testing a computer monitor or mobile device display.
With test screens, you can easily adjust your monitor settings to get the best picture quality. A number of tests will help you evaluate the image quality of your monitor. Even from the first test screens, you can calibrate the monitor by adjusting the brightness, contrast, sync phase, sharpness and gamma correction of the monitor. Tests are best viewed in dim or dark ambient light and in full screen mode. When running tests, you will be automatically prompted to switch to full screen mode. When you move the mouse pointer, a test control panel will appear at the bottom of the screen. Using the controls on the panel, you can select the test you need, rotate the slide (if the test allows it), return to the main page, or turn off full-screen mode. On the left and right sides of the screen, buttons for moving between tests are displayed when you move the mouse. For convenience, controls disappear from the screen when you don't move the mouse pointer. In addition, hot control keys are provided. To move between test screens, use the Left, Right, or Space keys, or the mouse wheel. To rotate the slides - “Up” and “Down”, to exit the test - “Esc”.
If you have any color management systems installed in the operating system or additional video card correction software, it is recommended to disable them first. The first step is to make adjustments to your monitor's settings so that its performance is as close to ideal as possible, before using some kind of color management software to compensate for any small possible deviations or imperfections.
The following describes what and how you can check using tests of the monteon service, what you should pay attention to and other useful tips.
Customize Laptop Color Using the intelHDgraphics App
But this is not the only method applicable to solve this problem. For example, there is software that solves this problem better. If the laptop runs on an Intel processor, then you should adjust the color through the “Graphics characteristics” section. You can get there using the same pop-up menu, called by right-clicking the mouse. When you open a section, a window will appear with several categories responsible for the video card parameters. To adjust the color, select the “Display” category. There, in the “Color” tab, you can find the “Advanced” tab, in which the necessary color adjustment controls are located. The only parameters are hue and saturation, with which the adjustment is made. The level of increase or decrease in values is determined by the user himself based on his needs.
Changing the window color scheme
You can also customize the included theme more subtly by clicking on the “Window Color” link below. Provides a variety of colors, the ability to turn transparency on and off, and other options.
If you selected the classic theme at the previous stage, then clicking on “Window Color” will open a window familiar from Windows XP, where you can configure in detail all the elements of the window color scheme.
In the “top ten” you can change the window color in “Personalization” - “Colors”.
Features of adjusting brightness on a laptop
It is known that if you need to quickly adjust the monitor screen, you can use the interface of the buttons located on its body. But on a laptop, things are a little different, and to be honest, this becomes a real problem for many uninformed users. The fact is that there are simply no such buttons on the laptop body. This is not due to the lack of space for this functionality, but to the fact that the optimal image is selected by the equipment developer.
But sometimes the need for quick color adjustments arises. To solve this problem, the laptop has a special Fn key that is responsible for additional functionality. Holding down this key activates additional key functions that have icons in a different color. To adjust the brightness of the monitor, you need to use the keys with the image of a sun (standard brightness icon).
Assessing the quality of calibration using web services
To verify calibration results, refer to publicly available resources. Below are two sites where you can check the quality of the calibration.
Monteon
On the website Monteon.ru it is possible to check not only the quality of color reproduction, brightness and other important parameters. You can also test your monitor for dead pixels and other possible problems. Each test is accompanied by a detailed description.
Online Monitor Test
The second site is entirely in English, which is compensated by rich functionality. In addition to a wide range of tests, it is possible to install an application in which all the necessary tests will be outside the browser.
Testing Color Rendering Using Real Color
There is another remedy that is considered a reference in certain circles. These are special Real Color wallpapers that bear some resemblance to the tuning grids once used on televisions. When using this method, special wallpapers with the optimal resolution for a computer or laptop are installed on the desktop. By looking at the screen from a normal distance, you can determine whether the color rendition is calibrated correctly. If the settings are correct, a smooth gray gradient should be visible, but if stripes appear and shades mix, it means the color is set incorrectly.
To summarize, we can say that adjusting the monitor color is a rather painstaking task and depends on many factors. Therefore, for each individual case, its own parameters must be applied to meet specific needs. But in order not to be scattered among many different methods, you need to do this: for quick setup, use the built-in system parameters, and for a more complex task, you can resort to third-party applications.