Smartphones and tablets from the Korean company Samsung are considered one of the best and perhaps the most popular devices with Android OS. The functionality of any Samsung is always at its best, but sometimes users need to have enhanced capabilities, which requires rooting Android on Samsung. The advantage of gadgets of this brand is good protection, which becomes a problem when you get root.
What are Root rights?
Devices with Android OS provide ample opportunities out of the box. They are superior to iOS devices in functionality, but not in stability due to the highly fragmented system and complex optimization.
But for some users, the basic features are not enough. They need full access to the device so as not to be limited in its use. To do this, the device is rooted.
Why do Android have restrictions at all? They are necessary to protect the system from the user. Not all smartphone owners have deep knowledge of Android and understand the intricacies of how this OS works. Their actions can cause damage to the device and negatively affect its subsequent functioning.
Therefore, developers install a kind of “restrictive tape”. The user receives sufficient functionality, and the system is protected from it. There is no possibility that the owner will accidentally break something in the OS through his actions.
But how is rooting useful for the user? How can you use full system access in practice? Ruth opens up the following options:
- View and manage all system files.
- Hacking applications.
- Changing operating system settings.
- Setting up the operation of phone components. For example, you can adjust the functioning of the processor.
The possibilities for using root rights are wide. You can do whatever you want with your phone. But be careful, there is a high probability of causing failures in the operating system.
Simply and quickly “IN TWO STEPS” we get ROOT rights to Android
- What is “Team Win Recovery Project”
- Installing "TWRP Recovery"
- Installing the Recovery Installer tool
- Open source utility “Magisk Manager”
TWRP
To install ROOT rights we need “Team Win Recovery Project” or TWRP for short. This is custom open source software, that is, a special extended phone mode that also gives us the opportunity to:
- Install unofficial third-party firmware
- Install various patches and add-ons
- Create backup copies of both individual partitions and the entire firmware as a whole
- Recover data from both internal memory and SD card from previously created backups
- Connect to PC via USB in ADB mode and removable storage mode
- Reset “Data” to factory settings
- Clear the “Cache” and “Dalvik-cache” partitions
- Format any partitions and create new ones
Well, are you ready? Then let's go to get Root rights for your smartphone by following the instructions below.
Remember that only you are responsible for all your actions!
If you need to customize your phone, this is an ideal and fairly safe option. But do not forget that serious system failures and even complete failure of the smartphone are possible if you follow all the steps in this instruction incorrectly. Therefore, be careful and consistent.
Before you start, be sure to make a full BACKUP!
Rules for obtaining root rights
How to root Samsung Galaxy? Before we move on to the actual instructions, it is necessary to warn users about the following points:
- The owner of the device performs all the described actions at his own peril and risk!
- You should carefully study the rooting process and be sure of its success.
- If in doubt, it is better to refuse to obtain Superuser rights.
- Root rights are grounds for refusal of warranty service for a smartphone.
- When flashing firmware, there is a high probability that something will go wrong. Due to a user error, your smartphone can turn into a “brick”, including without the possibility of recovery.
- If you have root rights, you will not receive official OS updates from the developer.
- On such phones you cannot fully use banking applications and contactless payment systems.
What is Bixby Samsung and how does it work
Prerequisites before rooting Samsung Galaxy S10
Before moving further, we will list a few prerequisites that you will need to download.
- Download the latest phone firmware from SamMobile.
- Download and install Samsung USB Drivers here.
- Get the latest Odin from here and unpack it somewhere that is easily accessible.
- Download Magisk Manager APK from here and install it on your device.
Step 1: Unlock Galaxy S10 Bootloader
The first step we are going to take is unlocking the bootloader. The process for this is not as simple as simply enabling OEM unlocking from the developer options, because Samsung has introduced a new service called VaultKeeper. However, despite this, the process is quite simple. So, let's begin.
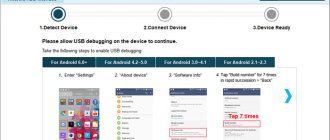
- Go to Settings > About phone > Information about the software on your device.
- Once there, scroll down and continuously tap the build number until you enable Developer Options. You will receive a message saying “Developer mode is enabled.”
- Go back to Settings, scroll down to the bottom and click on Developer Options.
- Look for the OEM unlock switch and turn it on.
- Turn off your device now.
- Now it's time to boot into download mode, to do this you will have to press and hold the Volume Down and Bixby buttons together while connecting your device to your PC using a USB cable. You will receive a warning message.
- Long press the Volume Up button and you will enter device unlock mode.
- Press the Volume Up button again and you will confirm the bootloader unlocking process.
- Once the process is completed, your phone will reboot and all data will be erased.
Even though you have successfully unlocked the bootloader, you still need to ensure that the VaultKeeper service can check the status as without this you will not be able to transfer any custom binary to your device. However, the process for this is simple. Once your phone boots up, simply connect to the internet, skip all the settings and enable the developer options as you did in the second step. Go to Settings again, then Developer Options, and make sure the OEM Unlock switch is turned on and greyed out. This is full confirmation that the bootloader is completely unlocked.
Google Pixel 4a features a larger 3140mAh battery and confirmed 18W fast charging
Step 2: Fix AP Firmware File Using Magisk Manager
The next step is to patch the AP firmware using Magisk Manager. To do this, you will need to follow the following steps.
- Assuming you have downloaded the latest firmware from Prerequisites, simply extract the firmware to your PC.
- Then copy AP.tar to your phone's internal memory.
- Install the Magisk Manager app on your phone.
- Launch the application and click on the “Install” button.
- Click on the "Install" button again and then select "Select and fix file."
- Navigate to where you saved the AP.tar file and select it.
- Once you have selected the file, Magisk Manager will patch the file and you will receive a magisk_patched.tar, this file will be placed in the Download folder of your internal storage.
Transfer this modified file to the same folder where you extracted the firmware.
Step 3: Flashing Modified AP File Using Odin
Now is the time to flash your phone using Odin. If you have not already done so, please follow the instructions carefully.
Note. If you are not sure whether the firmware you downloaded matches the firmware on your phone, it is better to flash all the files in the Odin folder.
- Launch One.
- Turn off your phone and boot into download mode.
- The ID:COM section will light up.
- Go to the Options tab in Odin and make sure you disable automatic reboot.
- Press the BL button and select the firmware file that starts with BL, now press AP and select the magisk_patched.tar file. Now do the same with CP and CSC (make sure you select HOME_CSC).
- Once all the files are downloaded, simply click on the Start button and let the phone sit down while Odin flashes the firmware.
Once the flashing is completed, you will get a green signal on Odin, but do not reboot your device as it will not complete the rooting procedure.
Step 4: Factory reset your phone
This step is a little complicated, but doesn't have many steps, so follow them carefully.
- Turn off your phone.
- Press the Power and Volume Down buttons to exit Download Mode.
- The moment the screen turns off, press the Power, Bixby and Volume up buttons together to boot into stock recovery. Keep pressing these buttons until you are in stock recovery.
- Navigate using the Volume buttons to navigate to the Wipe Data/Factory Reset option and press the Power button to confirm.
- Once this is done, simply proceed to reboot the system right now and immediately press the Power, Bixby, Volume up buttons together until the Bootloader warning appears on your device.
- Once the screen appears, simply release all buttons and you will be booted into the root system.
Once the device boots up, complete the initial setup, go to the applications section and open Magisk Manager. Once you launch the app, it will go through all the procedures required to set it up and your phone will reboot again. Once downloaded, you will have a rooted Samsung Galaxy S10.
Loading in different modes
Even if you have rooted your Samsung Galaxy S10, you should still remember that both the recovery and Magisk will be in the same partition. This means that you will have to use a different method to root.
Note: The following steps must be performed while your phone is completely turned off.
- Unrooted System: Simply hold the Power button as usual and your phone will boot into the unrooted system.
- Root system. Hold the Power, Bixby, and Volume Up buttons together and release them once the bootloader warning screen appears, which will boot your phone into the root system.
- Data Recovery: To do this, you will need to hold the Power, Bixby and Volume Up buttons together, and release the Power and Bixby buttons when the Bootloader Warning screen appears and hold the Volume Up button to boot your device into stock recovery.
Don't forget to check the following:
- How to Download Updates to Your Google Pixel Phone Using the Pixel Repair Tool
Recovery and SuperSu
On Samsung it is better to use firmware from CWM or TWRP recovery. Some users try to obtain root rights through specialized programs for smartphones, for example, Framaroot. But such applications often turn out to be ineffective for devices from the Korean manufacturer.
Therefore, in our article we will consider a method using a PC. You will need:
- USB cable.
- SuperSU application installed on the device.
- Odin program for PC.
- Custom Recovery.
- You need to install drivers for your phone on your computer.
How to disable Root access on Android
Delete files that put the phone into Super User mode (user with advanced rights). Install the file manager first. Launch it. Follow the path and delete the file.
Find and delete the “superuser.apk” file located in the “System” - “APP” directory. Reboot your device.
SuperSU
The program works if third-party firmware has not been installed on the phone. Otherwise, after a reboot, the smartphone software will return Root access. To disable, download, install and run the utility. Further:
Preparation
You need to enable USB debugging. This option is located in the developer settings section, which is not available to the user by default. To open it, you need to go to the “About phone” item and click on the build number several times.
Now open the developer settings that appear. In this section, enable USB debugging, unlock OEM.
Additionally, go to the “Security” item. In it, you need to turn off remote control, which may interfere with subsequent rooting of the smartphone. Now the device is ready for further manipulations.
Full access using Android programs
In this section, I will show you how to get root rights using Android programs. All actions will need to be performed directly from your Android device.
Root access using the KINGROOT program
(Since the article was written earlier, today, the application interface has changed somewhat. The old option for obtaining root rights will be described below, and in the second part of the article we will describe the capabilities of the utility provided to us today. IMPORTANT to note that the process of installing the program and obtaining root rights - did not change).
This is a fairly easy-to-use program, which is why it is the most popular. 1. First, download the installation file from the official website directly from your device (this will be easier than from a computer). Click "Free Download". Confirm saving the file. The screenshot clearly shows the site address and also shows what needs to be done. You can see the download status in the notification bar.
Note: When downloading the installation file, it is advisable to have a high-speed Internet connection via WiFi. 2. Now you need to install the application. Before doing this, allow installation from unknown sources. Then go to the downloads directory and click on the appropriate file. Everything is shown in the pictures, please be careful.
3. Now install the application by clicking on the “Install” button.
4. Find the Kingroot application shortcut on one of your desktops. Click on it to launch. Immediately the application will begin to determine the model of your device, as well as whether it is already rooted.
5. Now that the definition is over, click on the “TRY TO ROOT” button to get root rights. And wait for the device to reboot, which will inform you that the process of hacking the system is over.
King Root program update
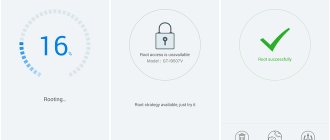
In the updated version of the program, the developers paid tribute to security, namely, built-in protection against malware, optimization of boot processes, and improved system capabilities that speed up smartphones. After completing the previously described steps, the user will see the following download window:
So, in the right corner there will be information about the status of your root rights. At the bottom of this function there is a field that allows you to track the authorization of a number of applications installed on the smartphone and control their access to the system directory.
The start window looks like this:
By clicking the “Security” button, KingRoot optimizes all processes and displays a report:
Root access using OneClickRoot program
Unfortunately, this program no longer works for free (a couple of years have passed since this article was written). At the office The site only has a paid version for $30.
This program is much lighter than the previous one and, moreover, immediately after scanning it tells you whether it can open root access to your device.
- I won't tell you much about how to download and install the application. You need to perform all the steps similarly to the case described above. Everything (including the official website) is visible in the pictures. Just follow the instructions.
2. After opening the application, you will immediately be prompted to get root. So click on “Root Device”. Then scan your device to see if the program can provide root access to your system. If not, you will see a message like in the third screenshot. You can click “Notify Me” if you want to be informed when the program can help you.
3. If it is still possible to grant you root rights, you will see a screen like this. Click "Root Device".
Procedure
Let's look at the immediate procedure:
- Turn off your smartphone.
- Connect it to your PC.
- Hold down the Home button, Volume Up and Power, wait for the menu to load.
- Launch the Odin program on your computer.
- Uncheck "Re-Partition".
- In the AP section, specify the path to the custom recovery stored on the PC.
- Click on "Start".
- Wait for the installation to complete.
- Now you can disconnect your phone from your computer.
How to get root access without using a computer
This method does not require a PC, and all actions are performed exclusively in the interface of the Android device. True, you can’t do without third-party programs here either. Let's list the most popular ones:
- KingRoot;
- OneClickRoot;
- Framaroot;
- iRoot
If these applications do not suit you, you can find others on the Internet. Interaction with any of them will occur approximately according to the same scenario:
- An apk file is downloaded directly from the official website to your phone;
- The program is installed from it (the “Allow installation of applications from unknown sources” option is first activated);
- After launching the program, the device model is determined (or manually selected) and rooted.
Let's take a step-by-step look at the process of obtaining root rights on Android using the KingRoot application.
KingRoot
Download the installation apk file from the official website kingroot.net.
Next, before performing the installation, go to the phone settings and in the “Security” section enable the “Unknown sources” option.
Now we find the saved file in the list of recent downloads of the File Manager or any File Manager.
We initiate the installation.
After installation is complete, launch the program. In our version of the application, to start rooting, you had to go to the “Complex rights” page and click the “Get root” button.
In other editions the interface may be slightly different. We are waiting for the procedure to complete.
Possible problems
Modern devices from the Korean manufacturer have the Knox application installed. It restricts access to the system, including preventing the full use of root rights. Therefore, this program will need to be removed.
The easiest way to get rid of Knox is through the Root Browser application. You need to download this program to your device, then:
- Open Root Browser.
- Give him access to Ruth.
- Go to the /system/app section.
- Delete all files whose names contain KLMS and KNOX.
A selection of the best applications for Samsung Galaxy Watch
Pros and cons of root access
While root access may seem like a useful feature on the surface, granting root access has a number of disadvantages. We propose to consider them against the background of their advantages, which also exist in large quantities.
Pros:
- unlimited possibilities for editing the system;
- restoring access even if the password is lost;
- recovery of deleted information;
- issuing broader permissions for each application separately.
Minuses:
- the smartphone is removed from warranty;
- some applications, including banking clients, do not work on rooted devices;
- the phone becomes more susceptible to external threats.
Thus, root is absolutely not a panacea for any problems related to the operation of the device. On the contrary, rooting is a rather dangerous procedure with serious consequences. However, these shortcomings may bypass you if you do not forget to revoke root rights in a timely manner.
How to refuse root rights?
You learned how to get root rights for Samsung. But how to refuse them in the future? Required:
- Open Root Browser.
- Go to /system/bin/.
- Delete the .su file.
- Go to /system/app/.
- Remove Superuser.apk.
- Restart the device.
Important! If you used custom operating systems, you will need to flash the firmware. You must install the official version of the OS from the Korean manufacturer on your device.
We remind you once again: the rooting procedure poses a threat to the device. If you are not sure that you need Superuser rights, then it is better to abandon this idea.
If you subsequently contact the service center under warranty, you must first remove Route from the smartphone. Our website provides only instructions for the firmware, and the user is responsible for its use and the further condition of the phone.
How to use and how to disable
Sometimes you may need to remove these root rights - if you do not want to lose the warranty or still do not use extended access. How to completely remove root rights from Android: you will need a utility to manage the superuser SuperSu. It will help you configure notifications, keep access logs, temporarily and completely disable root, and work when the OS is loaded incorrectly.
How to remove root rights on Android using SuperSu:
- In the utility settings menu, select “Full unroot”.
- Confirm the decision by clicking “Continue” to restore the rooted device.
- Reboot your device.
We managed to remove all advanced features. Uninstall SuperSu, after that no one will understand that this device was rooted.
Rooting Android 7 and above
Traditional methods of obtaining super user rights on new types of devices do not always give positive results. Installing the application will only allow you to control some functions of your smartphone, but not become super su.
We will provide a short guide for OS version 7 and higher.
- It is mandatory to unlock the Bootloader on your smartphone. Depending on the model and firmware, this procedure will be slightly different.
- Go to “developer mode” (again, depending on the model, this menu item may be in different places) and enable “USB debugging”.
- Download the development environment - Android SDK Platform Tools - to your PC.
- On a specialized website we find the custom firmware we need for your smartphone, usually TWRP.
5. After flashing, our initial TWRP window loads, select Recovery Mode using the volume keys, confirm the selection by point-pressing the power button.
6. Next, open the SuperSU.zip archive and thereby obtain root rights. Reboot the device and exit recovery mode.