Login without password Windows 10 allows the OS to start faster and instantly access the desktop. After deactivating the function, there will be no need to remember the code for constant entry and waste your time on this process. The code helps protect information from strangers, so you need to think before uninstalling or turning off this option.
Login to Windows 10 without password automatically
Logging into Windows 10 without entering a password is not difficult to set up with the following algorithm of actions:
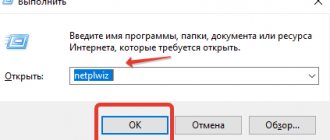
- Win + R, enter netplwiz and press Enter.
- In the “Accounts” section, select the desired one and uncheck the “Require input...” line, then click on “Apply”.
- In the “Automatic Login” window, enter the current password twice and click “OK”.
- The result will appear after the system restarts.
Using the iSunshare Windows 10 Password Genius utility
Step 1: Download and install iSunshare Windows 10 Password Genius on another computer.
Step 2. Launch the program and do the following:
- Insert an empty USB flash drive or disk into your computer.
- Select USB device or CD/DVD in the program depending on the first step.
- Click on the “Begin burning” button, the program will format and write the reset program to the media.
Select your flash drive and click on the “Begin burning” button - In the dialog box, click on “OK”.
Click "OK"
Step 3. Insert the reset flash drive into the original computer, press the reset button. At boot time, go to the BIOS menu using the corresponding key on the keyboard. You can find out what key you need to press from the table below.
List of keys for going to the BIOS menu on different devices
Step 4. In the BIOS, select boot from our flash drive. Save and exit the menu. The system will reboot again.
Select boot from our flash drive
Step 5. After rebooting, you will see the program window. In the “Step 1” column, click on the name of your computer, in the “Step 2” column - on the account name. Click on the “Reset Password” button. Click on "OK" in the dialog box. After this, “Blank” should appear next to the account name.
In the “Step 1” column, click on the name of your computer, in the “Step 2” column - on the account name, click on the “Reset Password” button
Step 6. Click on the “Reboot” button opposite the “Step 4” inscription. Next "OK". The computer will restart.
Click on the “Reboot” button opposite the inscription “Step 4”, then “OK”
Step 7: Sign in as usual. No password will be required.
Congratulations! You have successfully reset your Windows 10 password.
Login without password Windows 10 through the registry
To turn off the code using this method, you will need to work with the registry editor:
- Win + R, write regedit and press Enter.
- We go along the path HKLM\Software\Microsoft\Windows NT\CurrentVersion\Winlogon.
- Double-click the AutoAdminLogon parameter; we should set the value to 1.
- Click on the “DefaultDomainName” key and indicate the name of the PC. If there is no element, you can create it manually by specifying the name exactly as written earlier.
- We replace the value of the “DefaultUserName” parameter with the login of the user for whom we want to quickly log into the system.
- We find or create the “DefaultPassword” parameter, where we enter the password for the profile in the system.
- You can close the registry and reboot the PC to check the result.
Uninstalling the code
When using a profile (local only), it is possible to completely uninstall the password, so you will not need to constantly enter the login code. Even when we lock the computer by pressing the Win+L buttons. To remove you need:
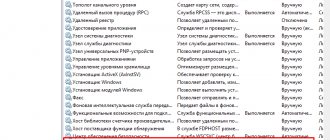
- Log into the console using administrative rights.
- We enter the commands in order:
- net user – helps to obtain information about the users entered in the system. You need to remember your login.
- net user login “” – if the login has 2 or more words, it is enclosed in quotation marks.
- After entering the commands, you must press Enter.
As soon as we complete all the necessary commands, the password will be uninstalled and you will be able to log in to the system without asking for a code.
Logging into Windows without a password when resuming from sleep mode
Removing a password when your computer wakes from sleep mode is not difficult, but the method of achieving the goal is different. There are 2 effective ways to deactivate a password.
Option 1 for Windows 10:
- Go to “Options” and expand the entire list.
- We look for the “Accounts” item and go to the “Login Options” category.
- In the “Login required” section, set the “Never” option.
- Now every user will have access to the PC.
Option 2 – universal:
- After clicking on Start, go to “Control Panel”.
- Click on the “Power” tile.
- Go to the “Scheme Settings” section, and in the new window click on “Change...”.
- We find the section for changing parameters that are currently not accessible and set the value to “No” next to the “Require password” item.
- Changes take effect upon application.
Fix 2 - Edit the registry
Changing the registry should solve the problem.
1. Press the Windows + R keys simultaneously.
2. In the Run panel, write down “regedit” and click OK.
NOTE -
Any unaccounted changes in the registry editor can lead to unstable system operation. We ask that you make a backup copy of the registry on your computer.
Once you have opened the Registry Editor, click "File". Then click "Export" to make a new backup on your computer.
3. Now go to this header file from the left side −
ComputerHKEY_LOCAL_MACHINESOFTWAREMicrosoftWindows NTCurrentVersionPasswordLessDevice
4. Then on the right side, right-click on the spacebar and click on New > and then click on DWORD Value (32-bit).
5. Name the key as "DevicePasswordLessBuildVersion".
6. After that, double-click the key to change it.
7. Set the key value to "0".
8. Click OK.
Just close the Registry Editor. Restart your computer to see the changes yourself.
[
NOTE –
If the registry fix doesn't work for you, try this approach –
1. Open the Registry Editor.
2. Then, go here –
HKEY_LOCAL_MACHINESOFTWAREMicrosoftWindows NTCurrentVersionWinlogon
3. Next, on the right-hand side, check for the “DefaultUserName” value.
4. Simply, double-click on the particular value.
5. Make sure that the value mentioned in the 'Value data' box is your account name.
6. If you are satisfied with this, click on "OK".
7. On the same right-hand pane, check if you can detect a value named “DefaultPassword”.
8. If you can't find it, right-click on the space and click on “New>” and then click on “String value”.
9. Name this new value as "DefaultPassword".
10. Now, just double-click on this “DefaultPassword” key to edit it.
11. Here, enter your account password in the 'Value Data:' box.
12. Finally, to save it, click on "OK".
13. Now, on the same page, look for the “AutoAdminLogon” entry.
14. Then, double click on that particular value to edit it.
15. After that, set the value to "1".
16. Finally, click on “OK” to save this modification.
Close the Registry Editor window.
Don't forget to restart your computer once. This should enable the automatic login process on the machine.
Further, if you want to disable the automatic login facility, follow these steps.
a. Open the Registry Editor.
b. In the Registry Editor, expand to this location –
HKEY_LOCAL_MACHINESOFTWAREMicrosoftWindows NTCurrentVersionWinlogon
c. Now, double click on the "AutoAdminLogon".
d. Then set the value of this key "0".
e. Click on “OK” to save the value.
Restart the machine, once.
This way, you can disable the automatic logging facility on your computer.
]
Login to Windows without entering a password using Autologon for Windows
It is an absolutely free and compact utility that automatically removes the password request. You can download from. Microsoft website. It is one of the simplest methods, but requires downloading a third-party program.
What to do:
- Download and launch the application, agreeing to all the terms.
- Enter user data and click Enable.
- The utility will display a message about the completed action and related information.
If you ever want to renew your login password, just set the utility to “Disable”.
Using control userpasswords2
This is one of the easiest ways to set up autologin in the system, using standard Windows tools, i.e., it does not require downloading and installing any third-party programs. You can use it as follows:
- First you need to open the Run window. You can do this as follows:
- In older versions of Windows, just left-click on the Start menu and select the “Run” menu item.
- In Windows 8 or Windows 10, you can right-click on the Start menu (or press the Win + X keys alternately) and select “Run” in the menu that appears.
- Alternately hold down the Win + R keys.
- In the window that appears, enter the command control userpasswords2, then click OK.
- In the window that appears, uncheck the “Require username and password” checkbox and click OK.
- In the window that appears, you will be required to enter your username and password.
- After entering, you can click OK. Now, when you turn on your computer, you will automatically log in as the user you need.
Password reset
The technique allows you to remove the password, but the form itself will still appear. You will be logged in by pressing Enter.
- We go to the section for managing accounts through Start or the Settings window.
- We find the “Login Options” item, and inside we also find the “Password” column, next to which there is a “Change” button.
- Now you have to enter your account information.
- In the window for entering new login data, you cannot enter anything, not even a space; you can enter anything in the last column.
- Save the changes.
“netplwiz” command for Windows 7
This method is suitable for Windows 7 and for those users who log in through a Microsoft account. The process for deactivating password entry is as follows:
- Once logged into the system, press “Win + R”
- Now a command entry window will appear on the screen, in which you should enter: netplwiz and press Enter
- After all this has been done, the account management menu will open, in which there will be a “Users” section. In this section, you should uncheck the “Require password and username” function.
- Now all that remains is to click on “Apply” and “OK”
- The system will require you to enter a password and name. You must fill in all fields and click “OK”.
In some cases, this method may not work, so you can use the following method.
Using Autologon
Another simple method for setting up automatic login to the system is to use the Autologon program, authored by Mark Russinovich, a Microsoft employee. You can download it from the Microsoft website using this link.
Using the program is as simple as possible - you need to run the downloaded program (no installation required, but upon first launch you will have to accept the terms of use), and enter all the data you need.
In the Username field you should write the user name; if the user belongs to an Active Directory domain, then you should specify his name in the Domain field. Finally, you should enter your password in the Password field. After that, to turn it on, you just need to press the “Enable“ button, and after that auto-login will be configured.
Method 1: Through user account settings
Start icon and select “ Run ” in the window that opens. A similar action can be performed using the Windows + R key combination.
2. Now enter the netplwiz and click OK .
3. As a result, a window with a list of accounts should load. Require username and password checkbox . Click the "Apply" button.
4. Enter your user's password twice and click " OK ".
Now when you reboot the system, you will automatically be taken to your user's desktop.