ADB (Android Debug Bridge) is a console client-server program that serves as a universal interface for managing Android devices (or their emulators).
Through ADB programs on your computer, you can interact with your phone or tablet, for example, to synchronize contacts, data backups, or remote access to the device.
However, the main purpose of ADB is to debug applications and services during their development and testing. In this case, interaction with the device is carried out through the console.
ADB Features:
- viewing connected devices;
- viewing logs;
- copying files;
- installing and uninstalling applications;
- screenshots (and video recording) of the device screen;
- deleting and flashing the data partition;
- launching various scripts;
- managing network parameters.
ADB consists of three components:
- a client that runs on a computer and sends commands. It can be called from the command line by entering the adb command;
- a daemon that runs as a background process on an Android device and executes client commands;
- a server that runs in the background on a computer and manages the client and daemon.
How ADB works:
- when launched, the adb client checks for the presence of a running adb server process, and if not, launches it on the computer;
- the server establishes a connection on port 5037 and listens on it for commands from adb clients;
- then the server establishes connections with all running devices, scanning odd-numbered ports in the range from 5555 to 5585. For each device, a pair of serial ports is used - an even-numbered port for console connections, an odd-numbered port for adb connections;
- Once the server has configured connections to devices, you can use adb commands to access them.
ADB Basics
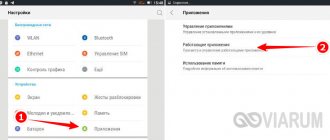
To start working with ADB, you should activate it on your device and install the adb utility and drivers on your computer. The first task is performed by enabling “USB Debugging” in the “For Developers” settings item (if this item is hidden, click seven times on the build number in the “About Phone” menu).
To install ADB on your computer, download Adb Kit and unpack it into any folder (I recommend using folder names without Russian characters). We also download and install ADB drivers.
You need to work with adb from the command line. Press Win + R and enter cmd, then go to the folder in which adb is located. For my folder the command would be:
cd\android
In order not to do all these manipulations every time, you can add the desired folder to the Path variable. To do this, go to “Control Panel -> System -> Advanced system settings -> Environment variables”, find the Path variable and add the path to the adb folder to the end of the line, separated by a semicolon. Now, after starting the console, you can immediately enter the necessary commands.
Adding adb to the Path variable
Other articles in the issue:
Xakep #208. Attack on the signal
- Contents of the issue
- Subscription to "Hacker" -70%
Let's check our connection to the phone using the following command (it should display a list of connected devices):
adb devices
You can work with ADB via Wi-Fi. To do this, you need root rights and the WiFi ADB application. We launch the application, press the switch and connect to the smartphone using the connect command and the IP address shown by the application:
adb connect IP address
Further work with ADB is no different.
How to install TWRP Recovery on Android via computer using Flashtool, Odin and Fastboot
Any smartphone is initially equipped with stock recovery, which allows you to revive the phone in case of failures, virus attacks and other reasons that cause loss of performance. It also makes it possible to reset the system and some components. However, there is a custom Recovery that has much more functionality. One of the most famous projects is TWRP. But how to install TWRP Recovery? It's easier than you think. The procedure will take time, but don’t worry, we will describe everything as clearly as possible. The main thing is to strictly follow the instructions.
Why do you need TWRP?
TWRP stands for TeamWin Recovery Project. This is a custom recovery for Android. It allows you to do the following:
- install firmware from third-party developers;
- root your phone;
- create and restore backups;
- reset Android and its components;
- manage system files;
- install patches and do even more complex operations.
The reason why TWRP Recovery is the best solution is that it is updated frequently and officially supports a large number of devices. There are also many unofficial builds for other smartphones.
Pre-installation requirements
Be sure to comply with the requirements below before following these instructions.
- We strongly recommend that you create a backup copy of your device data before installing Recovery.
- Charge your phone at least 50-60% to avoid sudden shutdowns during installation.
- To flash TWRP, you must first unlock your device's bootloader. Read about how to do this in the relevant topics for your device.
- Download and install USB drivers on your PC.
- Download and install the SDK Platform Tools on your computer (link below).
Now you can proceed to installing custom recovery using one of the proposed methods.
Using ADB Fastboot (without Root)
The flashing method via ADB Fastboot is relevant for those who have not rooted the device.
- Open the link https://developer.android.com/studio/command-line/adb. The tool is available for Windows, Mac and Linux, so download it for your operating system.
- Unpack it to the root directory of any disk.
- Go to the official TWRP website https://twrp.me/Devices/, find your device and download the recovery image. If your device is not officially supported, then download a third-party Recovery from the profile thread of the 4PDA or XDA forum.
- Move the downloaded file to the directory from step two and rename it “twrp”.
- Now on your device, go to “Settings” - “About phone” (the menu location may vary slightly depending on the firmware. To find it, use the settings search).
- Scroll down to find the Build Number line. Tap this item seven times to enable developer options.
- Return to the main settings menu and then click on Developer Options.
- Activate "USB Debugging"
- Connect your phone to your desktop using a USB cable. Attention! Before you proceed with the following steps, we again recommend that you perform a full backup of your device. Most likely, these steps will not have negative consequences, but it is better to be safe.
- On your PC, open the extracted directory where you just copied the downloaded TWRP document.
- Hold “Shift” and right-click (RMB) on a free area to open the folder options window.
- Tap "Open PowerShell window here."
- In the command panel, write: “adb devices”
- Press "Enter".
- If you see chaotic numbers, it means everything is fine. If not, install the latest USB device drivers on your desktop again and go to the previous step. This time it should work.
- Enter the command: “adb reboot bootloader”
- Click "Enter". This will launch the bootloader.
- When the device is in Bootloader mode, enter: “fastboot flash recovery twrp.img”
- Click "Enter".
- The installation of Recovery on the mobile will start.
- On the device (while it is in Fastboot), select “Recovery” by pressing the “Volume UP” + “Power” key or the “Power” button (depending on the device model).
- The mobile phone will enter Recovery (sometimes it may take several minutes).
- The first thing you will see is a notification window “Keep System Read Only?”. You don't need to do anything here. Simply swipe right to allow modifications.
You have successfully installed Recovery via Fastboot. Then you will only need to update it if necessary. Read about this at the very end.
Using the official application (Root required)
If you have a mobile phone with Root rights, installation of recovery will be even easier.
- Download the official TWRP app from the Google Play Store.
- Launch it and agree to the Terms.
- Click on “Install TWRP” (“TWRP Flash”).
- Select a smartphone and a suitable TWRP build for it.
- This will download the document - the recovery system image - to the phone.
- When the download is complete, go back and click on “Select a file to flash”.
- Mark the uploaded image.
- Click "Flash to Recovery".
As you can see, with this method you were able to roll up TVRP even faster, and you didn’t have to do it through a computer.
Using the Odin tool
Odin is a Samsung Corporation tool for flashing firmware and performing other similar manipulations with the company’s smartphones. Using it, you can install custom recovery without any problems.
- Download TWRP recovery for Samsung Odin (.img.tar format) from https://twrp.me/Devices/Samsung/.
- Also download Odin tool https://samsungodin.com/ extract the contents of the .zip folder to your computer.
- Open the extracted directory and run "Odin3.exe".
- Enter “Download Mode”, to do this:
- turn off your phone;
- press the “Home” + “Volume UP” + “Power” buttons together;
- when you see warning signs, throw the buttons;
- Tap on the “Volume Up” key to select “Download Mode”.
- Connect your gadget to your PC.
- The COM port in the Odin program interface window should light up.
- Press the "AP" button.
- Select the .tar file that you downloaded in advance.
- Finally, tap “Start” to install TVRP.
- If the firmware is successfully installed, you will see a pop-up message “PASS!” on the screen and the phone will automatically reboot.
Here's how to install recovery using Odin. This is even easier than some other methods, so we recommend this method for owners of Samsung smartphones.
Using SP Flash Tool
Another available method for installing TVRP is through the Flash Tool.
- Download the latest version of SP Flash Tool from https://spflashtool.com/ and extract it to your computer.
- Download Recovery that is suitable specifically for your device.
- Now open the “flash_tool.exe” document by right-clicking and selecting “Run as Administrator”.
- Click on the "Download" tab.
- Click on “Scatter-loading”.
- Now select the Scatter-loading file (it should be in the firmware folder and in .txt format).
- Make sure that only the “Recovery” option is checked in the list (do as in the screenshot).
- Turn off your smartphone and connect it via USB cable to your desktop computer or laptop.
- Press the Volume Down button to make the PC detect the device.
- As soon as the firmware is completed, a green ring with a check mark will appear, signaling success.
- Next, unplug the cable from your mobile phone and reboot your Android device.
Now the device has a fully functional Recovery, from which you can flash and obtain Root rights.
How to update TWRP?
Sooner or later you will need to update your recovery to get new features or improve compatibility. This is not difficult to do, the main thing is not to mess anything up.
- Download the current assembly of TVRP (you can do this directly from your smartphone to bypass the second and third steps of the instructions).
- Connect your mobile phone to your computer using a USB cable.
- Copy the newly downloaded document to your internal storage or SD card.
- Turn off your device.
- Start Android in recovery mode.
- Go to the “Install” menu and tap the “Install .img” button at the bottom.
- Select the recovery image.
- Then tap “Recovery” in the list of partitions.
- Finally, swipe the slider on the screen to update to the latest version.
- After that, click the “Reboot System” button.
So we looked at the simplest but most universal ways to install TWRP. Now you can do whatever you want, for example, install custom ROMs (LineageOS, Pixel Experience, Resurrection Remix, etc.), create backups or root your devices.
But once again, this is important: whenever you are going to use TWRP, make a backup of your files first. Performing tasks such as flashing a new operating system or rooting can lead to your phone being bricked or bricked.
Installing programs
ADB can be used to install applications without having to copy them to your smartphone. All you need to do is run the following command:
adb install d:/downloads/filename.apk
You can also add additional keys to the command. Useful ones would be -e - reinstall the application while saving the data and -d - install a version less than the current one.
Programs can be removed, but to do this you need to know the name of the package (I’ll tell you how to find out a little later). Using the game Angry Birds Seasons as an example, the command would look like this:
adb uninstall com.rovio.angrybirdsseasons
Installing ADB on Linux
The ADB program is included in the standard set of Android SDK utilities. You can install this environment and get the required utility. But you don’t always want to drag an entire execution environment onto your computer. Sometimes you only need one program. It can be very easily installed separately. On Ubuntu, you can do this by running the command:
sudo apt install android-tools-adb
For Red Hat, CentOS the command will be slightly different:
sudo yum install android-tools-adb
If you need to install ADB on Windows, you will have to download the Platform Tools SDK from the official website.
Application backup
Android has built-in backup functions that can also be launched using the command line. To do this, use the adb backup command and a set of options:
adb backup [options] <
- indicates the name of the file being created and its location on the computer. If the key is missing, the backup.ab file will be created in the current directory;
- -apk|-noapk specifies whether to include only application data in the backup or the .apk itself too (by default it does not include);
- -obb|-noobb specifies whether to include .obb extensions for applications in the backup (not included by default);
- -shared|-noshared specifies whether to include the contents of the application on the SD card in the backup (not included by default);
- -all indicates the need to backup all installed applications;
- -system|-nosystem specifies whether to include system applications in the backup (includes by default);
- — list of packages for backup.
If we want to create a backup of all non-system programs, including the .apk themselves, to a specific location, then the command will look like this:
adb backup -fc:\android\backup.ab -apk -all -nosystem
After entering, you must confirm the start of the backup on the device itself. To restore the resulting backup, you need to run the appropriate command:
adb restore c:\android\backup.ab
Backup process
Firmware problems
Sometimes during the process of flashing devices, the user may encounter various errors that prevent the process from being completed successfully. One of the reasons may be outdated software.
Before working with the ADB utility, be sure to check that the drivers installed on your PC are up to date. Always use the latest software products as they provide the proper level of optimization.
Also, if errors occur, pay attention to the “mechanics”. Check the USB cable connecting your PC and Android device. If the wire is defective, the firmware process may fail for no apparent reason.
If you have up-to-date drivers and the wire does not cause any problems, pay attention to the model and brand of your gadget. It is possible that the settings provided by the device developers conflict with the requests performed by ADB.
Console within a console
Along with the mentioned console, which is a DOS console for Windows, Android also has its own. It is called via adb shell and is essentially a standard Linux console, but with an incomplete set of commands, which can be expanded by installing BusyBox from the market. There are two ways to use this console. In interactive mode it is launched with the command
adb shell
The $ sign appears in the console (hereinafter in the text this sign will mean the need to enter the preliminary adb shell command), and after that you can enter a series of commands, receiving a response after each. The second method is if you need to enter only one command, you can write it in a row using the adb shell.
The shell uses standard commands for copying, moving and deleting files: cp, mv and rm. You can change directories (cd) and view their contents (ls). In addition to standard Linux commands, which you can learn about from any reference book, Android has several of its own specialized tools, but to use some of them, you will have to gain root rights on your smartphone, and after launching the console, run the su command:
adb shell su
This needs to be done if, in response to any command, you see a line similar to “access denied” or “are you root?”. If successful, the $ sign will change to #.
Displaying free space on the device using the adb shell df command
An example of the ls command to display information about partitions
Naptime
Doze is an amazing feature of Android. It reduces battery consumption by pausing background CPU and network usage when your device's screen is turned off, unplugged, and stationary. It was introduced in Android 6, while Android 7 brought further improvements.
This feature overrides blocking (if present), temporarily stops synchronization mechanisms, and prevents Wi-Fi and GPS scanning. Naptime improves the Doze implementation with more features. It imposes an aggressive Doze and kicks a few minutes after the screen turns off.
Setting up ADB
Paste this command:
. adb -d shell pm grant com.franco.doze android.permission.DUMP
Next enter this command:
. adb -d shell pm grant com.franco.doze android.permission.WRITE_SECURE_SETTINGS
Once accessed, whitelist Naptime from Android Battery Optimization ( Settings > Apps & Notifications > Show All X Apps > Naptime > Advanced > Battery > Battery Optimization ) so that it can work normally.
Unique Features
- The app is easy to use without any complicated menus or settings. Just toggle the options listed in the app.
- It gives you detailed Doze statistics and history to know when Doze started or stopped.
- If you use Tasker or MacroDroid, you can enable or disable Doze on demand.
Download: Naptime (Free)
Taking a screenshot
Done in one line:
adb shell screencap /sdcard/screen.png
After this, you need to pull the picture out of the device using the adb pull command:
adb pull /sdcard/screen.png
In recovery, you can take a screenshot with the following command:
adb pull /dev/graphics/fb0
Then you need to convert the fb0 file into a normal image using FFmpeg, which you need to download and put in the adb folder. The extension must be installed on your device:
ffmpeg -f rawvideo -pix_fmt rgb32 -s 1080×1920 -i fb0 fb0.png
Android hacks that don't require root
Rooting opens up your phone to a whole bunch of cool customizations. But it may prevent some apps from working and increase your device's risk of potential security issues. For many users, rooting is not a viable option.
With the help of ADB and some amazing third party apps as discussed above, you can improve the user experience even without rooting. For more information, take a look at some popular hacks that you can perform without rooting your device.
Application management
To manage applications, two commands are used: pm (package manager) - package manager and am (activity manager) - activity manager. These teams have many keys that can be viewed on the developer portal. Let's look at a few.
To begin with, we will get a list of applications installed on the device in the form of package names that will be useful later:
$ pm list packages
By adding -s to the end, you will see only system applications, -3 - only third-party ones, -f will show package installation paths, and -d - disabled applications. Further, knowing the names of the packages, you can perform various violent actions on them :). For example, disable an unnecessary calendar:
$ pm disable com.google.android.calendar
Clear data:
$ pm clear com.dropbox.android
Well, you can completely remove it like this:
$ pm uninstall com.dropbox.android
To use the activity manager, you will need a deeper knowledge of the Android structure and an understanding of what Avtivity and Intent are. This will allow you to launch various applications, such as the browser or settings:
$ am start -n com.android.browser/.BrowserActivity $ am start -n com.android.settings/.Settings
You can shut down the application using the opposite command:
$ am kill com.android.browser
Well, kill all running applications with the following command:
$ am kill-all
The same activity manager will help you make a call to the desired phone number:
$ am start -a android.intent.action.CALL tel:123
And this is how you can open the page in the browser:
$ am start -a android.intent.action.VIEW 'http:/xakep.ru'
Launching the browser from the console
And using a variation of the previous command, you can send an SMS:
$ am start -a android.intent.action.SENDTO -d sms:PHONE_NUMBER —es sms_body “SMS_TEXT” —ez exit_on_sent true $ input keyevent 22 $ input keyevent 66
In this command, input keyevent emulates pressing buttons and can be used for both hardware and buttons inside the application. In our example, 22 corresponds to moving focus to the right (joystick to the right - dpad right), and 66 - Enter.
Using the input command, you can, for example, unlock your phone. To do this you need to enter:
$input keyevent 82
The keyevent 26 screen will turn off, which corresponds to pressing the Power button. You can also experiment with the numbers 3 - Home, 4 - Back, 24 - Volume Up, 25 - Volume Down, 27 - physical Camera button. The last button can also be transmitted via broadcast messages (you can find the full list of broadcast messages here):
$ am broadcast -a android.intent.action.CAMERA_BUTTON
Another broadcast message will put the phone into airplane mode:
$ am broadcast -a android.intent.action.AIRPLANE_MODE —ez state true
But this command will not work on the latest versions of Android. It uses the svc utility to manage power and wireless communications. For example, you can enable data transfer via a mobile network or control Wi-Fi using commands
$svc data enable $svc wifi disable
You can also force your smartphone to remain on when connected to a USB port/charging/Wi-Fi network or always:
$ svc power stayon usb $ svc power stayon ac $ svc power stayon wireless $ svc power stayon true
Returning to the input command, it's worth highlighting one more command to insert text into the current field. Some may find this a more attractive way of typing from a computer than pressing buttons on a small area of the screen. The command looks like this:
$ input text "Text to insert"
In addition to the text option, the input command has others. The full form of the command is:
$input[] […]
You can specify trackball, joystick, touchnavigation, mouse, keyboard, gamepad, touchpad, dpad, stylus, touchscreen as the source. The commands will be:
- text (Default: touchscreen) [delay]
- keyevent [–longpress] … (Default: keyboard)
- tap (Default: touchscreen)
- swipe [duration(ms)] (Default: touchscreen)
- press (Default: trackball)
- roll (Default: trackball)
As you can see from the commands, it is possible, although with difficulty, to control the device via the input touch and input swipe commands with a broken screen, if mouse operation via USB-OTG is not supported. For example, to pull out the curtain with notifications it will look like this (coordinates are counted from the upper left corner):
$ input swipe 10 10 10 1000
And this is how you can find out the screen resolution:
$ dumpsys window | \sed -n '/mUnrestrictedScreen/ s/^.*) \([0-9][0-9]*\)x\([0-9][0-9]*\)/\1 \2 /p'
For Nexus 5, the resolution will be 1080 x 1920. Then click on the “Applications Menu” button of the standard Google launcher, which is located above the “Home” button, like this:
$ input touchscreen tap 500 1775
Scripts
The execution of all series of commands described in this article can be automated.
To do this, we paste them into a text file (the lines following adb shell), which has the line #!/system/bin/sh at the beginning, save it with the sh extension and upload it to the device. After this, you can run the script through the same adb: adb shell sh /sdcard/file_name.sh
Setting permissions for files and directories
To find out what rights files and directories have, you need to write the following command
ls -n
Access rights (permission)
And so we know that there are users and groups. Now let's talk about access rights. Why is this necessary? For example, you have a directory containing personal files. So that you, the owner , for example, can edit, view files, a group , only see data, files, and other users who are not members of any of the groups and are not owners cannot do anything at all, which is why access rights are needed.
File permissions can be indicated by numbers and letters:
| In numbers | Letters | |
| Reading | 4 | r |
| Record | 2 | w |
| Performance | 1 | x |
| 0 | — |
The values of rights in numbers are summarized:
- full rights (rwx) 7 = 4 + 2 +1
- read and write (rw-) 6 = 4 + 2 + 0
- read and execute (rx) 5 = 4 + 0 + 1
- read only 4 (r—) = 4 + 0 + 0
- write only 2 (-w-) = 0 + 2 + 0
- no rights (—) 0 = 0 + 0 + 0
For each file and directory, rights are assigned separately for the owner, group and other users.
| Owner | Group | Rest | ||
| u | g | o | ||
| permissions letters | access rights numbers | |||
| rwxrwxrwx | 777 | read, write, do everything | ||
| rwxr-xr-x | 755 | reads, writes, executes | read and run | |
| rw-r—r— | 644 | read and write | only reading | |
| r——— | 400 | only the owner reads it | — | — |
You can change access rights to a file or directory using the chmod command using either numbers or letters.
Assigning access rights in numbers
To change the permissions of a file or directory using the chmod command using numbers, enter the command:
sudo chmod 755 text.txt
For directories, you need to add the -R switch after chmod.
Assigning access rights by letters
For beginners, changing access rights with letters will be a little more difficult, but this knowledge will be useful.
As you know that there is an owner, a group, and other users, they are designated as follows:
| u | user | Owner |
| g | group | Users included in the group |
| o | others | Other users |
| a | all | All users |
Access rights can be assigned, removed or assigned:
| + | add rights |
| — | remove rights |
| = | set rights |
Set permissions on the file “rwxr-xr-x” (755):
sudo chmod u=rwx,g=rx,o=rx text.txt
Add execution rights to the owner, remove execution for the group, delete entry and execution for others:
sudo chmod u+x,gx,o-wx text.txt
Add the ability for everyone (user, group, others) to read:
sudo chmod a+r text.txt
To change directory access rights, you must use the -R switch:
sudo chmod
-R a+r imya_papki
System utilities
I will briefly highlight several useful commands (the functionality of some, however, may depend on the firmware version and phone model).
Change DPI . Does not require root and runs on Android 5.0+. The standard value for Nexus 5 is 480. With a value of 420, the stock launcher desktop displays five icons in a row instead of four:
$ wm density 420 && adb reboot
Connect /system in recording mode . For some commands that change system files, you must first remount the /system partition to write. This is also necessary when uninstalling system applications. Remounting is done with the following command:
$ su # mount -o rw,remount /system
Soft reboot:
$ setprop ctl.restart zygote
Putting your smartphone into Doze power saving mode (Android M+):
$ dumpsys battery unplug $ dumpsys deviceidle step
...we repeat the steps until we see idle.
Battery percentage (Android 4.4+):
$ content insert —uri content://settings/system —bind name:s:status_bar_show_battery_percent —bind value:i:1
Reboot Android. ADB Reboot
To reboot Android, after any operations performed, or reboot into a special mode, there is a command:
adb reboot
The commands will reboot Android to normal mode (normal reboot):
adb reboot or adb reboot normal
The command will reboot Android into Bootloader mode:
adb reboot bootloader
The command will reboot Android into Recovery mode:
adb reboot recovery
Android management. ADB SHELL
Go to Android management , after which you can use the linux commands of the Android OS.
The full potential of Android is revealed when you go into Android management where many Linux commands are available.
adb shell
Removing logs
Very often, when a user goes to the device forum to solve a problem, they are asked to send logs of the phone or application. Two utilities are responsible for this: logcat and dmesg . The first allows you to see system messages in real time, and the second will show the operation of the kernel after the fact, including I/O error messages, loading drivers, connecting USB devices, and so on. The full log can be output directly to a file with the following command:
adb logcat > logcat.txt
All events will be recorded continuously as the device operates. You can stop recording using the standard combination Ctrl + C. However, all the information gets into the log, which makes it very difficult to find what you need. Therefore, for work they usually use a set of keys and filters suitable for a specific situation. There are seven message priorities in increasing order: V - Verbose, D - Debug, I - Info, W - Warning, E - Error, F - Fatal, S - Silent. For example, to display all messages with priority E and higher, enter:
adb logcat *:E
After this, you can run the problematic application and see what exactly is causing the error. Output of information from alternative buffers is also supported. In this way you can see what applications are doing in the background and, for example, what events occur after the screen turns on:
adb logcat -b events
Output of adb logcat -b events command
Best Battery Statistics
Finding apps that drain your phone battery is a mystery. How do you know that a particular application goes into a sleep state when you exit it? And how can you measure the effectiveness of battery saving apps like Naptime?
Better Battery Stats extracts detailed data about your battery. It shows apps that wake your device from deep sleep, detects unusual changes in behavior and what's happening behind the scenes, and collects information about app usage and wake-up blocks. The data is displayed in different categories - starting from boot, shutdown, screen off, etc.
Setting up ADB
Previously, this app was only available for rooted devices. But with ADB, anyone can start using it. Paste and run these commands in order:
. adb -d shell pm grant com.asksven.betterbatterystats android.permission.BATTERY_STATS . adb -d shell pm grant com.asksven.betterbatterystats android.permission.DUMP . adb -d shell pm grant com.asksven.betterbatterystats android.permission.PACKAGE_USAGE_STATS
Unique Features
- Shows the screen in relation to the awake person. Ideally, screen time should equal wake time.
- Find changes in your wake/sleep profile and quickly identify rogue apps.
- Battery Statistics shows you detailed Doze metrics so you can check how effective battery saving apps are.
- It can select applications that result in partial wakelocks or applications that use CPU in kernel wakelocks.
Download: Best Battery Statistics ($2)
Advanced level
In one of my articles, I showed how you can get information from databases of various applications. Well, now let's see how to do this directly from the console, without downloading the databases to your computer or installing database viewers on the device. sqlite3 command is used for this . Let's display the history of the Chrome browser:
$ cd /data/data/com.android.chrome $ su # sqlite3 app_chrome/Default/History > .schema urls > select * from urls where url like "%android%";
In order for the database to be read, you need to unload the browser from running applications. You can interrupt the execution of the sqlite script by pressing Ctrl + Z, and exit with the .quit command. If in response to the command you receive the error /system/bin/sh: sqlite3: not found, it means that sqlite3 is not on your smartphone and you will have to download it, put it in /system/bin and give the file all rights. I use sqlite3, which I once pulled out of Titanium Backup.
Chrome Browser History
Also, using sqlite3 you can pull out all contacts from your phone. To do this, the console on your computer must use the Lucida Console font and before starting to execute commands, you must convert the encoding to UTF-8. Otherwise, strange symbols will be displayed instead of Russian letters. The commands themselves look like this:
chcp 65001 adb shell $ su # cd /data/data/com.android.providers.contacts/databases # sqlite3 contacts2.db > select t1.raw_contact_id,t1.normalized_number,t2.display_name from phone_lookup as t1, raw_contacts as t2 where t1 .raw_contact_id=t2._id Order by display_name;
If everything is done correctly, then in the console you will see a table with the serial number of the record, phone number and contacts, sorted by name. For contacts from more than one number there will be several entries in a row.
Outputting contacts from the contacts2.db database
You can output the data not to the screen, but directly to a text file. To do this, the commands need to be changed:
adb shell $ su # cd /data/data/com.android.providers.contacts/databases # sqlite3 contacts2.db "select t1.raw_contact_id,t1.normalized_number,t2.display_name from phone_lookup as t1, raw_contacts as t2 where t1.raw_contact_id =t2._id;" > /sdcard/contacts.txt
An alternative way to output contacts to a file is with a command that requires BusyBox installed:
content query —uri content://contacts/phones —projection number:name —sort “name ASC”| awk -F= '{gsub(/[-() name]/,"",$2);print $2″ "$3}'| sed 's/,//g' >/sdcard/contacts.txt
Removing a pattern key, PIN, facelock
Let's say you forgot your PIN or you set a pattern key when you weren't completely sober, or your friends joked and set up facial recognition... So, if the device is blocked for some reason, then the blocking can be removed (provided USB debugging is enabled) through the same console:
adb shell $ su # cd /data/system # rm *.key
The command will remove all passwords and patterns. The files themselves, depending on the firmware and model of the device, can be: gesture.key, password.key, cm_gesture.key, personalpattern.key, personalbackuppin.key. The files locksettings.db, locksettings.db-shm, locksettings.db-wal are also responsible for blocking.
After this, just reboot the device and enter any key or password. If this doesn't help, you can try the following:
adb shell $ cd /data/data/com.android.providers.settings/databases $ sqlite3 settings.db > update system set value=0 where name='lock_pattern_autolock'; > update system set value=0 where name='lockscreen.lockedoutpermanently';