Filling cells, rows, columns, tables with color must be selected; the block whose color needs to be changed.
Menu Format/Borders and Fill;
Fill tab select the desired shades.
First you need to select the block whose parameters you want to change.
- 1st method. In the Format/Borders and Fill menu, you can set custom borders for selected cells or the entire table. In the Line Type window, you can select solid, dashed, double, etc. line, in the width list, indicate its thickness. The selected line can then be assigned to a specified boundary of the selected block of cells. To do this, click on the buttons around the Sample field or in this field itself. Each of the buttons turns on/off one of the outer borders or inner dividers.
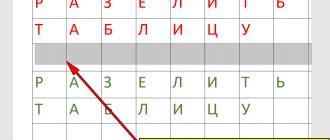
- 2nd method. Use the Pencil tool on the Tables and Borders toolbar and select the required one in the Line Type window. Move the pencil to the border to be changed, press the left mouse button and, without releasing it, drag it to the end. It is necessary that the border being changed is painted gray.
The multifunctional text editor MS Word has in its arsenal a fairly large set of functions and ample opportunities for working not only with text, but also with tables. You can learn more about how to create tables, how to work with them and change them in accordance with certain requirements from the material posted on our website.
So, as you can already understand by reading our articles, we have written quite a lot about tables in MS Word, providing answers to many pressing questions. However, we have not yet answered one of the equally common questions: how to make a transparent table in Word? This is exactly what we will talk about today.
Use hotkeys
If I were a software developer, I would call hotkeys soul buttons. After all, sometimes you just want to hug your laptop just because they exist. When it comes to Word tables, the three combinations I use most often are:
- Alt + Shift + Up/Down quickly moves the current line one position higher or lower (simply indispensable).
- Ctrl + Shift + A instantly turns capital letters into caps, which is very useful for headings.
- Ctrl + Tab adds a tab in a cell, while regular Tab moves the cursor to the next cell.
How to Change Page Borders in Microsoft Word 2010
There are many different ways to improve the visual appeal of a Microsoft Word 2010 document. If you want to add columns or apply formatting that makes all letters appear as small caps, there may be a way to achieve this goal. Improving the appearance of a document, especially if it's a document that's designed to grab your attention, such as a newsletter or flyer, can be a great way to draw attention to your information. People pay attention to things that stand out, so adding some other elements to a Word document can help be the deciding factor in whether someone decides to read your information rather than someone else’s. However, the first choice you make when setting up a document may not always be the best or correct choice, so you may find that you need to change what you've done. This also applies to a document that you received from someone else and that you need to edit. Luckily, it's easy to learn how to change page borders in Microsoft Word 2010 .
How to Adjust Page Borders in Word 2010
The beauty of using Microsoft Word 2010 to create documents is the ease with which you can make changes. This doesn't just apply to your documents either. Anything created in Microsoft Word 2010, or any earlier version of Microsoft Word for that matter, can be edited in the program and edited in the same way. So, once you learn how to change page borders in a Word 2010 document once, you You can do this the same way in any future documents.
Begin the process of setting Word page borders by double-clicking the file to launch it in Word. At the top of the window is a series of tabs containing tools and document options related to the menu that contains them. The options we're interested in for the purposes of this tutorial are located on the Page Layout , so click on that tab.
Below the tabs is the Ribbon, which is the primary navigation tool used in Microsoft Office 2010. The Ribbon for the Page Layout contains a Page Background , which contains a Page Borders . Click this button to open the Borders and Shading , where you will choose the options for the border you want to use instead of the one currently set for your document.
Make sure the Page Border at the top of the window is selected, then browse through the different sections of that window. On the left side of the window is a Setting where you choose the general type of new border you want to choose for your document.
The center section of the window is the most important area where you will be able to make the biggest changes to the appearance of your border. You can use a combination of the Style , Color , Width , and Art to get a nearly infinite number of border combinations, so experiment before choosing a design you're not into. completely satisfied.
On the left side of the window is a preview pane where you can see how the document will look with your current selection. The Apply To section also has a drop-down menu where you can choose which part of the document you want to apply the border to. Once you are satisfied with all the page border settings, click the OK at the bottom of the window to apply them to the document.
There is no limit to the number of changes you can make to Word 2010 page borders, so feel free to return to this menu at any time if you decide that the selected page border is not ideal for your document. ,
.
Diploma frame
Some coursework and dissertations must be framed with a stamp. The difficulty arises in the fact that some pages should not have a border or it is different. How to make a frame for a diploma?
First you need to break it down into sections, and only then insert frames where necessary.
Step 1. Place the cursor at the end of the page, after which the frame changes (appears, disappears).
Place the cursor at the end of the page
Step 2. On the Page Layout tab, in the Page Setup tool group, click on the Breaks icon.
On the Page Layout tab, in the Page Setup section, click on the Breaks option.
Step 3. In the drop-down list, select “Section Breaks”, click on the “Next Page” option.
In the “section breaks” sub-item, click on the “Next page” item
Step 4 . Insert frames (see instructions “Frame with stamp”).
Add a frame to a table
Depending on the program you use, you can add a border to your table using the Border Styles gallery, you can apply a pre-designed table style, or you can create your own border.
Word
The fastest way to add borders in Word is from the Border Styles gallery.
- Click the table, and then click the table move handle to select the table.
The Table Tools Design tab will appear.
.
, the Table Design
and
Layout
tabs appear . Click the
Table Design
.) - Click Border styles
and choose a border style.
- Click Borders
and choose where you want to add borders.
Advice:
To change or add borders to part of your table, make sure
Border Painter
, and then in the table, click each border you want to change or add. Word applies the border style you've already chosen, without you having to select the table first.
Applying a pre-designed table style is another quick way to make your table stand out. Table styles add consistent borders, shading, and text formatting.
- Click inside the table and then click tab Table Tools Design
(
Table Design
in Office for Mac). - In the gallery Table styles
click table style.
To see other gallery styles, click the More
. (This arrow appears below the gallery in Office for Mac.)
To create your own border, select a color, width, line style, and where you want to apply the border.
- In Word or Outlook, click a table, and then click the table move handle to select the table.
In PowerPoint, click anywhere on the outside border of the table to select it. (The table move handle does not appear in PowerPoint.)
- Click tab Table Tools Design
(
Table Tools
in Office for Mac). - Create your own border.
Click Line Style
(
PowerPoint Pen StyleClick Line Thickness
(
Pen Thickness
) and select the border width you want.Pen Color
and select a color.
- Click Borders
and select the boundaries you want.
Advice:
To change or add borders to part of your table, make sure
Border Painter
and then click each border in the table. Word adds a border in the style, width, and color you've already chosen, without you having to first select the table.
PowerPoint
Applying a pre-designed table style is a quick way to make your table stand out from others. Table styles add consistent borders, shading, and text formatting.
- Click inside the table and then click tab Table Tools Design
(
Table Design
in Office for Mac). - In the gallery Table styles
click table style.
To see other gallery styles, click the More
. (This arrow appears below the gallery in Office for Mac.)
To create your own border, select a color, width, line style, and where you want to apply the border.
- In Word or Outlook, click a table, and then click the table move handle to select the table.
In PowerPoint, click anywhere on the outside border of the table to select it. (The table move handle does not appear in PowerPoint.)
- Click tab Table Tools Design
(
Table Tools
in Office for Mac). - Create your own border.
Click Line Style
(
PowerPoint Pen StyleClick Line Thickness
(
Pen Thickness
) and select the border width you want.Pen Color
and select a color.
- Click Borders
and select the boundaries you want.
Advice:
To change or add borders to part of your table, make sure
Border Painter
and then click each border in the table. Word adds a border in the style, width, and color you've already chosen, without you having to first select the table.
You can add your own borders in Word or PowerPoint.
Word
- Click the table or select the cells to which you want to add borders.
- On the tab Tables
Under
Draw Borders
click
Borders
, and then click the borders you want.
- Click the table or select the cells where you want to add or change borders.
- On the tab Tables
Under
Draw Borders,
Line Style
pop-up menu, click the line style you want. - On the tab Tables
Under
Draw Borders
click
Borders
, and then click the borders you want.
- Click the table or select the cells where you want to add or change borders.
- On the tab Tables
Under
Draw Borders,
Line Weight
pop-up menu, click the line weight you want. - On the tab Tables
Under
Draw Borders
click
Borders
, and then click the borders you want.
- Click the table or select the cells where you want to remove borders.
- On the tab Tables
under
Draw Borders
click
Borders
, and then click
None
.
PowerPoint
- Click the table or select the cells to which you want to add borders.
- On the tab Tables
Under
Draw Borders,
click the arrow next to the
Borders
, and then click the borders you want.
- Click the table or select the cells where you want to add or change borders.
- On the tab Tables
Under
Draw Borders,
Line Style
pop-up menu, click the line style you want. - On the tab Tables
Under
Draw Borders,
click the arrow next to the
Borders
, and then click the borders you want.
- Click the table or select the cells where you want to add or change borders.
- On the tab Tables
Under
Draw Borders,
Line Weight
pop-up menu, click the line weight you want. - On the tab Tables
Under
Draw Borders,
click the arrow next to the
Borders
, and then click the borders you want.
- Click the table or select the cells where you want to add or change borders.
- On the tab Tables
Under
Draw Borders,
click the arrow next to the
Line Color
, and then click the line color you want. - On the tab Tables
Under
Draw Borders,
click the arrow next to the
Borders
, and then click the borders you want.
- Click the table or select the cells where you want to remove borders.
- On the tab Tables
Under
Draw Borders,
click the arrow next to the
Borders
, and then click
No Border
.
,
Use templates
Office everyday life is full of monotonous documents, including tables. We take one electronic piece of paper, cut out part of it, insert it into a new document and edit the details. A good technique, but it seems to me that working with templates is a little easier and faster. By the way, in Word itself, templates are called express tables.
Click on the "Insert" tab, click on "Table" and go to "Quick Tables". Pay attention to the “Save selected fragment to collection” item.
Here you will find several quite useful options and, most importantly, you will be able to save any other table or its fragment, including your own, as a template.
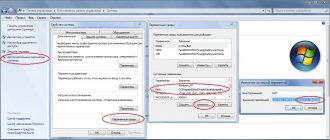
How to make fields visible in Word?
View Page Fields
- Click the Microsoft Office Button. , and then Word Options.
- Click the Advanced button, and then select the Show text borders check box in the Show document contents section. Fields appear as dotted lines in the document.
Interesting materials:
When Nietzsche cried what is the book about? When is an asset accepted for accounting? When do you wear a hat? When is the new moon in April 2022? When do you need a pass in Moscow? When should you give vitamin D in the morning or evening? When should you go to the doctor if you have a delay? When do you need to change summer tires to winter tires in Germany? When should you start watering Hippeastrum? When should you start figure skating?
Draw tables
Remember the bear that, as a child, walked over your ears and hands in a rampant gypsy dance? It is since then that you have disliked singing and brushes, and it has been since then that you have stubbornly ignored the “Draw table” option in Word. Buck up, grown man! It's time to suppress the furry monster! It's easier than it seems.
Click on the “Insert” tab, click on “Table” and go to “Draw Table”.
And don’t be afraid to make a mistake: there is always an eraser at hand. Sometimes a pencil and eraser greatly simplify the creation of complex tables with small elements.
Paragraph settings
If the text in the table does not just “creep” onto the cell boundaries, but part of it is actually hidden behind it, you probably need to change the paragraph parameters of this test. To do this, select the required cell or the entire column and in the main menu enter the “Paragraph” settings window.
In the paragraph settings window, you will need to change the indentation (left, right and first line), usually you need to set zero values everywhere. In this case, the position of the text in the cell will depend only on the settings of the cell margins (which we have already changed).
You can also change paragraph parameters inside the table.
Thus, by changing the table and paragraph properties, you can make tables more neat and attractive. This can be done using the word processor Word. In addition, some of the valuable information will not be hidden behind the boundaries of the table cells. And that's good too!
Apply to multiple pages
All the methods described above on how to create a frame in Word, after clicking “OK,” lead to the appearance of a frame only on the current page. If it is necessary to draw a frame in Word for the entire document in this way, then this is not very rational. Faster and correct way:
- In the “Borders and Fill” item in the lower right corner there is a line “Apply to”;
- Select the required setting from the drop-down list (Apply to the entire document or insert on specific pages, applying to a specific section).
In addition to the framing style, you can specify its borders, location and number of edges. Border Options sets the margin sizes for the four edges relative to the selected edge.
If one of the borders is not needed in the frame, then this can be configured in the “Sample” by turning off the border by clicking on the corresponding icon.
Creating an invisible table for content
Now let's look at what to do if you have content in a document. To begin, insert the table on the desired sheet. A link to a detailed article on how to do it is given at the beginning.
Open the “Insert” tab, click on the “Table” button and select the appropriate number of rows and columns – “2x5”. "2" are columns. The first will contain the title of the section, the second will contain the page number. "5" are lines. Here indicate the number of points you have in your content.
Complete the content points and their corresponding pages, and move the center line to the right.
Use a ruler
Every person has favorite and disgusting numbers that he indiscriminately uses or avoids in his life. Even in the parameters of your tables. I know people like that.
If you are used to accurately setting the indent values, width and height of cells through table properties, try an alternative - the ruler.
Hover your cursor over the border of columns or rows, grab it, hold down the Alt key and use the convenience of a centimeter ruler.
The same trick can be done with indent and protrusion markers. Hover your cursor over them and hold down the same Alt key.
How to highlight the borders of only one or more cells
First way . To change the borders partially (select some cells), you can perform all the steps in steps 2 or 3 except selecting the entire table. And the cursor must be placed in the cell whose borders are subject to special framing.
Second way . You can act through the “Coloring borders by pattern” button from the menu in the “Border styles” table. First, you need to select the appropriate contour, width and color of the lines. In the video below I clearly demonstrate how to create table frames at your own discretion and how to select one or more cells.