The inability to connect Wi-Fi, as well as slow connections when accessing the Internet, is often caused by channel congestion. You can use special software to identify and fix this problem. This topic is especially relevant for those who live in apartment buildings, since neighbors often share the same Wi-Fi channel.
You can use different methods to check
What is a Wi-Fi network channel and why change it
Classic routers can support from 1 to 15 channels, depending on technical features. Wi-Fi network channel is the subfrequency on which the device operates. The more routers connected, the more interference and less bandwidth there will be. The subfrequency is generated at the broadcaster or router.
Replacing the channel, like checking wifi, is sometimes necessary. For example, there are several routers whose signals intersect and operate on the same channel. Errors may appear in the operation of the router or wireless network in the form of constant loss of the router connection, low speed, etc.
How to connect and configure Wi-Fi Analyzer on iOS
Connect WiFi Analyzer for iOS is available through the unofficial Cydia app store. In order for Cydia to be available on the device, the iPhone will have to be jailbroken. Since after jailbreaking the device loses the manufacturer's warranty, the user decides whether to use this method at his own peril and risk, there is nothing to advise here.
After installation, you can use the application immediately, if desired, changing the scanning type from manual to automatic, selecting channels only in the 2.4 or 5 GHz range, marking open networks with a special sign, and so on.
Checking Wi-Fi channels
5 GHz Wifi channels - increasing Internet speed using the right channel
A modern router can scan and check the congestion of wifi channels. Using the check, you can also find a free window. The firmware often needs updating.
Note ! The update will stop if power is suspended. Instead of checking, you may end up with a damaged router. Only a service center can restore wireless access.
Reasons for use
External interference can reduce the speed of information passage. The bitrate begins to drop noticeably. To prevent this from happening, you should place the router near a working microwave oven. Interference comes from telephones, sunlight, industrial and military facilities. Even USB-3 fails.
A program for scanning ports and IP addresses on the local network
Checking WiFi channels allows you to detect available SSIDs without extraneous factors. For this reason, even a free niche can sometimes perform poorly. Software should be taken into account when building a home network.
Note ! Seeing that the speed has decreased significantly, it is necessary to use shielding with directional antennas. Avoid crossing the radial line with your body. Microwave radiation is very harmful to the body. Impairs memory, immunity, blood and sleep.
How to test your wireless network
Installing the NetStress benchmarkInstall the NetStress testing utility (nutsaboutnets.com) on both computers. Typically, once launched, the program will automatically detect available LAN or WLAN network connections. Select the correct connection option on both PCs. Since the application checks all network protocols, NetStress will open up to four connections, which you must allow in Windows Firewall. | |
Connecting to the receiverIn the program window, on the Transmitter tab, click on the Remote Receiver IP item, which is located in the top menu. It is almost certain that NetStress will immediately show the correct IP address. Otherwise, enter the address of the second computer manually. | |
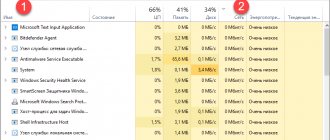
Start stress testIn the menu “Settings | Display Units”, select “Mbps”, click “OK”, and then the “Start” button to start measuring. Let the test run last a couple of minutes. On the right side of the graph, NetStress will display numerical values. | |
Measurement resultsFor our laptop, ASUS NetStress determined the average data transfer speed to be 50.3 Mbps. If your router shows what maximum transfer speed your device is operating at, then you can judge whether the connection is fast or slow. In our test, the connection speed between the router and the laptop was 150 Mbit/s. This means that our laptop is only using 33% of its maximum speed. Of course, the speed will never rise to 150 Mbit/s, but achieving at least 60 Mbit/s is a very real task. | |
Installing a test serverTo identify throughput problems, install the TamoSoft Throughput Test program (tamos.ru) on a PC that will act as a server and a laptop that will act as a client. Then on your PC, click Start | All programs | TamoSoft", right-click on "Run Server" and select "Run as administrator". In the lower field of the window you will see the computer's IP address. | |
Launching the test clientNow on your laptop, click on “Start | All programs | TamoSoft" and select the "Run Client" shortcut. Run the application as administrator and enter the IP address obtained above in the “Server IP or IPv6 address” field. | |
We begin network testingIn the open client window, click “Connect” and wait a while. The program will send TCP and UDP data streams over the network, and also display the current data transfer rate, packet loss and round-trip delay (RTT - Round-Trip Time). | |
Evaluating the resultsPress the "Disconnect" button to stop measurements. Now look at the values on the graph. Thus, our laptop reached a speed of only 50 Mbit/s when loading via TCP. To increase throughput, try adjusting the router's position. Often it is the furniture surrounding the device that interferes with signal transmission. Also make sure that no objects are blocking the router or standing close to it. |
Diagnostics of Wi-Fi networks and detection of free channels
In this article we will talk about how to detect an open Wi-Fi
network for more accurate (reliable) configuration of an access point or other wireless equipment.
Diagnostics of Wi-Fi
networks is performed using specialized utilities. Among them there are both paid and free versions, the most popular are presented below:
Let's focus on the inSSIDer
, as it is a powerful tool for diagnosing wireless networks.
This program will help you measure signal strength and evaluate the performance of your Wi-Fi equipment in different locations. You can clearly see and check how walls, stairs, doors, and in general the layout and materials of your premises affect the coverage area of the wireless network being served. Moreover, the Home version is completely free. Currently, in any modern city, every home or office is literally teeming with an abundance of Wi-Fi networks. At the same time, when several wireless networks overlap the channel on which they operate (i.e., several APs
in a building distribute a Wi-Fi network over one channel), a situation arises in which the operation of all Wi-Fi networks on this channel slows down.
inSSIDer
scanner will help you discover the best channel for your Wi-Fi.
Features of this software:
- inSSIDer uses your current wireless card software and Wi-Fi connection
- Works with Microsoft Windows Vista, 7 and 8.1 (32 and 64 bit)
- tracks the strength of received signals in dBm over time
- Sorting by MAC address, SSID, channel number, RSSI, and time is available
Installing the utility does not cause any difficulties. It is worth noting - if you use several wireless adapters, then in the Network connection
select the desired wireless adapter - it will be used to scan. Next, the program will automatically scan wireless networks and display information about the airwaves. Below is a screenshot of the inSSIDer working window:
Working window of the inSSIDer program
Let's take a closer look at the information provided:
SSID
– name of the wireless network.
Channel
– the number of the channel on which the wireless network operates.
It is recommended to use a wireless channel that has the least number of other networks. RSSI
– received signal power level.
The higher the RSSI number, or the less negative it is, the stronger the signal. Try not to share the Channel number with access points that are close to your network in terms of signal strength. Security
– security type.
In some versions of the utility, the security type WPA2-TKIP
is designated as
RSNA
, and
WPA2-AES
as
CCMP
.
Max Rate
– the maximum speed of the device at the physical level (maximum theoretical speed) provided by the access point.
Vendor
is an access point manufacturer.
In Russia, 13 wireless channels are allowed for use, three of which are non-overlapping (these are channels 1, 6 and 11). If the wireless adapter installed on your computer/laptop/tablet/smartphone is intended for use in the US, it will only be able to use channels 1 through 11. Therefore, if you set the channel number to 12 or 13 (or if one of them was selected by the automatic channel selection algorithm), the wireless client will not see the access point. In this case, you must manually set the channel number from the range 1 to 11.
So, we got acquainted with one of the utilities used for Wi-Fi diagnostics - inSSIDER. In the next article we will talk in more detail about the reasons for the unstable operation of wireless networks - stay tuned to the blog site.
Hello again, dear readers of the blog site. Earlier in the article, I described the reasons why the Internet speed can decrease greatly. One of these reasons may be the incorrect choice of a free wifi channel, the occupancy of which by other wireless networks has a very negative impact on the operation of your access point.
To begin with, I would like to say that in any case the router will reduce the speed even slightly and you need to determine for yourself whether this situation suits you or not.
Before you start checking wifi channels, you first need to determine how much your Internet speed is dropping. I won’t describe the whole process, as you can read about it in more detail.
The next step is to determine the number of wireless networks creating interference, and also select a free wifi channel for the router.
Windows
At the moment, there are many wireless Internet system analyzer programs for Windows systems. Below are the most frequently used tools by Internet users.
InSSIDer
The most common paid program, which can be downloaded for free only for 7 days by going to the official website of the manufacturer. As a rule, 7 days of free use is enough to find a free channel. To get a trial license, you need to click on the download button, enter your data and wait for the key to be sent to your email. When you start the program, a list of networks in several bands will be displayed along with a graph of channel power distribution.
WirelessNetView
WirelessNetView for Windows is a program designed to detail a wireless local network and display the collected information. It has a simple and attractive graphical interface. Helps to detect unauthorized access points, for example, from a neighbor, display connected clients, scan and analyze used wireless networks at 2.4 and 5 gigahertz, build signal graphs and analyze their strength. You can download it on the company's official website.
Note ! Allows you to get a list of passwords due to the built-in plug-in system.
Free Wi-Fi Scanner
Free Wi-Fi Scanner is a free and simple service for finding Internet networks, their signal levels and availability. A reliable and indispensable tool for network administrators. The program allows you to inspect the operation of the system, quickly check networks, and view the information found about them. It works by itself by connecting or disconnecting wireless adapters, applying a list filter to the found networks, connecting to them and determining their encryption standards.
Analyzer
WiFi Analyzer for iOS is a good program that can scan all nearby wireless networks. Anyone who has ever scanned a wireless space using programs on a computer or laptop should have a rough idea of how it works.
IP Scanner
A particularly useful program for those who do not have a DHCP server configured on their router. In this case, each device has its own IP address, which is entered manually. It is also useful to find out the IP when the DHCP server is enabled and the addresses all change dynamically after a certain time. There is a similar application in the AppStore.
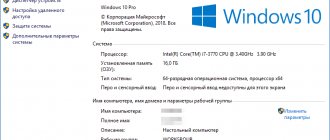
More and more home devices are able to connect via Wi-Fi. Many users appreciated the convenience of the wireless Network, which led to an increase in the number of routers in apartment buildings. Sometimes, due to this, the quality of the Wi-Fi connection deteriorates. But there are options for solving the problem, which will be discussed below.
Linux
Linux continues to be popular among network administrators and large companies. Therefore, there is a wide range of applications that allow you to look online and check the load of wireless Internet connections and make adjustments to them.
LinSSID
LinSSID is a convenient program aimed at monitoring the occupancy and analyzing the loading status of wireless networks. It has a minimum number of settings to start analyzing wireless network resources, scanning and displaying information. It shows a lot of information in the form of visual graphs, in particular, signal strength with address, data security type. Based on a wireless utility where administrator assistance is required. In its functional characteristics and appearance it resembles Insider. Installation of the service is free, using the source code on the company’s official website.
iwScanner
iwScanner is a convenient scanner for wireless Internet networks that allows you to download information in Wi-Fi mode about a detected wireless connection, support adjustment of scanning speed, display a histogram for each connection, connect to a point and perform work as usual.
Mac OS - WIFISCANNER scanner
The WIFISCANNER scanner is a professional program created to detect and correct problems with the Internet connection. Native tool of the Mac OS operating system. Being a dedicated scanner, it shows data about connected wireless networks with a brief description of network types and best channels.
Note ! It has the benefit of showing noise levels, current network connectivity, and detailed signal performance information. The program allows you to capture packets for export to a third-party packet analyzer and perform a comprehensive analysis of wifi networks.
Analysis of external wireless networks
In order to find out how much external wireless networks jam yours, you should use a laptop or desktop computer with wireless connectivity. Yes, you understood everything correctly, a desktop computer can also be used for this purpose, and read about that on the pages of my project.
If you do not have any problems with this, then the next step is to download specialized software that allows you to select the best channel for wifi and analyze the operation of external routers accordingly. Based on my experience, I can recommend two free programs that work under both the Windows operating system and the MAC OS operating system:
- Free Wi-Fi Scanner
(https://lizardsystems.com/wi-fi-scanner/)
Today there are also wifi analyzers for mobile devices, thanks to which you can carry out the corresponding analysis. However, they will be discussed in another article. Therefore, do not forget to subscribe to updates and follow the news.
After installing and launching the program, a window with an intuitive interface will appear in front of you, which has several tabs. To work, we only need two tabs that determine the search for networks by the frequency of their operation. You can see how they look in the picture below.
I’ll step aside a little from the main topic of the article and tell you what these frequencies are intended for, what frequency is best to work with and how many channels each of them has.
At the moment, most of those installed in homes for private use use the operating frequency of 2.4 Hz; this standard was adopted quite a long time ago and most devices support it. Such routers have a channel range from one to thirteen. During the development of wireless networks and with the advent of a Wi-Fi router in every home, such networks began to interfere with each other and, accordingly, drown out the communications of their fellows, which in turn negatively affected the data transfer speed. In connection with this current situation, the production of routers with an operating frequency of 5 Hz has started. The new frequency made it possible to transmit a more stable signal, and the range of wifi channels increased. Thanks to this, you can avoid interference caused by other networks. However, many older mobile devices only operate at a frequency of 2.4 Hz, which does not allow connection to five hertz. Of course, now manufacturers of laptops and phones have begun to take this into account when producing their gadgets, which allows the user to choose which network to connect to. The selection of the priority network can be done during ,
as well as with direct .
So, returning to the description of the process, I again draw your attention to these two tabs. If the access point operates in the 2.4 Hz range, then select the appropriate tab, and if it operates at a frequency of 5 Hz, then select this tab.
If you are connected to a five hertz network, then most likely you should not have such problems, since during the analysis you will see a maximum of two or three routers operating at this frequency, which automatically selected a free channel (fortunately the range allows).
After you have opened the appropriate window, a graph will appear in front of you that will display the wireless networks around you, the signal level, a possible access point model, as well as the Wi-Fi channel on which this or that router is currently operating. It is after analyzing this information that the choice begins.
I will give a more detailed description of the information displayed by the program:
SSID
- name of Wi-Fi.
Channel
– the installed channel on which your access point operates.
RSSI
– received signal level.
The higher this value, the stronger the signal level. Try not to use the same channel as that of networks approaching yours in power. Security
– encryption type.
Max Rate
– maximum throughput of the router.
Vendor
is a router manufacturer.
In this graph (table) you need to find the name of your wireless network and determine on what channel it operates. If, in addition to it, several more routers are working on the same channel, then try to visually determine which one is the freest, and we will configure the operation of our access point on it. I would like to note that there are three channels that do not intersect, these are the first, sixth and eleventh. If, after using the wifi analyzers listed above, these channels turned out to be the most free, then first of all I advise you to use them.
Also in the Channel
Not one, but two may be displayed at once, for example 1+4 or 3+9, this is due to the fact that the width of 40 MHz is selected in the router settings; to install just one, you need to change the width from 40 MHz to 20 MHz.
If you are going to install channels 12 or 13, then be prepared for the fact that some of your devices may not see this network. This situation arises if your gadgets were brought from America. The fact is that the permitted wifi communication standard in America is the use of channels from one to eleven, and mobile device manufacturers take this into account during development and production. In the CIS countries, the use of all from the first to the thirteenth is allowed.
I really hope that this article will be useful and will help you in checking and selecting free wifi channels for further uninterrupted operation. If you did everything correctly, then only .
If for some reason you have difficulties or need a more detailed and detailed description of all the actions, I suggest you describe all the details in the comments, where my readers and I will try to help you figure it out.
Android
AirScout Live for the Android operating system can turn your smartphone into a Wi-Fi network scanner. The program works in 7 modes, 4 of which are free. It can be used to detect all active access points, determine channel congestion, measure the signal strength of each connected point, and identify places where the signal level is insufficient. Can be used to determine sources of interference by analyzing the parameters of using channels at 2.4 and 5 gigahertz.
Possible problems and solutions when connecting Wi-Fi analyzers on iOS
Due to the fact that the AppStore strictly controls the quality of applications downloaded to it, the utilities described above are completely safe to use and, most likely, there will be no failures in their operation. If problems arise, it is recommended to act as standard: restart the device, reinstall the application, reset the smartphone settings to factory settings. Next, if the program still does not work correctly, you need to replace it with one with similar functionality from the list and send a report to the application developers.
Which channel is better to choose
First you need to understand which channel is not currently loaded. This is the one you need to choose. How to understand that he is not busy? For a computer, use InSSIDer, and for a phone, use Wi-Fi Analyzer or Home Wi-Fi Alert. The specified programs will indicate the total number of connected signals. You need to determine by eye where there are the fewest connected points. This is the fastest method for selecting the best channel. The only thing you should remember is that many channels have intersections in the frequency range and can create additional interference.
Note ! Non-overlapping channels are those numbered 1, 6 or 11. You should not install the 12th and 13th channels, since some devices do not detect them.
Lifehack one: separate 2.4 and 5 GHz networks
Modern routers are dual-band: they can transmit signals at frequencies of 2.4 GHz (WLAN b/g/n) or 5 GHz (WLAN ac). We wrote about this in detail in our article on choosing a router - read it to understand:
Interference with the Internet can be eliminated by distributing devices across different frequencies. Find out which devices on your network can catch 5 GHz Wi-Fi. This is usually written in the technical specifications.
After that, go to your router's settings and create two different Wi-Fi points instead of one. Let one point operate at a frequency of 2.4 GHz, and the second at a frequency of 5 GHz. For each router, the instructions for creating a point are individual, so we won’t recommend anything here.
Selecting the Wi-Fi frequency in the MikroTik router settings.
After that, connect devices that support WLAN ac to the 5 GHz point, and the rest to the 2.4 GHz point. Thus, you will speed up the signal for “five-GHz” devices and significantly clear the channel for “two-GHz” devices. The Internet will become much more stable.