Share Tweet Pin Send by email SMS mail
Hello computer blog visitors. The topic of our today's release is Windows 7 restore point. Perhaps some of you have already heard about this before.
So, in this article, we will learn what Windows restore points are, why they are needed, how to create them, run system restore, and much more if your computer begins to work incorrectly.
System rollback
At the end of the publication, and I recommend everyone to read to the end, I posted two video lessons on how to create restore checkpoints in Windows XP and Windows 7.
All information presented in this article was taken from my personal work experience.
I’m writing this post and listening to cool music by the Norwegian band Röyksopp. If you have music files that you want to burn to a disc in order to listen to them on a computer, player, music center, car or other place, but you don’t know how to do this, or you have difficulties and questions, then read the material on the topic How to burn music to a disc.
Let's look at the following questions:
- What is a restore point and why is it needed?
- What you need to know for recovery
- How to view restore points
- Create a Windows XP restore point
- How to create a Windows 7 restore point
- Running System Restore
- Recovering via Safe Mode
- Deleting Windows 7 restore points
- Problems creating recovery checkpoints
Let's start in order. A computer is a complex mechanism that tends to break down, but most often problems arise not with the computer itself, but with its operating system.
Let's say you have a Windows program loading, you can use a cool thing, the computer's safe mode or the useful F8. If none of these options helped you, then you can try to revive your PC using Windows restore points. I will write about how to do this below, so read on.
What is a restore point and why is it needed?
These are special files (time points) that are created manually by the operating system or the user to store important information about the performance of Windows at a certain point in time.
Windows restore points can be useful in restoring your computer to normal operation if something goes wrong with it. Surely some of you have already heard that there is a system restore function, but not everyone can use it correctly.
Windows System Restore
Due to the presence of viruses, driver or software mismatches, the OS may malfunction. If your Windows crashes, don’t rush to panic. The situation can be corrected by returning the state of files and programs to the moment when the PC was working properly.
While running OS Windows 7, 10 or 8, certain errors and problems may occur. As a result of such failures, starting the operating system again in operating mode becomes impossible. In this case, it is not at all necessary to do a time-consuming reinstallation of the OS. All you need to do is perform a system restore.
More on the topic: Laptop does not recognize wireless headphones in Windows 7
What you need to know for recovery
At first glance, there is nothing complicated, but this function has its own subtleties that every person should know before proceeding to restore the Windows 7 system and others. You will now recognize some of them.
Before running this function, you should be aware that the changes made in most cases relate to system and software settings of Windows operating systems. All programs that you downloaded after a specific restore point will be automatically deleted. Keep this in mind when you restore your Windows.
Let's say we have a restore checkpoint created on July 25th, and today is August 3rd and you want to return the previous state of Windows to July 25th. To do this, you need to go into system recovery, select the date July 25 and begin the rollback process. Programs that were downloaded and installed during this period of time will be deleted accordingly, and all data should remain unchanged.
If you want to use Windows 7 recovery to get back previously deleted files, then you won’t be able to do it. To do this, you can use data recovery information - it really works.
You can also use the Previous versions of files function, but for this, you must have System Protection enabled on your local disk, and in the Recovery Options settings, the Restore settings of your system and previous versions of files function must be checked and enabled.
When I click on the Configure button, only five percent is allocated in my Windows 7 operating system (local disk). I recommend moving the slider by 10 or 15%, it all depends on the size of your physical hard drive.
How long the recovery points will be stored will depend on the allocated hard drive space; accordingly, the more space, the longer the storage. When creating a new restore point in Windows 7, if there is not enough space, the old point is deleted and a new one is written in its place.
If your computer is broken and you don’t know what to do with it, I recommend that you check out Computer Repair in Astana.
System Volume Information
The check marks are displayed when running the standard system recovery tool and are detected and displayed by the CCleaner utility. But where are the points physically located?
Recovery files are stored in the System Volume Information system folder. It is located in the root of each hard drive partition and is created automatically when the system protection function is enabled. However, you won’t be able to get inside the directory - you first need to make it visible, and then also get special rights.
- Open Control Panel and set the view mode to Large Icons. Find the Folder Options section and launch it.
- Go to the View tab. Find the “Hide protected system files” option and uncheck it. Save your changes by clicking Apply.
Open “Computer” and go to the partition where system protection is enabled. You will see the System Volume Information folder, but you will not be able to enter it - when you try to log in, Windows will inform you that the location is inaccessible and you are denied access.
If you want to view the files in which system restore points are stored, you will have to give your account special rights:
- Right-click on the System Volume Information folder and go to its properties.
- Go to the "Security" tab. You need to find the “Advanced” button at the bottom - clicking on it launches a window for configuring the security settings of the system directory.
- On the Permissions tab, click Continue to begin obtaining special rights to the Windows system folder where the restore points are located.
- In the Permission Items field, you will see that only the system has access to the directory. To correct the situation, click "Add".
- Enter your username and click OK.
The Permission Items window opens. Here you need to specify several access parameters:
- “Apply” – for this folder, its subfolders and files.
- “Permissions” – check all the boxes in the “Allow” column.
After clicking OK, your account will appear in the Permission Items list. This means that you can now open the System Volume Information directory and see what is in it.
The files and folders located here cannot be deleted manually, as they are protected by the system. If you want to clean the System Volume Information directory, then use standard methods that allow you to delete Windows restore points, or the capabilities of the CCleaner cleaning utility.
recoverit.ru
How to see the presence of restore points
If you are using the Windows XP operating system, then you need to go to the Start menu > All Programs > Accessories > System Tools > System Restore.
Select Restore your computer to an earlier state and click Next.
A regular calendar will appear in front of us, in which there are dates, numbers and months. We go to the desired month and look at the dates. If the number is in bold, then there is a system recovery checkpoint on that date. All dates not highlighted in bold have no recovery points recorded.
If you are working on the Windows 7 operating system, then the procedure is almost no different from XP, the only thing is that there are several ways to view recovery checkpoints.
You can go through the Start menu > All programs > and so on. Or you can use smart search; to do this, you need to again click on the Start menu and where it says Find programs and files (search), enter the word system recovery.
After which, the Restoring an earlier saved state of this computer window will open in front of us; we need to click Start system recovery.
The following Restore system files and settings window will appear - click Next.
After this, a tab will appear where you can see the presence of Windows 7 restore checkpoints.
This is how you can see the presence of rollback checkpoints in two operating systems.
View available points
If you want to perform a system rollback, you will need a list of all available checkpoints to select the appropriate date. The built-in System Restore tool will help you get this kind of information and roll back Windows. The easiest way to find it is through the Start menu.
After launching the recovery window, a list will appear with checkpoints to which you can roll back Windows. To see all points, click "Show others". The list will show points that Windows automatically created, as well as points that you manually set. In the “Type” column you can see who is the author of the tag. Pay attention to the description - it helps you understand what changes will be made after a system rollback (if the point is created automatically).
Be sure to run the “Search for affected programs” - this feature will help you determine which applications will be added/removed as a result of Windows recovery.
You can also view all restore points in CCleaner:
- Launch CCleaner. Go to the "Service" tab.
- Open the "System Restore" section.
A list of all available Windows points appears along with the date they were created. You can manage markers by deleting unnecessary points (only the most recently created point will be unavailable for deletion).
Creating a Windows XP restore point
In order to create a system restore point, you need to follow simple steps. Open the Start menu > All Programs > Accessories > System Tools > System Restore.
Select Create a restore point and click Next.
The next step is to write a description of our new recovery checkpoint. For example, write August and click Create.
Within one or two minutes, our new recovery checkpoint is created. Then click Home or Close.
This way you can create restore points in Windows XP.
Automatic creation of points: order
In different versions of Windows, the frequency of automatic creation of restore points was not the same.
Can I change how often restore points are automatically created? Of course, but such an operation is an undocumented feature. There are several options, we will consider them in the article How to change the frequency of creating recovery points? (I will write later). However, sometimes it’s easier to create restore points manually before making any changes or to create restore points automatically after Windows starts. But you won’t be able to endlessly accumulate recovery points: an immutable /eternal recovery point - subsequent ones will overwrite the previous ones.
Create a Windows 7 restore point
The procedure for creating a rollback point in Windows 7 is fundamentally different from Windows XP, but the meaning remains the same.
Go to the Start Menu and go to Control Panel.
We get into the computer settings settings, here we go to System and Security > System > System Protection.
A system properties window opens in front of us, where you can create a restore point, click the Create button.
We are asked to enter a description to identify the restore point, I wrote today's date August 3, 2013, you can write something of your own and click Create.
After this, you need to wait a little while a new recovery checkpoint is created. This process took me a few minutes, but your time may vary.
Once the procedure is complete, the following window should appear: The recovery point was created successfully.
That's it, the new restore point is ready.
Running Windows 7 System Restore
Let's say we installed a program, after which it does not work correctly, freezes or generally slows down your computer. This is precisely why we have recently created a restore point, even before the moment when this program was installed.
Right-click on my computer on the desktop or Start menu and go to the bottom Properties tab.
Next, we return to System Protection.
Go to System Restore and click Restore...
The Restore System Files and Settings window opens, click Next.
Select the desired Windows 7 restore point and click Next.
In the next Confirm Restore Point window that appears, click Finish.
The final warning appears - System Restore will not be able to be interrupted if it is running. Click Yes and wait until the system rolls back to the specified restore point.
After restarting the computer, the problematic installed program is no longer present. That’s basically the whole simple process of restoring Windows 7.
System recovery Windows 8/8.1
If you were able to start the OS, you can resume Windows 8 through Settings. Hover over the top right corner and enter them. Click on “Change computer settings” – “Update and recovery”. The “Recovery” section will offer several options:
- "Normal recovery with preservation of information."
- "Deleting data and reinstalling the OS."
- "Special option."
Decide what exactly needs to be done. Next, follow the menu prompts.
More on the topic: How to reinstall Windows on an Asus laptop? Step-by-step instruction
If you choose the latter method, in the window that opens, click on the diagnostics item. You will be offered the following options:
- "Restore";
- “Return to original state”;
- "Extra options". This item includes the ability to roll back to the desired resume point.
To resume Windows 8.1, press Win+R and call sysdm.cpl. In the system properties window, in the “Protection” tab, specify the required system drive. Click "Restore". By clicking "Next", you can see a list of rollback points. Select the one you want and click “Search for affected programs.” Changes that have been made to the PC since the selected moment will be deleted. Complete the process by clicking "Finish".
If you work with Windows 8, problems may occur, the Internet may not work correctly, etc. To fix this, you can use the classic recovery method through restore points.
Another option is a system rollback. To do this, open the “Start” menu - “Control Panel” - “Windows Update”. Select the item “Remove updates”. The same can be done using the command line.
So, in the list of updates that opens, we delete those from the moment of installation of which (we look by date) problems and malfunctions began. We delete unnecessary files and reboot.
You can perform a factory reset on Windows 8.1. Important files will not be affected during this operation. The method is effective, but to implement it, the OS needs to boot without problems. We use the algorithm:
- The right side of the monitor is “Settings”;
- "Change settings";
- “Update and recovery” - “Recovery”;
- "Recovery without deleting files."
If you cannot log into the system in the usual way, you must use the disk with the system. Load the installation disk and select “System Restore”. Click the “Diagnostics” button and “Restore”.
Recovering via Safe Mode
If your computer does not boot or boots and does not work correctly, then you can use the Windows 7 restore point. To do this, you need to go into safe mode; here you will not be able to create a checkpoint, but it is quite possible to use it and return to an earlier state of the computer.
To enter safe mode, you need to press the F8 button (additional boot options) when starting the computer; you can read more about this in the useful F8 article.
In the additional boot options window that appears, you must select Safe Mode and press Enter.
Next, go to the Start menu > Control Panel > Recovery, where System Restore and Run Recovery will appear. We select the desired control point and proceed to rollback the system.
If safe mode did not help you, or you were unable to enter it, then do not be upset.
You can select the Windows 7 restore points you want by going to More boot options > Troubleshoot your computer > System Restore.
If you changed your Windows login password after the restore points were created, you will have to strain your brain and remember the old password. If you remember your old password, it’s good, if you can’t remember, I wrote an article on my blog specifically for this: How to hack a password on a computer.
Windows 10 System Restore
If you are having problems with Windows 10, press Windows + Pause. Go to “System Protection” and click “Restore” - “Next”. Select the desired indicator and click “Next” again. When completed, click “Done.” The computer will automatically restart and the changes will take effect.
One of the advantages of the “ten” is the ability to return the settings to factory settings. This helps avoid having to install the system all over again. To reset the data, go to “Computer Settings” – “Update and Security” – “Recovery” – “Return the computer to its original state”. Click "Get Started."
You can take care of the possibility of a rollback in case of failure in advance. You can create resume points yourself or configure their automatic creation at the desired frequency. To do this, in the settings, in the Update and security item, select Backup service. Specify where to save copies, click Add disk. After selecting the device, the function will be activated.
You can restore your Windows 10 system again by using restore points. In this case, the system will be rolled back to the moment when it loaded smoothly and worked without failures. This recovery method is described at the beginning of the article.
If the OS does not boot, a warning table appears on the screen with the “Additional recovery options” button. Click it and select “Diagnostics” - “System Restore”. We select a Windows restore point, wait for the system to roll back and reboot.
If such operations do not help and the computer continues to work incorrectly, you can roll back to the basic settings. Some programs and utilities, personal PC settings will be reset, and personal data will be deleted.
This technique is used extremely rarely if the other options described above do not help. The algorithm of actions is as follows:
- “Start” - “Select options” - “Updates and security” tab;
- “Recovery” item – “Start” button;
- We choose to delete all files or keep some of them.
Recovering the system after this will take 40-90 minutes.
Deleting Windows 7 restore points
There are times when the disk runs out of free space, and you urgently need to install something or download information. You can delete all Windows 7 restore points except the last one. And you probably immediately have a question about how to do this. As they say, nothing is impossible, you just need to turn on your brain and everything will work out, but seriously, now I will explain to you how this can be done :).
As usual, go to the Start menu and type Disk Cleanup in the search bar. In the proposed answers, go to Free up disk space by deleting unnecessary files.
Select the disk on which to perform cleaning.
After this, the disk evaluation begins; it can last from several minutes or more.
Now the assessment is complete and we see the Disk Cleanup (C:) window. On the first Disk Cleanup tab, you can remove the following unnecessary files. In my case, Disk Cleanup can free up to 581 MB; this figure may vary for you. I don't have much space on my hard drive, so I decided to free up an extra half gigabyte :).
But we need to go to the Advanced tab, where we can clean up Programs and Features, as well as delete everything except the latest restore points.
The warning comes out again, Do you really want to delete all checkpoints except the last one? Click delete and say goodbye to our old Windows 7 restore checkpoints.
So, you can delete old checkpoints and free up some space on your hard drive.
Uninstalling updates
It happens that the cause of incorrect operation of the OS is incorrectly installed patches or updates. Using built-in tools you can easily get rid of them.
- In the Start menu, look for a program called Windows Update and launch it.
- In the lower left corner of the window that opens, click on “Installed updates.”
- A list of all update files will open in front of you. If you know which update caused the failure, you can remove it using the corresponding item that appears when you right-click. After this, don't forget to restart your PC.
If you are not sure what exactly caused the operating system to become inoperative, then it is better not to touch the patches, much less delete them all. One of the most common signs of an incorrect update installation is error code 0x80070002 .
Windows 7 restore points are not created
Now let's look at the main possible reasons why recovery checkpoints may not be created.
Power off on laptop
If you are running a laptop on battery power without main power, you will not be able to create a restore point. This option is enabled by default on all laptops. If your laptop holds a battery charge for more than 4 hours, you can disable this option in the Task Scheduler. To do this, you need to open the Run window, I press the keyboard shortcut +, or Start > Run and type the command.
In the window that appears, go to Task Scheduler Library > Microsoft > Windows > SustemRestore, then go to .
We got into properties, go to the Triggers tab and set up (change) the schedule.
By default, this task runs 10 minutes after the computer is idle; in other words, while you are working on the computer, no restore points will be created. If you want to change the time, then go to the Conditions tab and change it to the suggested options.
In the Windows 7 operating system, everything is so hidden and complicated that you can’t figure it out without a bottle. It was a joke, of course :).
Utilities for cleaning the registry and hard drive
Most registry cleaning utilities mistake checkpoints for garbage and therefore safely remove them. In order not to delete recovery points, you must specify as an exception the System Volume Information folder, in which our checkpoints are stored. It is advisable to go into the settings of the utility program and configure everything manually.
Different operating systems
There are people who have several operating systems installed on their computer, for example Windows 7 and Windows XP and so on. So, when you start a newer (older) version of the Windows XP operating system, all recovery checkpoints that were created by Windows 7 are automatically deleted.
Legacy file systems
When working in FAT and FAT 32 file systems, creating recovery points is not possible. These file systems do not support shadow copies, which contain information about changes to user and system files. But the Windows 7 operating system uses shadow copies to create its own restore points.
In conclusion, I suggest watching two video lessons on how to create restore checkpoints in Windows XP and Windows 7. And one more thing, for more convenient viewing in good quality, watch the video in full screen mode.
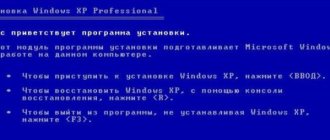
Windows XP Restore Point
Windows 7 restore point
System protection settings
It is important to understand that when creating points, the main system files and system settings (Windows registry) are saved, but installed programs, music and movies are not saved. It is also not possible to recover deleted files. To do this, you need to use the “Previous versions of files” function. In other words, a restore point in no way replaces a full system backup.
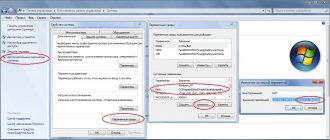
, System Protection must be enabled To enable or check whether a function is enabled or not, right-click on “My Computer” on the Windows desktop and select “Properties”, or simply press the hot keys “Win + Pause”
In the window that opens, we need to select “System protection”.
A window will open where we can see the current state: on the “C:” , where the system is installed, protection is enabled. By clicking the “Configure” button we can change the system protection settings for this disk
We choose what information to save in recovery points:
- System settings and previous versions of files
- Only previous versions of files
- Disable system protection
It’s better not to change anything and leave it as default: saving system settings and previous versions of files. If you disable system protection, the Previous File Versions feature is also disabled for the selected drive. In Windows 10, you can only turn protection on or off.
Below in this window you can limit the maximum amount of disk space used for storing points, which is set as a percentage. We set as much as you like, but it is advisable to set from 15% . If the set limit is exceeded, points will be created, but at the expense of deleting the previous ones.
To clear the disk of all recovery points, you can click the “Delete” . There is an alternative option, for example deleting the “System Volume Information” folder. Previous versions of files will also be deleted if the limit is exceeded.
Let's sum it up
Well, friends, the large and informative article Windows 7 restore point has come to an end.
Today we learned what restore points are, why they are needed, what you need to know before starting a system restore, we figured out how to view and create restore points in two operating systems Windows XP and Windows 7, we learned how to restore through safe mode, as well deleted old checkpoints and analyzed possible causes of problems when creating restore points.
Perhaps you have questions related to Windows 7 restore points. You can ask them below in the comments to this article, and also use the feedback form with me.
Thank you for following me on Twitter.
Stay connected - my You Tube channel.
If the above information was useful to you, then I recommend subscribing to my blog updates to always be aware of the latest and relevant computer literacy information.
Don't forget to share this information with your acquaintances and friends. Click on the social buttons and thank the author.
Sincerely, Dmitry Sergeev August 4, 2013
Blog navigation
You can share your opinion, or you have something to add, be sure to leave your comment.
Please share links on social networks.
Resuming using the installation disc
One of the radical methods of fixing the error involves using an installation disk. After launching it in BIOS, click System Restore. In the Troubleshooting section, specify the desired action. Next, follow the system prompts to complete the process.
The debate continues about which is better than Windows 10 or Windows 7. This phenomenon is not accidental. Developers from Microsoft claim that there is nothing better than Windows 10, but experienced users say the opposite, saying that the system is more reliable than Windows 7 now.
It’s been a while since we’ve had any major reviews on our website, much less such global ones related to updating/reinstalling the operating system. We present to your attention a condensed but very useful overview of how to upgrade to Windows.
Sometimes, when installing programs or applications, a message appears on the computer screen stating that Windows 10 error 5 has occurred. This means that the user is denied access. This happens if there are several accounts in the system.
More on this topic: Internet Explorer category page Microsoft Download Center
One Response to "Windows System Restore"
After the system recovery options are displayed, the mouse and keyboard stop working, what should I do?
howwindows.ru
Finding recovery marks
On drive C (local), a certain part of it is occupied by recovery points. To determine the ratio of this size to the total volume of the disk, you must enter its settings. The information will appear in the window after you click on the “Configure” button.
The amount of local disk space allocated for recovery points is typically 10%. We recommend increasing this figure to 15%.
Increasing disk space will help extend the storage life of recovery points, because If there is not enough space, creating new points leads to deleting old ones.
Some subtleties
It is important to take into account the fact that selecting a system restore point and then applying it leads to the deletion of previously created files. To make it easier to understand the essence of the matter, we will explain this with an example. So, if you created a tag on February 10, and after 5 days, that is, February 15, you needed to return to the previous point, in this case all programs that were created on February 10-15 will be deleted.
This happens because the version 7 recovery label cannot save previously deleted files. You can change the situation by using the “Previous versions of files” function if system protection is installed and active on this disk with the “Restore OS settings and earlier versions of files” option checked in the settings. When performing the above steps in Windows 7, the process of archiving the user’s personal data will be carried out, which will be represented by shadow-type copies. The final result depends on the correct application of the information received.
What other ways are there to restore Windows 7?
There is another little-known way to restore Windows 7 boot after a failure, and I’ll tell you about it. At first glance, it may seem difficult to many, but nevertheless it often helps me out.
The fact is, friends, that a very large part of the problems due to which you cannot boot Windows 7 lie in registry errors. And Windows 7 would not be Windows 7 if it did not have a mechanism that protects registry files. Such a mechanism exists and creates backup copies of the registry in the RegBack folder every 10 days, regardless of whether you have system recovery enabled or not.
If you cannot solve problems loading Windows 7, you should try replacing the existing (and apparently damaged) registry files from the Config folder with archived files from the RegBack folder. To do this, we will have to boot the computer from the Windows 7 installation disk or the Windows 7 recovery disk.
Boot into the recovery environment and select the command line.
We type in it - notepad, we get into Notepad, then File and Open.
We go into the real explorer, click My Computer. Now we need the system drive C:, pay attention, the drive letters here may be mixed up, but I think you can recognize the system drive C: by the Windows and Program Files system folders located inside.
We go to the folder C:\Windows\System32\Config, here are the active registry files, specify the File Type - All files and see our registry files, we also see the RegBack folder, in which every 10 days the Task Scheduler makes a backup copy of the registry keys.
So, we will replace the current registry files from the Config folder with backup registry files from the RegBack folder. So, first of all, let’s delete from the C:\Windows\System32\Config folder the files SAM, SECURITY, SOFTWARE, DEFAULT, SYSTEM, which are responsible for all registry hives (my advice is to copy the registry hives somewhere before deleting, just in case).
In their place, let's copy and paste files with the same names, but from the backup copy, that is, from the RegBack folder.
Note: The SAM, SECURITY, SOFTWARE, DEFAULT, SYSTEM files cannot be deleted all together; delete them one by one. Then copy the same files from the RegBack folder in their place.
Friends, if this does not help, use Windows 7 file integrity recovery; if the operating system does not boot, it is done in exactly the same way as in Windows 8.
What else do we have left of Windows 7 recovery tools?
Memory Diagnostic 7 -> checks system memory for errors. Command line -> using it you can delete files that interfere with loading Windows 7.
I hope our article on how to restore Windows 7 system helped you.
Similar posts from the section
- How to update Windows 7
- How to restore Windows 7 system
- Bootable USB flash drive Windows 8: how to write an OS image to a USB flash drive
- Sleep mode Windows 7: features and settings
- Windows 7 swap file: how to configure and optimize
- Windows 7 Command Line - how to open and work
- Optimizing Windows 7 - speed up your computer in a few clicks
- Windows 7 - which one is better to choose, OS comparison
- Windows 7 Scissors - how to use the utility
- How to remove Windows 7 - instructions for beginners
How to make a recovery point at seven
How to roll back the system in Windows 10 back to a restore point
The standard way of performing a given task is divided into the following actions according to the algorithm:
- Go to Start.
- In the parameters column on the right of the window that appears, find the word “Computer” and right-click on it.
- In the window that appears, click on the properties line.
- A small menu will open in which you will need to switch to the “System Protection” section at the top.
- At the bottom of the window, find the “Create” button and click on it with LMB.
- Another menu will appear where you will need to specify the name of the point. The user fills out this field at his own discretion, and then clicks on “Create”.
- The procedure for activating the point will begin, which may take several minutes. In this matter, much depends on the technical characteristics of a desktop computer or laptop. Wait for the creation procedure to complete.
Important! After carrying out the above manipulations, it would not hurt the user to restart his PC to apply the changes made, and then check whether the point was actually created.
The above information shows the manual procedure for creating a restore point. However, this element can also be created automatically, for example, after a scheduled update download.
It is not recommended to disable automatic creation to avoid unpleasant consequences. For example, the user will forget to create a point himself, after which he will not be able to roll back the operating system if problems arise.
System Protection tab on Windows 7
What is a restore point: its main functions
This is one of the components of the operating system recovery tools. Each PC user has the right to independently create a restore point. i.e. indicate a specific date when the computer is functioning normally.
Windows 7 is the most common OS after tens
Subsequently, the user will be able to roll back the system to this state by specifying a restore point. In this case, all changes that were made to the device after creating such a point will be automatically deleted.
This function is especially useful if the PC has stopped functioning normally, or Windows 7 cannot start. This problem may occur after installing a particular program, utility, or downloading an update.
Note! Experienced experts recommend regularly creating points that can be used to restore the operating system if necessary.