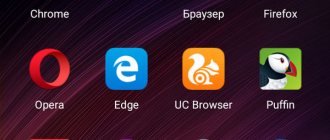
Google Chrome is the most popular browser for the Android mobile platform, with a market share of more than 60% in August 2022. This is not surprising, given the high speed, ease of use and the presence of all the necessary functions. Although, to a large extent, its fame is the result of installing the browser as a pre-installed application on Android.
Keeping in mind the popularity of the web browser, I wanted to collect 20 of the coolest tricks for using Google Chrome on Android. Despite the apparent simplicity of the Google browser, it has a lot of functions, some of which are currently only experimental. They will help enrich your web browser experience. Some opportunities are hidden from view, so little is known about them.
Important! Some tips and tricks are experimental, so users are not immune to errors. If you don't want to take risks, you should avoid advice related to changing flags in Chrome settings.
Activate dark mode
Night or dark mode is a ubiquitous interface that is already available in many Android applications. Google recently proposed its own analogue for the browser. Using Night Mode darkens the web browser interface, making it easier on your eyes when using your smartphone in the dark.
How to enable dark theme:
- Launch the Chrome app, tap the three dots on the top right corner and go to Settings.
- Select the “Themes” section and set to “Dark”.
Enable "Easy Mode" in Chrome on Android
“Simplified mode” was previously called “Data Saver”, it reduces the data consumption of loading web pages. For most users, mobile traffic is paid, and even with an unlimited tariff plan, if the network is used too actively, operators impose restrictions on the download speed. However, a simplified regime allows you to avoid overpayments and other difficulties.
How to enable traffic saving:
- Go to Google Chrome.
- Open the browser menu and select “Settings”.
- Click on the “Simplified mode” item.
- Move it to the active position.
Synchronize bookmarks, passwords, history and more between different devices
Everyone already knows that Google has a personal cloud that can be used to sync data between multiple devices inside Chrome. You can set up automatic transfer of almost anything: passwords, history, bookmarks, open tabs, credit card information, etc. However, Google analyzes the information and uses it not only to personalize search results, but also to display more relevant advertising.
How to activate synchronization:
- Launch the browser, click on the 3 dots and open “Settings”.
- Log in to your personal profile using the corresponding button.
- Go to the "Sync" section and turn on "Sync Chrome data."
Now you can access synchronization services and Google services.
YouTube SubSound - automatic voice acting of subtitles on YouTube
Browser extension that reads subtitles on YouTube.
Hi all! When we go to YouTube, we limit ourselves to videos whose language is familiar to us, and we ignore a great deal of content in other languages. “How great it would be to erase this border!” – I thought and created “YouTube SubSound”
This free extension provides subtitles on YouTube alongside the video and supports Russian, English, Japanese, Chinese, Korean, French, German, Spanish, Italian and Polish.
A little background. It all started with the idea of translating and dubbing films and TV series. It was interesting to feel the mechanics of subtitles, speech synthesis and synchronization with video. After a short attempt at implementation, it became clear that I couldn’t find a useful and convenient application for this and everything stopped even before it started.
But after a while, opening some video on YouTube with subtitles, I felt the difficulty of simultaneously following the picture of the video and reading the translation. Combining a previous bad experience with film dubbing with a new problem, the idea was born to bring YouTube subtitles to life with a software-generated voice. So, I decided to make an extension for Chrome because... This is the most convenient way to implement this function.
Having posted a small demo on
80 lines of code, I realized that it turns out pretty well, although the result greatly depends on the quality of the translation. Of course, it worked best with videos where the author took care of writing/translating subtitles. But after finalizing the code, we managed to achieve fairly acceptable listenability. And at some point, during the test, I listened to an interview video in the background with a very fast presentation and found that I not only caught the essence, but also did not feel much discomfort (this is a matter of taste) while listening!
Preload pages to speed up web surfing
Page preloading is a Chrome technology that reduces the time it takes for websites to load. If enabled, the browser will actively use cookies and download some data from sites in the background. But when you go to the website, it opens much faster, because some of the content has already been downloaded earlier. However, if cookie data is cleared, the loading time of sites may increase dramatically. Over time, the speed will be restored. The technology provokes unnecessary waste of mobile data, so it should be used when connecting to unlimited Internet.
How to activate:
- Open the browser application and go to “Settings” from the menu.
- Click on the “Personal data” element.
- Check the box “Allow pages to preload to improve browser and search speed.”
#9: Save pages as a PDF file
As noted earlier, Chrome has the ability to download pages when you do not have access to the network. But what if you want to send the downloaded page to someone else, or to be able to open it through other applications?
Open the page you downloaded, in the main menu click “Share” - “Print” - “Save as PDF”. Then click the blue button to download the file. Ready! It is now a PDF file that can be opened by various PDF reading applications on PC, smartphones or tablets.
Change search bar in Chrome
Google is the king of search, but it has worthy replacements. It is likely that the reader has a desire to install Yandex as the main search engine. Chrome allows you to do this without unnecessary movements.
What should be done:
- Launch Chrome and go to its “Settings”.
- Click on the “Search Engine” section.
- Select one of the preset options: Google, Bing, Yandex or @MAIL_RU.
#12: Add more search engines
For many years, Chrome supported a fairly limited number of search engines: Google, Yahoo, Bing, Ask.com and Yandex. And only in 2022, with the release of an update to version 57, it became possible to add other search engines.
Although the implementation is somewhat lame, it is not that difficult to do. To begin, open a page. Then go to settings and select “Search engine”. In the menu that opens, you will see a list of available default search engines and those you have visited previously, click on one of them, and it will be set as the default search engine.
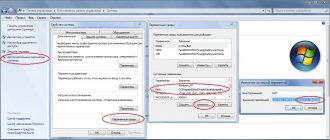
Horizontal tab switcher
Many users will continue to use the standard tab switcher. And here there is an alternative - change the vertical layout of the pages to horizontal. However, this feature is experimental. This makes the switch more similar to the Android multitasking menu. Why is this better? You can view the contents of pages in more detail and more accurately determine the appropriate tab to switch.
How to change the parameter:
- Open
- Paste Chrome://flags into the address bar and press Enter.
- Find “Enable horizontal tab switcher” from the list, click on the “Default” button and set the value to “Enabled”.
No. 1: Copy the link from the address bar
There are several ways to copy the link of the page you opened. The most famous is to click on the address bar, highlight the link and then click “Copy”. Not very fast, especially since you constantly have to select the entire line in order for the context menu to appear. Fortunately, there are faster methods.
Click on the main menu button (3 vertical dots in the upper right corner of the screen) – “Share” – “Copy”. Another way: hold down the address bar and click “Copy” in the menu that appears. If you see a green padlock at the beginning of the line, click on it and hold down the link to copy.
And lastly, if you are using tabs, just hold your finger anywhere on the top line and the link will be copied.
Create a group of tabs to organize pages
The next trick for organizing tabs involves grouping them into a single whole. This solution will allow you to create and save all pages more accurately, sorting them into appropriate categories.
How to enable tab grouping:
- In your browser, follow the link Chrome://flags.
- Find and activate "Tab Groups".
- Restart the browser.
Continuation of the post “How to disable tab grouping in the Google Chrome mobile browser”
Another Google Chrome update and another struggle with imposed convenience.
I’ll say right away that I couldn’t make an accordion/carousel like in previous posts, but I managed to get rid of the grouping. Now my tabs are displayed as tiles.
To do the above:
1) In the browser line, type the text: chrome://flags
2) In the window that opens, type in the search bar: M90
3) Change the value from Default
to
Enabled
4) Click Relaunch (restart Chrome)
5) Open the browser again on the page chrome://flags
6) In the window that opens, in the search bar, type: Tab Groups
7) And for all values, there are 3 of them, change from Default
to the value
Disabled
.
Click Relaunch (restart Chrome)
Just in case, after the manipulations have been done, force stop the Chrome application through the android settings and start it again.
Google Chrome Version: 91.0.4472.88
I feel like this can’t continue for long, so I’m looking at other browsers.
Possible duplicates found
I currently have version 90 of Chrome, enabling the m88 and m89 flags helped me get the carousel back. (+disabling #enable-tab-to-gts-animation)
Enabling m89 helped
m89 and m90 enabled, tab grid layout disabled, 3 values of tab groups from point 6 in the post disabled. I cleared the cache, chrome and restarted the phone 100 times. The grouping of tabs has not disappeared, the “carousel” never returns. Help me please.
How to remove the display of tabs in a grid and disable grouping?
For now I’ll switch to Opera, but I don’t want to give up Chrome completely due to synchronization with the PC(
Tab grouping is still disabled. You MUST stop the Chrome application in your phone settings, only then will it work.
The last question remains: how to disable the tab grid and enable carousel view?
Is #enable-tab-grid-layout disabled?
you need to turn them on, damn)