Unfortunately, the software has its own vulnerabilities that may stop responding to user actions.
For Sony devices
Method 1: power button and volume down key.
Method 2: Both sound keys and power button.
Method 3: ON and volume up . After the logo appears, release the sound button and immediately press it again.
Method 1: ON button and volume down key
How to install custom recovery on Android
They install modified Recovery on Android gadgets in different ways. The choice of one method or another depends on whether the device has root rights, the brand of the device, and the availability of a PC.
The simplest and most popular ways to install custom Recovery
Factory Mode on Android - what to do if you accidentally logged in
Several popular methods of installing recovery on Android gadgets are described in detail below.
The simplest and most accessible is the Official TWRP App. This method is suitable for almost all Android gadgets, and does not require a PC.
Note! For some devices, using this program you can download Android recovery from the TWRP App server. However, this method of updating Recovery requires superuser rights, so you need to obtain them in advance.
The procedure for installing Recovery via the Official TWRP App is as follows. Download and install the Official TWRP App utility on the gadget. Next, launch it and attach one of your Google accounts to it. After about and “Run with root permissions” and click “OK”.
Program installation
Then, in the main program menu, click the “TWRP Flash” tab and allow the application access to system partitions.
Selecting “TWRP Flash and root permission”
On the next page, download the installation image of the recovery (if the developers support the gadget) or import it from the phone. To download the file, click “Select Device”, and then select the desired smartphone model from the list provided. Next, look for the latest version of the boot image and go to the download page, where they click the “Downlods File Name” link.
For your information! Recovery Android can be downloaded from various thematic sites where users help each other.
Uploading a file using the application
To import downloaded Recovery files, click the “Select a file to flash” tab in the program, then open the desired directory and select the required file there.
Selecting a file for installation
After adding the image to the program, they proceed to the process of flashing the recovery firmware on Android. To do this, click the “Flash to recovery” tab, and then click “Okay” in a small dialog box. Next, in the new window, click “Okey” again.
File firmware
The file is flashed quickly, after which you can reboot the device into the flashed Recovery from the program interface. To do this, in the top menu of the utility, click the icon in the form of three bars and select the line “Reboot” in the proposed list, and in the next window click “Reboot recovery”.
Selecting the Reboot option
Next, confirm the command in a small dialog box.
Rebooting the gadget into recovery
An alternative method for gadgets based on the MTK processor (PC required)
On gadgets with an MTK processor, it is easier to flash the recovery using the SP Flash Tool.
Scatter file and recovery in one folder
To do this you need to do the following:
- Install a universal ADB driver and Flash Tool on the PC (a ported version is often posted on the Internet).
- Then you need to download the custom recovery into a separate folder and place the scatter file in it, which must be taken from the current version of the smartphone’s firmware (you need to download it or the desired file using the MTK Droid Tools program).
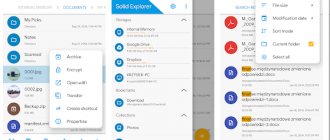
- Then you need to launch the Flash Tool and click the folder image opposite the “Scatter-loading File” line. Next, you need to select the previously prepared scatter file.
- Many parts of the firmware will appear in the program menu, of which only Recovery should be checked.
- Next, you need to select the “Download Only” download mode and click the “Download” tab in the top panel of the program (indicated by a green arrow).
- Then connect the turned off gadget to the PC using a USB cable. The process of flashing the modified recovery will start, and after a few seconds it will be installed.
Selecting the file to be flashed in the Flash Tool
This completes the installation procedure for the modified Recovery, but it is advisable to immediately check its operation. To do this, you need to turn off the device, and then press the desired combination of buttons on it (in most cases, this is one of the buttons that regulates the sound level and the power button).
Successful flashing of modified recovery
Important! The custom recovery file must be renamed to Recovery, otherwise it will not appear in the program.
Alternative solution for Samsung gadgets (PC required)
This recovery installation method provides the following:
File selection
- Download the Odin program and install it on your PC. To do this, you need to go to the official website of the developers of this software.
- Download the required version of Recovery.
- Connect the device to the PC using a USB cable.
- Then they launch the program.
- Next, transfer the switched off gadget to Download Mode. Depending on the device model, two methods are used. The first involves simultaneously pressing the power button and volume reduction button (suitable for older models released before mid-2011). The second involves simultaneously pressing the power, “Home” and volume down buttons.
- As soon as a warning appears on the display, release the buttons, and then press the Volume Up button to enter Download Mode. Then the program must be determined by the device.
- Next, in the flasher menu, select the “AP” item and indicate the path to the previously downloaded custom Android recovery file. At the same time, put a tick next to this item.
- Then press the “Start” button and wait until the file is installed. Then the gadget will reboot.
Utility menu after flashing
For HTC devices
Method 1: power button and volume down key. After a menu with a choice of modes appears, select the recovery section. To navigate, use the volume down . To confirm the action, use the power button ; if it doesn’t work, raise the volume.
Method 2: ON and volume up .
on[/su_label] and reduce the sound level.
Method 2: ON and Volume Up buttons .
A little theory
To begin with, it is worth noting that Recovery is a specialized service of the Android operating system, which is available on all devices. You can use it to launch when you want to quickly delete all data in the gadget, restore to factory settings, change the firmware, etc.
If the Recovery has never changed, it is called stock, if the firmware has been changed, it has become custom. The factory service, which is installed on new devices, has somewhat reduced functionality, but even with its help you can reset system parameters or install cool firmware.
After updating Recovery, the user receives many new functions on his Android, for example, backup recovery, the ability to get root, creating backups and many other options.
Other ways to enter recovery mode
The most common method is with a key combination. It is also important to know the keyboard shortcut in case the system does not boot. If the system is working properly, there are two other ways to go to the recovery menu.
Via system application
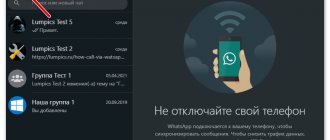
Universal programs, such as Rom ToolBox, allow you to reboot the device into various modes. Find the reboot section in the menu, where select reboot to recovery.
Important! The program requires root rights to operate.
Reboot into recovery mode via the Rom ToolBox application.
Via ADB console
Instructions
- Install ADB or ADB RUN drivers for your phone model on your PC.
- Enable debugging mode on your device.
- Connect the device to the PC using a sync cable. Important! Requires a data cable.
- If you are using ADB, enter the adb reboot recovery .
- When using ADB RUN, select item 2 from the menu, then item 4.
Part 3: How to Boot into Recovery Mode on Android Phone
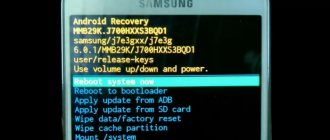
With Android developed, it is more than a tool that people use to call others or text messages. As you know, most Android devices now have a fairly simple Android recovery mode by default. And most of the recovery mode has six main functions: Reboot system now, Apply update from ADB, Apply update from external storage, Wipe data/factory reset, Wipe cache partition, Apply update from cache. With six functions, you can reboot your Android device, erase data, install updates to SD card, and so on. Next, we'll take a closer look at the four features of Android recovery mode. For more knowledge, please scroll down and read on.
Android Recovery Mode Option - Reboot System Now
Reboot System Now is an option that allows you to reboot your Android phone, your Android device will shut down and reboot into the commend interface. If your Android phone is frozen or has some errors, you can boot into Android recovery mode and reboot the system. When you boot into recovery mode, do something else and when you are done, you can also exit Android recovery mode by selecting this option.
Android Recovery Mode Option - Apply Update from ADB
ADB is an Android recovery mode tool, short for Android Debugging Bridge. To use this feature, you'd better connect your Android phone to your computer so that it can build a bridge between the two devices. Android Debugging Bridge allows users to perform some operations through the computer with your Android device. So it is widely used by Android app developers to fix app bugs. Moreover, ADB also allows you to use your computer to push and install updates to your Android phone, which depends on the connection between your phone and computer. But this feature is more suitable for app developers and may be difficult for those who have never touched it. If you need to use this tool, you can find step-by-step instructions on the website.
Android Recovery Mode Option – Wipe Data/Factory Reset
Wipe Data/Factory Reset is a very common and easy way to reset your Android device into Android recovery mode. When you select this feature, it will erase all your data including photos, videos, messages, photos and apps. And then it will return your phone to its original factory state. This is very convenient for you when you want to deal with your old Android phone. But if you just want to factory reset your phone to fix Android problems, make sure all your Android data has been backed up.
Android Recovery Mode Option - Wipe Cache Partition
The cache partition is temporary data which is mainly related to app installations and it will be stored in your Android phone. This will slow down your Android device and even make your phone unusable. But you can delete it by wiping the cache partition in Android recovery mode without losing any personal data or settings, which means you cannot erase them. So this is recommended to fix many common Android problems.
What is Recovery Mod and why is it needed?
If there is a software failure in the Android system, we can delete some suspicious program or file; perhaps there is an antivirus on the smartphone that finds malicious code and successfully removes it, or finds nothing. What to do if even resetting the phone from the system settings does not help? The well-known Recovery menu comes into play. If you compare it with a regular computer, it is similar to BIOS, but with limited functionality.
Recovery is settings for restoring the phone to its factory state. It allows you to completely clear your phone of system files from the internal storage or external storage (SD card). Using recovery, you can re-flash your phone (analogous to reinstalling Windows) or any other file that makes certain changes to the system.
We understand what Recovery is. Surely you have heard the concept of stock or custom recovery. Okay, next are the definitions again.
- Stock recovery is a standard tool with limited functionality (Stock recovery). It only has options to reset the smartphone, cache and delete data. Any phone comes with this menu installed from the factory.
- Custom recovery is a menu with a wide range of settings where you can create backup copies (backups) of Android or certain data, and restore the entire system if flashing fails. Inside the menu you will find your own file manager, more convenient than the stock one, and the ability to connect your phone to a PC directly from the custom one.
There are two types of custom recovery - CWM (ClockworkMod) and TWRP (Team Win Recovery Project). In terms of functionality, they are practically the same, but the second type differs in that the options are controlled by clicking on the screen, while the first type is controlled only using buttons. Some smartphones may support both types or one of them. By the way, ClockworkMod now also has two versions - push-button and touch.
Why do you need a custom recovery if you have a standard stock one? It is needed not only for convenience, but for installing any firmware you want.
↑ Login to the Recovery System via Terminal Emulator
To do this, you need to install the “Android Terminal” application, and then type the “su” command in it. After pressing enter, the program will ask for administrator rights. Afterwards, enter “reboot recovery” and press the enter key. After all these operations, the smartphone will boot into the recovery system.
In situations where, when entering the software module, “No command” is displayed on the screen, and Android is displayed on the screen, which is lying down, and a yellow exclamation mark hangs above it, then you should quickly press two buttons: on/off the smartphone and increase sound. Then you can immediately go to the recovery system.
I am the project manager, I love Android. I keep up with new products, news, and also help solve problems that users have with their Android smartphones!
In order to take advantage of the full capabilities of the site, please log in using social networks.
If you have any questions solving a problem on your smartphone. Leave a comment describing the problem in detail, and be sure to indicate the model of your smartphone. We will try to help you!
Information
There are no comments at the moment