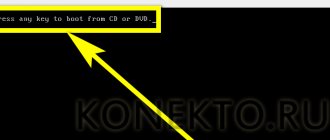
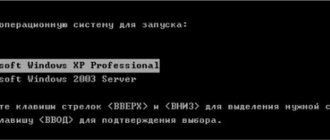
For example, you can set Windows 10 as the priority system, and have Windows 7 or Windows 8 installed in reserve. But the Windows 10 system by default shows the user the boot menu if the second system is installed on another hard drive. It turns out that it is impossible to boot into another OS.
How to fix this problem? You can go the hard way by setting the BIOS settings to boot from the desired disk, or you can completely disable the physical disk with ten. But these methods are so primitive that they are not worth considering.
You can do the job much easier, which will be discussed below. The whole process will take no more than a minute, and its results will certainly please you.
Why does Windows 10 always start first?
Each OS has its own individual boot manager. They are not connected to each other in any way, and they are located on different physical media. Windows 10, as a more advanced system, takes precedence over earlier versions of Windows.
How to change the boot menu by adding another OS there?
To register a second system, and a third one too, if necessary, you should register the second installed system in the configuration file, which is part of the Windows 10 download store.
After completing this step, you will need to re-create the configuration file. To do this you need to do the following:
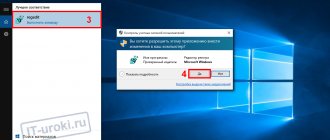
- Run command line mode as administrator.
It's very easy to do. Click on the Start menu and then simply type cmd on your keyboard. “Command Prompt” will appear in the search bar. Click on the text that appears, after which the command line menu will appear. This is a separate black window.
- How to enter safe mode via command line
— Write and execute the command “bcdboot Z:/Windows”. This command will register the second OS in BCD Windows 10.
— Write and execute the command “bcdboot C:/Windows”. This command rewrites the Windows 10 boot configuration file.
This assumes that the second OS is already installed on the Z drive, and Windows 10 itself is located in the usual place, on the C drive.
Please note the following. If you write and execute only the first command, the boot menu will appear, but only the second operating system will be displayed in it.
After completing these simple steps, a multi-OS boot menu will appear on your computer. We strongly advise users to create a boot menu if one does not exist.
Otherwise, you simply will not be able to boot from a backup operating system if problems arise with Windows 10. I would also like to note that the Windows XP system as a backup will not be listed in the boot menu.
You can also look at the recordings
How to log into your computer if you forgot your password Convert FB2 to MOBI format for Amazon Kindle How to choose a power supply for your computer How to take the perfect selfie from a smartphone How to connect video surveillance on a laptop Acceleration of a mobile device on Android OS What are the main parameters for choosing a laptop Samsung Galaxy A40 smartphone - review How to choose a Windows operating system How to disable the timeline in Windows 10 Spring Creators UpdateDell is developing its own Januss smartphoneHow to download via Download MasterHow to remove Candy Crush Saga in Windows 10The computer does not see the video card in the device manager - how to fix it?How to recover information from a flash drive or hard driveOverclocking an Nvidia RTX video card has become easier
- 28-06-2017
- 17 250
Windows 10 / Windows 8.1 / Windows 7 / Windows functionality
Hello friends! If you have two Windows 10 operating systems installed on your computer or laptop, then when you turn on your PC you should see a special boot menu in which you can select any OS to work with. Many users are confused by the fact that the names of the operating systems in this menu look almost the same, the only difference is in the indication of the volume with Win 10 located on it. Changing the name of the operating system in the Windows 10 boot menu is very simple and in today’s article I will show you how to do it by editing the Download Manager with the bcdedit.exe tool.
- Troubleshooting Windows boot problems at the BCD boot configuration system store level
Introduction
In this article, I would like to summarize ways to edit the boot menu of operating systems based on the Boot Configuration Data (BCD), which is used in Microsoft operating systems starting from Windows Vista. It cannot be edited using a text editor, as you could with boot.ini in Windows XP. However, editing BCD is possible using the console program bcdedit.exe, located in the WindowsSystem32 system folder. To work with this program you must have administrator rights. You can also work with it on the command line of the recovery environment.
Complete removal of the second Windows
The process of completely removing a second Windows system, including removing the boot entry from the boot loader menu, is described in this site article.
Microsoft engineers have implemented a boot store, also known as Boot Configuration Data (BCD), and a boot menu in Windows. The first contains the bootloader identifiers of all operating systems available on the PC, and the second reads them and displays them as a list of operating systems available for launch. This makes life much easier for the user whose computer has several systems. He doesn't have to do anything fancy to switch between them. Just restart your computer and select the one you need from the list provided. Like other parts of the Windows OS, the boot menu is customizable. This guide lists the available ways to edit this section.
Note: Almost all actions described in this guide must be performed under an account with administrator rights. Otherwise, you must know the password for it.
Editing the boot menu using System Configuration
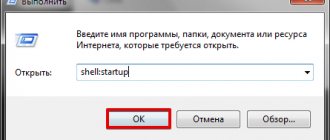
To open the System Configuration window, click the Start button and the R key (hereinafter referred to as Win+R). In the “Run” line, type msconfig and press Enter. The system configuration window will open. Go to the "Download" tab.
This tool allows you to:
- obtain information about the current and default loaded systems;
- edit the time (timeout) after which the operating system defined for loading by default will be loaded without user intervention;
- change the system that boots by default;
- remove unnecessary entry from boot menu.
At the top of the tab that opens there is a field with a list of operating systems. A comment has been added to the right of each entry about the operating system you are logged into and the default boot system.
To change the system that boots by default, select the entry for the desired operating system in the list field and click the “Boot as default” button. As a result of the performed operation, a corresponding comment will appear to the right of the name.
Editing the timeout is not difficult: in the required field you need to set the desired number of seconds.
To delete an unnecessary entry, select it from the list and click the “Delete” button.
After completing all the steps, click the “Apply” button and close the system configuration window. You will be prompted to restart your computer, however, if this is not urgently necessary, select the “Exit without reboot” button. You will see the changes the next time you boot your computer.
With this tool you cannot:
- see and perform operations on entries for operating systems booted using other boot loaders (for example, Windows XP booted using ntldr);
- rename existing entries;
- change the entry position in the boot menu.
One way to ignore the entry about a non-existent system in the boot menu: set the current system to boot by default, and set the timeout to zero.
Possible problems and recommendations
When installing a new operating system, in some cases the bootloader may be completely overwritten - for example, instead of Windows 7, 8 and 10, only “ten” will be displayed in the menu. To avoid such difficulties, always make a copy of the bootloader before installing a new OS. It will only take a couple of minutes and will protect you from possible problems.
Damage to the boot sector, erroneous changes, or typos in system addresses can lead to problems starting Windows. If you are planning serious edits, save a backup of the boot file and leave the original line in the menu until the very end, renaming it WORK, TEST or LEGACY. If the edits are unsuccessful, this line may be the last chance to boot Windows without additional actions.
You should not change parameters unless you understand exactly what they do. For most users, boot menu edits are only needed to remove an annoying menu at startup. To do this, you don’t need to run the command line - use the first or second method, they are no worse.
Reference! Additional information on the task can be found in one of the Russian-language Microsoft blogs at https://news.microsoft.com/ru-ru/microsoft-blogi/.
Editing the boot menu using the Operating System Boot window
You can open the “Load Operating System” window like this: Start – “Control PanelAll Control Panel ItemsSystem” or, if displaying Toolbar controls by category is enabled: “Control PanelSystem and SecuritySystem”. Next: “Advanced system settings”, in the window that opens, go to the “Advanced” tab. You can also use the search capabilities of Windows 7 and write “Advanced” in the search field, and select “View advanced system settings” in the list that opens. In the Startup and Recovery frame, click the Options button. We will be interested in the top part of the window: “Loading”.
Editing the boot menu using bcdedit.exe
The bcdedit.exe program is a tool that allows you to do whatever you need with your boot menu. I want to warn you: thoughtless and incorrect actions may make it impossible to boot operating systems. Therefore, before you begin, prepare an installation disk with the operating system, create a recovery disk, and back up your boot storage data.
Create a backup folder on any partition. Call it BCDREZ. Run:
where X is the letter of the partition with the BCDREZ folder located on it.
In any case, you can get back to square one by exporting the BCD from the backup:
Let me remind you again - all commands in this utility are executed in the command line launched with administrator rights or in the command line of the recovery environment.
Data Analysis and Load Storage Options
In order to make changes competently, you need to become familiar with the structure of where these changes are made. Information about BCD is presented in the form of two columns: the left column contains the names of the parameters, and the right column contains their values. It is not my goal to describe in detail every microcommand or identifier, but will focus only on those related to the boot menu. To see the part of the BCD that is responsible for loading the operating systems installed on your computer and displaying them in the boot menu, run:
Some BCD parameter values are written in curly braces - <>. These are identifiers - IDs. Any identifier has an alphanumeric code of the form. Standard identifiers have names such as: , , and so on.
Let's look at the parameters that interest us:
identifier - >This, of course, is far from complete, but, for the purposes of this article, it is a completely sufficient list.
All bcdedit.exe commands that do not include a set followed by an identifier are executed against the boot manager. You must remember this because if you want to change something in an operating system entry and forget to specify its identifier, you make changes to the dispatcher. It’s good if everything is limited to “startup recovery”.
Before we continue, let's say that our boot menu contains three entries with IDs , , .
Purpose of the default boot system
Everything is simple here - depending on which system we want to load by default, we write the ID of that system in the command. For example, for a system with ID2 the command:
But this command does not move the default boot system entry to the top of the boot menu.
Changing the location of entries in the boot menu
There are 3 ways to change the location of entries:
- use the command to move the selected entry down the list:
- use the command to move the selected entry to the top of the list:
- use the command to generate the menu in the selected order:
Changing the timeout
where XX is time in seconds.
Changing the boot manager language
where ln-Ln is the selected language designation. For Russian it is ru-Ru, for English it is en-Us, for German it is de-De, for Ukrainian it is uk-UA, etc.
A caveat needs to be made here. After a startup repair operation, the boot manager settings are set to English, even though the locale is not changed. How to fix the situation, see here.
Deleting a system boot entry
This command is best used to temporarily exclude a boot entry from the menu. When this command is executed, the entry for the parameters of the selected system is not deleted from the BCD and, if necessary, any of the above bcdedit / displayorder commands can be restored.
Change the location of your Downloads folder
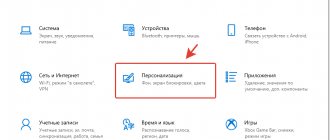
To move your Downloads folder in Windows 10, just follow these simple steps:
- In Windows 10 Explorer, right-click on the Downloads folder and open its properties.
- On the Location tab, click Move and select a different folder on your computer where you want to locate your downloads folder.
- Click the “Apply” button and in the dialog box, answer whether you want to move the files already in the “Downloads” folder to the new folder (this may take time) or not.
- Wait for the files to finish moving (if you chose this option) to the new folder.
This will complete the process: browsers and other programs that download files to the system “Downloads” folder will now download them to the new folder you specified.
Changing the download folder in browsers and programs
Most browsers and many other programs that download files from the Internet have their own settings that allow you to specify where exactly they should be downloaded by default. Usually, the folder specified by the system is used, but not always.
This is implemented differently in different programs, but almost always the necessary parameters can be found in the settings. For example, in Google Chrome you will need to open the settings, open additional options and specify the folder in the “Downloaded files” section, as in the screenshot above (or you can enable the option so that each time you download, you are asked for the location where you want to place the file).
Disable grouping by date in the Downloads folder
In the latest version of Windows 10, files in the Downloads folder are grouped by date by default, which is not always convenient for use.
To enable the standard view, while in this folder, right-click in an empty space in Explorer, select “Grouping,” and then select “None.”
Video instruction
In conclusion, there is a video in which everything described above is clearly shown. Perhaps this will be more convenient for some of you.
Microsoft engineers have implemented a boot store, also known as Boot Configuration Data (BCD), and a boot menu in Windows. The first contains the bootloader identifiers of all operating systems available on the PC, and the second reads them and displays them as a list of operating systems available for launch. This makes life much easier for the user whose computer has several systems. He doesn't have to do anything fancy to switch between them. Just restart your computer and select the one you need from the list provided. Like other parts of the Windows OS, the boot menu is customizable. This guide lists the available ways to edit this section.
Note: Almost all actions described in this guide must be performed under an account with administrator rights. Otherwise, you must know the password for it.
Adding operating system entries to the BCD and boot menu
There are many options for performing this procedure, but we will focus on the most popular or least labor-intensive.
Adding Windows XP
This process with the necessary explanations is described in some detail in the article Installing Windows XP on a computer with Windows 7. Here I will just combine the commands to be executed:
Adding Windows Vista or Windows 7
If the system you are adding is Windows Vista or Windows 7, you can automate the process by using the recovery environment and one of its options, “startup repair.” This will create a new boot entry in BCD and add a menu item to the boot manager. You will get the same effect when using the command:
If the utility finds an operating system on the computer that does not have an entry in the BCD, such an entry will also be created.
You can use the method described above, that is, start with the command:
But this method is labor-intensive and is not without the possibility of making numerous mistakes. It is easier to copy an existing entry and change the values of the device and osdevice to those corresponding to the operating system being added. Let's say you're running Windows 7. Run:
As a result of executing the command, you will receive the message “The record was successfully copied to <хххххххх-хххх-хххх-хххх-хххххххххххх>”. Next do:
where X is the letter of the partition on which the operating system is located. Enter the code indicated by crosses carefully, or better yet, copy and paste it into commands using the right mouse button. Finally, run the command that adds a new entry to the boot manager:
As you can imagine, the entry will be added to the bottom of the existing list.
Add a boot entry for an operating system installed on a virtual hard disk
If you installed Windows 7 on a virtual hard disk and want to add an entry to the boot manager, use the method described above, but take into account the peculiarities of booting from a VHD. The alphanumeric code obtained after executing the bcdedit /copy... command is designated as:
where [X:]DIRfilename.vhd is the full path to the VHD file and the file name.
“The Shortest Guide” - a little more detail
The boot menu must be implemented at the bootloader level - editing text configs is much easier and safer.
We don’t need a boot record - the fact is that when you set the BIOS settings to boot from a disk, the UEFI firmware first looks for an EFI partition on it, and then tries to execute the file at a strictly fixed address on this partition: /EFI/Boot/BOOTX64.EFI
What is an "EFI partition"? In theory, it should be of a special type “EFI System” (ef00). In practice, the first partition on a GPT disk that is formatted in FAT32 and has enough space to accommodate the bootloader and support files (if any) is suitable.
Point 3: “Download any UEFI bootloader from the Internet . What does it mean? A bootloader is simply an executable file of a certain format, which comes with a config. For example, if you have an installed package with systemd on hand, the bootloader file can be found at /usr/lib/systemd/boot/efi/systemd-bootx64.efi, rename it to bootx64.efi and copy it to /EFI/Boot / on the EFI partition. Don't have systemd at hand? Download the archive from the Archlinux website. Or from the Ubuntu repository. Or Debian. Do you have a Windows system at hand? Take the Windows bootloader from there, it will also work)) If you can set it up, I honestly haven’t tried it.
Point 4: “Set up the config” . Just like a regular program, when the bootloader starts, it expects to find configuration files in certain paths. This information is usually easy to find on the Internet. For the systemd-boot loader, we need to create a “loader” directory in the root of the EFI partition, and in it a “loader.conf” file with three lines (I’ll give my own):
default archlinux timeout 10 editor 1
The editor parameter is responsible for the ability to edit the boot menu item before starting.
Next to loader.conf you need to create an entries directory - one file in it will be responsible for one boot entry in the boot menu. I have one arch.conf file there with the following content:
title Arch Linux linux /efi/archlinux/vmlinuz-linux initrd /efi/archlinux/initramfs-linux.img options root=/dev/mapper/vg1-lvroot rw initrd=\EFI\archlinux\intel-ucode.img
I didn’t mention it, but it’s pretty obvious - the kernel and initramfs must be on the same file system as the bootloader, that is, on the EFI partition. The paths to them in the configs are counted from the root of this file system.
Removing System Boot Entry from BCD and Boot Manager
Removing the installed operating system entry from the BCD and boot manager is done using the command
There is a peculiarity in executing the command: if a known record is specified as the ID, for example, then the command must be executed with the /f key:
If the ID is written in alphanumeric code, the /f switch is not needed. When this command is executed, data about the operating system being removed is removed from both the BCD and the boot manager. This is its main difference from the team
For those who want to master more advanced capabilities: run the command
How to change the operating system name in the Windows 10 boot menu
In Disk Management you can see that the first Win 10 is on the drive (C:), and the second is on the drive (E:). By default, Windows 10 boots, located on volume 4 (disk (C:) in the screenshot).
When you turn on the PC, the OS boot menu appears.
Now let's open the Download Manager
using the
bcdedit.exe
Launch the command line as administrator and enter the command: bcdedit
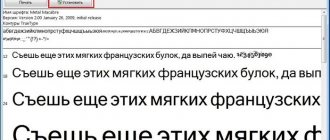
The description parameter determines the name of the operating system in the Boot Manager.
.
As you can see, the names of both operating systems in the Manager are the same: - Windows 10.
Connecting a virtual hard disk (VHD)
Bcdedit also allows you to work with virtual disks by adding an entry for them directly into the bootloader. The technique allows you to use a virtual machine as a regular OS, with the ability to start when the computer starts:
To connect VHD, you need:
- bcdedit” in the command line console run the command by pressing the “Enter” key.
Editing the boot menu of several Windows within the system
Editing the Windows boot menu is done in system properties. Press the Win+Pause keys and select “Advanced options”.
A system properties window will appear; here you need to click the “Options” button at the very bottom, in the “Boot and Recovery” column.
What is offered to us? We can select Windows, which will boot by default.
We can set a different timer value, but this time enter an arbitrary number of seconds during which the multi-Windows bootloader menu will be displayed on the screen.
To reduce the boot time of the main Windows, you can completely remove the boot loader menu for several systems. To do this, you need to uncheck the option to display a list of OS.
In this case, the bootloader menu will disappear and the main Windows will boot immediately. At the same time, the second system is not going anywhere. To get into it, you just need to check the box back, and the next time you start the multi-system boot loader menu will appear again. This option is convenient for cases when the second system is rarely used.
When you finish editing the bootloader menu, click “Ok” at the bottom.