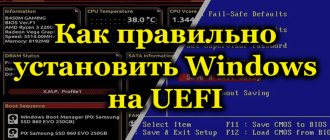
UEFI (Unified Extensible Firmware Interface) technology, like BIOS, is an interface to the computer's firmware and provides communication between it and the operating system. Like BIOS, the UEFI interface (also referred to in Russian-language computer journalism as UEFI) is used to initialize computer hardware components and launch the operating system stored on the hard drive.
UEFI positioning diagram in the generalized structure of interaction between PC components.
scenarios when it is necessary to use BIOS
- you are installing an older OS that does not support UEFI boot (such as Windows Vista SP1 or earlier), or
- you need to install an OS with a different bitness than the firmware (i.e. 32-bit OS on a machine with 64-bit UEFI, or vice versa)
Note that an OS that nominally requires UEFI can often be forced to boot on BIOS-based machines using a specially designed boot loader1. For example, this is the case with OS X - as any Hackintosh enthusiast can tell.
Difference between UEFI and Legacy
At first glance, UEFI and Legacy are very similar. However, on a deeper level, they are significantly different.
Since UEFI is the successor to BIOS, it inherits all its features and capabilities. Below are the differences between UEFI and Legacy:
| UEFI BOOT MODE | Legacy or LEGAL LOAD MODE |
| UEFI supports a more beautiful user interface. | Legacy boot mode is traditional and very simple. |
| It uses the GPT partitioning scheme. | Legacy uses the MBR partition scheme. |
| UEFI provides faster boot times. | It is slower compared to UEFI. |
| Since UEFI uses the GPT partitioning scheme, it can support disks and flash drives up to 9 Zettabytes. | The MBR disk partitioning scheme used by Legacy only supports storage devices up to 2 TB. |
| UEFI runs in 32-bit and 64-bit versions to support mouse and touchscreen navigation. | Legacy runs in 16-bit mode, which only supports keyboard navigation. |
| Supports Secure Boot, which prevents unauthorized applications from being downloaded. It can also prevent dual booting by treating operating systems (OS) as applications. | Cannot provide a secure boot method that allows unauthorized applications to be loaded, allowing Dual Boot to occur. |
| It has a simpler update process. | The update process is more complex (and not always possible) compared to UEFI. |
While UEFI seems better than Legacy (and it is), it is not always the best choice to use and you may not need it. It all depends on the specific device and OS you want to use.
In some cases, you may need to use Legacy boot mode. For example, if you want to dual boot, UEFI may interfere with this process. Some operating systems, especially older ones, simply cannot work in UEFI mode, and if you want to install such a system, you will also have to use Legacy boot mode.
Here are some example scenarios where you won't need UEFI:
- Dual boot process (can be bypassed using e.g. rEFInd )
- If you are using disks less than 2 TB (you can continue to use MBR)
- When your OS does not know how to work in UEFI at all, or it is not required for it. (old versions of Windows and Linux)
- If you just like a fast and simple graphical BIOS interface with easy keyboard control.
How to install Windows in Legacy mode?
The conditions for creating a flash drive are the same as in the previous version. Only now the Rufus before writing to a flash drive, in terms of some settings, looks like this:
A more detailed (although the process is simple) description is in the contents of the article Bootable USB flash drive with Windows from Rufus. There, using the example of a slightly outdated version of the utility, everything is put into place. The process of selecting a ready-made flash drive when installing Windows on a computer is also similar to that from the previous paragraph:
- selecting a flash drive as a boot device from the BIOS or Boot Pop Up Menu
- selecting/creating/partitioning a disk as needed
- installation of the system and device drivers
How do partition styles relate to boot modes?
Boot mode (Legacy or UEFI) requires compatible partitioning (MBR or GPT) on the boot (system) disk. Legacy only boots in MBR style, while UEFI requires a GPT boot entry. This means that if the computer is running in Legacy mode, the boot disk is divided into partitions in the MBR structure. If you plan to switch to UEFI, you will need to change the type from MBR to GPT.
How to check whether you need to change the markup from MBR to GPT?
You can find out the breakdown in the hard drive and partition management settings. To access them, search for “Creating and formatting hard drive partitions.” Click on the option found and wait until the Disk Management window appears.
Right-click on your hard drive and select Properties. If there are several of them, check only the system one on which Windows is installed
On the Hardware tab, click on the “Properties” button again and select the “Volumes” tab. Here you will find information about Section Style.
If the style is set to GUIDPartitionTable (GPT), then you do not need to make changes to the partition layout. If the display is MasterBootRecord (MBR), you first need to change the style to GPT, then the boot mode from Legacy to UEFI.
Setting up UEFI before installing Windows 10 from a flash card
UEFI is a graphical interface that is responsible for the pre-boot environment of the operating system.
UEFI is essentially a replacement for the outdated BIOS basic input/output system, which has been successfully used in computer technology for decades. The world does not stand still, but moves forward by leaps and bounds, so it’s time to part with an old, trusted “friend” who has repeatedly helped when various problems arise. Created back in 2005 and improved over the past ten years, the “Extensible Firmware Interface” is much more responsive to the requirements of modern computer hardware. The need for its implementation arose a long time ago, and now all new models of personal computers are released with UEFI installed.
The UEFI-boot boot program, which controls the startup of a laptop or desktop computer, similar to the BIOS, begins to start when the computer is turned on before Windows 10 starts. With its support, all components and modules are polled to determine their readiness for operation, and then Windows 10 itself is checked. License code of the program , which prevents viruses from modifying the bootloader and installing pirated copies of Windows 10, can be located in a long-term storage device chip built into the motherboard, in a hidden area of the hard drive, or in its own network storage. UEFI management and debugging are easy to use and tailored to create maximum user convenience.
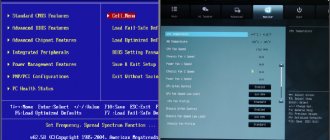
If you have an idea about BIOS debugging, then there will be no problems setting up UEFI:
- Hold down the Delete or F2 key (the specific keyboard combination is indicated in the technical description) while turning on the computer.
- The UEFI launch pad will open.
- Press the F7 key on your keyboard or the More key in the menu on the display.
In Control Panel, press the Advanced key - In the start panel, click on the “Download” tab. Select the “USB Support” option and select “Full Initialization” in the drop-down menu.
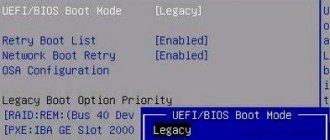
In the menu, select “Full initialization” - Expand the Compatibility Support Module option. Set it to "Available". There, in the additional tabs, set “Setting up boot devices” to the “UEFI only” option.
- Put “Both, but UEFI first” in the “Boot from media” line.
- Set "Windows UEFI Mode" in "Secure Boot".
- Select the flash card as the initial boot module in the “Boot Menu”.
- Save your selections by pressing F10.
- Press Enter to reboot.
After completing this algorithm of actions, you can begin installing Windows 10.
Video: how to configure UEFI before booting Windows 10 from a flash card
What will be the installation media?
First, decide on the media from which you will install Windows. I won’t sway you in any direction; all options have pros and cons. I personally have forever understood that:
- an optical disk in the drive is always safe (if stored properly: do not leave in the sun, do not wash with solvent or scratch); however, the drives do not always work for everyone
- The flash drive is compact and mobile; but the reliability of the media is called into question: you pulled it out of the connector a little wrong or inserted it into the port crookedly - and you have a RAW with unreadable files that now also need to be restored. But, given the general availability and increasing applicability of flash drives as universal devices, this is what I will have as a carrier.
I don’t see any point in developing this topic in more detail, so let’s proceed with the installation. However, before the process, you may need information on how to find out in what form the existing media is prepared for installation. That is, if the flash drive is already on hand, is it Legacy or UEFI? There are several options for this, the fastest is from PowerShell:
We look at the output of the PS terminal in the Parttition Style part. GPT is UEFI boot, MBR is Legacy.
How to disable Secure Boot
The Secure Boot option in UEFI prevents the launch of unauthorized OS and software components when the device boots by scanning the digital signatures of the boot loaders, thereby ensuring security. In some cases, it may interfere with booting the device from a flash drive when installing Windows 7, XP or Ubuntu, and therefore requires disabling. Deactivation may also be required before enabling BIOS emulation, since the settings may not initially display the option to switch the mode.
Depending on the firmware version, Secure Boot may be located in Boot, Security, Advanced – System Configuration, Authentication. To deactivate the secure startup option, move it to the Disable position. In some firmware variations, in addition to activating the BIOS and disabling Secure Boot, in the software settings you also need to specify the type of OS being loaded - “Other OS”.
conclusions
Now you know what UEFI and Legacy are in BIOS. Although many manufacturers still call UEFI BIOS, you won't see new devices with BIOS anymore. However, Legacy Compatibility Mode (CSM) is still in demand. It allows you to run older operating systems (Windows Vista and earlier) on modern computers.
This mode can also make upgrading your computer easier. If you used Windows 7/8/10 on a computer with BIOS, you can enable compatibility mode on the new motherboard. This will allow you to leave the old drive with the operating system previously installed on it.
Rate this article:
( 3 ratings, average: 3.67 out of 5)
Tweet Pin It
View BIOS or UEFI version in Registry Editor
1. Open the registry editor: in the search bar or in the Run menu (Run is called with the Win + R keys), enter the regedit and press Enter.
2. Navigate to the path HKEY_LOCAL_MACHINEHARDWAREDESCRIPTIONSystemBIOS. When the BIOS section is selected in the left column, in the right column in the BIOSVersion and BIOSReleaseDate parameters you will see the version and release date.