While using a computer, to change operating system settings, many users are advised in instructions posted on the Internet to change local group policy settings. In this regard, the question arises of how to open the Local Group Policy Editor in Windows 10, Windows 8.1, Windows 8, Windows 7.
Local Group Policy Editor is a built-in tool in the Windows operating system designed to manage group policy for computers that are not part of a domain. Using this tool, you can configure a large number of operating system settings: enable or disable Windows functions, prohibit the launch of certain programs, apply restrictions for users, etc.
System tool - Local Group Policy Editor (gpedit.msc) works only in older versions of Windows:
- in Windows 10 Professional (Professional), Education (for educational institutions), Enterprise (Corporate);
- in Windows1 Professional (Professional), Enterprise (Corporate);
- in Windows 8 Professional (Professional), Enterprise (Corporate);
- in Windows 7 Professional (Professional), Ultimate (Maximum), Enterprise (Corporate).
Users of home versions of Windows are out of luck due to the fact that Microsoft has decided not to provide this tool, as they believe to less inexperienced users. Therefore, this article contains instructions suitable for owners of older versions of Windows.
In this guide, we will look at many ways to launch the Local Group Policy Editor running on Windows 10, Windows 8.1, Windows 8, Windows 7 operating systems.
How to open the Local Group Policy Editor with a command from the Run window - method 1
To launch the Group Policy Editor, you can use the command launched from the Run window. This window launches various Windows tools, tools, or applications.
Follow these steps:
- Press the "Win" + "R" keys.
- In the "Run" dialog box, in the "Open:" field, enter the expression: "gpedit.msc" (without quotes), and then click on the "OK" button.
- The Local Group Policy Editor window will open on your computer's desktop.
Can't find gpedit.msc on Windows 10 and 11
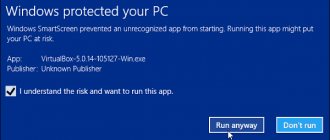
When you try to run the Group Policy Editor launch command in Windows 10 Home and Home for the same language or in Windows 11 Home: Win+R -> gpedit.msc, an error appears:
Cannot find 'gpedit.msc'. Check that the name is correct and try again.
It is likely that, according to Microsoft's logic, a home user does not need to edit local settings through the gpedit.msc graphical interface. Accordingly, users of the home edition of Windows 10 have to make changes through the registry editor, which is not so clear and more risky from the point of view of the possibility of making a mistake and breaking something in the system.
Luckily, Windows 10 Home has an undocumented option to install the gpedit.msc editor from the Windows image packages and manifests store (\Windows\servicing\packages).
Opening the Group Policy Editor from the management console - method 4
Another way: use the Microsoft Management Console - MMC (Microsoft Management Console). We'll run Local Computer Policy as a console snap-in.
Follow these steps:
- Press the "Win" + "R" keyboard keys.
- In the Run window, type "mmc" (without quotes).
- Press the "Enter" key.
- In the “Console 1 – [Console Root]” window that opens, go to the “File” menu, select “Add or remove a snap-in...”.
- In the Add or Remove Snap-ins window, in the Available Snap-ins area, select Group Policy Object Editor, and then click the Add button.
- In the “Select a Group Policy Object” window, click the “Finish” button.
- In the Add and Remove Snap-ins window, click OK.
- In the Console 1 - [Console Root] window, click the Local Computer Policy snap-in to open the Local Group Policy Editor in the management console window.
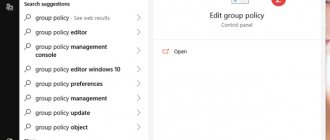
Search
Enter the word “group” in the search field. You can set the search filter – “parameters”. As a result, our editor will be found, which will be called “Change Group Policy”.
You can also enter the previous command in the search - gpedit.msc. There will be an executable file through which the editor is launched.
Running the gpedit file—method 7
This method involves launching the Local Group Policy Editor directly from the tool file located in the Windows system folder.
The following steps must be taken:
- Open Windows Explorer and then follow the path:
C:\Windows\System32
- In the "System32" folder, find the "gpedit" file.
- Double-click on the file with the left mouse button to launch the Group Policy Editor.
To make it easier to access gpedit.msc, create a shortcut to the file from which you can then launch the Local Group Policy Editor:
- Right-click on the "gpedit" file located in the "System32" folder.
- In the context menu that opens, first select “Send” and then “Desktop (create shortcut).
A shortcut to launch the system tool will appear on your computer's desktop. For greater convenience, the application shortcut can be pinned to the Control Panel or the Start menu.
Policy Plus
There is a utility that creates a graphical editor interface in any version of Windows 10. It is called Police Plus and can be downloaded here (https://github.com/Fleex255/PolicyPlus). Scroll to the bottom of the page and click on the active link “Download a Debug build”.
Run the exe file, agree to continue (if an error occurs) - and work in the local policies interface. The main drawback of the utility is that it is entirely in English.
Difference from Registry Editor
How to open Registry Editor in Windows 10
If you pay attention to the functionality and capabilities of these built-in Windows utilities, you can quickly notice that LGP configurations are superior to the registry tweaker in this path. This is explained by the fact that when editing GPU settings, network administrators always see and understand what they are working with. There are no complicated parameter paths or scripts in this program that can only be understood by experienced users.
The registry editor is significantly different from RLGP
When making any changes in the LGP Editor program, they will always be automatically accepted in the system registry by the Windows operating system. The opposite is also true: if you make the necessary changes to the keys in the registry settings, then the values in the RLGP will also be changed before their subsequent adjustment.
There is one very interesting fact: group policies of the Windows 10 operating system automatically update registry entries at certain time intervals. This is necessary to keep everything in working order.
Note! Typically the time interval is in the range of half an hour to one and a half hours. If the user wants, this setting can be changed.
How to Access Group Policy Editor in Windows Home
Group Policy Management is a feature reserved for the Professional, Enterprise, and Education editions of Windows. But with some tweaks, home users can enable the Local Group Policy Editor, or you can use a third-party tool to access a more comprehensive set of settings. We'll show you both options.
How to open the Local Group Policy Editor
You can access the Local Group Policy Editor in several ways.
Here are the two most convenient:
- Press Windows Key + R to open the Run menu, type gpedit.msc , and hit Enter to launch the Local Group Policy Editor.
- Press the Windows Key to open the search bar or, if you're using Windows 10, press the Windows Key + Q to bring up Cortana, type gpedit.msc , and open the corresponding result.
If this doesn't work, then you either don't have administrator rights or you're using Windows Home and don't have access to the Local Group Policy Editor.
Luckily, you don't need to upgrade to Windows Pro to configure Group Policies. Below we explain how to enable Local Group Policy Editor in Windows Home, but we recommend checking the following third-party tool first.
How to Configure Windows Settings Without Group Policy Editor
Before you try to enable the Local Group Policy Editor, consider using a more convenient and more powerful alternative. Policy Plus is an open source tool that gives you access to settings in the Group Policy Editor and the Windows Registry.
Policy Plus is compatible with all editions of Windows. This requires .NET Framework version 4.5 or higher. We recommend installing a more stable Release build . Once installed, go to Help > Get ADMX Files , double check the destination folder, and click Get Started to download additional administrative templates.
If you've ever tried the built-in Windows Group Policy editor, the Policy Plus interface will be familiar to you. However, the categories in the left column follow a slightly different logic, which is easier for us to navigate.
If you're using the Home version of Windows, switch to see the settings in the Computer category only, as your system will ignore changes to individual user GPOs; instead, you will need to make these changes to the Windows registry.
Changing settings works the same as in the Group Policy Editor; more on this below. Please note that if you are using Windows Home, you will have to restart your computer or log out and log back in for the changes to take effect.
How to enable Local Group Policy Editor in Windows Home
Whether you're using Windows Vista, Windows 7, Windows 8.1, or Windows 10 Home, you can enable Group Policy Editor using one of the two solutions below.
Solution 1: Use the Add GPEDIT.msc installer
To install this tool correctly, it requires several settings and NET Framework version 3.5 or higher.
First, head to C:Windows SysWOW64 and copy these items:
- GroupPolicy folder
- GroupPolicyUsers folder
- gpedit.msc file
Then open C:Windows System32 and paste the items you just copied.
Currently from DeviantArt user Drudger and install it on your computer. You will need a DevianArt account.
Once installed, you will find a tool under C: Windows Temp gpedit . You may have to manually navigate to this folder.
If your Windows username contains more than one word, you may need to change your setting. Right-click x64.bat or x86.bat , depending on whether your system is 64-bit or 32-bit, and select Open with... > Notepad or Edit (Windows 10). Add quotes to the six instances of %username% , i.e. change %username% to "%username%" , save the changes, then right-click the BAT file again and select Run as administrator .
If you keep getting the "MMC could not create the snap-in" error, try replacing %username% with "%userdomain%%username%" .
Solution 2: Use GPEDIT Enabler BAT
If you cannot find the gpedit.msc file on your system or if the previous method did not help, try this.
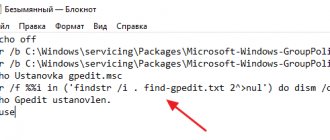
Open Notepad , enter the code below and save the file as Enabler.bat .
@echo offpushd “%~dp0″dir /b %SystemRoot%ervicingPackagesMicrosoft-Windows-GroupPolicy-ClientExtensions-Package~3*.mum >List.txtdir /b %SystemRoot%ervicingPackagesMicrosoft-Windows-GroupPolicy-ClientTools-Package~3*. mum >>List.txtfor /f %%i in ('findstr /i . List.txt 2^>nul') do dism /online /norestart /add-package:»%SystemRoot%ervicingPackages%%i»pause
Then right-click the BAT file you just created and select Run as administrator . A command window will open and the BAT file will be run through several installations. Wait until you see Press any key to continue below; this will close the command window.
Now try opening gpedit.msc as described above. If you can't find gpedit.msc using search, be sure to try opening it in the Run window.
Courtesy of ITECHTIKA for pointing this method out to us.
How to change Group Policy Editor settings
Now that you have access to the Local Group Policy Editor, what are you going to do with it?
The number of settings available in the Group Policy Editor is being reduced, and what you could previously do now requires tweaking the registry. But you may still discover some gems, and we'll show you how.
Inside the Group Policy Editor, you can find settings that affect Computer Configuration or User Configuration and three subcategories for each. Browse through the Administrative Templates to discover the most interesting settings.
Let's look at Computer Configuration > Administrative Settings > Windows Components > Windows Update , everyone's favorite Windows feature. You will find that most of the settings here are not configured .
To change one of the settings, such as Set up automatic updates , double-click the item, then view the available settings in the properties pop-up window and change them as you wish. In this example, you can change the setting to Enabled , then select option 3 - Windows Startup and Installation Notification , and then specify the day and time you want to install. When you're done, click Apply .
The Group Policy Editor also offers settings for pausing or stopping Windows Update and ways to manage driver updates in Windows 10.
Promotion with Windows Group Policy
The Group Policy Editor is a treasure trove of powerful Windows settings. Although its importance has declined since the introduction of Windows 10, it still offers many ways to customize Windows. And now home users have access to these settings too.
Post Views: 10
What it is
This is a specialized tool for the Windows operating system that allows administrators and ordinary people to make the necessary changes to the OS configuration from one computer to many devices connected to the local area network. You can also use it to configure your own computer. This utility includes many options that are accessible to ordinary people, such as registry settings, system security configurations, and software settings. Do not forget about computer operating scenarios, methods for turning it on or off, and directory redirection.
Window of the standard Windows policy editor
Thanks to the fact that the system has group policy management in Windows 10, anyone can quickly and easily restrict access to certain files to other people on the local network or, conversely, grant it. This allows you to control information within a small company or enterprise.
For your information! Managing local computer policy in Windows 10 makes it possible to work with single machines, carrying out similar manipulations with them. This utility is ideal for configuring the Windows operating system not only in the office, but also at home.
What are group policies and why are they needed?
Group Policy is a tool available to administrators working with the Active Directory architecture. It allows you to centrally manage settings on client computers and domain-joined servers, and also provides an easy way to distribute software.
Group policies allow you to configure settings for a specific set of users or computers within an Active Directory domain. They also allow you to specify policies in one place for a group and apply them to a target set of users.
For example, you can enforce a standard set of settings and configurations for groups of users or computers in a domain or on demand. In all companies, as a rule, there are various departments, for example, a department of system administrators, developers, designers, each department needs its own standard set of software, their work computers must be configured for special tasks and needs. Using Group Policies, you can create sets of settings for specific groups of users in a domain. With Active Directory Administration, you can set up and manage individual, unified sets of settings specifically for designers or developers.
Configurations for computers or users are simpler and more efficient because... located in one place and do not require repetition on each computer.
Removing a GPO
If you no longer need a GPO instance, you can delete it. Open the Active Directory management console and select the object to delete, then use the right mouse button to select the Delete
.
PS Other instructions:
- Active Directory storage structure
- Create an Active Directory Domain Services domain controller
- Adding a server to an existing Active Directory domain
- How to Configure Distributed File System (DFS) and Replication in Active Directory
You can find other instructions on our website.
To try the service, click on the button below. Try the service
Examples of using
Let's move on to using the Local Group Policy Editor. I'll show you a few examples that will let you see exactly how the settings are made.
Allowing and prohibiting programs from running
If you go to the User Configuration - Administrative Templates - System section, you will find the following interesting items there:
- Deny access to registry editing tools
- Disable command line use
- Don't run specified Windows applications
- Run only specified Windows applications
The last two parameters can be useful even to an ordinary user who is far from system administration. Double click on one of them.
In the window that appears, set “Enabled” and click on the “Show” button next to the words “List of prohibited applications” or “List of allowed applications”, depending on which of the parameters is changing.
Specify in the lines the names of the executable files of the programs whose launch you want to allow or deny and apply the settings. Now, when running a program that is not allowed, the user will see the following error message: “The operation was canceled due to restrictions on this computer.”
Changing UAC User Account Control settings
In the Computer Configuration - Windows Configuration - Security Settings - Local Policies - Security Settings section there are several useful settings, one of which you can consider.
Select the User Account Control: Administrator elevation prompt behavior option and double-click it. A window with the parameters of this option will open, where by default it is “Request consent for executable files not from Windows” (This is why, whenever you run a program that wants to change something on the computer, you are asked for consent).
You can remove such prompts altogether by selecting the “Promote without prompt” option (but it’s better not to do this, it’s dangerous) or, on the contrary, set the “Prompt for credentials on a secure desktop” option. In this case, when starting a program that can make changes to the system (as well as to install programs), you will need to enter the account password each time.
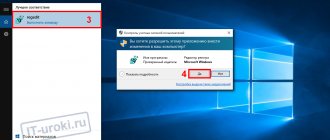
Launch Group Policy using PowerShell or the command line
- To launch PowerShell, you need to right-click on “Start” and select “Windows PowerShell” from the pop-up menu;
- Then, in the window that opens, you need to insert the same combination gpedit.msc
- The GPU starts up quite quickly. Enter the same combination into the command line window and launch the GP.