If you need to configure certain Windows operating system settings, you may need to use the Local Group Policy Editor. It can be found both in early versions of the Windows operating system and in Windows 10. But we will tell you how to do it in this article. Looking ahead in advance, we note that there are several ways at once.
Important! The methods for launching the editor do not work for Windows 10 Home - it has certain restrictions that prevent you from launching the editor.
Using the command line
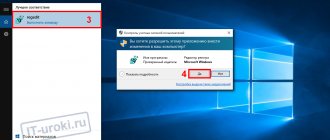
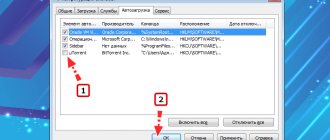
Let's start with the command line. Place the cursor on the “Start” button, then click on the right mouse button - a menu will appear. In this menu, just click LMB once on the “Command Line” line.
Hint: the same menu can be called up by pressing the Win+X keys on the keyboard.
The Command Prompt is open, you need to enter the command gpedit.msc and press the Enter key.
The editor is running.
Run window
You need to open the “Run” window. To do this, you can, for example, press Win + R on your keyboard.
The Run window will appear. Specify the gpedit.msc and click OK.
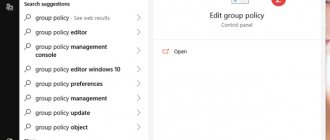
Search button
Click on the search button next to the Start icon.
In the search, write group policy change or only part of the phrase. You see the application of the same name, click on it to launch.
The same effect will occur if you enter the gpedit.msc into the search bar.
Solving common problems when running gpedit msc
When you try to run gpedit, if you receive an error message like "Failed to create snap-in," this in most cases indicates that the application does not have the necessary rights to create temporary files. This can be resolved as follows:
- Go to system drive
- Next - to the Windows folder
- Then in "Temp".
- Using the context menu, create the gpedit folder (with a small letter).
- If after this the error repeats, then you need to download the file from the above site gpedit-temp-files-x86x64.
- If for some reason gpedit msc fails to download additional files, then there are alternative download links on the above site.
- Next, unzip the archive and place the files in the gpedit folder (in the “Temp” folder created by the user).
Computer (Explorer)
You can use File Explorer or your computer to launch Group Policy Editor.
Find the “Computer” icon on your desktop and double-click on it with the left mouse button.
In the address bar, enter the address C:\Windows\System32\gpedit.msc, where drive C is the drive on which the operating system is installed. Press the Enter key on your keyboard.
The editor will be launched.
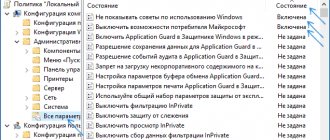
How to use the Local Group Policy Editor
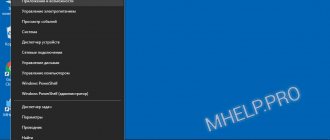
The Local Group Policy editor is divided into two panes: the left pane contains the Local Group Policy settings that appear in categories, and the right pane contains the contents of the active category. Local group policies are divided into two large sections:
- Computer Configuration—Contains Local Group Policy settings that control policies that apply to the entire computer, regardless of whether users are logged on or not.
- User Configuration—Contains Local Group Policy settings that control user policies. These policies apply to users, not the entire computer. While it's beyond the scope of this guide, you should be aware that user policies apply to users regardless of which computer on your network they log in from.
The Computer Configuration and User Configuration categories are divided into three sections:
- Software Settings - Contains software policies and should be empty by default.
- Windows Settings - Contains Windows security settings. This is also the place where you can find or add scripts that should run when Windows starts or shuts down.
- Administrative Templates - has many settings that control many aspects of your computer. This is a place where you can see, change and even apply all sorts of settings and rules. To give you a few examples, you can control how Control Panel, Network, Start Menu, and Taskbar work, and what users can change when using them.
Console
Probably one of the most inconvenient methods, but since it works, we cannot help but talk about it.
Click on the search button and enter the mmc . Next, select the application of the same name.
The console is running. Click “File”, then in the menu - “Add or remove snap-in”.
Next, select “Group Policy Object Editor”, click “Add” and then OK.
Installing a new administrative template in an Active Directory domain
New administrative templates are installed in the same way. For example, you plan to use Group Policies to manage the Edge Chromium on users' computers. Administrative Templates for Edge Chromium are missing from both Windows 10 2004 and 20H2. You will have to manually download the Edge Chromium policy files and copy the admx files to the PolicyDefinitions directory on the domain controller.
- Microsoft Edge for business page (https://www.microsoft.com/en-us/edge/business/download);
- Select the Edge version, build, and platform you want to use. Click the button Get Policy Files;
- Unzip the MicrosoftEdgePolicyTemplates.cab file;
- Go to the \MicrosoftEdgePolicyTemplates\windows\admx directory. Copy the files msedge.admx, msedgeupdate.admx and directories with language packs (for example, ru-RU and en-US) to the central policy repository on the domain controller (\\winitpro.ru\SYSVOL\winitpro.ru\Policies\PolicyDefinitions);
- Verify that new policy sections for configuring Microsoft Edge settings appear in the Domain GPO Editor.
Previously, we showed how to install GPO administrative templates for programs from the Microsoft Office suite (Word, Excel, Outlook, etc.).
If your company uses several versions of software that you want to manage through GPO, sequentially download and install on the DC all admx for all versions, starting with the oldest (admx templates for the current version of the software should be installed last).
Create an editor shortcut on your desktop
Right-click on an empty space on the desktop to display a menu. In it, select “Create” - “Shortcut”.
Specify the address C:\Windows\System32\gpedit.msc, where drive C is the drive on which the operating system is installed. Click “Next”.
Give the shortcut a name and click “Done.”
The Windows 10 Group Policy Editor icon is on the desktop. Just double-click the left key to start.
You can even change the editor icon like we did.
Diving into Templates and Taming Windows GPOs
In the next article from the “administrator’s summary” series, I would like to refresh my memory on several nuances of using group policies. At the same time, we’ll have fun creating our own templates and automating work with these same policies.
I will not tell you what group policies are, and will only focus on the main points that you should keep in mind when working with them.
In Windows systems, in addition to domain ones, there are also local group policies - they can be managed using the gpedit.msc on Professional and higher edition systems. It is often believed that without a domain, you can only configure local group policies for all users on the computer. This is not entirely true - with the release of Windows Vista, it became possible to use Multiple Local Group Policy or MLGPO . This mechanism allows you to configure separate policies for different users.
You can get to it by calling the mmc console: when adding the “Group Policy Object Management” snap-in, click the “Browse” button. Next, on the “Users” tab, you can select a specific user or group “Administrators” and “Non-administrators”. Unfortunately, management for the user group is not implemented.
Group Policy management for individual users.
It also happened that Active Directory was deployed on a separate terminal server only in order for an individual user to configure the behavior of the driver for EasyPrint. Do not do it this way.
When adding domain group policies, it is worth remembering the order in which they are applied - the policy applied last will have the highest priority (and this is often asked in interviews).
So, let's assume that we have a computer in a domain and four group policies: local on this computer; policy for the department in which the computer is located; domain policy and forest policy. The order of their application will be as follows:
- Local Group Policy.
- Site group policy.
- Domain Group Policy.
- Top OU Group Policy.
- Group Policy for the child unit.
That is, the closer to the object, the higher the priority, with the exception of local group policy. If you need to disable the application of higher-level policies, then block inheritance.
Blocking inheritance.
Any group policy can be divided into two configurations - user and computer. Typically, policies with computer settings are assigned to the organizational unit in which the computers are located. And policies with user settings are for users.
If you need to apply computer settings to a department with users and vice versa, use the so-called Group Policy shortcut. For example, this setting is useful when you need to apply specific policies to users to work on terminal servers.
The operation of the shortcut is configured directly in the policy ― Computer Settings ― Administrative Templates ― System ― User Group Policy short circuit processing mode.” We already wrote more about the mechanism in the article about using Merge\Replace in GPO. I'll just add that Group Policy loopback mode is also a common interview question.
Configure Group Policy loopback.
Physically, domain group policies are located in the SYSVOL on domain controllers. The folder is replicated between controllers. Each Group Policy looks like a folder with a GUID name.
Domain group policies.
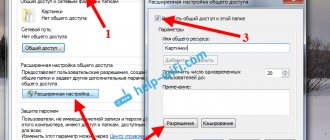
Filtering rules configured through the Group Policy Editor correspond to the NTFS rights settings for the corresponding subfolder.
Speaking about filtering rules, we cannot fail to mention the MS16-072 update, which “broke” group policies. Now, in order for filtering rules to work, you need to add a “read” rule to each filter, but not an “apply” rule to the Domain Computers group.
Each Group Policy folder has Machine and User corresponding to the user and computer settings. If you dig deeper into the subfolders, you can easily understand the structure of Group Policy:
- At the root of the folder there is a GPT.ini with Group Policy settings, such as its name.
- registry.pol files with settings for the corresponding registry branches.
- In the path Microsoft\Windows NT\SecEdit you can find a security settings template - GptTmpl.inf .
- The Preferences subfolder contains group policy preferences, which are subfolders with xml files.
- The Applications subfolder contains distributions for deployment through group policies.
- The Scripts folder contains scripts for logon\logoff for the user and startup\shutdown for the computer.
- The Documents and Settings folder contains settings for redirecting user folders.
- Finally, the Adm folder contains outdated Group Policy templates.
You can read more about the structure in the Group Policy Basics material, so let’s move straight to the templates.
At their core, administrative templates are special files with instructions for changing the client registry ( HKCU or HKLM branches) and settings for displaying changeable parameters through Group Policy Management. In principle, the registry can also be changed through “Group Policy Preferences”. But the difference here is not only in the beautiful interface.
| How to change the registry | How it behaves when deleting a policy with standard settings | Is it possible to change the setting manually? | Is it possible to change the parameter through the application? |
| Templates | The registry setting is restored to the "default" value if the default settings are in the template | — | — |
| Policy preferences | Registry setting does not change | + | + |
Comparison of Group Policy preferences and Administrative Templates.
In other words, registry settings through Group Policy templates are more strict. Whereas configuration through group policy preferences resembles the periodic use of a reg file. Of course, preferences allow you not only to change registry settings, but are also quite flexibly configured. That's why they are valuable.
This is relevant when the Policies branch is changed, and the custom application must store its settings in the registry. Simply changing the settings through Preferences and Templates will work in a similar way, only templates may be more convenient.
Before the advent of Windows Vista\2008, only the .adm standard was used as a group policy template. Although it had a simple structure that was easy to edit manually, this standard also had a number of disadvantages:
- We had to create a separate template file for each language.
- The template file was physically located in the Group Policy folder. When using the same template, it was saved to each folder, which increased the space taken up and replication time.
- Multiline and QWORD parameters were not supported.
A new one has emerged to replace the outdated standard. The new templates consist of two files: the template itself, which is independent of the language - .admx, and the language “package” for it - the .adml file. Now templates can be “put” in a central storage and accessed without creating identical files in the SYSVOL folder.
There was a fly in the ointment - now the file contents are in the XML format popular in the industry. And creating new templates in a notepad has become no longer so convenient.
Templates already exist for most of the parameters that may be needed. In addition, many application manufacturers release their own administrative templates. Here are some examples:
- MS Office 2016.
- FireFox and Thunderbird.
- Google Chrome.
- Adobe Acrobat and Reader.
- Catalog of templates for various software.
If there is a need to develop and implement your own administrative template, then the easiest option is to create an old .adm file and convert it to admx using a special utility. A more complicated option is to start right away with .admx.
First, let's look at a simple example. Let's create a group policy template that will allow us to turn on and off the display of hidden and system files, and at the same time the display of extensions.
I’ll say right away that this can be done through “Group Policy Preferences” - in Control Panel Settings - Folder Options. But we are not looking for easy ways and at the same time we do not want the display parameters to be changed manually.
Three keys in the registry are responsible for the parameters we need:
- Software\Microsoft\Windows\CurrentVersion\Explorer\Advanced\Hidden.
- Software\Microsoft\Windows\CurrentVersion\Explorer\Advanced\HideFileExt.
- Software\Microsoft\Windows\CurrentVersion\Explorer\Advanced\ShowSuperHidden.
The contents of the ADM template, which we will analyze further, are under the spoiler.
CLASS USER CATEGORY !!ShowExplorer POLICY !!ShowHiddenFiles KEYNAME "Software\Microsoft\Windows\CurrentVersion\Explorer\Advanced" EXPLAIN !!ShowHiddenFilesExplanation VALUENAME "Hidden" VALUEON NUMERIC "1" VALUEOFF NUMERIC "2" END POLICY POLICY !!ShowFileExtensions KEYNAME " Software\Microsoft\Windows\CurrentVersion\Explorer\Advanced" EXPLAIN !!ShowFileExtensionsExplanation VALUENAME "HideFileExt" VALUEON NUMERIC "0" VALUEOFF NUMERIC "1" END POLICY POLICY !!ShowSuperHiddenFiles KEYNAME "Software\Microsoft\Windows\CurrentVers ion\Explorer\Advanced" EXPLAIN !!ShowSuperHiddenFilesExplanation VALUENAME “ShowSuperHidden” VALUEON NUMERIC “1” VALUEOFF NUMERIC “0” END POLICY END CATEGORY [strings] ShowExplorer=”Show files in Explorer” ShowHiddenFiles=”Show hidden files” ShowHiddenFilesExplanation=”When this setting is enabled, Explorer will show hidden files." ShowSuperHiddenFiles="Show system files" ShowSuperHiddenFilesExplanation="When this setting is enabled, Explorer will show system files" ShowFileExtensions="Show file extensions" ShowFileExtensionsExplanation="When this setting is enabled, Explorer will show file extensions"
Let's look at the file syntax in more detail.
- CLASS. Can take the value USER or MACHINE - depending on the class, the registry branch HKCU or HKLM will change, respectively.
- CATEGORY . A string that specifies the name of the policy "folder".
- POLICY . The line specifies the name of a specific policy - we will have three of these.
- KEYNAME . Path in the registry to the parameters to be changed.
- EXPLAIN . A reference to a “variable” with an explanation of the setting.
- VALUENAME . The name of the parameter being changed in the registry.
- VALUEON **VALUEOFF**. The value that the parameter will take when turning it on or off in the policy.
- [strings] . Section with variable values that I used for text strings. You don’t have to use them, but then there may be problems because of the Russian language.
In addition to the options involved, there are others, for example:
- EDITTEXT . Text field for input.
- NUMERIC . Field for entering numbers.
- CHECKBOX . A list where you can check off parameters.
- COMBOBOX . List with "switch"
- DROPDOWNLIST . Drop-down list.
- LISTBOX . List for entering multiple items.
More details about all the parameters can be found in the MSDN ADM Format section.
Installing a new template is not easy, but very simple - just right-click on “Administrative Templates”, select “Add and remove templates” and add our newly created template.
Added template.
After installing the template, it will appear in the “Classic Administrative Templates” branch.
Now we can convert our template to .admx using the faAdmxConv from ADMX Migrator.
Converting the template.
After conversion, the resulting .admx template and the Ru-ru folder with the .adml localization file must be copied to the %Systemroot%\PolicyDefinitions folder for the local policy or to the Sysvol\PolicyDefinitions folder on the domain controller.
Installed .admx template.
Full listing of the resulting template and localization file under the spoiler.
Sample:
Localization file:
Show files in Explorer Show hidden files When this setting is enabled, Explorer will show hidden files. Show system files When this setting is enabled, Explorer will show system files. Show file extensions When this setting is enabled, Explorer will show file extensions. ADMX Migrator encountered a string that is not present in the source ADM string table. ADMX Migrator encountered a policy that does not have a supportedOn value.
Indeed, xml in the new format is slightly less readable than the old .adm. To make it easier to work with the new format, ADMX Migrator includes the faAdmxEditor.msc . In addition to this utility, there are scripts for converting reg files into templates, and third-party paid utilities.
Of course, you can do without all this and figure it out on your own - I’ll leave this as homework. Fortunately, the MSDN portal has a detailed description of the XML schema, and there are good materials with examples on the Internet. For example, “Group Policy Administrative Templates.”
Now let's move on to automation.
Working with group policies from the command line is quite boring. There are three main tools.
PowerShell . There is a set of cmdlets for backup, recovery and group policy management. The creation of new policies is limited - you can only change the registry. However, in most cases this is enough. As an example, let's create a group policy that will disable automatic updates of Adobe Reader DC.
The bUpdater in the [HKEY_LOCAL_MACHINE\SOFTWARE\Policies\Adobe\Acrobat Reader\DC\FeatureLockDown] branch is responsible for disabling automatic updates By setting the parameter to 0, we will disable the option.
Creating a group policy in PowerShell will look like this:
Import-module -Name GroupPolicy Write-Host “Create a new policy object named Adobe_Reader_disable_autoupdate” New-GPO -Name Adobe_Reader_disable_autoupdate Write-Host “Add the registry value we need” Set-GPRegistryValue -Name “Adobe_Reader_disable_autoupdate” -key “HKLM\SOFTWARE\Policies” \Adobe\Acrobat Reader\DC\FeatureLockDown" -ValueName bUpdater -TypeDWord -value 0 Write-Host "Link the new object to the required OU" Set-GPLink -Name Adobe_Reader_disable_autoupdate -Target "ou=Computers,dc=domain,dc=com" -LinkEnabled Yes
Freshly created group policy.
A complete list and description of cmdlets is available in Technet Group Policy Cmdlets in Windows PowerShell.
COM interface to GPMC (Group Policy Management Console). The method allows you to do a lot with policies, in any programming language that supports COM interfaces. Unfortunately, it has not gained popularity and there are quite a few examples on the Internet, despite the rich description of interface methods on the MSDN portal. A few use cases are available for download in the Technet gallery.
LGPO.exe. Not long ago, Microsoft replaced the set of utilities for working with local group policies with a single utility. You can download it on the official website. The utility is convenient for copying and deploying local group policies. Support for MLGPO has also been announced. You can also create your own policies. The program is also convenient for creating and modifying registry files registry.pol. For example, let's change the local group policy by adding to it disabling the update of the unfortunate Acrobat Reader DC.
Let's make a backup of local group policy with the command
lgpo.exe /b C:\Temp /n “Backup”
A subfolder with a GUID will appear in the C:\Temp folder with a structure similar to domain group policies:
Now let’s expand registry.pol into a text file:
LGPO.exe /parse /m C:\temp\{GUID}\DomainSysvol\GPO\Machine\registry.pol >> reg.txt
The syntax of the text file is obvious. Let's add registry values to it to disable automatic updates of Acrobat:
The registry value added to the file.
Now all that remains is to wrap our reg.txt back into registry.pol and import the changed file back into local group policy:
LGPO.exe /r C:\Temp\reg.txt /w C:\Temp\registry.pol LGPO.exe /m C:\Temp\registry.pol
All these machinations, of course, can be wrapped in one script and used to massively change local group policy using a familiar tool for running commands on remote computers. You can read more about methods for running commands in our article “1000++ way to run commands on a remote computer.”
Of course, knowing the structure of domain group policy, nothing prevents you from creating a tool for creating and managing policies that is convenient for you. Share in the comments, do you have your own ways of setting up user machine registries?