Many novice users are wondering how to enter the registry in Windows 10, 8, 7 or XP. No matter how much you go through the Start menu items, you won’t find a shortcut to the registry in it! How to open the registry in Windows?
The fact is that any thoughtless change in the registry can lead to catastrophic consequences for your computer. To prevent inexperienced users from causing trouble, access to the registry was hidden.
Promise yourself that you will not make rash changes to the registry so as not to harm your computer!
Details about what a registry is , how it works, and how it can be used can be read in this lesson .
For any version of Windows, there are several ways to launch a program in which you can change registry settings (called " registry editor ").
How to open the registry in Windows 10
Let's start with the latest Windows 10, and consider two options for accessing the registry.
Launching Registry Editor - Method 1 for Windows 10
- Click the "Start" button with the left mouse button (or the "Windows" key on the keyboard);
- When the Start menu opens, type the command “ regedit ” (without quotes) on your keyboard;
- At the top of the search menu, under the inscription “Best match”, the item “REGEDIT – Execute command” will appear, click on this item with the left mouse button;
- If a confirmation window for launching Registry Editor appears, click “Yes”;
The Registry Editor window will appear in front of you, in which you can make changes to the registry itself.
Launching Registry Editor on Windows 10
Launching Registry Editor - Method 2 for Windows 10
- Click the “Start” button with the right mouse button (or the Win+X key combination);
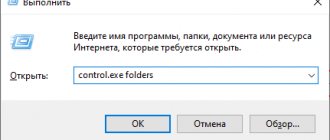
- In the menu that appears, select “Run” (these two steps can be replaced with one key combination Win+R);
- In the “Run” window that appears, type “ regedit ” (without quotes) and click “OK”;
- In the launch confirmation window, click “Yes”;
The Registry Editor window will appear, and you can start making changes.
You can clearly see how to enter the Windows 10 registry in this video:
Use search to launch Registry Editor
The second (and for some, the first) most convenient way to launch is to use the Windows search functions.
In Windows 7, you can start typing “regedit” in the Start menu search box, and then click on the found registry editor in the list.
In Windows 8.1, if you go to the Start screen and then simply start typing "regedit" on your keyboard, a search box will open where you can launch Registry Editor.
In Windows 10, in theory, you can find the Registry Editor in the same way through the “Internet and Windows Search” field located in the taskbar. But in the version that I currently have installed, this does not work (I’m sure it will be fixed by release). Update: In the final version of Windows 10, as expected, the search successfully finds the Registry Editor.
How to open the registry in Windows 7
To open the Registry Editor in Windows 7, you need to follow similar steps:
Launching Registry Editor - Method 1 for Windows 7
- Click on “Start” with the left mouse button;
- Type the command “ regedit ” (without quotes);
- Click at the top of the menu, under the inscription “Programs” on the inscription “ regedit ”;
- When prompted to confirm the launch, select “Yes.”
Launching Registry Editor - Method 2 for Windows 7
- Press the Win+R key combination on your keyboard (hold down the Windows key and, without releasing it, press the R key);
- In the “Run” window, type the command “ regedit ” (without quotes) and click the “OK” button;
- Confirm the launch of the registry editor with the “Yes” button.
Both methods of entering the Windows 7 Registry Editor can be seen in this video:
Proper Registry Cleaning/Repair to Increase Performance
We got to the registry editor. But what can be done with it, what is in it, and most importantly, how can the system be optimized as much as possible and errors corrected. Let's take it in order.
As mentioned above, the registry is a database. Whatever program you install, its initial settings are stored there. In the process of working with this program and when changing its settings, the corresponding registry directory and the files in it also change. Thus, any application in the registry has a certain folder with parameters, and more than one. Some directories store basic data that is modified by the operating system itself. In others - data about the user’s work with the program (in other words, your personal settings).
It’s not hard to guess that since almost any changes and settings are saved to the registry, it means they can be viewed and even edited. And since this data can be edited, it means that cleaning out some unnecessary directories or files can help optimize the system. This is true, but a user who encounters the “regedit” program for the first time will probably find its interface complex and unusual. Therefore, before performing any manual actions, you should turn to special programs whose task is to clean the registry. Let's leave the registry editor for now and move on to the most common applications that can be used to clean the registry without unnecessary hassle.
How to clean your computer using CCleaner
CCleaner
CCleaner is one of the most popular programs for cleaning your system from excess junk. Its capabilities are not limited to just cleaning the registry. There are several other equally interesting and useful functions, including, for example, setting up startup programs and clearing the cache. But now we are interested in cleaning the registry.
To clean the registry using CCleaner, run the program and go to the “Registry” section.
Go to the “Register” section
Next, click on the “Search for problems” button at the bottom of the screen. Wait until the search is completed (the completion percentage is visible at the top). The result will look something like this:
List of registry problems
Now click on the “Fix” button. The program will ask you: “Do you want to back up the changes you made?” This is necessary in case something goes wrong and something that cannot be deleted is deleted. This usually doesn't happen, but you can play it safe if you want.
CCleaner will ask you one by one whether to fix a particular registry file. This way you can familiarize yourself with each problem in particular. If you don't want to do this, just click "Correct marked".
Fixing registry errors
Your registry is now cleared of unnecessary stuff.
Reg Organizer utility
Reg Organizer
Reg Organizer has almost the same functions as CCleaner. As for cleaning the registry, there is more functionality here. The user has access to not only “Automatic Registry Cleaning”, but also “Manual...” In the first case, everything is quite simple. You just need to click on the corresponding button in the program interface. But manual cleaning structures the potential errors found into sections. Thus, if you are good at it, you can look at each of the registry keys for any problems. Users who have not previously worked in the registry are recommended to use automatic cleaning.
Manual cleaning window
It is worth noting that in new versions of Reg Organizer it is quite simple to launch the program. An automatic “Express check” will be carried out, as a result of which all faults will be found. You will only need to click "Clear".
Express registry check
How to clean the registry in Windows Cleaner
Windows Cleaner
Working with this program is practically no different from working with CCleaner. Its interface is even simpler. To clean the registry, go to the “Registry” tab and check the boxes next to all the options. Then click "Analyze".
Registry analysis in Windows Cleaner
The program will display the analysis results. Now you just need to click “Cleanup”.
Video: WindowsCleaner - cleaning and optimizing the system
How to clean it manually using the registry editor
If you do not want to use additional software, you can clean the registry manually. In this case, you will perform all the optimized functions of the programs mentioned above yourself.
ATTENTION! Manual cleaning of the registry is recommended only for users with sufficient knowledge of the operation of the registry itself. You do any actions at your own peril and risk. We cannot guarantee that the advice below will not cause system failures.
Manual work with the registry can be divided into two types:
- Editing the registry in the "regedit" program;
- Tweaking the registry on the command line.
Let's consider each method as a separate topic.
How to open the registry in Windows XP
In Windows XP, opening the Registry Editor is slightly different:
Launching Registry Editor - Method 1 for Windows XP
- Click on “Start” with the left mouse button;
- In the right column, find the “Run” item (both steps can be replaced with the Win+R combination)
- In the “Run a program” window, write the command “ regedit ” (without quotes) and click the “OK” button;
Launching Registry Editor in Windows XP
Launching Registry Editor - Method 2 for Windows XP (and more)
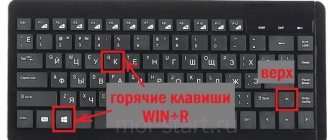
- Open File Explorer (you can use the keyboard shortcut Win+X);
- Go to drive “C:”;
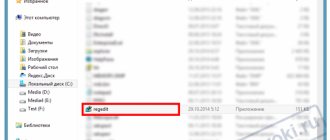
- Open the Windows folder;
- Find the "regedit" file and run it.
And, of course, a video version of opening a registry editing program in Windows XP:
The second method is suitable for all of the listed versions of Windows. Moreover, you can cheat a little:
Once you get to the “regedit” file, you can create a shortcut on your desktop and greatly simplify access to the Registry Editor in the future.
You can find out more about what a registry is and how it works here .
Running regedit.exe
The Windows Registry Editor is a regular program, and like any program, it can be launched using an executable file, in this case regedit.exe.
You can find this file in the following locations:
- C:\Windows\
- C:\Windows\SysWOW64 (for 64-bit OS versions)
- C:\Windows\System32 (for 32-bit)
In addition, in 64-bit Windows you will also find the file regedt32.exe; this program is also a registry editor and works also on a 64-bit system.
Additionally, you can find the Registry Editor in the C:\Windows\WinSxS\ folder; for this, it is most convenient to use a file search in Explorer (this location may be useful if you did not find the Registry Editor in the standard places).
Safe editing rules
To run Regedit, there are secure editing steps. To preserve the system, you must be able to always return to the starting point. The user should keep in mind that the saved registry does not have an undo function. Here are some safe positions:
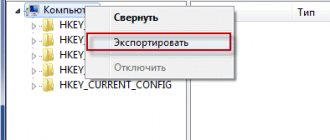
- The ironclad rule of editing is that the user must first create a copy. Creating a system restore point is the most convenient backup method.
- Use Regedit's export feature to create a copy of the registry key.
- Use key edition rules recommended by known reliable sources.
One thing to remember is that many transformations require the user to log out or restart the computer before they take effect, and many of the general recommendations on the Internet are useless or even dangerous to the operating system.
Solving startup problems
There are several reasons why the Windows 7 registry does not start:
- A virus has entered the system.
- The administrator has prohibited editing the registry.
Malware
In case of viruses, proceed as follows:
- Download the AVZ utility from the official website.
- Run it and update the virus databases.
- In the main AVZ window, open the “File” menu.
- Select Troubleshooting Wizard.
- Among the categories, use "System problems".
- Danger level: “All problems.”
- Wait for the scan to complete. Then click "Fix flagged issues."
Copying and restoring keys
REG files do not replace keys, but add to them. The user needs to remember: everything that is added to the registry is not deleted. Some advanced PC users prefer to do any actual editing in the exported REG and then merge the edited file. This prevents you from accidentally executing the wrong key. The user should always remember that Regedit does not have an undo feature. Before you get into the Windows 7 registry, you need to know how to copy its data. The procedure for creating a backup copy of the key:
- Open Regedit and highlight the key.
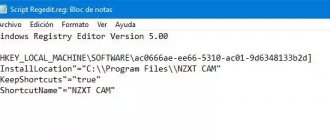
- Open the “file” menu and click “Export”. An alternative method is to right-click on the key and select Export. A standard save dialog box will appear.
- In most cases, you need to choose to save as a registration or REG file. This is a text document with a .reg extension, which is a copy of the selected key.
- Keep it in a safe place.
You can use the Import feature to restore it, but it's easier to merge the REG files into the registry by right-clicking the file and selecting Merge.
Launch from the Start menu
The Windows 7 registry can be opened in another way. Is more simple. Applicable in situations where the conductor’s operation is disrupted. And changes need to be made to the registry. To enter the registry editor, you need to do:
- We go to “Start”.
- In the search field “Find programs or files”, enter the expression “regedit”.
- To launch and enter the editor, click on the search result at the top.
Sources
- https://tehno-bum.ru/all-ways-to-open-registry-editor-in-windows-7/
- https://www.remnabor.net/upravlenie-reestrom-v-windows-7-i-ego-nastroyka
- https://ITpotok.ru/kak-mozhno-zapustit-redaktor-reestra-v-windows-7/
- https://pomogaemkompu.temaretik.com/656354691220506916/redaktor-reestra-windows-7/
- https://pc-consultant.ru/operatsionny-e-sistemy/kak-zajti-v-reestr-na-windows-7/
- https://komp.site/windows/redaktor-reestra-windows-7-kak-otkryt.html
- https://pcpro100.info/kak-otkryit-redaktor-reestra-windows-7-8-4-prostyih-sposoba/
- https://market-mobi.ru/opersistemy/reestr-vindovs-7.html
- https://canal-it.ru/soft/win7/kak-zajti-v-reestr-windows-7/
- https://3xru.ru/gde-v-vindovs-7-nahoditsya-redaktor-reestra/
[collapse]
How to clean your PC
This technique can help insure an inexperienced user:
- Download and install the special CCleaner program on your PC.
Download and install the special CCleaner program - Clear debris by running “Cleanup”.
Cleaning your computer of junk - Turn on “Analysis”, wait for the list to appear and press the “Clear” key.
- Check for problems related to the integrity of the registry by alternately clicking the “Registry”, “Search for problems” buttons, and after displaying the “Fix” list. You can correct errors one at a time, but you can also fix them as a whole list. If you are new to this subject, you are advised to agree to the suggestion to save copies. And remember the name of the folder to which the files will be sent.
Fixing problems
The program allows you to not only clean the system. By logging in through the “Service” button, you can remove unnecessary programs from startup and restore the system.
You can watch the video on how to download, install and work with the program.
Video - WindowsCleaner - cleaning and optimizing the system
Editor menu
The registry is systematized for quick navigation. Regedit has menu sections that are familiar from Windows. Menu sections:
- File.
- Editing.
- Find further, entrance.
- Edit.
- Favorites.
The File menu has Import and Export functions that can be used to backup and restore individual keys using REG. The "Edit" menu contains commands for making changes to the registry. Keys and values can be deleted, added, or renamed.
Useful "Find" function. There are thousands of keys in the registry and this search function is very necessary. Unfortunately, it cannot find binary values or REG_DWORD entries. It looks for key names, value names, and string data . The Edit menu also contains a useful "Copy" keyname entry, which directs the key's path to the clipboard. Since they can be quite long, this makes the job very easy. Another section of the menu that is very important is favorites. If a user frequently changes a certain key, it can be added to the Favorites list for easy access.
How to edit the registry
Editing the registry basically means changing existing partition settings. Find the desired section on the left, double-click on the parameter to be changed (on the right) and enter a new value in the window that opens. Click OK
Sometimes it is necessary to create a new parameter or section. To do this, you can right-click on the empty field on the right side (where the parameters are), open the Create menu and select the type of parameter to be created
By calling the context menu in the parameters section, you can also create a new section or parameter
For me, the first option is more familiar.
You can also Delete or Rename a section or parameter
by calling the context menu on the parameter.
Types of information in the registry
The information that a computer system must have is divided into two main categories. One of them is general about the computer itself. These are settings that apply to the system as a whole, including the hardware. Another general category consists of settings that apply to each account. The user who is logged into the OS is called the current one. Information in the registry is presented in a tree system, similar to folders and files.
In it, containers for information are called “keys”.
They are similar to folders. Keys can have subkeys. The name of the data contained in the key is called the "value". Actual data has several formats and can be a string, a number, or a series of numbers.
Just as a computer and folder have a root system, the registry has root keys at the top of the key-value hierarchy. It contains the names that Microsoft uses. Their names are "HKEY" affixed to the front and they are often called "beehives". Five root keys are used, three of them are really just subsections or combinations of sections of the two main HKLM and HKU. Additional root keys are often used when writing scripts and INF files. Root keys:
- HKEY _ CLASSES _ ROOTHKCR. File storage and COM object registration.
- HKEY_CURRENT_USERHKCU. Data associated with the current account.
- HKEY_LOCAL_MACHINEHKLM. Stores system information.
- HKEY_USERSHKU. Information about all accounts on the machine.
- HKEY_CURRENT_CONFIGHKCC. Information about the current PC profile.
Tweaking the registry as a way to optimize system performance
If you are a confident user, or you need to perform several sequential operations to edit the registry, it makes sense to use the command line. However, you shouldn't do it just like that. When using the command line, pressing the wrong key can have unexpected consequences. Therefore, be doubly vigilant.
To enter the command prompt, press Win+R, type “cmd” and press Enter.
Login to the command line
To execute a command, enter it in the window that opens and press Enter. To manage data in the registry, commands are used with an approximate syntax of the form:
REG <procedure> [parameter list]
Procedure is one of the 11 parameters presented below.
How to clean the registry on Windows 10 using CCleaner?
The CCleaner application is an excellent solution, characterized by high speed and comfortable interface implementation. Let's look at methods of working with the CCleaner utility when cleaning the registry on Windows 10:
- After starting the complex, you need to open the “Cleaning” tab.
- Using checkboxes, programs are marked that the user wants to completely remove.
- By pressing the “Analysis” key, the process itself is activated, which requires a certain amount of time.
- Using the “Cleanup” button, the specified deletion parameters will take effect. In addition to standard files, temporary files, storage of system files and folders that are not used by the operating system, cookies, browsing history, and much more can be cleaned.
- In the “Registry” item, there is the “Search for Problems” tab, here you can see the list of problematic registry files.
By pressing the “Fix” button, attempts are made to solve problems. - The “Service” tab contains a list of software.
- By selecting “Uninstall Programs,” you can free your PC system from unused applications and incorrectly removed software.
- The list of programs that start automatically when you turn on the PC is available when you select the “Startup” tab. Here, all unnecessary programs can be disabled.
Delving into the specifics of cleaning the registry of more outdated operating systems, you should familiarize yourself with the methodology of this process in the still popular Windows XP operating system.
Option number 1: Launch the registry editor through the “Start” system menu
Perhaps this is the most convenient and simplest method that can be used to open regedit on absolutely all computers, regardless of the version of the Windows operating system installed on them. True, depending on the system interface, the actions will differ slightly:
- for Windows Vista, 7, XP and earlier OS versions: The first thing to do is open the Start menu. To do this, look for and press the key on the keyboard, or find the “Start” icon on the taskbar and left-click on it. In any case, the standard menu should open:
Next, enter the value regedit in the search line, and the system will automatically find and display the file we need:
All that remains is to launch the Windows registry, for which you just need to left-click on the detected regedit file, and the system window we need for work will open by itself: - for Windows 8: Open the Start menu and type with the cursor on the right side of the screen from top to bottom. Next, click “Search” (picture “Magnifying glass”), in the search form that appears, enter the word regedit and by clicking the left mouse button, open the found program:
How to run and properly defragment the registry
Defragmenting the registry is the final stage of cleaning it. The fact is that after deleting values or files from the registry, the memory allocated for them remains allocated. Nothing is stored in it, but it is essentially not used. Defragmentation allows you to repurpose empty portions of reserved memory so that programs can use it again.
Almost all of the previously described programs have a defragmentation function. And if not, it means that the publishers have separated the defragmenter into separate software. So, Piriform (the creators of CCleaner) released Defraggler, whose work we will familiarize ourselves with.
The registry is defragmented only before Windows boots. Therefore, after opening the Defraggler program, click “Settings” -> “Startup Defragmentation” and select the option you need (“One-time” or “Always”).
Defraggler window
Reboot your computer and you will see the following when the system starts:
System output on new start
This means that defragmentation was successful. Note that constant or periodic defragmentation of the registry has a positive effect on the operation of the entire computer.
Video: How to use Defraggler
Obtaining access permission
Using Regedit requires some knowledge of the basic structure of the registry. Complete ignorance of what is actually in it often frightens users. Although in fact it is a simple database.
To open the editor you need to:
- Click Start > Run > Type regedit. exe > "Input". In the left pane, right-click on the key that needs permission.
- Click "Access Rights". Select the group or user name to which you want to apply the permission.
- Select the Allow checkbox for group or username access levels.
- Select possible operations. Reading - the contents of the key, without saving the change. Full access - to open, edit and obtain ownership of the key.
- To grant special permission in the key, click Advanced. Double-click on the name of the user or group where special rights are required.
- In the "Permissions" section, check the "Allow or deny" checkbox.
- Click "Apply" and then "OK" to accept the changes.
Editing the registry using the regedit program
The regedit program was created to simplify the user's work with the registry. In it, the entire registry is presented in the usual form of files and directories. In fact, it is only a graphical representation of the database. That is, you will not be able to find this or that file from the registry on your computer.
The entire registry consists of five root directories:
- HKEY_CLASSES_ROOT;
- HKEY_CURRENT_USER;
- HKEY_LOCAL_MACHINE;
- HKEY_USERS;
- HKEY_CURRENT_CONFIG.
The first directory contains files used and modified by the system. It is not recommended to edit anything in it at all.
The HKEY_CURRENT_USER directory contains registry data that can be modified by a specific user (the one under whose name the system is logged in). For example, here you can find some launch parameters for installed programs (HKEY_CURRENT_USERSoftware), etc.
The third folder is similar to the second. Only here the data used by the entire computer (that is, any user) is stored. For example, some programs are installed for all users. Their parameters are listed in the HKEY_LOCAL_MACHINESOFTWARE section.
HKEY_USERS contains registry files used by all users, as well as user information.
The last directory is designed to record the hardware settings used by the computer each time the system starts.
The above characteristics are only brief, generalized information. However, it will be quite sufficient for the registry settings that we will make. If you want to know more, check out the relevant literature.
Creating an item in the context menu
The recommendations are suitable for users who often need to access the registry. The item in the desktop context menu can be accessed in 2 mouse clicks. Open the Windows 7 registry in a convenient way and start doing the following:
1. Go to the shell section (full path in the picture).
2. Right-click on shell. In the menu, point to "create", then select "section". Give it a name, for example, “registry” (without quotes), this is what will be displayed in the desktop menu. Press Enter.
3. Next, right-click on the created “registry” and create a section called “command”.
4. By selecting “command”, you will see the “default” option on the right. Double-click on it with the right button. Copy the path “C:\Windows\regedit.exe” (with quotes) into the “value” field and click OK. This shows the path of drive C, you may have a different letter.
Close all windows, right-click on an empty space on your desktop. Click the appropriate item in the menu.
Now you can easily open the Windows 7 registry in compliance with all security measures. In the next article we will figure out how to enter the Windows 8 registry. In many ways, the opening methods are similar, but due to the different interface, there are still differences.