On December 21, 2022, TP-Link began sales in Russia of its brand new home router Archer AX73 (AX5400). Over my many years of using TP-Link routers at home, I have seen a lot: there were both positive and negative aspects. Spoiler – here both the price and functionality are good. Is everything really that good and you can find out my opinion after a week of test use of the device below in this article.
Friends, if you have any questions or suggestions regarding this article, you can leave a comment. Help yourself, help others, help us.
Brief opinion
For those who do not like to read long reviews, but want to briefly collect other people’s experience in their doubts “to buy or not,” I recommend that you familiarize yourself with this section. Here, in my opinion, I have collected the most important things that can be useful to a home user.
- Wi-Fi 6. Moreover, it is uncut and supports 160 MHz. I wouldn’t like to list all the features of Wi-Fi 6 here, so I recommend that you read this article of mine. Everything there is beautiful and on the shelves. And it will be useful to know for the future, because... Wi-Fi 6 is not the story of one specific router, but in general of all Wi-Fi devices of the near future. So if you have a choice between Wi-Fi 5 (802.11ac) and Wi-Fi 6 (802.11ax), if you have a budget, it’s definitely worth looking at the new version.
- Gigabit Wi-Fi . This is especially true for those who have already connected to gigabit Internet, but the previous generation of Wi-Fi reduced their speed. Here the maximum speed for the entire router is ~5400 Mbit/s (4804 Mbit/s at 5 GHz and 574 Mbit/s at 2.4 GHz). This is the same AX5400. In total, we connect gigabit Internet, and then we can create a couple of 8K streams via wire and air without any problems.
- Connection of ~200 devices (128 at 5 GHz and 96 at 2.4 GHz). We are often asked about the maximum number of devices that can be connected to a Wi-Fi router. This is especially true with the advent of the smart home, where there are many different small sensors, and people are accustomed to their USB modem with a maximum limit of 16 devices. Here this problem is completely solved. Moreover, if in the future you suddenly decide to transfer all your devices to Wi-Fi 6, it will all work in new colors - the same OFDMA and MU-MIMO 4×4 characteristic of Wi-Fi 6 will be connected here. Everything will be fine with the old equipment work as before.
- HomeShield . New interesting router protection based on Avira. I've never seen anything like this before. But there is a BUT - a number of functions are paid, so I propose to allocate a separate section here for its consideration. Although at this price of the router and the availability of free features, it’s quite an interesting solution.
- USB port . I really miss this port on my current router. And to be honest, I would really like to see 2 ports, because... In the old days, one of them was always occupied by the printer, and the second would be interesting to organize as storage for films for watching on TV.
- OneMesh . The feature is available out of the box. On my AX10 I never waited for it to appear, but here everything is available right away. For those who are not in the know, this feature allows you to organize a truly seamless Wi-Fi network at home. Those who have used repeaters (even with the same network name) understand that when moving from one point to another, the phone is still temporarily disconnected from the network, and this is very critical when making calls over Wi-Fi.
- There is no repeater mode and no WDS connection. Personally, for me, these functions are not needed on this router - I will not build a bridge, and for the repeater there is OneMesh.
- The USB port in the current version does not have all the functionality. There is no print server or modem support.
- HomeShield. Yes, I considered it higher as an advantage, but there is one nuance. To access basic parental controls, you will need to install a mobile app. For some it will be faster, but sometimes it’s easier for me to enter the configurator through a browser. Although everything you need is here, if you don’t use it tightly, you won’t suffer. And it’s quite possible that someday this will be transferred to a regular configurator - after all, there is no hardware connection.
What we get as a result: a completely serviceable, powerful router with all the latest functions; the functionality for the same TP- Link has something new that is interesting to look into. Bonus - original design.
- Perfect for those who were looking for a good Wi-Fi 6 router. I already regretted that I did it earlier.
- Powerful home router.
- For an excellent price (recommended - up to 7,000 rubles, in practice it is sold right now in stores for much cheaper), TOP for your money.
Characteristics
The most important characteristics of this router:
- WiFi 6
- Dual bands 2.4 GHz and 5 GHz
- Speeds: 4804 Mbps on 5 GHz and 574 Mbps on 2.4 GHz
- USB 3.0
- 6 antennas (non-removable, but freely rotating). 1st and 3rd (front view) – 2.4 GHz, the rest are responsible for 5 GHz
- Triple-core 1.5 GHz processor (Broadcom BCM6750)
- Gigabit ports (WAN and LAN)
I put all the other characteristics under the spoiler, maybe someone will see something interesting there:
Detailed Specifications
| Wi-Fi standards | Wi-Fi 6: 802.11 ax/ac/n/a 5 GHz 802.11 ax/n/b/g 2.4 GHz |
| Wi-Fi speeds | AX5400: 5 GHz: 4804 Mbps 2.4 GHz: 574 Mbps |
| Antennas | 6 antennas, non-removable Supports Beamforming and High-Power FEM |
| Wi-Fi Features | Dual band 4x4 MU-MIMO OFDMA Airtime Fairness DFS 6 streams |
| Operating modes | Router Access Point |
| CPU | 3-core, 1.5 GHz, Broadcom 6750 A separate BCM43684 is allocated for 5 GHz The configurator settings now display 4 cores |
| Ethernet ports | WAN: 1 piece, gigabit LAN: 4 pcs., gigabit 2-port LAG available |
| USB | USB 3.0 Support for NTFS, FAT32, exFAT, HFS+ media Functions: Apple Time Machine, FTP, Media Server |
| Buttons | Wi-Fi on/off Power on/off On/off indicators WPS on/off Reset |
| Nutrition | 12 V, 2.5 A, 30 W |
| Wi-Fi protection | WPA, WPA2, WPA3, WPA/WPA2-Enterprise |
| Network Security | SPI Firewall Access control IP&MAC Binding Application Gateway HomeShield |
| Guest networks | 1 x 5 GHz and 1 x 2.4 GHz |
| VPN | OpenVPN and PPTP |
| Mesh | OneMesh |
| Parental control | Powered by HomeShield: Family Member Profiles URL filtering Time limit Access schedule (with sleep time function) Logging and detailed reports |
| Connection types | Dynamic IP (DHCP) Static IP PPPoE PPTP L2TP |
| Prioritization | QoS |
| Cloud services | Automatic update TP-Link ID DDNS |
| NAT | Port Forwarding Port Triggering DMZ UPnP Virtual Server |
| IPTV | IGMP Proxy IGMP Snooping Bridge Tag VLAN |
| DHCP | Address Reservation DHCP Client List Server |
| DDNS services | TP-Link NO-IP DynDNS |
| Settings | Tether App WEB configurator |
| Dimensions | 272.5 – 147.2 – 49.2 mm (excluding antennas) |
| Equipment | Router Power adapter RJ45 Ethernet cable Quick Installation Guide |
| Certification | FCC, CE, RoHS |
| Terms of use and storage | Working temperature: 0℃~40℃ Storage temperature: -40℃~70℃ Working humidity: 10%~90% Storage Humidity: 5%~90% |
| Wi-Fi transmission power | CE: <20dBm{2.4GHz} <23dBm{5.15GHz~5.35GHz} <30dBm{5.47GHz~5.725GHz} FCC: <24dBm{5.25GHz~5.35GHz&5.47GHz~5.725GHz } <30dBm{2.4GHz &5.15GHz ~5.25GHz&5.725GHz~5.825GHz } |
| Wi-Fi sensitivity | 2.4GHz: 11ac VHT20 MCS0:-94.5dBm 11ac VHT20 MCS8:-72.5dBm 11ac VHT40 MCS0:-92.5dBm 11ac VHT40 MCS9:-69.5dBm 11ax HE20 MCS0:-95dBm 11ax HE20 MCS11:-64.5dBm 11ax HE40 MCS0:-92.5 dBm 11ax HE40 MCS11:-62dBm 5GHz: 11ac VHT20 MCS0:-97dBm 11ac VHT20 MCS8:-74dBm 11ac VHT40 MCS0:-95dBm 11ac VHT40 MCS9:-70dBm 11ac VHT80 MCS0:-91.5dBm 11ac VHT 80 MCS9:-66dBm 11ac VHT160 MCS0: -86dBm 11ac VHT160 MCS9:-61dBm 11ax HE20 MCS0:-95dBm 11ax HE20 MCS11:-64dBm 11ax HE40 MCS0:-91.5dBm 11ax HE40 MCS11:-62dBm 11ax HE80 MCS0:-88dBm 11ax HE80 MCS1 1:-58dBm 11ax HE160 MCS0:- 85.5dBm 11ax HE160 MCS11:-55dBm |
| Guarantee | 4 years |
Port forwarding
To forward, go to “Forwarding” – “Virtual Server” – click on the “Add New” button.
Enter the “Service Port” to which the external user will log in. And the “IP Address” of the device to which the forwarding will take place. You can also specify the type of protocols, but it is better to leave “ALL”.
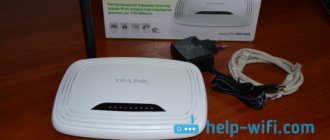
Equipment
As I have written many times, the latest TP-Link boxes suit me personally very much. Large, colorful, informative, and with this router it’s also heavy. This is how the power of the product is felt. Inside the main “shell” box, another package awaits us (I see this for the first time):
And then everything is in its place in bags and films - just an unpacker's dream (evaluate this when unpacking each of the six antennas). The whole set is almost standard:
- Router
- Power adapter
- Ethernet cable RJ45 short
- Power supply 12 V, 2.5 A, 30 W – powerful unit
- A set of papers: quick installation, adaptation to different languages (Russian is available), warranty and... a card with default Wi-Fi names and passwords. You can also write your data here after installation.
Setting up PPTP
For these settings, we need to find the Network section in the menu, then select WAN. Here you should select “PPTP/Russia PPTP”, and below you will see a field in which you need to enter a username and password. In addition, you will need to enter the server IP address. All this information can be clarified with the provider by calling, or can be found in the service agreement. If you entered all the data correctly, you need to check the box next to Connect Automatically. Be sure to save your changes.
Appearance
Now let's move on to the appearance of the router:
Interesting? I've never seen this before. You already know about 6 antennas, let’s move on to the “lattice” itself. This beautiful pattern at the top of the router, made of some kind of pleasant-to-touch material, is actually a ventilation grille. Yes, there is ventilation here from below, and all this together should provide sufficient cooling, because... Even in simple mode the router tries to warm up.
If you look at it from the side, you may not understand that this is a grille, but when you look at it from above, you can even notice the board through the perforation. Another interesting design element here is the same plate. Some even confuse it with a smartphone lying on the router.
And I suddenly thought: it would be funny to include wireless charging in such a plate. Otherwise, you usually put the router somewhere away from view for many years, but here it would be in plain sight, and would also be used every day in the household. Of course, only use it on older models, because owners of younger ones usually don’t have wireless charging YET. And so far I have not seen this.
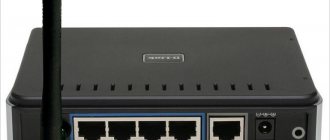
On the front panel on the left we are greeted by indicators:
From left to right:
- Nutrition
- Wi-Fi 2.4 GHz (small icon)
- Wi-Fi 5 GHz (large icon)
- Internet (lit green if everything is OK, orange if there is no Internet)
- LAN
- USB
- WPS
On the right is a USB port (USB 3.0). It’s very convenient that they took it out separately, because... Some hard drives (and especially modems, if it were supported here) are not very comfortable to place against the wall:
And here you can already notice that the router is quite tall. All my models look “baby” in comparison.
Everything else that is most interesting is located on the back side:
From left to right:
- Button to turn off LED (indicators). This is the first time I’ve seen a separate button dedicated to turning off the display. Cool. I have nothing against it.
- Disable/enable WPS.
- Turn Wi-Fi off/on. Please note that separate buttons were allocated for all functions, and they were not combined into one (previously, combinations of WPS/Wi-Fi or WPS/Reset were often found) on one button.
- Reset (recessed). Standard factory reset button. Just a classic. We took something thin (a paperclip, a pen, a needle), pressed this button with the router turned on, held it for about 10 seconds until the lights blinked, and we are happy with the clean router.
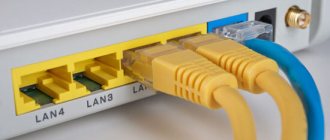
- LAN – 4 yellow local ports.
- WAN – 1 piece, blue.
- Power on/off button. An excellent mechanical button, it will be very convenient to reboot the router without any distortion.
- Connector for power adapter.
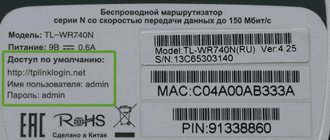
At the bottom, we also have everything standard: perforation over the entire area, rubberized legs, ears for hanging on the wall, a sticker with connection data (address of login to the configurer, names of access points and password/pin for them):
Overall: stylish, fresh, interesting. Suitable for any interior, but will probably be located in the most inconspicuous place)
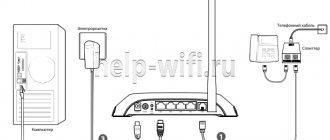
Installation and Connection
I suggest you briefly get acquainted with the process of installing and connecting this router to the wires. There are no special features here:
- We connect the provider cable (from the Internet) to the WAN port (blue).
- If you connect your computer to the router via wire, use any yellow port.
- Don't forget to connect to power and press the power button. The indicators should work.
All. Here is the traditional advice from me: Wi- Fi magic does not exist, even on this router, so we try to place it closer to the center of the apartment, and everything with the Internet will be fine.
Execution
The appearance of the device is quite attractive. The top panel is dark blue, glossy. And the router underneath is beige. Compared to other models, the AC750 router stands out noticeably.
The device received three antennas for the Wi-Fi network. The signal is stable and reliable. There are 4 LAN connectors on the rear panel with an operating speed of 100 Mbit/s. There is also one connector for the provider cable. On the back of the device you can find a USB connector. There is also a reset and power button here.
You can connect a 3G/4G modem via USB to create a backup communication channel. You can also connect an external hard drive to this connector. On the back of the router there is a special button to disable the wireless broadcasting option.
Quick setup – Tether
I usually post an analysis of the router’s functionality with comments in the settings section. And as a rule, I start with a basic connection through a computer browser. But then I wanted to introduce myself to simple home users who don’t have a laptop or computer (and there are more and more such people), and see how you can configure a router through an application. Shall we try?
- Install the TP-Link Tether application on your phone (available in the Play Market and App Store). LINK FOR THE LAZY.
- Log in to your TP-Link ID. If you haven't created an account with them yet, you need to register.
- I already have my device here, so add a new one by clicking on this plus sign:
- "Router":
- "Wi-Fi router":
- Next, in fact, there will be practical instructions for connecting the router. So click “Next” everywhere, and I will dwell on difficult parts separately. First we must reach the stage where we will be asked to connect to the router's Wi-Fi network:
- We connect to the router's Wi-Fi network manually. The names of Wi-Fi networks and the password are indicated on a sticker on the bottom of the router or on a separate piece of paper. We turn it over, look, connect. Personally, I connected using the QR code from the instructions in the screenshot above - the QR code itself is on the same sticker at the bottom.
- After connecting to the network and clicking the “I’m connected” button, a network search will begin, as a result of which you will see your router:
- We create a new password for future access to the router configurator.
- Select the connection type. The type of connection depends entirely on your provider. It is usually specified in the contract. If you don’t know it, feel free to call your provider and find out. Moreover, if your connection type differs from Dynamic IP (for example, like I have PPPoE), then you will need to enter additional data (for example, login and password for accessing the Internet via PPPoE or the need to change the MAC address with Dynamic IP – here we are more interested in asking our provider or looking at the data from the contract, there is nothing complicated):
- Set the settings for the Wi-Fi network. Smart Connect can be left enabled - this will create networks on 2.4 GHz and 5 GHz under ONE name, and the router itself will detect the connected devices and assign them the correct frequency. Otherwise, set the Wi-Fi network name and password for it:
- We enable auto-update of the router and set its time (I didn’t touch anything).
- We apply the settings and rejoice. The orange indicator on the router should turn green after connecting it to the Internet.
Then, for some reason, we are immediately pleased with the HomeShield functions, but I suggest stopping for now - we have achieved the main goal: the Internet is available, Wi-Fi is working.
Network equipment overview
The Archer C20 router is a universal device that is necessary for organizing a wireless Internet network at a dacha in the Moscow region.
The device of the model in question has advanced functionality:
- interactive television;
- media server;
- IP version 6;
- parental control;
- firewall.
This is a dual-band model that can be used for two frequencies. If the first channel is heavily loaded, the user can switch to another band. There is no built-in VPN server in this model. To connect to the Internet from your ISP, L2TP, PPTP and IPSec are used. The manufacturer does not provide an option to change the functions of the buttons.
Quick setup – On a laptop via the Web interface
Now let's go through the classic method of setting up a router - using a computer or laptop. In my case it will be a laptop with a Wi-Fi connection (although I highly recommend using a wire).
- We connect to the router’s Wi-Fi network (I already wrote where to get the network names and password):
You can connect to any of them (you should have something similar). And if you’re too lazy to look for passwords, you can press the WPS button on the router when prompted for a password, and everything will connect automatically.
- Enter any of the following addresses in the browser (you can simply follow the links):
https://tplinkwifi.net 192.168.0.1
- We are walking along the familiar road again. They ask you to create a password to access the configurator in the future, so that evil hackers do not disturb our YouTube:
- Select time zone:
- We set the connection type and all the parameters necessary for it (I already wrote about this above, it is possible to set Dynamic IP, Static IP, PPPoE, L2TP, PPTP). If anything, check with your provider:
- Set the Wi-Fi network settings:
- We wait for the connection check to finish and rejoice. If something still doesn’t work for you, it means you simply made a mistake in the type of connection or the data from it. Try again and everything will work out.
After completing the setup, if you changed the name of the Wi- Fi network, do not forget to reconnect to the new created network!
Repeater mode
To enable repeater mode, you need to:
- In the “Wireless Settings” window, check the “Enable WDS” box;
- Enter the SSID of the network you want to connect to;
- Click “Search” to search for the MAC address of the router you are connecting to;
- Select the key type, it must match the one installed on the partner router;
- Enter the password to connect to the access point.
Factory reset
If you did not receive this device in a new form, some unknown password is required when entering the configurator, or something simply went wrong and you want to start over, I recommend resetting it to factory settings. The easiest way to do this is through the physical button on the back:
- Turn on the router. Make sure that the power indicator has stopped blinking.
- Press the reset button with something thin and hold it for about 10 seconds.
- The indicators should blink and the router will begin to reboot.
- All!
Firmware update
To update the firmware of a router with an old version of the settings panel, you need to go to “System Tools” and click on the “Firmware Update” line. Click the “Browse” button and select the file with the latest firmware version previously downloaded from the manufacturer’s website. Click on the “Update” button and wait until the router reboots.
Full customization
In fact, there will be no full customization here. Here I would like to show the capabilities of the router interface and highlight some of the functions of the router itself - and it is through the interface that this is easiest to do. Let's focus on the web configurator version, because... Here the screenshots will be clearer. You can search for the same settings in the application - everything is perfectly configured through it.
Network diagram
“Network diagram” is the main page of the router. For me its content was not immediately obvious. But if you look closely, the top icons Internet, Archer AX73, Mesh Network Devices and Clients are buttons (since they are tabs of this page). You can click and find something useful for yourself:
- Internet – here you can see the main thing, whether there is Internet or not. Although the router will tell you that there is no Internet even without this - the orange indicator will light up. This is a good signal to call your provider with questions.
- Archer AX73 – here you can turn on/off Wi-Fi networks based on their frequencies, quickly create a guest network, view the processor and memory load, find out which ports devices are connected to and at what speed.
- Mesh network devices. Here you can see those devices that are connected to the router using OneMesh technology.
- Clients. Other devices somehow connected to the router. You can see the speed of their connection to the router and block them (if someone is terribly disturbing you from enjoying the silence at home).
Example of the "Clients" tab. We haven't had time to connect yet.
Change internet connection type
Let's imagine that your router is configured perfectly for you, and you wouldn't want to reset it to factory settings. But bad luck - I had to change my Internet provider (or they moved). You just need to change the connection type, and everything else will remain as is. For this purpose there is an “Internet” tab:
As you can see, the same familiar connection types are presented here again. So if something went wrong during the first setup, you can simply try to adjust it here.
Easy Wi-Fi Settings
The next simple task is that you want to quickly set up a guest Wi-Fi network or change the password for an existing network. Of course, there are alternative options, but as one of them, here is the created “Wireless Mode” tab:
In fact, there are more details there than shown in the screenshot, and I’ve already managed to make my own settings (no need to repeat anything, in extreme cases, leave everything as it was originally). We will consider individual points from this section a little later.
clause is now being deliberately omitted. We will return to its consideration in a separate paragraph, since this is a special function of this router.
Additional settings
All other router features for fine-tuning are collected here. It is advisable to familiarize yourself with them at least once; I will only focus on the most important in my opinion.
Quick setup
Remember, when you first set up, the setup wizard was launched? It can be called from here:
Network – LAN
Here you can change the IP address of the router itself (for example, to change the subnet when resolving conflicts or connecting to another router) and set channel aggregation (up to 2 LAN ports, for example, to connect to a home NAS server and receive a theoretical 2 Gbps via wire ):
Network – IPTV
Relevant for those who still connect original IPTV set-top boxes to their TV (personally, I went into applications on the TV, but for someone without SmartTV it may be very relevant). By default, IPTV is disabled - just check the box, select the required router ports for IPTV and connect set-top boxes to them:
Network – DHCP server
By default, the DHCP server issues addresses starting with XXX100. If you need to change the range of addresses issued, this is done in this section. You can also disable DHCP completely, but then you need to remember to configure all devices manually.
Network – DDNS
A classic example is that you created a Minecraft server on your local network (an example that is especially close to children and those who have children). And a friend wants to connect to you remotely. You forwarded the ports correctly, gave access and everything plays great. But tomorrow your provider wants to change your external IP (if you do not have a permanent external white IP, I won’t say anything about gray addresses for now). What to do? Giving a friend a new IP address. And so every time.
To avoid doing this all the time, it is enough to create an external “domain name”, and let it itself be permanently associated with your IP address. Of course, the router itself will handle this binding. Currently, three dynamic DNS providers are supported - TP-Link itself, NO-IP and DynDNS:
TP-Link ID
You can link your router to your TP-Link ID account. Then additional services will be available (like DDNS, HomeShield, or connecting to the router through an external application). You can link here:
Wireless Mode - Wireless Settings
All the most interesting Wi-Fi settings should be done here. Most of this is not represented in the remaining sections. That’s why I tried to omit all this earlier. Catching up:
Let's go through the points:
- OFDMA is an excellent Wi-Fi function. I have already given references to them, but I still recommend that you get acquainted with this technology. Here it is very brief and crude - if before Wi-Fi responded to everyone in turn, now it can respond to several devices at the same time. Of course, this is only relevant for Wi-Fi 6 clients. Therefore, if you already have a lot of them, this is a must have.
- TWT is a “wake up timer” for smart devices. Now this is not particularly relevant, because... Most smart devices are still on Wi-Fi. But in the future, this feature will be able to keep these devices not constantly connected to the network, but only when necessary or on a schedule. Which should save a lot of energy, especially if they do not operate from the mains.
- Smart Connect - the router combines two frequencies of 2.4 and 5 GHz into “one” network, and itself assigns the required frequency to the connected devices. The function is interesting and cool, BUT when it is activated, it becomes impossible to configure each Wi-Fi network in detail. If you don’t need to configure anything additional, you can safely activate it, it’s convenient.
- And then the settings for each individual frequency begin (if Smart Connect is turned off): you can turn the frequency on/off, reset the name and password, select the type of protection (there is support for WPA3), set the channel width (for example, now for the test I turned on 160 MHz so that get maximum speed), set the channel (although Wi-Fi 6 is not prone to interference from other people’s networks, the house is full of old devices).
Wireless mode - WPS
Here you can disable the WPS function (and it doesn’t seem necessary on this router, but security guards will probably turn it off) or connect another device using the WPS function (for example, we connect a repeater, and you don’t want to run behind the router to press the WPS button):
USB
Unfortunately, the functions of the USB port at the time of writing the review do not include a print server or modem support.
The USB port is used here as data storage - for example, for your favorite TV or backup shared storage on the local network. It’s also nothing complicated – just connect USB and use it. Here you can set options for accessing it (by default, external access is disabled). Mac owners have the option of using Time Machine.
NAT Forwarding – Port Forwarding (PORT FORWARDING)
Another common option for people contacting us is port forwarding. It is done in this section. We add a new rule, bind the port to the IP address of our local computer, and rejoice. Conveniently, there are presets for ready-made services (although in everyday life you usually prescribe something third-party):
VPN server
We are talking about CREATING a VPN server using the router itself. There is support for OpenVPN and PPTP. Those. you create a configuration (OpenVPN) or accounts (PPTP), and thanks to them, users connect to your local network from the outside.
Unfortunately, this router cannot connect to the same OpenVPN configs. So those looking for it will have to wait for alternative firmware (yes, this is typical for all routers).
System - Firmware Update
We are talking about updating the firmware. By default, you can activate auto-update (useful at home, so you don’t forget to check for updates); there is also the option of manually downloading a file in case alternative firmware appears in the future:
System – LED indicator
Let me remind you once again that on the router itself there is a separate LED button to turn off the indicators (they don’t shine so brightly even at night, but in case they get in the way aesthetically for someone). You can also turn them off in the settings here, but what’s most interesting is that there is a night mode. Those. turns off the “lights” only at night according to the schedule, and let them be on during the day so as not to cause another line failure at the provider:
System - Operating Mode
To avoid some difficulties, two operating modes are immediately provided here:
- Wi-Fi router mode – the router itself connects to the Internet via the provider’s cable and distributes the Internet further.
- Access point mode - the router takes ready-made Internet from another device (modem, router or optical terminal) and simply distributes it further without creating additional connections.
Repeater mode is not provided here! There is no need to make a simple repeater out of this router)
MAC Address Filtering
This item is located in the “Wireless Mode” section. The idea is simple - you can allow or deny network access for dedicated MAC addresses. For example, you can allow access only for all your home devices, then if someone hacks you, they will not be able to access the network. Or, conversely, you can deny access only for a certain MAC address.
Everything is intuitive. If you set the “Deny” mode, then all allocated MAC addresses will not be able to use the router’s network. If you specify the “Allow” mode, then on the contrary, only the specified addresses will be able to use the benefits of the Internet center. The list of connected devices and their MAC addresses can be viewed in the “DHCP” section – “DHCP Clients List”.
HomeShield
But where are the parental control and other QoS functions familiar to other routers? And here all this was transferred to a separate HomeShield setting - a new router protection system in collaboration with Avira. Therefore, I propose to discuss it here in a separate section.
What's included in this package:
- Security (protection of smart home items, protection from DDOS, intrusion by intruders, malicious content).
- Parental controls (filters for family members, incentives for allocating extra time on the Internet for homework done, bedtime for completely turning off the Internet at night).
- Network analysis and optimization (reports, QoS and some kind of smart scanning to optimize network performance).
But for some reason nothing from this section can be viewed in the web configurator; it requires you to go to the mobile application:
But in the mobile application this section is already available:
If you wish, you can purchase a subscription:
But in fact, the main functionality for parental controls and QoS is available for free. Here is a comparative table of the capabilities of the PRO and regular versions:
In total, in order to add priority to a device (according to the classics - TV for K movies) or set basic parental control functions (block sites by URL or filters, set bedtime) - you need to install a mobile application and calmly set it there. Those looking for a separate section in the web configurator will not succeed. But you don’t have to do this very often)
Although everything else looks interesting (it is worth noting the correct approach to introducing profiles of family members who may have several devices):
But again, and solely in my opinion, it would be more common to see separate parental control and prioritization functions in a regular configurator, and make protection optional in a separate section. But this is my personal opinion, this does not affect the functionality itself. But there are additional functions – and that’s good. Especially for such a price.
Coverage map
Traditionally, all routers that we have passed undergo a coverage test with a regular Soviet “kopeck piece” in order to once again make sure that they all work the same, despite the manufacturers’ statements about the exclusivity of the operation of a particular device. We check:
As you can see, the kopeck piece test has been passed. Even from a distant room, the signal allows you to cover the entire area of the room without any terrible anomalies and the need to install repeaters.
Parental Control
- First about (Enable Parent Control).
- Next, in the line “MAC Address Of Parental PC” - you need to indicate the address of the parent, if you are using it, then click on the “Copy to Above” button.
- Below is a list of 4 addresses where we connect the child’s devices. You can select already connected devices in the “MAC Address in current LAN” drop-down list; to transfer to the desired line, select the second “Copy to” drop-down list.
- You can also specify your schedule here. And below we enter “URL” and click on the “Add” button.
- Don't forget to save your settings at the end.
What about speeds?
This would be the right place to make a series of speed measurements on all interfaces, BUT:
- This router is designed for simple home users who just want to enjoy the Internet. Therefore, personal experience is more important. I used this router for about a week of pure time. A dozen devices, parallel torrents/YouTube/TV with 4K movies via the Internet and DLNA. I didn’t notice any sudden reboots, crashes or any personal limitations. What I REALLY liked was OneMesh. This router gives my AX10 this one function.
- I still haven't found a decent Wi-Fi adapter for measuring speeds above 2.4 Gbps (my current one is AX200). But he easily achieves this level (
- The ports of this router are 1 Gbit/s, which is quite the fastest Internet in Russia today. It will definitely be enough for many more years, and then maybe in 5 years we’ll see the beginnings of something revolutionary new.
Therefore, if you really need to measure and look at something, you can always ask about it in the comments, we really try to keep our articles up to date as needed.
Reviews
Opinions of owners of Archer C7 network equipment taken from the website Otzovik.ru:
- User mmarratt considers the AC1750 an excellent investment. He liked the technical parameters, cost, availability of additional options, and high speed of the wireless network. The only drawbacks are the glossy body and large dimensions for this solution.
- The owner DaRRkys123 also considers this solution excellent. He liked the speed provided by the router and the easy setup. Used for online games and video editing via the Internet. The disadvantages include the large size of the model.
Total
When you pick up a brand new router, professional degradation forces you to immediately value it in rubles. And here there is nothing particularly to complain about for use at home: everything works more than enough, there is a lot of headroom, Wi-Fi 6, AX5400, OneMesh. I previously predicted 12,000 rubles for him...
Imagine my surprise when TP-Link set the recommended price to 7,000 rubles, and right now at the start of sales in the same DNS it is sold for 6,000 rubles (or even cheaper). And not to find fault, just a break in the pattern. Compared to my AX10, this is simply TOP for the money. Maybe something bad will emerge in the distant future in the process of blatant exploitation, but I doubt it. And the current highlighted shortcomings do not stop me, of course, I would like to get a perfect sample, but this is rather impossible at a reasonable price. Would you recommend it? Personally, I have already recommended it for purchase to a couple of my friends, and I myself am in the process of overcoming myself, because OneMesh is very captivating.
And in such a pleasant afterthought at the moment of parting with this model, I say goodbye to you! Don't forget about comments, always in touch, your WiFiGid.
Bottom line
After two weeks of testing, the TP-Link Archer AX55 (AX3000) demonstrated consistently high speed, high-quality coverage and stable performance when working with a huge fleet of connected gadgets.
The presence of a functional USB port and a convenient application are tempting to keep the Archer AX55 as a replacement for your router. To summarize, the main advantages are: ease of setup, support for current technologies, including the WiFi 6 standard and OneMesh. The latter will be appreciated by owners of spacious apartments and country houses. Thus, TP-Link Archer AX55 (AX3000), in addition to a high level of performance, opens up a broad prospect for upgrading your home wireless network.
The recommended price of TP-Link Archer AX55 (AX3000) is 5,499 rubles. You can buy this router from partners of the TP-Link brand.
iGuides in Telegram - t.me/igmedia iGuides in Yandex.Zen - zen.yandex.ru/iguides.ru