When turning on the computer, the user starts only the operating system. All other actions are performed independently in the graphical interface. Depending on the task being solved, a specific set of programs is launched. At the same time, each user has those that will be opened without fail. Some people first launch an email client, others open social networks in a browser. Not everyone knows that these routine operations can be automated by setting up programs to autorun.
Autorun cleaning
A clean OS automatically starts only system services. When installing programs, most users do not pay attention to the initial settings. As a result, after some time the computer turns into a “zoo”. Several browsers “live” in it at the same time, clients of various cloud storages, optimization utilities and file downloads start independently. Thus, startup turns from a useful tool into an “enemy” of the user, slowing down the operating system.
Windows 7
On versions of Windows with a traditional Start menu, the startup folder can be found in the general list of installed programs. In this place it is a remote shortcut intended for quick access.
The folder is actually located in the hidden user files area. You can directly access it by calling the context menu. The items indicated by frames will open the directory of a specific user in Explorer, and those indicated by arrows will open the system-wide directory.
In order not to search for where startup is located in Windows 7, you can use the universal command in the “Run” menu. Enter “shell:startup” into the text field. Clicking on the "OK" button opens "Explorer".
At the top of the window we see the full path to the desired directory. By default, AppData is not visible in Explorer. Therefore, if we simply open the user’s folder, we will not find it until we enable the display of hidden files.
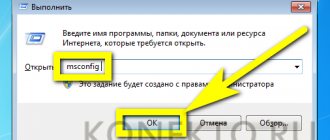
You can enter Windows 7 startup in this way, but you cannot fully edit it. The disadvantage of this method is that most programs that have an automation option in the settings will not be visible here. You can edit the startup list in the configuration utility. Let’s launch the “Run” menu and enter the command shown in the screenshot in the text field.
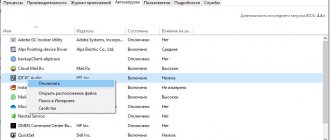
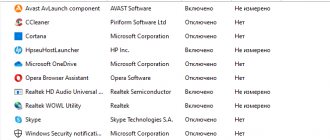
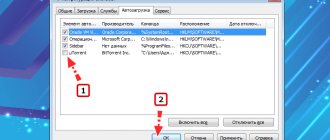
In the configuration utility window, go to the “Startup” tab. Here we see a general list of programs whose behavior can be controlled using the checkboxes indicated by the arrow. By removing them, we exclude automatic start. The changes made must first be applied by clicking on the appropriate button. The “Location” column, highlighted in green, contains the startup path for each program and we will need it later.
Adding a program to startup using the registry in Windows 10
Step 1. To enter the registry editing environment in Windows 10, you need to expand the context menu of the Start button using the right mouse button.
Expanding the context menu
Step 2: Run the Run procedure.
Launch the “Run” procedure
- How to remove autorun programs on Windows 10?
Step 3. In the window that appears in the query input box, you need to enter the command “regedit” and launch the editor control console.
Enter the command “regedit” and launch the editor control console
Step 4. In the console interface, go through the list to the “Run” directory.
- LOCAL MACHINE (for local station), or CURRENT USER (for your user);
- SOFTWARE (software settings are stored in the folder);
- Microsoft (corporation product settings);
- Windows (operating system settings);
- CurrentVersion (current version settings);
- Run (settings for automatic program launch).
In the console interface, we sequentially go through the list to the “Run” directory
Step 5. To add a program, use the “Edit” menu and use it to select the command to create a new string parameter.
Using the "Edit" menu, select the command to create a new string parameter
Step 6: Set the parameter name.
Set the parameter name
Step 7. Expand the line parameters and write the path to the executable file. After specifying the path, save the settings.
Expand the line parameters and write the path to the executable file
Important! When changing registry settings, be careful - careless handling of entries can disrupt the normal operation of the software and operating system.
Setting up autorun
In a well-configured system, nothing should be launched without the user's knowledge that is not needed within the first five minutes. By clearing startup of unnecessary “garbage” and following this rule, you can set up autostart of programs that are needed in the first place.
Autorun software
Open the settings of the selected software and look for the item responsible for integration with the operating system. If the developer has provided such an opportunity, you just need to take advantage of it. For example, let's take the popular AIMP player.
The required parameter is present here. Therefore, we can add it to Windows 10 startup by checking the box indicated by the arrow.
Third party software
You can also add any application to the startup of the Windows 7 operating system using a special utility. The program is called CCleaner and is available on the official website absolutely free. Therefore, we take a few simple steps:
- Follow the link above and download the latest Russian version of the application.
- We received the installation file, run it and, following the prompts of the step-by-step wizard, install the application.
- When CCleaner starts automatically, we will need to go to the “Service” tab. Here we select the “Startup” sub-item and start working with the list of available programs.
Expert opinion
Daria Stupnikova
WEB programming and computer systems specialist. Editor of PHP/HTML/CSS site os-helper.ru .
Ask Daria
In addition to working with startup, this application is capable of automatically cleaning the system, including the hard drive and registry.
Task Manager
Using the scheduler, you can force programs to run on a schedule. Open the Simple Task Wizard and follow its instructions.
For example, let's schedule a regular launch of the music player. So that you can later find the created task, give it a name.
Select launch when logging into the OS.
By default, the scheduler suggests creating a task to run the program.
Use the Browse button to specify the path to the executable file.
The task is created, and the system gives us an overview window with the specified characteristics.
After completing the wizard, the trigger can be edited by setting additional conditions.
For example, activate a deadline limit. Using the designated area, we indicate the start and end date values for our task.
Laptop owners should pay attention to the “Terms” tab. To ensure that the task is performed in any case, and not just when connected to the mains, in the area indicated by the frame, uncheck both boxes.
The result of these manipulations will be the automatic launch of the player every time you log into the OS. However, it is impossible to remove the program from startup using the methods discussed above. It will not appear in the task manager. To cancel a task, you must remove it from the scheduler.
Adding a program to startup using an additional application
To change the software startup mode in Windows, you can use the CCleaner software product. It is completely free and provided "as is".
Step 1. Launch the software product.
On a note! When choosing a program, you can download the full version (requires installation) or portable version (works without installation).
Launch CCleaner
Step 2. Expand the “Service” list located in the left frame of the interface.
Expanding the “Service” list
Step 3. Go to the Startup list. To add an additional element to the automatic download, select it with a mouse click and use the “Enable” button.
Go to the “Startup” list, select the element with a mouse click and click the “Enable” button
Important! Please note that the program uses direct access to the registry, just like the MSconfig utility. Since CCleaner is a third-party software product, attackers can use it for their own purposes. Install only proven versions of the software package.
Video - How to add a program to startup
Enabling previously disabled startup items
When using the methods described above, you may encounter the fact that despite the fact that some programs have already been added to startup before your actions, they do not start. This may happen if the startup of these programs has been disabled in Windows 11 Settings or Task Manager. If you wish, you can enable it again in two ways:
- Go to Settings - Applications - Startup and enable autostart for the desired items from the list.
- Open the Windows 11 task manager (you can right-click on the Start button and select the desired menu item), go to the “Startup” tab and, by right-clicking on the desired item, enable startup for it.
First way
Launch the required program and go to the settings section. Perhaps there is an option here that allows you to launch the software along with the OS startup. You just need to check the box next to this item. With a subsequent restart of Windows, the program will start automatically.
The simplest example is uTorrent. If you wish, you can make the application run along with Windows. To do this, you just need to check the box in the right place.
Second way
In cases where the software does not contain additional functions, you can move on to another method. In this case, you need to first create a shortcut for the program. To do this, on the desktop or in any folder, right-click and select “Create” - “Shortcut”. For the latter, you must immediately specify the location of the final object. Let’s say, if you want Mozilla Firefox to start simultaneously with Windows startup, you need to go to “My Computer” - “Disk C” - Program Files - Mozilla Firefox - firefox.exe. Then click ok. If you double-click on the shortcut, the browser will open.
If this happens, great. Now all that remains is to move the shortcut to the startup folder. For many users, it is located directly in the Start menu, but in some cases it simply is not there. So just open the address C:\ProgramData\Microsoft\Windows\Start Menu\Programs\Startup and place the shortcut there.
