Badges are an excellent way to identify employees; they create a trusting atmosphere between partners at seminars, trainings, presentations and other events. The minimum amount of information guides the potential client and helps direct the conversation in the right direction. In addition to the owner’s personal data, the product usually displays a company logo. This article will help you prepare a complete template for a badge of any size and print it on a printer. At the bottom of the article is a link to a standard size badge template.
How to make a badge in Word with your own hands
When choosing the size of a badge, you should take into account the amount of information that needs to be placed on it. Badges for company employees are usually made in a standard size of 90 by 60 mm. You can use a template to create a badge, but we’ll talk about that later.
How to make a badge in Microsoft Word with your own hands:
- first you need to open a new file in the program, in which you select sheet orientation (for a vertical badge you must select portrait orientation, for a horizontal badge - landscape).
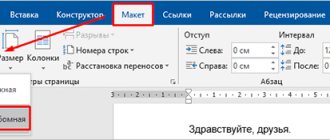
- The tab with the required function may be called “Layout” or “Page Layout”. For ease of use, it is better to make the indentation from the edge of the document a little smaller. To do this, in the tab you are using, select the function Margins - Narrow;
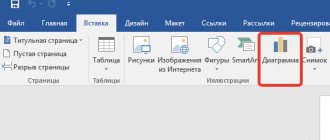
- needed in the document insert tableby clicking the two buttons “Insert” and “Table”. We also indicate the appropriate number of cells there. After that, in the upper left corner of the grid, right-click on the cross to go to the context menu and select the section “ Table properties».
- Then click on the “Insert” tab and indicate its height (6 cm). You should uncheck the “Allow lines to wrap to a new page” checkbox. Then go to the “Column” tab and specify its width as 9 cm. If other dimensions are required, you must specify other values. The table is ready;
- The final stage of making badges yourself is to layout them. To do this, two fields are written in the first cell, which contain the full name and position, and the font for indicating the position should be smaller. If necessary, you can leave a space on the badge where of the person and the name of the company, the name of the event and other information located Photos are inserted using the “Insert” and “Drawings” buttons;
- To transfer information to the remaining cells, move the cursor to the end of the inscription and click the left mouse button 3 times. We copy the selected information by simultaneously pressing the CTRL + C keys and then move the cursor to the top of the table and click on the cross. This action will make the table completely highlighted. After this, you will need to use the keyboard shortcut CTRL + V, which will allow you to fill it with copies of the prepared badge.
What is font size and PT in Word
Using Templates
If you don’t have time to make a badge manually, you can use its templates in Word. Microsoft Word already has several categories of templates installed, but this particular one will need to be downloaded from the Internet.
To do this, you need to go to the “File” menu and click on the “Create” and “ Sample templates ” buttons. After that, go to the official website with templates and download any suitable option.
In addition, you can make a badge using a business card template . To do this, among the available templates in the program, select the one called “Cards” or “Business Cards”, then click on “Download” when the most suitable option is found. The choice is quite large; you can find badge templates for a first-grader at school or for work.
To start editing the template, you will need:
- go to the “ Working with tables ” tab, where you will need to select “Layout” or “Design”;
- If you need to change the dimensions of the template, select the table and in the “Width” parameter specify the number 8.5. The Height value changes to 5.5. After the dimensions are adjusted to the standard, press the Enter key. This will allow you to consolidate the results of the changes;
- In order not to go beyond the boundaries of the table, you should click on the “ Display grid ” button. Thanks to this, transparent lines will be highlighted with a blue dotted line, but when printed they will remain transparent;
- then you should write the company name;
- To change the text design style, you need to select it and select the appropriate font, size and other values in the “ Home ” tab.
- If desired, you can place photographs of a person or an organization logo on the badge. This can be done using the “Drawing” button, which is located in the “Insert” tab. In the window that appears, you need to select the appropriate image and click on “Insert”. To make the picture look beautiful, you should select it and click on the “ Text Wrap ” and “Forward” buttons in the drop-down menu;
- After editing the template, you need to copy the resulting sample and move it to the remaining cells.
Vertical text in Word - changing direction
Saving as a template
To be able to use the result obtained in other cases, it should be saved.
To do this you should:
- In the “File” menu, click on “Save as»;
- specify a suitable name and storage folder for the file;
- at the bottom next to the name, indicate the format “ Word Template (*dotx) ”;
- click on “Save”.
How to Print a Badge in Word
You can print in Word 2010 or any other version as follows:
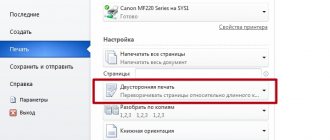
- open “File” and select “Seal»;
- then select the external device – printer;
- Next, set the necessary parameters and click on the “ Print ” tab.
The best online services
We have collected the most popular sites that allow you to make a badge online and print it, completely free.
Badge-online
An easy-to-use online service that allows you to prepare a badge without downloading and installing additional programs. Its advantage is that all necessary services are provided free of charge.
The work literally takes place in several stages:
- choosing a suitable template;
- specifying the required data;
- downloading the finished result;
- adjusting the required dimensions.
If you are not satisfied with the ready-made templates, you can use your own version. To do this, you need to go to the “Upload your own” section, which is located at the very top of the page, in the “ Information ” section.
Offnote.net
This resource is primarily used for making business cards, but it can also easily be used to make a badge.
To get started with it, you should:
- click on the button open editor ;
- choose a suitable template;
- to provide information;
- change sizes.
Business card
An online resource that is often used in the production of badges and business cards. Ideal for beginners as it does not cause any difficulties when using it.
To make a badge, you need:
- provide all necessary information;
- edit text;
- if desired, place a photo or logo;
- save the finished result.
How to sort a list alphabetically in Microsoft Word
Source: https://composs.ru/kak-sdelat-bejdzhik-v-vorde/
How to make a template for a badge in MS Word. Step-by-step instruction
A badge is useful and integral for any business. It helps to make a first impression on the client and quickly introduces you, eliminating unnecessary inconvenience and fuss. Nowadays, the badge not only performs an informative function, but also an advertising one, as well as an aesthetic one.
In addition to the owner’s personal data, the badges contain the company logo. The logo and other information can be applied in different ways to get from simple economy badges to elite and presentable ones. In this article, we will help you figure out how to create a badge template in Word.
Please note that product sizes may vary.
You can download the badge template in Word on our website, the link is at the end of the article.
To start working in Word, you need to decide on the size of the badge. And the size depends on its contents and environment of use.
As a rule, for large events with a large number of employees, large badge sizes are used.
For example, for conferences, symposiums, seminars and trainings they use 90x110mm, 80x100mm and even 105x148mm (A6 format). By creating a badge template in MS Word, you can easily print it on a regular printer.
This badge template in MS Word is perfect for badges made of transparent plastic of any format with a paper insert. You can find these plastic economy pockets here or here. Create a template for a badge in MS Word. Below are step-by-step instructions.
Deciding on a standard size
The basic principle for choosing the size of a badge is the amount of information that needs to be placed on it and the pocket available for the badge for that size. For standard badges containing the name, position and company logo, a 90x60mm format is sufficient. Badges for private security company employees are usually made in sizes 100x70mm, and for public events large badges in A6 format (105x148mm) are usually made. According to our statistics, the main size of pockets for badges is ordered for a horizontal liner of 90x60 mm. In this example, we will proceed from these dimensions.
Badge template: download for Word
This page presents various badge templates that can be downloaded for free.
School duty badge template
After downloading the next DOC, you will have the opportunity to edit a badge for the school official in Word. The badge size is standard - 55 x 85 mm.
You can type a badge for a nurse or doctor if you download this template. Edit it in Word to your liking. You can change the color, font, background color, add a logo.
Salesperson badge template
To make it easier for the client to contact the seller, they write their name on the badge. By opening the following DOC in Word, you can change the type of badge to suit your needs. Choose the store’s corporate color, insert a logo, and select a more suitable font.
Baby badge template
This Word document presents badge templates that are perfect for school and kindergarten. Change the background of the badge depending on the gender of the student. Edit existing text and add your own. In order to print the desired version, just copy it into the free cells of the template.
Source: https://3mu.ru/?p=9357
How to make badges in Word: detailed instructions and recommendations
Microsoft Word is an excellent text editor that is included in the Office software package. It is one of the most used and downloaded editors in the world. Many users mistakenly believe that Word has earned such popularity solely due to its affiliation with one of the largest companies, but this is far from the case.
Editor "Word"
This program opens up many possibilities for formatting and layout of text of varying complexity, and it will be convenient for both beginners and professionals to work with it. Word is widely used by office workers, journalists, copywriters, schoolchildren and students.
It can be both a complex mechanism for creating a unique design and a platform for editing quick notes. The program perfectly adapts to many text formats, synchronizes with other Office products, has a huge range of fonts and functions for modifying them, etc.
Word will also become an indispensable assistant for creating primitive information material.
A badge is a small plate that indicates the employee’s identity (first and last name), his position and, as a rule, the name of the organization. Badges are worn suspended by a string around the neck or attached to a pin on the chest.
You might have seen such cards from employees of supermarkets, beauty salons, large firms, corporations, and so on. The “trend” has reached schools and institutes. So, duty officers, interns, library workers and others carry such cards. Plastic holders can be found in a huge variety of office departments.
But how to make badges and their informative content in Word? We will talk about this further.
How to make a frame for a badge in Word using a ready-made template?
There are several ways to make a badge. The simplest of them is to edit a ready-made template. Some of them are already installed by default, but templates such as badges need to be downloaded additionally. However, it won't take much time. First, you need to check whether such a template has been downloaded in advance and look at the available templates.
To do this, go to “File”, then click “Create” and “Sample Templates”. If there is no badge template, click “Office.com Templates” and download the required option. Further work will proceed in the same way as with any other document.
We enter the required data, you can add the organization’s logo, play with fonts, add a border, fill it, and more.
But often the badge template does not meet user expectations. They want to create their own unique option from the very beginning. How to make badges in Word from scratch?
Create your own version of the badge
Even though all badge holders are made in a standard size, you still need to measure it to be on the safe side. We will make this version of the badge using table blocks. They are fairly easy to draw and cut after printing.
Types of badges
- cards with text
- stickers
- badges (badges)
Currently, the most common, due to their low cost and ease of use, are cards with text - paper or plastic rectangles with information printed on them. They usually contain the first and last name of the person being identified and the institution they represent. Sometimes such a badge contains some additional information (position, logo). Sometimes includes a photograph of the wearer.
Cards with text are usually inserted into a pocket or holder that has fastenings (clip, ribbon, pin, cord) that allow you to secure the badge to clothing or the wearer’s neck.
Badges of employees of organizations are sometimes combined with a pass, which in turn can be electronic. This badge/pass is worn on a cord around the neck so that it can be easily applied to
It is customary to wear badges at official events, in shops, cafes, hotels and offices. It's kind of like a temporary pass. The size of the badge depends on the status, level of the event and the situation.
The absence of a badge indicates that the person is not an employee of the company organizing the event or an invited guest.
How to make a badge in Word
In Microsoft Word, you can not only work with text, but also with pictures, diagrams, tables, formulas and more. Using the various features of the editor, you can beautifully design the cover of a book, or make a report, formatting it according to all the rules.
Now we will figure out how you can make a badge in Word. I’ll tell you about using templates: where you can download them and how to change them. Next, we’ll look at how to do everything ourselves from scratch: create a block of a suitable size and insert text, a drawing or a photograph into it. Then you will print what you have, cut it out and paste it into a badge.
Using Templates
If you want to use ready-made badge samples, then create a new document in Word.
Then, in the search bar for available templates, type either “Cards” or “Business Cards” and click on the arrow to search. You need to look for cards, since there are simply no badges on this list, and they are most similar to them.
In the list of available options, select the one that suits you best and click “Download”.
When the template is downloaded, it will open in a new window.
If you don’t like anything from the displayed list, then you can find an option on the official website: https://templates.office.com/ru-ru/Business Cards
Follow the link, select the item we need on the left, and then look for what you like. Make sure that Word is written under the image. Then click on the name of the template and download it by clicking on the corresponding button.
The next thing to do is to move on to editing and formatting the blank. Almost all the necessary buttons will be located on the “Working with Tables” tab – “Layout” or “Designer”.
Click on any word and look at the top to see what size the table cell is. In the example, the blocks are 8.82x5.08 cm. This may not always be suitable. The size of a standard badge in centimeters is 8.5x5.5. If you do not have a standard one, it is better to measure the width and height of the leaflet that you will insert there.
I will stick to the standards, so select the table and enter 8.5 in the “Width” field (your value may be different). Then change the height value, where it is 5.08, and press “Enter”. After this, each cell will become the size you specified.
To make it clear where the table boundaries are, you can “Display grid” by clicking on the corresponding button. As a result, all transparent lines will become a blue dotted line, but they will not be printed.
Next, think about how you want to print the text. This could be a company name or school number, position or grade. If necessary, you can add a company logo or a photo of a person to the badge.
Let's change the sample - enter your organization name.
Then delete the text below - select it and click “Delete”.
By pressing “Enter” I made an additional indent from the top line and typed the person’s first and last name. Select them, go to the “Home” tab and here select the appropriate size and font, you can use italics or bold.
The bottom lines remain. We delete them, print the appropriate text, this is my position. Then change the font and letter size. To place words, for example, in the center, left or right, click on one of the stripe buttons.
The next step is to add an image. This is not necessary, so in principle, the badge can be considered ready. If you want your badge to have a picture, then click on the cell that you edited and select “Picture” on the “Insert” tab.
- There is a detailed article on this topic: inserting a picture into Word.
- In the window that opens, select either a logo or a photo and click “Insert”.
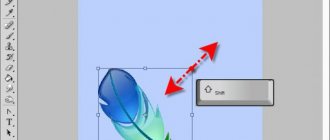
- Then you need to reduce the image using the markers on the frame.
- To ensure that it is displayed correctly on the sheet and the words do not move, select it and select “Text Wrap” – “before” in the drop-down list.
- Read more in the article: how to make text wrap around a picture in Word.
Again using the markers and arrows in different directions on the frame, move the drawing to the desired location. I have it in the top left.
Once one badge is ready, copy it and replace the pattern in the other cells. Then change names and positions. This way, you can make several copies for different workers or schoolchildren.
- To print your badge, go to the "File" tab.
- Next, you need to select “Print” from the list on the left.
- Specify the number of copies, select a printer and click on the desired button.
We do it ourselves
Considering that there are no ready-made templates, and the cards need to be remade, which is not entirely convenient, let's figure out how to make a badge yourself from the very beginning. As for me, this option is simpler - you don’t need to change anything, you immediately indicate the required dimensions, select the design and the like.
Open “Insert” at the top and add a table with the appropriate number of rows and columns to the page. In my example, I will have 2x3.
An article on how to add a table in Word is already on the site.
Then select it by clicking on the crosses in the upper left corner and specify the values for the width and height of each cell. Since my dimensions are 8.5x5.5 cm, I divide 8.5 in half (since there are 2 columns) and 5.5 into three (3 lines).
You will get a table with all the same cells. If this is not suitable, you can make a cell with a width of 3 cm in one line, then the second will be 8.5-3 = 5.5 cm. In general, decide on the type of badge and calculate the size of the cells.
Since we don't need borders, they need to be removed. For convenience, we will leave only the outer borders so that it is convenient to cut. Select the entire table, click on the small arrow next to the “Borders” button and click “None” in turn, and then “External”.
You can read how to remove borders in a Word table by following the link.
Now on the “Layout” tab we display a grid to make it convenient to work with data. It looks like a dotted line and is not printed.
Video tutorial
How to create and print a badge in Word?
Thank you for your mark. If you want your name to be known to the author, log in to the site as a user and click Thank you again. Your name will appear on this page.
Have an opinion? Leave a comment
You can post an announcement of an article on your website with a link to its full text.
Error in the text? We are very sorry that we allowed her to do this. Please select it and press CTRL + ENTER on your keyboard.
Template-analyzer of class performance in different subjects
| 2007-2020 “Pedagogical community of Ekaterina Pashkova - PEDSOVET.SU.” 12+ Certificate of registration of mass media: El No. FS77-41726 dated August 20, 2010. Issued by the Federal Service for Supervision of Communications, Information Technologies and Mass Communications. Editorial address: 603111, Nizhny Novgorod, st. Raevskogo 15-45 Founder address: 603111, Nizhny Novgorod, st. Raevsky 15-45 Founder, editor-in-chief: Pashkova Ekaterina Ivanovna Contacts: +7-920-0-777-397, Domain: https://pedsovet.su/ Copying site materials is strictly prohibited, is regularly monitored and prosecuted by law. By sending material to the site, the author, free of charge, without requiring royalties, transfers to the editors the rights to use the materials for commercial or non-commercial purposes, in particular, the right to reproduce, publicly display, translate and rework the work, making it available to the public - acc. with the Civil Code of the Russian Federation. (Article 1270, etc.). See also the Rules for publishing a specific type of material. Editorial opinion may be different from those of the authors. To confirm the authenticity of documents issued by the site, make a request to the editor. webinar service About working with the site We use cookies. By publishing materials on the site (comments, articles, developments, etc.), users take full responsibility for the content of the materials and resolution of any controversial issues with third parties. At the same time, the site’s editors are ready to provide all possible support both in publication and other matters. If you discover that materials are being used illegally on our website, please notify the administrator and the materials will be removed. |
Badge online!
Did you know that the standard badge size is 85 x 55 mm (3.35 x 2.17 inches)?
Popular badge templates this week:
| gust | Range |
| Binary | Vintage |
| Brunette girl | Creation |
| Dreams | Brown-haired girl |
| Summer | Sunflowers |
| Future | magic |
| autumn flame | reflection |
| spray | green fantasy |
| Earth | VIP |
| city | petals |
| corners | corners-2 |
| radius | Taxi |
| hearts | ornament |
| city-1 | city-2 |
| For the medic | urban |
| In contact with | Pencils |
| Food-1 | Food-2 |
| My name is | Sakura |
| Medicine-1 | Medicine-2 |
| Medicine-3 | Medicine-4 |
| Medicine-5 | Medicine-6 |
| Holiday | Volunteer Sochi 2014 |
| B-Lines | A-Lines |
| Pension Fund | Blue World |
| Music | Imprint |
| Shining Space-1 | Shining Space-2 |
| Peripeteia | Hippocratic cup |
| Up | Natural |
| This summer | This is the Sea |
| Cursor | Interference |
| Black flower-1 | Black flower-2 |
| Black flower-3 | Coin |
| Magnet | Black flower-6 |
| School | Carousel |
| Pyaterochka | X5RETAIL |
| First-grader | Creative |
| First grader | Summer |
| Sochi 2014 | Imprint |
| Waves of color | Mood |
| Auto | Bottles |
| Computer | Young woman |
| Boy | Russian Railways |
| Business lady | The girl is surprised |
| Glamorous girl | Cook |
| Chef | Boss |
| Graphic arts | Silk |
| Pursuit | Aster |
| Sberbank | Cherry |
| Tropics | Projection-1 |
| Doctor | Maple |
| Champion | Roundings |
| Street paint | Magic |
| Arch | Prism |
| Colored paper | Ornaments |
| Night Lights | By notes |
| Pointer | edge |
| Retro | Copybooks |
| Seal | Heat |
| Buckle | Retro-1 |
| Bubble | Shkolny-1 |
| Shkolny-2 | Shkolny-3 |
| Sea | Flat |
| Loach | New Year |
| New Year | Happy New Year |
| Sled | Snowman |
| Kote | cat |
| Cat | Butt |
| Japan | Medical |
| Summer flowers | Summer flowers |
| Sunflower | These are kids |
| Vegetables and fruits | First autumn |
| For school | First-grader |
| Back to school soon | For girl |
| For boy | Briefcase |
| Winter evening | Snowflakes |
| Dark night | Winter night |
| Hare | Fawn |
| Girl | Boy |
| Watercolor-1 | Watercolor-2 |
| Autumn 2016 | Autumn again |
| Gymnast | Hockey |
| Snowboard | Freestyle |
| Washer | Back to school 2017 |
| Back to school 2017 | Textbooks |
| Boxing | FIFA 2k18 |
| FIFA 2018 | FIFA 2022 Russia |
More templates... file size no more than 2MB
Download
Paste your badge into a text editor and give this image the following dimensions: width 8.5 cm, height 5.5 cm.
Link to the page with your badge settings: show link
Source: https://badge-online.ru/
Make a badge online for free and print it
Employees of many companies are required to wear a badge. Usually this is a simple card with a lanyard or a special clip. It is used as an identity identifier.
In today’s publication, we’ll look at how to make a badge online for free and print it. We found the most popular services. If you wish, you can use the capabilities of Word.
But if this program is not available, then use the suggested resources.
Badge-online
A simple and convenient tool that allows you to make a badge without downloading and installing additional software. The main advantage is that all services can be used for free. The creation work consists of several stages:
- choose a template;
- indicate the specified data;
- download the result;
- adjust the sizes.
If you don’t like the existing templates, you can upload your own version. To do this, go to the “Upload your own” section, located at the top of the page, in the “Information” tab.
BUSINESS CARD
An excellent online service that is convenient to work with. It's ideal for users with no experience, so you can quickly create a pro-level layout. Once created, you can print it for free.
This online special constructor does not have to be installed, registered in it, and the result is given immediately, there is no need to pay for anything, send SMS, etc. The resource allows you to:
- enter and edit online text;
- format;
- insert snapshots and other images in common formats Png, Jpeg, Gif;
- select the color of text objects;
- insert emblems and different logos;
- download the created layout;
- There is support for many languages, including Russian.
Business Card Master
The program was created for creating business cards, but if necessary, you can also make a badge online for schoolchildren, medical workers and print it. It’s worth noting right away that this is a paid tool, but you can use the demo version, which has the following limitations:
- works 10 days after installation;
- the result cannot be saved in graphic format.
If you wish, you can create a high-quality card. There are many images, layouts, and fonts here that will help you make a badge according to any parameters. The trial version is free. The work algorithm is simple, you need to:
- select a template;
- edit text;
- customize color;
- export to Paint;
- customize sizes.
You can easily create the required object in the “Business Card Templates” section. A list will open from which you can select. Below the layout are text fields, and on the right are font settings. If there is an extra field, uncheck it.
In this utility, unlike other web resources, you can customize the background color; for this you use the panel on the right side.
It has already been said that the demo will not allow you to save a file in a graphic format, so take a screenshot of the monitor (tap the PrtSc SysRq button, next to F12). Next, open Paint, press the combination Ctrl + V, cut off the excess.
The “Select rectangular area” item will help with this. Right-click on the top of the badge, move the cursor to the lower right corner, tap, and at the final stage change the size.
How to make a badge online for free and print using Canva
This is a very popular service in which you can create designs for various documents. Here you will find full functionality for working with badges.
- On the website, click “Create a name plate”;
- In the window that opens, indicate the purpose of using the site;
- Register through your Facebook, Google account, or your email;
- On the new page, click “Create design”;
- Tap “Use special sizes”;
- Specify the size. The most suitable option is 85x55 millimeters. Next, click “Create”.
To save the results of your work to your computer, click the “Download” button. Select the format you are interested in, “Download” again, and then print.
What is needed?
And you need very little, the main thing is to read this article to the end. Before you make a badge, make sure you have the following:
- Computer or laptop;
- Internet connection;
- Having a layout - or at least a clear idea of what the result should look like.
You will also need 15-30 minutes of free time.